


Яusso-Soviэt Forum
Russian or Soviet vehicles/armor modeling forum.
Russian or Soviet vehicles/armor modeling forum.
Hosted by Darren Baker, Jacques Duquette
siryan t72 av with era upgrade

asmodeuss

Joined: November 19, 2011
KitMaker: 1,389 posts
Armorama: 1,388 posts

Posted: Friday, October 11, 2013 - 12:39 AM UTC
Thanks indeed Aleska!
asmodeuss
Joined: November 19, 2011
KitMaker: 1,389 posts
Armorama: 1,388 posts
Posted: Tuesday, October 15, 2013 - 12:55 AM UTC

asmodeuss
Joined: November 19, 2011
KitMaker: 1,389 posts
Armorama: 1,388 posts
Posted: Thursday, October 24, 2013 - 12:51 AM UTC


RuloMxy

Joined: March 05, 2009
KitMaker: 154 posts
Armorama: 137 posts
Posted: Thursday, October 24, 2013 - 06:23 AM UTC
Phil,
Nice progress! It seems that I will have to ramp up the pace once I get free sometime next week. Fun awaits with the 200+ ERA bricks you have to clean.
Best Regards,
Raul
Nice progress! It seems that I will have to ramp up the pace once I get free sometime next week. Fun awaits with the 200+ ERA bricks you have to clean.
Best Regards,
Raul
asmodeuss
Joined: November 19, 2011
KitMaker: 1,389 posts
Armorama: 1,388 posts
Posted: Friday, October 25, 2013 - 12:14 AM UTC
Hahaha! you got that right Raul 
Thanks for the good words. I am looking forward to your next update.
Phil.
Thanks for the good words. I am looking forward to your next update.
Phil.
asmodeuss
Joined: November 19, 2011
KitMaker: 1,389 posts
Armorama: 1,388 posts
Posted: Friday, November 01, 2013 - 12:19 AM UTC
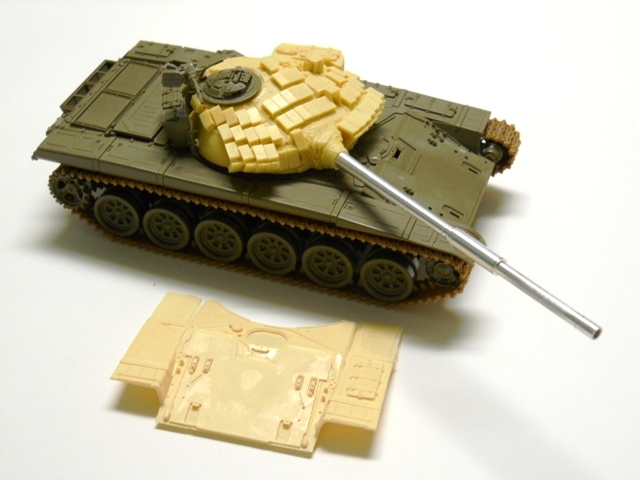
Got some work on the upper hull! I`ll have to cheat a little since the front glacis come`s short of 1.5 mil......That is major suckage, but there is no way I can get the resin part of the kit part. Gladly the kontak brics will hide that.

upperhull02 par asmodeuss, sur Flickr

upperhull01 par asmodeuss, sur Flickr
And I`ve modified the fuel drum support to add a little life!

All comments are welcomed!
Phil.
upperhull02 par asmodeuss, sur Flickr
upperhull01 par asmodeuss, sur Flickr
And I`ve modified the fuel drum support to add a little life!
All comments are welcomed!
Phil.
RuloMxy
Joined: March 05, 2009
KitMaker: 154 posts
Armorama: 137 posts
Posted: Tuesday, November 05, 2013 - 05:17 AM UTC
Hi Phil,
Thanks for sharing that the hull came out 1.5 mm short. I was nearly ready to do the surgery, so I will be extra careful and prepare the hull. The SP Designs front upper hull is nearly ready. I need to remove the molded fuel and storage straps so I can use the SBS Model ones.
In addition, I used the Trumpeter workable tracks. Affordable, nice detail and easy to use!
I will be stealing some of your ideas for the fuel drum supports and spare track mounts.
Best Regards,
Raul
asmodeuss
Joined: November 19, 2011
KitMaker: 1,389 posts
Armorama: 1,388 posts
Posted: Wednesday, November 06, 2013 - 02:23 AM UTC
Hey Raul! NIIIICE!
Steal all you want my friend. The side armor is a good ref for the fitting of the resin front glacis. I should have used them...better luck next time as they say!
Update soon.
Phil.
Steal all you want my friend. The side armor is a good ref for the fitting of the resin front glacis. I should have used them...better luck next time as they say!
Update soon.
Phil.
asmodeuss
Joined: November 19, 2011
KitMaker: 1,389 posts
Armorama: 1,388 posts
Posted: Thursday, November 07, 2013 - 02:02 AM UTC
got some work on the front glacis and engine bay!

engine bay01 par asmodeuss, sur Flickr
I had to patch the front edge of the glacis...it was 1.5mil too short due to an addition of factor. I`ll split the error so it will minimize the effect.

frontglacis04 par asmodeuss, sur Flickr
Phil.
engine bay01 par asmodeuss, sur Flickr
I had to patch the front edge of the glacis...it was 1.5mil too short due to an addition of factor. I`ll split the error so it will minimize the effect.
frontglacis04 par asmodeuss, sur Flickr
Phil.
asmodeuss
Joined: November 19, 2011
KitMaker: 1,389 posts
Armorama: 1,388 posts
Posted: Friday, November 08, 2013 - 01:50 AM UTC
Anyone has a thread with this particular upgrade set? The plan that come`s with the miniarm kit is somewhat....simple and not so clear it would help seing some actual build of this one 
Phil.
Phil.
asmodeuss
Joined: November 19, 2011
KitMaker: 1,389 posts
Armorama: 1,388 posts
Posted: Thursday, November 21, 2013 - 11:15 AM UTC
Hi guys here is an update on the T72
Lower is painted so I can fix the upper hull due to minor shrinkage issues...

runinggear01 par asmodeuss, sur Flickr
tracks are on! dry brushed the iddlers and sprocket prior installation.

runinggear03 par asmodeuss, sur Flickr
another angle:

runinggear02 par asmodeuss, sur Flickr
Thanks for watching. ACW!
Phil.
Lower is painted so I can fix the upper hull due to minor shrinkage issues...
runinggear01 par asmodeuss, sur Flickr
tracks are on! dry brushed the iddlers and sprocket prior installation.
runinggear03 par asmodeuss, sur Flickr
another angle:
runinggear02 par asmodeuss, sur Flickr
Thanks for watching. ACW!
Phil.

BBD468
Joined: March 08, 2010
KitMaker: 2,465 posts
Armorama: 2,383 posts

Posted: Thursday, November 21, 2013 - 04:00 PM UTC
Most excellent Fruilage my brotha from anotha motha!! 


asmodeuss
Joined: November 19, 2011
KitMaker: 1,389 posts
Armorama: 1,388 posts
Posted: Saturday, November 23, 2013 - 04:07 AM UTC
Thx alot Bromandude! Doing my best to keep it to the standard of Armorama.
asmodeuss
Joined: November 19, 2011
KitMaker: 1,389 posts
Armorama: 1,388 posts
Posted: Sunday, November 24, 2013 - 03:22 AM UTC
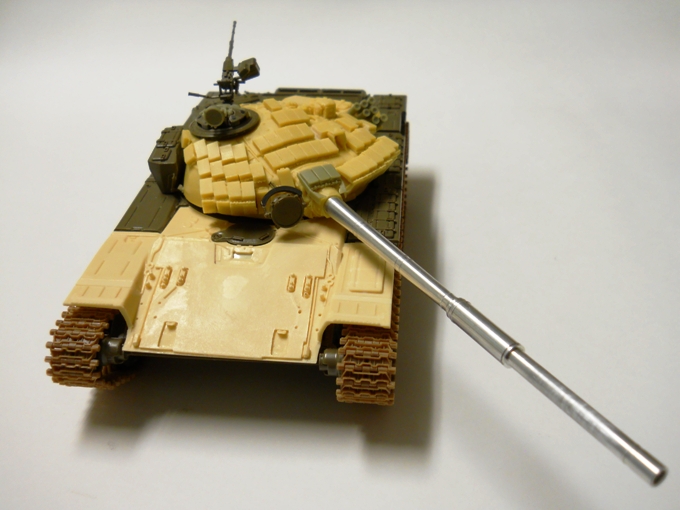
Some progres

progres01 par asmodeuss, sur Flickr

progres02 par asmodeuss, sur Flickr

progres03 par asmodeuss, sur Flickr
As you all know, I am supposed to get a turms-t on there, I can`t seem to be able to find a good picture of the turms from above(like on the last pic), showing the anti-radiation armor. Because I need to severly modify the turret in this region.
Thx and ACW.
Phil
progres01 par asmodeuss, sur Flickr
progres02 par asmodeuss, sur Flickr
progres03 par asmodeuss, sur Flickr
As you all know, I am supposed to get a turms-t on there, I can`t seem to be able to find a good picture of the turms from above(like on the last pic), showing the anti-radiation armor. Because I need to severly modify the turret in this region.
Thx and ACW.
Phil

grunt136mike
Joined: November 24, 2012
KitMaker: 1,896 posts
Armorama: 1,858 posts

Posted: Sunday, November 24, 2013 - 12:34 PM UTC
Hi Guys;
Can you Please explain the problem with the Turret, and why it needs too be Modified Or are you building a specific vehicle seen in one of the Videos. I am just curios as I have the same Miniarm turret. And by the way, I am really Enjoying your project. Superb Work !!
HAPPY THANKSGIVING; MIKE.
Can you Please explain the problem with the Turret, and why it needs too be Modified
Or are you building a specific vehicle seen in one of the Videos. I am just curios as I have the same Miniarm turret. And by the way, I am really Enjoying your project. Superb Work !!HAPPY THANKSGIVING; MIKE.
asmodeuss
Joined: November 19, 2011
KitMaker: 1,389 posts
Armorama: 1,388 posts
Posted: Monday, November 25, 2013 - 02:56 AM UTC
Hi Mike! Glad you are taging along.
For my part I ``plan`` to get a turms-t sight on there...So it will need some major mods
Depending on the particular model you want to build the gunner sight need some mods...There so many variant of those 72s that I often get lost in translation, if you get my drift.
I am sure that Raul can be more accurate than me on the subject since I am more of a wwII era builder
Thanks for the good words Mike! and happy thanks giving times too.
Phil.
RuloMxy
Joined: March 05, 2009
KitMaker: 154 posts
Armorama: 137 posts
Posted: Monday, November 25, 2013 - 04:39 AM UTC
Hi Mike and Phil,
The Miniarm TPD seems to not have the right height. The left frontal corner height measurement of T-72A TPD sight without the anti-radiation layer is around 15 centimeters (4mm in 1/35 scale). So when the anti-radiation layer is installed, on the left side face an anti-radiation screw is visible, which the Miniarm doesn't have.

source: dishmodels.ru
Phil,
Nice Progress! A T-72AV with Turms, that will be awesome! Good luck with it.
Best Regards,
Raul
The Miniarm TPD seems to not have the right height. The left frontal corner height measurement of T-72A TPD sight without the anti-radiation layer is around 15 centimeters (4mm in 1/35 scale). So when the anti-radiation layer is installed, on the left side face an anti-radiation screw is visible, which the Miniarm doesn't have.
source: dishmodels.ru
Phil,
Nice Progress! A T-72AV with Turms, that will be awesome!
Good luck with it.Best Regards,
Raul
asmodeuss
Joined: November 19, 2011
KitMaker: 1,389 posts
Armorama: 1,388 posts
Posted: Tuesday, November 26, 2013 - 02:21 AM UTC
Haha, I knew it! Thx Raul this will help a lot.
I`ve worked on the front glacis. I had to relocate some of the part to even the shrinkage effects. It is really anoying but it wil all be covered with era blocks.

frontglacissmlpces par asmodeuss, sur Flickr
ACW
Phil.
I`ve worked on the front glacis. I had to relocate some of the part to even the shrinkage effects. It is really anoying but it wil all be covered with era blocks.
frontglacissmlpces par asmodeuss, sur Flickr
ACW
Phil.
RuloMxy
Joined: March 05, 2009
KitMaker: 154 posts
Armorama: 137 posts
Posted: Monday, December 02, 2013 - 04:44 PM UTC
Hi Phil,
How is it going with the ERA bricks? Nice work so far on that T-72AV!
After a momentary moment of doubt, I decided to continue building the kit as a T-72AV. The parts somehow look cooler on the T-72AV turret than on the T-72B. I have started modifying the turret while using some of the parts of the miniarm T-72B turret set.
I am hoping on getting the anti-radiation screws soon to be able to continue working on the turret. In the meantime I will be working on the hull.
Best Regards,
Raul
asmodeuss
Joined: November 19, 2011
KitMaker: 1,389 posts
Armorama: 1,388 posts
Posted: Wednesday, December 04, 2013 - 01:45 AM UTC


vivkulan
Joined: September 13, 2011
KitMaker: 143 posts
Armorama: 98 posts
Posted: Wednesday, December 04, 2013 - 06:35 AM UTC
What is the right modern syrian armor color for the T-72AV and BMP-2 being used in the current conflict? Is Tamiya's Deck tan close or buff or desert yellow?
RuloMxy
Joined: March 05, 2009
KitMaker: 154 posts
Armorama: 137 posts
Posted: Wednesday, December 04, 2013 - 07:58 AM UTC
Hi Phil,
Your build is looking great! Depending on how it looks you may want to add another ERA block below the headlights. Also below the driver's sight where some ERA blocks normally go, you may want to add something that looks like the spacers where the ERA mounts.
The voyager set for the anti-radiation screws is the PEA209. Two sets coming from Japan sometime next week.
One of the things that also made me choose to continue with the T-72AV is that SBS Model is releasing a Super detail T-72B/B1 set. If it is as nice as their T-72M super detail set, it will be a beauty with minimal (nearly non existent) shrinkage. This build is going to help me to get a feel of their photo etch set.
Hi Vivek,
Don't really know, but I am going to go with what Alex Clark used in his amazing build, the Deck Tan XF-78 with some white XF-2.
Best Regards,
Raul
asmodeuss
Joined: November 19, 2011
KitMaker: 1,389 posts
Armorama: 1,388 posts
Posted: Thursday, December 05, 2013 - 12:56 AM UTC
Hi Raul
Thx for the good words, I`ve based my era block pattern on Alex Clark`s build mixed with some pics and the interview posted on the first page of this thread. I`ve tried to put the extra block in front of the headlight...mehhh not a succes. I would love some explanation about the spacers? ani ref pics I have trouble understanding.
Vivek
Raul is right about the paint, I could not get my ands on deck tan so I opted for dark yellow with little buff.
Phil.
vivkulan
Joined: September 13, 2011
KitMaker: 143 posts
Armorama: 98 posts
Posted: Thursday, December 05, 2013 - 01:48 AM UTC
Thanks Raul and Phil. Any possible diorama sets to match Syrian conflict and figures too. I know the possible candidates are Meng's middle easterners set and the pickup truck set.. anything else available?
RuloMxy
Joined: March 05, 2009
KitMaker: 154 posts
Armorama: 137 posts
Posted: Thursday, December 05, 2013 - 06:01 AM UTC
Hi Phil,
To the best of my knowledge the ERA mounting on the T-72AV hull is very similar in method (not placing) to the one of the T-64BV. So I am going to use a T-64BV drawing to try to explain it.

Source: btvt.narod.ru for discussion purposes only
You can see in cut A-A two things. The first you can see is the use of spacers. This is because a space is needed for the ERA explosion to disrupts the HEAT jet successfully. The second thing that can be noticed is that the upper ERA bricks overlaps the lower ERA bricks. The result is that only one spacer is used. The third thing that can be notices on cut B-B (Cyrillic) is the use of another spacer on the location of the KMT for mounting the ERA brick.


Source: army.lv for discussion purposes only
You can see in this photo of a T-72B, that where the ERA is not mounted the spacers are visible. Also please notice the placement of spacers where the KMT are, the lower side of the front hull (the ERA spacers are "outside" the edge of the front hull), below the driver's sight and the below and beneath the headlights. I have seen normally that the ERA row beneath the driver's sight are not mounted on Syrian T-72V.

Source: army.lv for discussion purposes only
Additionally, I have seen sometimes in some photos a small plate to mount the two ERA blocks beneath the headlights, on tanks with the "newer" fender and the "thickened" front hull.

Source deviantart.net
Please look at this destroyed Syrian T-72AV the era blocks below and beneath the headlights as well as the spacers.
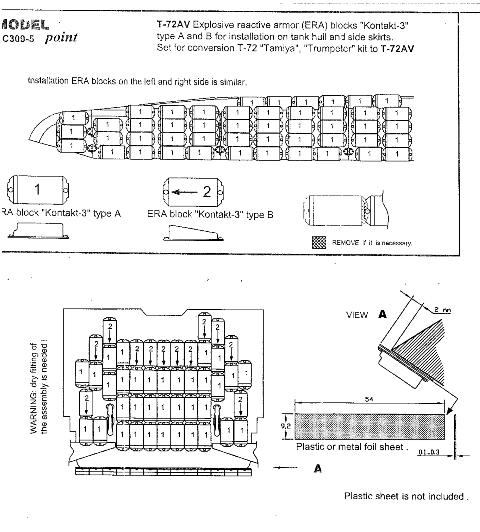
Modelpoint instructions
What I have found is that the Modelpoint instructions are pretty accurate on the placement of the ERA bricks.
Jacques please correct me if I have made a mistake.
Best Regards,
Raul
To the best of my knowledge the ERA mounting on the T-72AV hull is very similar in method (not placing) to the one of the T-64BV. So I am going to use a T-64BV drawing to try to explain it.
Source: btvt.narod.ru for discussion purposes only
You can see in cut A-A two things. The first you can see is the use of spacers. This is because a space is needed for the ERA explosion to disrupts the HEAT jet successfully. The second thing that can be noticed is that the upper ERA bricks overlaps the lower ERA bricks. The result is that only one spacer is used. The third thing that can be notices on cut B-B (Cyrillic) is the use of another spacer on the location of the KMT for mounting the ERA brick.
Source: army.lv for discussion purposes only
You can see in this photo of a T-72B, that where the ERA is not mounted the spacers are visible. Also please notice the placement of spacers where the KMT are, the lower side of the front hull (the ERA spacers are "outside" the edge of the front hull), below the driver's sight and the below and beneath the headlights. I have seen normally that the ERA row beneath the driver's sight are not mounted on Syrian T-72V.
Source: army.lv for discussion purposes only
Additionally, I have seen sometimes in some photos a small plate to mount the two ERA blocks beneath the headlights, on tanks with the "newer" fender and the "thickened" front hull.
Source deviantart.net
Please look at this destroyed Syrian T-72AV the era blocks below and beneath the headlights as well as the spacers.
Modelpoint instructions
What I have found is that the Modelpoint instructions are pretty accurate on the placement of the ERA bricks.
Jacques please correct me if I have made a mistake.
Best Regards,
Raul
 |

WEB HOSTING BY


Copyright ©2021 Armorama and Kitmaker Network, a subsidiary of Silver Star Enterprises
All Rights Reserved. Please read our Conditions of Use and Privacy Policy.
All Rights Reserved. Please read our Conditions of Use and Privacy Policy.