

Hi Charles,
I must say I love your ways of using cheap materials to great effect!!!
Reminds me of the good (?) old days, when that was more or less all you could buy!
I feel old!!!!!!!
Cheers
Romain
Dioramas
Do you love dioramas & vignettes? We sure do.
Do you love dioramas & vignettes? We sure do.
Hosted by Darren Baker, Mario Matijasic
'Close Contact' (WIP)

1stjaeger

Joined: May 20, 2011
KitMaker: 1,744 posts
Armorama: 1,727 posts

Posted: Wednesday, February 26, 2014 - 03:04 AM UTC
ti

Joined: May 08, 2002
KitMaker: 2,264 posts
Armorama: 1,763 posts
Posted: Wednesday, February 26, 2014 - 04:48 AM UTC
Quoted Text
Hi Charles,
I must say I love your ways of using cheap materials to great effect!!!
Reminds me of the good (?) old days, when that was more or less all you could buy!
I feel old!!!!!!!
Cheers
Romain
Do not worry about it. I do not have all the money in the world. The whole idea of doing this project was to use cheap materials. This was my first time using this technique.

jrutman

Joined: April 10, 2011
KitMaker: 7,941 posts
Armorama: 7,934 posts
Posted: Wednesday, February 26, 2014 - 05:42 AM UTC
Excellent!!! Really coming together now. Great ground work for sure.
J
J
ti
Joined: May 08, 2002
KitMaker: 2,264 posts
Armorama: 1,763 posts
Posted: Wednesday, February 26, 2014 - 05:59 AM UTC
Thanks Jerry.
ti
Joined: May 08, 2002
KitMaker: 2,264 posts
Armorama: 1,763 posts
Posted: Friday, February 28, 2014 - 12:07 PM UTC
I think I am satisfied with the insurgents. Not the best but I am still a novice at this figure painting venture.
Insurgent Figures:


Insurgent Figures:
ti
Joined: May 08, 2002
KitMaker: 2,264 posts
Armorama: 1,763 posts
Posted: Friday, February 28, 2014 - 09:02 PM UTC
Well, after buying some isop-alcohol, and soaking the figures in them to remove the paint, I finally took them out after 8 hours and the results were not that good. The paint seem to come off easily but so did the plastic. Or that's the way it looked from my point of view. I just thought the surface was rough and uneven. Regardless, I threw away two of the usmc figures. 
So typical. And these were the two main figures I wanted to use in this scene. So that means I will have to build the other two remaining ones and luckily I had one resin figure from Blast Model that I will add to the present ones.
Oh well. Next time I will not leave them in for so long. I am going to start on the figures this weekend. So my apologies for not having any pics to show of the usmc figures. Hopefully next update.
But here is an over all view of the entire diorama with little details. I painted the concrete barriers black/yellow strips and added drums to the mix to make the scene more interesting. Still going to weather the building some more and the surroundings. A little more detail here and there.

SpeedyJ

Joined: September 17, 2013
KitMaker: 1,617 posts
Armorama: 1,150 posts
Posted: Friday, February 28, 2014 - 10:15 PM UTC
My compliments for the set up. Very realistic. It forces to look even further. Makes a viewer want to discover what going on round the corner.
Maybe some weathering on the drums and garbage is needed. Still have that perfect look.
Some pictures are like stills from a movie.
Building is a real piece of ART.
Great job!
Regards,
Robert Jan
Maybe some weathering on the drums and garbage is needed. Still have that perfect look.
Some pictures are like stills from a movie.
Building is a real piece of ART.
Great job!
Regards,
Robert Jan
callmehobbes

Joined: April 17, 2005
KitMaker: 751 posts
Armorama: 740 posts
Posted: Friday, February 28, 2014 - 10:22 PM UTC
I love it. Wish I could scratch build like this. Really inspiring.
ti
Joined: May 08, 2002
KitMaker: 2,264 posts
Armorama: 1,763 posts
Posted: Friday, February 28, 2014 - 11:38 PM UTC
My thanks for checking on this build. Still not 100% done but hoping to finish it by the end of this month.
jrutman
Joined: April 10, 2011
KitMaker: 7,941 posts
Armorama: 7,934 posts
Posted: Saturday, March 01, 2014 - 01:08 AM UTC
Just gets better and better!
J
J
ti
Joined: May 08, 2002
KitMaker: 2,264 posts
Armorama: 1,763 posts
Posted: Saturday, March 01, 2014 - 02:29 AM UTC
Thanks Jerry.
1stjaeger
Joined: May 20, 2011
KitMaker: 1,744 posts
Armorama: 1,727 posts
Posted: Saturday, March 01, 2014 - 03:50 AM UTC
Wow!
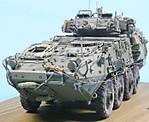
Brilliant job on the truck, clever details like the trash bags well rendered!!!
Congratulations on an overall suberb dio!!
Well done indeed!!!
Cheers
Romain

didgeboy
Joined: September 21, 2010
KitMaker: 1,846 posts
Armorama: 1,509 posts

Posted: Saturday, March 01, 2014 - 04:51 AM UTC
Charles what did you use to make the black trash bags, they look really convincing.

parrot

Joined: March 01, 2002
KitMaker: 1,607 posts
Armorama: 1,581 posts
Posted: Saturday, March 01, 2014 - 05:45 AM UTC
Quoted Text
Charles what did you use to make the black trash bags, they look really convincing.
Wondering the same thing,did you use small oieces of actual bags?
Tom
rogerjo1
Joined: November 12, 2010
KitMaker: 950 posts
Armorama: 905 posts
Posted: Saturday, March 01, 2014 - 06:33 AM UTC
Hej Charles, kanonfint diorama... Ser fram emot att se det färdigt!
So i can only say it is very good, looking forward to see more of it...
Roger
So i can only say it is very good, looking forward to see more of it...
Roger
Paulinsibculo

Joined: July 01, 2010
KitMaker: 1,322 posts
Armorama: 1,239 posts

Posted: Saturday, March 01, 2014 - 07:01 AM UTC
Hi Charles,
Thanks for sharing your very convincing build. Looks great. One minor thing, if you allow, the seems between the building and the side way, as well as the space between the trash on the street and the street! But those are minor things.
Looks great, indeed!
Thanks for sharing your very convincing build. Looks great. One minor thing, if you allow, the seems between the building and the side way, as well as the space between the trash on the street and the street! But those are minor things.
Looks great, indeed!
ti
Joined: May 08, 2002
KitMaker: 2,264 posts
Armorama: 1,763 posts
Posted: Saturday, March 01, 2014 - 09:21 AM UTC
Quoted Text
Charles what did you use to make the black trash bags, they look really convincing.
Thanks. I made the trash bags using this method:
1. I cut a small piece of GLAD food rap plastic and cut it into the size I wanted; more like a square shape napkin.
2. Then I took some sugar( sand works fine too) and placed some in the center of the plastic.
3. I gently folded all four corners together then used a piece of thread to tie the plastic together.
4. Then I took a spray primer and sprayed the entire plastic. You might want to use a plastic type spray that is compatible with such materials. I did not have any on hand. So I just used a car primer spray can.
4. After it dried for an half hour to an hour, I took a black spray can( Tamiya Matt Black, but any will do, I guess) and spray the bags until I covered all areas except the bottom. This area will not be seen anyway. That's it. Instant trash bags.
I am a cheapo modeler. So O try and look for all cheap methods to building. That is why I decided to do this project.
rogerjo1
Joined: November 12, 2010
KitMaker: 950 posts
Armorama: 905 posts
Posted: Saturday, March 01, 2014 - 09:54 AM UTC
Thanks for that tip... Must try it
ti
Joined: May 08, 2002
KitMaker: 2,264 posts
Armorama: 1,763 posts
Posted: Saturday, March 01, 2014 - 10:05 AM UTC
Quoted Text
Thanks for that tip... Must try it
Varsågod Roger. Thanks.

zorrolobo

Joined: May 31, 2013
KitMaker: 1,457 posts
Armorama: 1,440 posts
Posted: Saturday, March 01, 2014 - 07:41 PM UTC
I love the quality of your work! Your attention to detail is amazing. My only comment, and I don´t want to sound like the sour grape here, Is that the building is a bit overpowering for the whole scene. Especially all that empty space on the rooftop. This is particularly clear in the fifth picture. You might consider doing something happening there to help balance the scene. Some ideas: an Iraqi lady hanging her washed clothes on a clothesline. Some kids spying on the scene below, an interesting advertising sign, etc. You can get creative. Just my two cents worth.
ti
Joined: May 08, 2002
KitMaker: 2,264 posts
Armorama: 1,763 posts
Posted: Saturday, March 01, 2014 - 09:50 PM UTC
Quoted Text
I love the quality of your work! Your attention to detail is amazing. My only comment, and I don´t want to sound like the sour grape here, Is that the building is a bit overpowering for the whole scene. Especially all that empty space on the rooftop. This is particularly clear in the fifth picture. You might consider doing something happening there to help balance the scene. Some ideas: an Iraqi lady hanging her washed clothes on a clothesline. Some kids spying on the scene below, an interesting advertising sign, etc. You can get creative. Just my two cents worth.
thanks for your comments. Yeah. I do have the same thought and will see what i can do there. Hoping to find something before the 08 open in Stockholm.

RECON22

Joined: February 10, 2012
KitMaker: 665 posts
Armorama: 652 posts
Posted: Saturday, March 01, 2014 - 10:22 PM UTC
Hi Charles, love it mate...
Is the gunman standing with the AK finished yet? I just noticed his right hand not down where the pistol grip is....or is he suppose to be wracking the bolt to chamber a round...?
I have the same figures and you gave me an idea with that, except I will add a pistol grip to the AK where it is cutaway.
Compliments, Jason.

Cookie

Joined: September 21, 2003
KitMaker: 588 posts
Armorama: 490 posts
Posted: Saturday, March 01, 2014 - 10:44 PM UTC
Brilliant!! an amazing scratch build you've inspired me. Working in construction I'm off to find some of the insulation board waste cuttings.
Cookie
Cookie
ti
Joined: May 08, 2002
KitMaker: 2,264 posts
Armorama: 1,763 posts
Posted: Sunday, March 02, 2014 - 09:09 AM UTC
Quoted Text
Hi Charles, love it mate...
Is the gunman standing with the AK finished yet? I just noticed his right hand not down where the pistol grip is....or is he suppose to be wracking the bolt to chamber a round...?
I have the same figures and you gave me an idea with that, except I will add a pistol grip to the AK where it is cutaway.
Compliments, Jason.
The reason for that is that the gun is not glued to his hand as I was still working on the figure itself. Like I mentioned the dio is not 100% complete. The gun is temporarily mounted to give it the overall look.
ti
Joined: May 08, 2002
KitMaker: 2,264 posts
Armorama: 1,763 posts
Posted: Sunday, March 02, 2014 - 09:10 AM UTC
Quoted Text
Brilliant!! an amazing scratch build you've inspired me. Working in construction I'm off to find some of the insulation board waste cuttings.
Cookie
Thanks Cookie. There are two types. The Blue and pink. Usually the blue is harder and more expensive. Either will do. But I think the blue is a little softer and his made by another brand name.
 |

WEB HOSTING BY


Copyright ©2021 Armorama and Kitmaker Network, a subsidiary of Silver Star Enterprises
All Rights Reserved. Please read our Conditions of Use and Privacy Policy.
All Rights Reserved. Please read our Conditions of Use and Privacy Policy.