

Just my kind of modelling. Go ahead, I´ll be following!
Michael
Hosted by Darren Baker
PSM - Leopard 1 AEV 1

panorama

Joined: January 18, 2013
KitMaker: 254 posts
Armorama: 253 posts
Posted: Saturday, July 12, 2014 - 08:40 AM UTC

TRM5150

Joined: January 03, 2010
KitMaker: 2,159 posts
Armorama: 707 posts

Posted: Saturday, July 12, 2014 - 09:39 AM UTC
Thank you Michael!! Glad to have you along for the ride!! 
TRM5150
Joined: January 03, 2010
KitMaker: 2,159 posts
Armorama: 707 posts
Posted: Thursday, July 31, 2014 - 11:11 AM UTC
Hey folks!!
Just a little update here.
I have more of less finished the construction of the AEV ...I will get to that in a moment. First, I was going to attack the tracks to finish completely; apparently, the track in this case attacked me back.
Although the case is very nice on the PSM supplied tracks for this kit, they appear to be virtually impossible to remove without snapping the delicate end links right off.
Discouraged a couple weeks back, I came across Meng's new offering: D 640 A Workable Tracks for Leopard 1 Family.

The kit was, well...dirt cheap. I picked these up from Hobby Easy running about $12 US...including shipping!! Also, they arrived about 1 week after the order. If you were wondering...I am on the East Coast of the US and Hobby Easy is in China! Looks like the online store gets a +1 from me for this service!
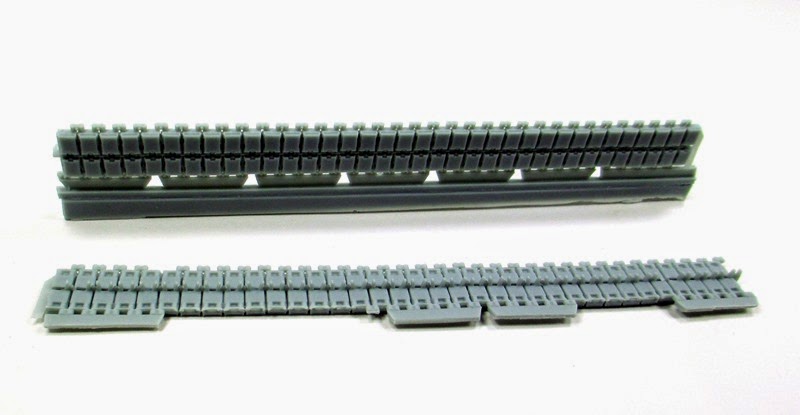
The kit comes with three bags of parts; bottom track links, top pads and track connecting rods. There is one sprue in the box which contains the jig for constructing the workable links as well as the grousers or Ice Cleats....these are optional.


The first process of construction is to lay out all the bottom plates to the tracks.

After the plates are in place, the tracks connecting rods are placed in with the teeth facing down into the slot provided.

It is hard to show how easy these go together. At first it will be a bit strange but once the "learning curve" has been reached, things move right along. The top pads are places on top of the corresponding bottom plate with the male posts and are pressed in for a tight fit. There should be no gluing required. I did find out that I needed to glue two into place as the top pads were loose after pressing into place. But with a careful placement of the thin cement into the female openings on the underside of the pads, things just went together.


These are fully movable tracks.


These tracks are an excellent outsourcing for Leopard 1 Tracks if needed. There was a little flash from the original sprue gate left on a few of the bottom plates when Meng's handlers removed the parts at the company, but nothing to write home about...there was absolutely no clean up needed.
I still need to assemble about 1 1/2 tracks as I got a little busy here...but things should go together just fine and a heck of a lot better than trying to clean up the resin alternative supplied by the kit maker.
Okay, now that that was out of the way, here it is. The finished construction pics. I left off the loose parts on the front as these will be painted separately as will the tow cables and various other smaller loose parts.


The one bigger issue I had was the auger. This part had a really poor casting design and is nearly impossible to remove with out wrecking things. I managed to salvage most of the drill bit blades. I made a new shaft from some spare rod I had. If I could find a viable way to construct a new one...I might, but for now I will progress!!

Well...that is that! Time to finish building the tracks and priming this one I think! I am heading to thee IPMS Show in Hampton, Virginia next week...for the week as I will be doing some Demos using Vallejo paints and effect ...for Vallejo. If you are in town for the show...please stop by and the Vallejo table and say hello!!
Thanks for tuning in!!
Just a little update here.
I have more of less finished the construction of the AEV ...I will get to that in a moment. First, I was going to attack the tracks to finish completely; apparently, the track in this case attacked me back.
Although the case is very nice on the PSM supplied tracks for this kit, they appear to be virtually impossible to remove without snapping the delicate end links right off.
Discouraged a couple weeks back, I came across Meng's new offering: D 640 A Workable Tracks for Leopard 1 Family.
The kit was, well...dirt cheap. I picked these up from Hobby Easy running about $12 US...including shipping!! Also, they arrived about 1 week after the order. If you were wondering...I am on the East Coast of the US and Hobby Easy is in China! Looks like the online store gets a +1 from me for this service!
The kit comes with three bags of parts; bottom track links, top pads and track connecting rods. There is one sprue in the box which contains the jig for constructing the workable links as well as the grousers or Ice Cleats....these are optional.
The first process of construction is to lay out all the bottom plates to the tracks.
After the plates are in place, the tracks connecting rods are placed in with the teeth facing down into the slot provided.
It is hard to show how easy these go together. At first it will be a bit strange but once the "learning curve" has been reached, things move right along. The top pads are places on top of the corresponding bottom plate with the male posts and are pressed in for a tight fit. There should be no gluing required. I did find out that I needed to glue two into place as the top pads were loose after pressing into place. But with a careful placement of the thin cement into the female openings on the underside of the pads, things just went together.
These are fully movable tracks.
These tracks are an excellent outsourcing for Leopard 1 Tracks if needed. There was a little flash from the original sprue gate left on a few of the bottom plates when Meng's handlers removed the parts at the company, but nothing to write home about...there was absolutely no clean up needed.
I still need to assemble about 1 1/2 tracks as I got a little busy here...but things should go together just fine and a heck of a lot better than trying to clean up the resin alternative supplied by the kit maker.
Okay, now that that was out of the way, here it is. The finished construction pics. I left off the loose parts on the front as these will be painted separately as will the tow cables and various other smaller loose parts.
The one bigger issue I had was the auger. This part had a really poor casting design and is nearly impossible to remove with out wrecking things. I managed to salvage most of the drill bit blades. I made a new shaft from some spare rod I had. If I could find a viable way to construct a new one...I might, but for now I will progress!!
Well...that is that! Time to finish building the tracks and priming this one I think! I am heading to thee IPMS Show in Hampton, Virginia next week...for the week as I will be doing some Demos using Vallejo paints and effect ...for Vallejo. If you are in town for the show...please stop by and the Vallejo table and say hello!!
Thanks for tuning in!!
TRM5150
Joined: January 03, 2010
KitMaker: 2,159 posts
Armorama: 707 posts
Posted: Friday, August 01, 2014 - 04:47 PM UTC
I was able to sneak into the cave for a bit tonight...


TRM5150
Joined: January 03, 2010
KitMaker: 2,159 posts
Armorama: 707 posts
Posted: Monday, August 04, 2014 - 01:46 PM UTC
Well I was able to bang out some color on this one just before doing some final packing before leaving tomorrow for the IPMS Show in Virginia.


In case you were wondering what I used...


So I plan on bringing this one with me to the show and bang out some weathering. All that's left after that is some track and get this together!!
Thanks for swinging by!!
In case you were wondering what I used...
So I plan on bringing this one with me to the show and bang out some weathering. All that's left after that is some track and get this together!!
Thanks for swinging by!!
TRM5150
Joined: January 03, 2010
KitMaker: 2,159 posts
Armorama: 707 posts
Posted: Sunday, August 17, 2014 - 12:42 AM UTC
Getting back into the swing of things here after a little break to attend the IPMS Nationals in Hampton, VA last week. I worked with Vallejo to provide product demonstrations and address any questions folks had about new products, old products as well as troubleshooting any problems they might have had or encountered in the past. Very successful week I would say!!! Met lots of folks from all over...had a blast!!

Most recently I was contacted by a good friend that had run into a little problem after starting the weathering process of his D 640 A Workable Tracks for Leopard 1 Family of tanks from Meng. The replacement tracks are brand new to the scene and offer one of the best alternatives to using kit supplied tacks. Fully workable, these tracks assemble quickly and easily as well as coming with a low price tag making them even all the more inviting.
The little problem my friend ran into, and subsequently more folks out there since I received the word, is the similar issue that crops up with some Link-n-length, Magic Tracks and even some DSs; that the some solvent based weathering products are basically either releasing the adhesive bond between the links or eating their way through some plastics in the weathering process of the track makeup.
Here we see an example of the result from using a solvent base weathering product on these Meng Tracks. The track pins have disintegrated resulting in the break upof the tracks.

One of the best viable options to eliminating this problem is the use of an Acrylic wash like Vallejos Model Wash.

These washes are true acrylic and water based which has no effect on the plastic whatsoever. The Acrylic washes, as with the paints, dries quickly so care will be needed to the application but this is limited to large flat surfaces usually where some tiding can occur if not either cleaned of after applying or blending in with a dry brush stippling effect to soften the edge.
After priming and painting the tracks, a clear coat is advisable to not only protect the work you have done but also the clear coat allows for better manipulation of the effects just after the application.
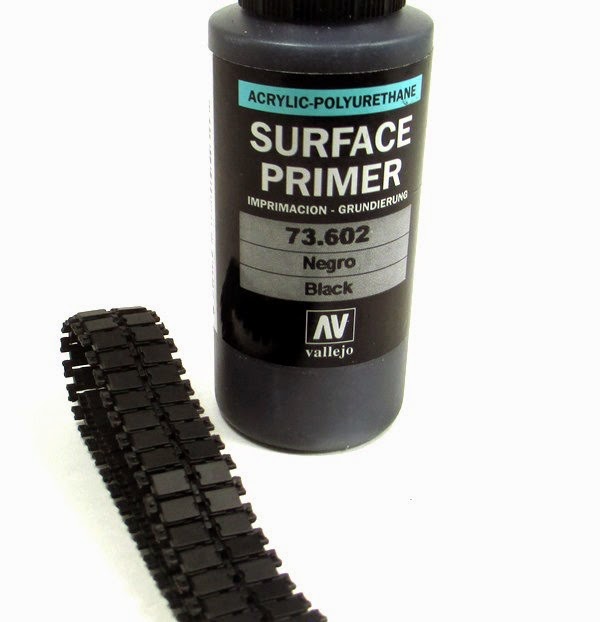


Here I have used the Black Model Wash to enhance the rubber track pads on the run. Simply apply the dark wash and allow drying. With Acrylic Model Wash, as with any washes made with acrylics, you do not want to get ahead of yourself and wash too much surface area at one time. The inherent properties of any water based acrylic is to dry quickly. If you apply too much wash over to large of an area that you can clean up or work with your efforts might be doubled if they dry before you get to them.

But with thoughtful preparation, you can move right along with the weathering process and complete the task in relatively the same amount of time that you would normally with a solvent based wash.
When adding localized or pin washes, if you dampen the area slightly with water as the water will act as a carrier such as in solvent. Then simply add your washes. After a few minutes drying time, feel free to added varying colors for contrast and depth.


If you wish to darken areas more, simply add another layer of wash which will naturally darken the area more. It is best to build up effects in layers over several applications rather than trying to cover all at once.
The washes are great for select coloring of certain areas such and panels and hatches or in this case the small rubber pads on the inside of the tracks. Dampen the area that you wish to darken and with a small brush treating the application as a pin wash, touch the center and the water carries the wash to the extents of the section inside the lines. This will give a subtle look to the rubber without having to individually paint each on and worry about masking or staying in the lines.


If you happen to go outside the lines, simply take a flat brush barely damp with water and coming in from an angle clean the excess wash off, drying the brush on a clean towel often.

In the end, not only can you get some excellent weathering results from using these acrylic washes your Meng tracks, and I suspect others brands of tracks as well, will be completely unaffected by the water based effects unlike with some solvent based products.

Model Wash from Vallejo is ready to go straight out of the bottle and can be thinned with water to make lighter washes or filters. Another fine alternative to solvent based washes and effect is to simply use any water based acrylic paint such as Model Color or Model Air. The process is just as you expect, thin with water until you have the constancy you are happy with and apply in the same fashion as describe with the4 Model Washes.
I have found this to be the best alternative for washes and effect on the Meng D 640 A Workable Tracks as well as other tracks that have come apart while applying weathering to my models due to the use of some solvents. Outside the Meng Tracks show in this review, I do feel the disintegration of the plastic due to the use of solvent based washes is not typical and maybe segregated to these particular track links. I have used solvent based product over the years and mostly noticed only some adhered joints loosening and coming apart as a result.
All that aside, I am rolling into the home stretch on this one. A quick testing of the track fit and things are off to the booth again, some decals will be on soon and then some weathering!


As always, thanks for stopping by for a bit!!
Most recently I was contacted by a good friend that had run into a little problem after starting the weathering process of his D 640 A Workable Tracks for Leopard 1 Family of tanks from Meng. The replacement tracks are brand new to the scene and offer one of the best alternatives to using kit supplied tacks. Fully workable, these tracks assemble quickly and easily as well as coming with a low price tag making them even all the more inviting.
The little problem my friend ran into, and subsequently more folks out there since I received the word, is the similar issue that crops up with some Link-n-length, Magic Tracks and even some DSs; that the some solvent based weathering products are basically either releasing the adhesive bond between the links or eating their way through some plastics in the weathering process of the track makeup.
Here we see an example of the result from using a solvent base weathering product on these Meng Tracks. The track pins have disintegrated resulting in the break upof the tracks.
One of the best viable options to eliminating this problem is the use of an Acrylic wash like Vallejos Model Wash.
These washes are true acrylic and water based which has no effect on the plastic whatsoever. The Acrylic washes, as with the paints, dries quickly so care will be needed to the application but this is limited to large flat surfaces usually where some tiding can occur if not either cleaned of after applying or blending in with a dry brush stippling effect to soften the edge.
After priming and painting the tracks, a clear coat is advisable to not only protect the work you have done but also the clear coat allows for better manipulation of the effects just after the application.
Here I have used the Black Model Wash to enhance the rubber track pads on the run. Simply apply the dark wash and allow drying. With Acrylic Model Wash, as with any washes made with acrylics, you do not want to get ahead of yourself and wash too much surface area at one time. The inherent properties of any water based acrylic is to dry quickly. If you apply too much wash over to large of an area that you can clean up or work with your efforts might be doubled if they dry before you get to them.
But with thoughtful preparation, you can move right along with the weathering process and complete the task in relatively the same amount of time that you would normally with a solvent based wash.
When adding localized or pin washes, if you dampen the area slightly with water as the water will act as a carrier such as in solvent. Then simply add your washes. After a few minutes drying time, feel free to added varying colors for contrast and depth.
If you wish to darken areas more, simply add another layer of wash which will naturally darken the area more. It is best to build up effects in layers over several applications rather than trying to cover all at once.
The washes are great for select coloring of certain areas such and panels and hatches or in this case the small rubber pads on the inside of the tracks. Dampen the area that you wish to darken and with a small brush treating the application as a pin wash, touch the center and the water carries the wash to the extents of the section inside the lines. This will give a subtle look to the rubber without having to individually paint each on and worry about masking or staying in the lines.
If you happen to go outside the lines, simply take a flat brush barely damp with water and coming in from an angle clean the excess wash off, drying the brush on a clean towel often.
In the end, not only can you get some excellent weathering results from using these acrylic washes your Meng tracks, and I suspect others brands of tracks as well, will be completely unaffected by the water based effects unlike with some solvent based products.
Model Wash from Vallejo is ready to go straight out of the bottle and can be thinned with water to make lighter washes or filters. Another fine alternative to solvent based washes and effect is to simply use any water based acrylic paint such as Model Color or Model Air. The process is just as you expect, thin with water until you have the constancy you are happy with and apply in the same fashion as describe with the4 Model Washes.
I have found this to be the best alternative for washes and effect on the Meng D 640 A Workable Tracks as well as other tracks that have come apart while applying weathering to my models due to the use of some solvents. Outside the Meng Tracks show in this review, I do feel the disintegration of the plastic due to the use of solvent based washes is not typical and maybe segregated to these particular track links. I have used solvent based product over the years and mostly noticed only some adhered joints loosening and coming apart as a result.
All that aside, I am rolling into the home stretch on this one. A quick testing of the track fit and things are off to the booth again, some decals will be on soon and then some weathering!
As always, thanks for stopping by for a bit!!
TRM5150
Joined: January 03, 2010
KitMaker: 2,159 posts
Armorama: 707 posts
Posted: Friday, August 22, 2014 - 01:44 PM UTC
Well, I think I can call this one done. After adding a couple of decals and a light dusting for the "not so new look".
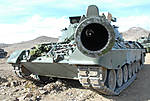
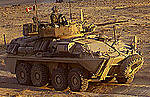
Here it is then...Perfect Scale Modellbau's Pionierpanzer 1(PiPz 1) mit Inneneinrichtung - Leopard 1 AEV 1


There you have it. WHile I did find many things that I felt the manufacturer fell short on when putting this kit together, this is a great base for a welcomed subject of the Leopard 1 AEV 1. I would fully suggest picking up a set of the Leopard one tracks from Meng if you pick one of these up to build as the cast resin tracks are a bit touchy to work with and the probable under $15 US is well worth the expenditure.
There are plenty of nice details with the kit and yet there is plenty of room to add more but I think this may be half the fun in modelling. Some of the casting with this particular kit I received did have its share of air bubbles; however this was limited to several small parts that were easily corrected through the use of some filler and/or replacement with a scratch built part.
Overall the individual parts were cast decently and laid out on blocks for easy access and the kit supplied photo etch was nicely done with plenty of goodies to make the detail pop on this kit.
As for the instructions....well this would not be the first set any of us have come across that were less than desirable. They are a jumbled mess and hard to follow at time. The out of focus and lack of exact part placement markings makes for a tedious run of things. There is a legend that shows the arts included and numbered both on the parts and throughout the instruction to aid in placement but there was one or two parts numbered incorrectly and personally I feel they should have numbered the parts after they did the photo layout of the parts legend making the parts sequentially on each block, left to right, top to bottom. These instructions give the parts somewhat numbered randomly throughout the cast blocks which becomes a frustrating effort to find the correct cast block with the correct part(s).
In the end I am happy with the kit, frustrated with the instructions and very pleased with the subject matter. While I will recommend the kit if you are a wanting fan of the Leopard family AEV's, I will caution most of the added effort needed to finish the model in a somewhat true to form fashion. This kit is not for the faint of heart nor if you are inexperienced in building full multimedia kits. As for the price, I do feel it is a bit high for what I needed to do to change and/or add things but it is a "demand" item as well as a full resin and photo etch kit which does tend to bring the price up and with some time and patience this will build up into a fine static display.
As always, thanks for tagging along while I through some parts together and tossed the paint around!!
Here it is then...Perfect Scale Modellbau's Pionierpanzer 1(PiPz 1) mit Inneneinrichtung - Leopard 1 AEV 1
There you have it. WHile I did find many things that I felt the manufacturer fell short on when putting this kit together, this is a great base for a welcomed subject of the Leopard 1 AEV 1. I would fully suggest picking up a set of the Leopard one tracks from Meng if you pick one of these up to build as the cast resin tracks are a bit touchy to work with and the probable under $15 US is well worth the expenditure.
There are plenty of nice details with the kit and yet there is plenty of room to add more but I think this may be half the fun in modelling. Some of the casting with this particular kit I received did have its share of air bubbles; however this was limited to several small parts that were easily corrected through the use of some filler and/or replacement with a scratch built part.
Overall the individual parts were cast decently and laid out on blocks for easy access and the kit supplied photo etch was nicely done with plenty of goodies to make the detail pop on this kit.
As for the instructions....well this would not be the first set any of us have come across that were less than desirable. They are a jumbled mess and hard to follow at time. The out of focus and lack of exact part placement markings makes for a tedious run of things. There is a legend that shows the arts included and numbered both on the parts and throughout the instruction to aid in placement but there was one or two parts numbered incorrectly and personally I feel they should have numbered the parts after they did the photo layout of the parts legend making the parts sequentially on each block, left to right, top to bottom. These instructions give the parts somewhat numbered randomly throughout the cast blocks which becomes a frustrating effort to find the correct cast block with the correct part(s).
In the end I am happy with the kit, frustrated with the instructions and very pleased with the subject matter. While I will recommend the kit if you are a wanting fan of the Leopard family AEV's, I will caution most of the added effort needed to finish the model in a somewhat true to form fashion. This kit is not for the faint of heart nor if you are inexperienced in building full multimedia kits. As for the price, I do feel it is a bit high for what I needed to do to change and/or add things but it is a "demand" item as well as a full resin and photo etch kit which does tend to bring the price up and with some time and patience this will build up into a fine static display.
As always, thanks for tagging along while I through some parts together and tossed the paint around!!
mshackleton

Joined: December 16, 2007
KitMaker: 559 posts
Armorama: 517 posts

Posted: Friday, August 22, 2014 - 07:16 PM UTC
Well done Todd.
You got there in the end and the end results looks pretty damn good despite your frustrations.
Best regards
Michael Shackleton
Author Leopard 1 Trilogy
www.leopardclub.ca
www.facebook.com/leopardfibel
You got there in the end and the end results looks pretty damn good despite your frustrations.
Best regards
Michael Shackleton
Author Leopard 1 Trilogy
www.leopardclub.ca
www.facebook.com/leopardfibel

TRM5150
Joined: January 03, 2010
KitMaker: 2,159 posts
Armorama: 707 posts
Posted: Saturday, August 23, 2014 - 12:00 AM UTC
I appreciate the kind words Mike!! I would also like to Thank you and the Leopard Club personally as you were an immense help to me on this project! Having the intimate knowledge of this variant along all the selection various publications you offer through the Leopard Club are all anyone would need when building a Leopard!
The Leopard Club is certainly to "GO TO" place when looking for information on any of the Leopard Family Beasts let alone the Leo 1 AEV! http://leopardclub.ca/
Thank you again Mike!!
The Leopard Club is certainly to "GO TO" place when looking for information on any of the Leopard Family Beasts let alone the Leo 1 AEV! http://leopardclub.ca/
Thank you again Mike!!
mshackleton
Joined: December 16, 2007
KitMaker: 559 posts
Armorama: 517 posts
Posted: Saturday, August 23, 2014 - 12:24 AM UTC
It was my pleasure, Todd. I'm always glad to help out. I'm proud to have been involved in this project in some small way.
Leopard Club is here to help out out anyone who needs info on the subject, not just my friends:-)
Leopard Club is here to help out out anyone who needs info on the subject, not just my friends:-)
panorama
Joined: January 18, 2013
KitMaker: 254 posts
Armorama: 253 posts
Posted: Monday, August 25, 2014 - 09:58 PM UTC
Hi Todd,
I always liked this vehicle, even during my army times. You caught it exceptionally well. Particularly the look of the used metal surfaces appear very realistic.
If I may mention two details that caught my eye: the decals look quite bright compared with the weather beaten appearance of the tank. Maybe a little fading and/or a wash or two might blend them in a bit more. And if I may suggest to add some smoke pigments around the exhaust grits at the rear of the hull as those are always covered with exhaust smoke particles.
I really enjoyed following your thread. Give us more of this.
Cheers Michael
recceboy

Joined: July 20, 2006
KitMaker: 706 posts
Armorama: 665 posts

Posted: Tuesday, August 26, 2014 - 12:28 AM UTC
Job well done on the build.
Anthony
Author. Canadian Leopard. Series
Anthony
Author. Canadian Leopard. Series
TRM5150
Joined: January 03, 2010
KitMaker: 2,159 posts
Armorama: 707 posts
Posted: Tuesday, August 26, 2014 - 04:39 AM UTC
Thank you for the kind work Michael! I was a bit light on the weathering when it came to the decals...certainly an area the could be done just a bit more as the same with maybe a bit of exhaust residue. Thanks for the comments!!
Thank you very much Anthony! Appreciate the feed back. Personally, I very much enjoyed your Canadian Leopard Support Vehicles...a very inspirational publication!! Thank you!
Thank you very much Anthony! Appreciate the feed back. Personally, I very much enjoyed your Canadian Leopard Support Vehicles...a very inspirational publication!! Thank you!
 |

WEB HOSTING BY


Copyright ©2021 Armorama and Kitmaker Network, a subsidiary of Silver Star Enterprises
All Rights Reserved. Please read our Conditions of Use and Privacy Policy.
All Rights Reserved. Please read our Conditions of Use and Privacy Policy.