

Hello fellow forum members,
Recently I'm working on a German Königstiger tank off the battle of the bulge. A kit from Revell. And I'm getting more comfortable with spraying one color with my airbrush on my models. But I found the next difficult thing, is the camouflage patterns. I had searched some video's for it on YouTube. But don't remember to get that much good results. So my question is, how to get nice results with painting camouflage patterns with your airbrush? How do I need to use my airbrush and so on for the different patterns? And how do I need to look at the instructions that are delivered with the kit with the paint scheme? How do I need to use it in order to get the best result out of it? And to get it as close to reality as I could do.
Cheers,
Lada_Niva
AFV Painting & Weathering
Answers to questions about the right paint scheme or tips for the right effect.
Answers to questions about the right paint scheme or tips for the right effect.
Hosted by Darren Baker, Matthew Toms
How to paint German camouflage patterns

Lada_Niva

Joined: October 06, 2019
KitMaker: 177 posts
Armorama: 97 posts
Posted: Monday, October 21, 2019 - 12:42 AM UTC

griffontech

Joined: November 21, 2007
KitMaker: 237 posts
Armorama: 231 posts
Posted: Monday, October 21, 2019 - 02:51 AM UTC
First off, start with a simple cam pattern until you get comfortable.
1) Try just green line or wavy blotches pattern. Just google King Tiger camouflage and see what comes up.
a) For the thin lines you would have to thin your paint correctly, use low pressure and get very close. This can be difficult to do because of overspray, spider webbing of the paint, splatters, etc...
b) Since you are ok to do single colour spraying, an easy way to start would be to research a single wavy blotch green pattern. Use some kind of putty to mask your entire model. Mix your paint like normal. Spray from the regular distance and pressures you are used to. Depending how well you press the putty onto the model, you may have some areas for touch up. If your putty has a "rolled" edge when it is on the model, you have a bit of undercut.
If you spray directly overhead of the roll, you get a hazy line. If you spray at an angle towards the model (so you get underneath the putty overhang), you get a fairly sharp line. This takes practice.
If you want to try this process, practice on scrap sheets of plastic, or do what I do: Practice on the belly of the king tiger to get a feel for it. Once you're done and comfortable, you can repaint the belly or leave it. No-one looks underneath there LOL
I haven't seen the instructions for the Revell KT, but be wary of any kit instructions. Some are not historically accurate. It all depends how much accuracy you want for the finished project. Are you painting a very specific vehicle , or a generic KT? Some people on these forums will harp on you if you paint a KT in anything but historical colours and patterns. Remember, there were not many KT's built, and everyone of them is documented with regards to cam patterns and markings. I sprayed my Jagdtiger in a made up pattern and spent days going back and forth with people saying I didn't care what they thought...
Lada_Niva
Joined: October 06, 2019
KitMaker: 177 posts
Armorama: 97 posts
Posted: Monday, October 21, 2019 - 06:28 AM UTC
Thank you for your reply. How do I change the pressure on a compressor? I have a compressor of Fengda with what I thought was a rotary knob. But couldn't rotate it. How can I do research on camouflage patterns? Do I need to purchase special books about it? Or would an search query do on the internet? Don't really see the method you are describing. Maybe you can give some pictures or examples?
Thank you for your reply,
Lada_Niva
Thank you for your reply,
Lada_Niva
Grauwolf

#084
Joined: September 14, 2005
KitMaker: 2,485 posts
Armorama: 743 posts

Posted: Monday, October 21, 2019 - 06:54 AM UTC
Give GOOGLE a try.
https://www.google.com/search?q=king+tiger+camo&client=firefox-b&source=lnms&tbm=isch&sa=X&ved=0ahUKEwiPvf77gq7lAhXumOAKHTl7DFYQ_AUIESgB&biw=1464&bih=903
Many, many examples.
To change the pressure on a compressor you need one of these.
It will also tell you what pressure you are working at and
will trap water that may build up in the hose.
https://www.amazon.ca/Paasche-R-75-Regulator-Moisture-Trap/dp/B000BR2STI/ref=asc_df_B000BR2STI/?tag=googleshopc0c-20&linkCode=df0&hvadid=292924384746&hvpos=1o2&hvnetw=g&hvrand=9310390253419265001&hvpone=&hvptwo=&hvqmt=&hvdev=c&hvdvcmdl=&hvlocint=&hvlocphy=1002615&hvtargid=pla-305953980128&psc=1

panzerbob01

Joined: March 06, 2010
KitMaker: 3,128 posts
Armorama: 2,959 posts
Posted: Monday, October 21, 2019 - 01:45 PM UTC
Lada_Niva:
As mentioned by previous; Google can be your very good friend. German vehicle camouflage is, in itself, a complex and many-storied topic - unlike other countries and in modern times, WWII German camouflage schemes were regulated generally as to what colors could be used, but otherwise mostly left up to individual vehicle crew to execute. This pattern or "modus-vivende" essentially started up with the 1938 brown-over-gray regulations from 1938 and continued variably thru to 1945. Some crew sprayed on camo colors, others brushed it on. Some unit commanders tried to standardize some pattern within the unit equipt, others didn't. Variation in both techniques and patterns resulted. Color regs shifted periodically up to the end... Crew still applied camo, and used what they had and did whatever they could or were allowed to.
The point of this very brief synopsis is; German WWII vehicle camo varied A LOT - it was very individualistic in many cases. So...
A modeler seeking some camo-accuracy needs to search for photos of his / her chosen subject vehicle and a chosen time-frame. Search Google for your tank, look at the pics, find a scheme you want to try, search out what colors were being used at that time.
Once you select your scheme... Develop YOUR technique: If you are going spray (even for hard-edge schemes), maybe the key thing, after checking out what a few others do for general AB techniques (thinning paints, regulating air pressures, etc.) and practicing general operations with your AB, is to PRACTICE pattern-painting on a nice, clean, flat piece of paper to get the hand-motions down as you try out doing various "blobs" and stripes and blotches. Once you feel you have some control and feel good about making blobs of some size and general shape, now you can tackle how to paint the build scheme. I would suggest starting by drawing out a likely pattern on your paper, and practice painting within your lines. You can then move to drawing your desired pattern onto your base-painted build with a light pencil - and apply your practiced paint-within-the-lines to going onto your build. As also mentioned previously, you can always mask your scheme onto your build - this is actually the good way to get hard-edged schemes with the AB, but does call for some careful techniques with putty or tape...
Practice is your key to success. Once you have hand-motions and AB control down, you can easily go to free-handing most schemes - Having a reference pic up on your paint-booth / hobby bench computer monitor (or a good color paper print...) on hand as you paint gives you something to help guide your developing scheme on your build. Remember: You can always repaint things if at first it doesn't come out the way you wanted it to!
Try stuff and HAVE FUN!
Cheers! Bob
Lada_Niva
Joined: October 06, 2019
KitMaker: 177 posts
Armorama: 97 posts
Posted: Tuesday, October 22, 2019 - 01:55 AM UTC
Thank you for your reply. I believe to that practicing is one of the most interesting and fun ways to learn how to do things such as getting good painting results. I also like studying these kind of things on the internet. But don't really know how to get to the more specialized sources. I generally come to the general information, but not to the more specialized and detailed information. Will look up some things online.
And thank you all for the nice and detailed information.
Lada_Niva
And thank you all for the nice and detailed information.
Lada_Niva
Grauwolf
#084
Joined: September 14, 2005
KitMaker: 2,485 posts
Armorama: 743 posts
Posted: Tuesday, October 22, 2019 - 03:12 AM UTC
I can write a 1000 words but your best instruction will come in a video tutorial.
There are many of these found on YOU TUBE. Have a look at them.
Remember that you will find both POOR and GOOD tutorials. Seek out the ones that
are the best and suit your needs and use them as a guide.
When you do and as Bob has suggested, PRACTICE and when you feel comfortable with the results, proceed to paint the model.
Cheers
Bozothenutter
Joined: December 06, 2017
KitMaker: 48 posts
Armorama: 48 posts
Posted: Tuesday, October 22, 2019 - 03:14 AM UTC
BoB would be mostly ambush at a guess.
so that limits you to three colours with contrasting dots.
so that limits you to three colours with contrasting dots.

marcb
Joined: March 25, 2006
KitMaker: 1,244 posts
Armorama: 1,226 posts

Posted: Tuesday, October 22, 2019 - 05:08 AM UTC
Lada,
What kit do you have exactly and what unit/decal option do you want to build?
The first Tiger II's were camo painted by the units in the field, later ones were camp painted in the factory according to a specific pattern.
What kit do you have exactly and what unit/decal option do you want to build?
The first Tiger II's were camo painted by the units in the field, later ones were camp painted in the factory according to a specific pattern.
Lada_Niva
Joined: October 06, 2019
KitMaker: 177 posts
Armorama: 97 posts
Posted: Tuesday, October 22, 2019 - 06:43 AM UTC
Quoted Text
Lada,
What kit do you have exactly and what unit/decal option do you want to build?
The first Tiger II's were camo painted by the units in the field, later ones were camp painted in the factory according to a specific pattern.
I'm painting it in the version of the 501. Schwere SS Panzerabteilung. That fought in the battle of the bulge.
marcb
Joined: March 25, 2006
KitMaker: 1,244 posts
Armorama: 1,226 posts
Posted: Tuesday, October 22, 2019 - 10:26 AM UTC
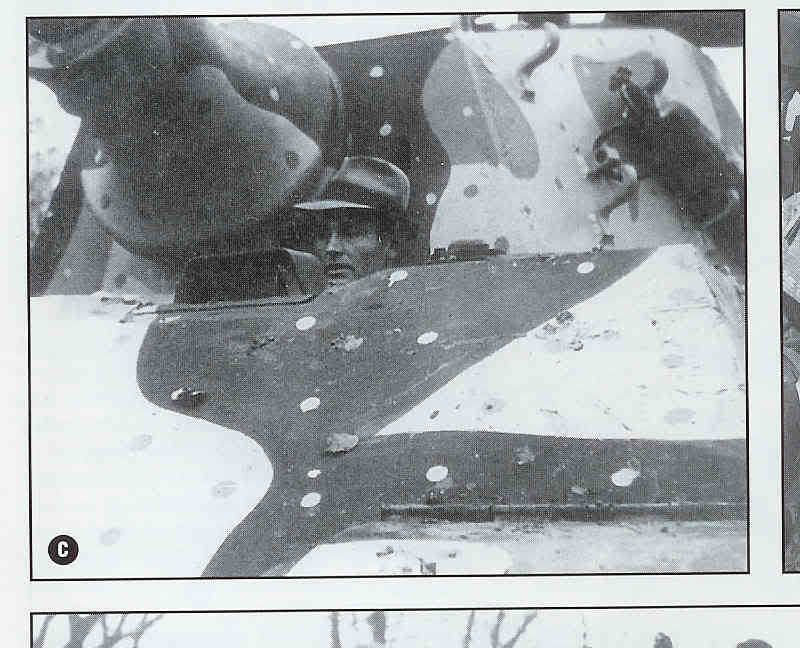
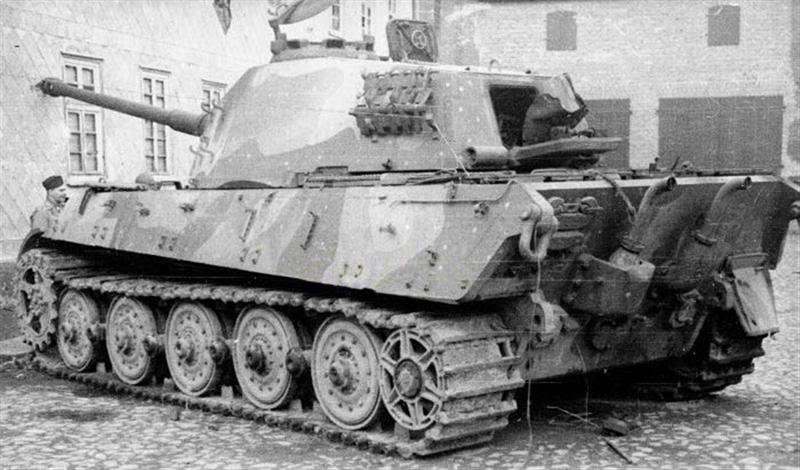
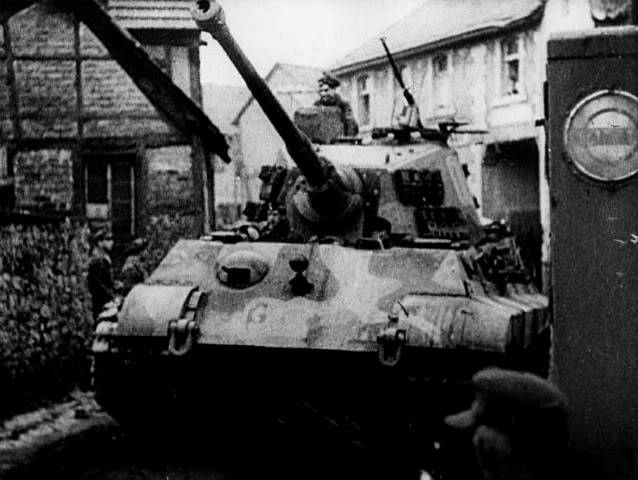
They had factory camoed tanks without zimmerit, painted in the "ambush pattern".
What scale is the kit?
Here are some pics.
What scale is the kit?
Here are some pics.
 |

WEB HOSTING BY


Copyright ©2021 Armorama and Kitmaker Network, a subsidiary of Silver Star Enterprises
All Rights Reserved. Please read our Conditions of Use and Privacy Policy.
All Rights Reserved. Please read our Conditions of Use and Privacy Policy.