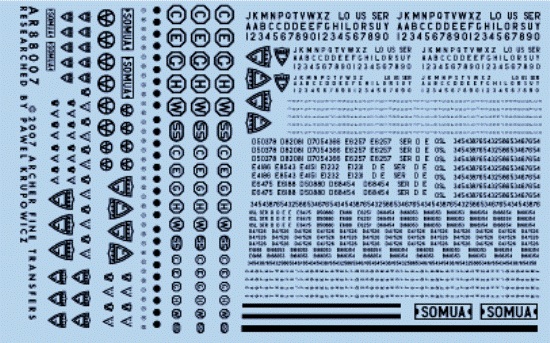
Typically, adding casting numbers and symbols to our Shermans and Pershings required cutting/scraping the numbers off the sprues, which could be a hit or miss type of deal. Archer Fine Transfers comes to the rescue with this set of various armor casting symbols, markings, letters and numbers.
Archer is well known for their dry transfers, but they also provide traditional water slide decals and 3-D resin surface details such as the casting symbols reviewed here.
review
This set includes both 1/35 and 1/48 casting symbols on a single sheet. Using these is as easy as applying traditional water slide decals, although these are usually applied under the paint. Careful cutting is required, especially for the smaller ones such as those used on suspension parts, as the symbols are packed on the sheet pretty close together.
To use, simply cut them out, dip in water as with a regular decal and apply. A little Microsol will help them snug down to the surface. When dry, add your top coats of paint, or if leaving them in the raw state Id recommend protecting them with a clear sealant before weathering, just like a regular decal.
conclusion
I am satisfied with them and would recommend them to anybody that is looking for that added touch to finish off that killer Sherman. Go and buy a few sets!
SUMMARY
Highs: Easy to use and apply. Saves time and looks great.Lows: I think they should be made in separate scales. Price might seem high to some.Verdict: I would use them any time I need to add or correct the casting symbols.
I have just used these (along with Archer weld beads) and they are great looking, at least prior to painting which is as far as I've gotten. The only issue I have is that the researcher apparently provided Archer some bad info as there are several errors: The large H and W symbols should be in circular "C" outlines, not octagons; the low bustle turret P/N was D50878 not D50378; the Scullin Steel "SS" logo is incorrectly shaped; and the 1 numerals should have the little "hat" at the top, rather than a single stroke. A couple other letters are an incorrect typeface. I would also have included a few more very common US symbols such as the U-in-keystone and D-in-C. I was able to correct the octagon marks by trimming the corners away.
Other than the SOMUA hull plate emblems these really are suitable to several scales. The real symbols were varying sizes so a range of heights is needed even if you are only making a single scale.
To answer the question above, I apply these after making the cast texture. In addition to using Micro-Sol as recommended, I seal them down with Future floor wax. Decal solvent really doesn't work all that well as the symbol itself is a hard resin and impervious to setting solution. I will probably seal again with a local spray of acrylic clear prior to my final wash down before painting.
I plan to get another set next month at AMPS.
KL
Hi Kurt,
Long time no hear.
Thank you for your comments. Please e-mail me directly at [email protected] if you'd like to help me make these changes so I can correct these issues on future sheets.
Woody Vondracek, owner
Archer Fine Transfers
I just used a bunch of these weld beads on a Tamiya SU-85 and Italeri Pzkw-IV (stash builds for AMPS).
They are da bomb !!! They are very easy to use, and they really add to the look of an older kit.
One thing I found with the weld beads is to trim the decal film right up on the edge of the bead or else it will show under the paint. As Kurt notes, decal-setting solution doesn't seem to do much. The first few I tried lifted off a bit. After they dried I ran a bead of ordinary plastic cement down the bead to try to seal it in place. Then paint on top of that. They look great. Again, a lot of older kits lack weld beads. If you are building one of those, this is a very easy, cheap, fast way to make them look a lot better.


Comments