Bronco's 1/35 AA Staghound
United States
Joined: July 04, 2009
KitMaker: 241 posts
Armorama: 199 posts
Posted: Thursday, September 03, 2009 - 05:37 AM UTC
Thank you Janne for the comments
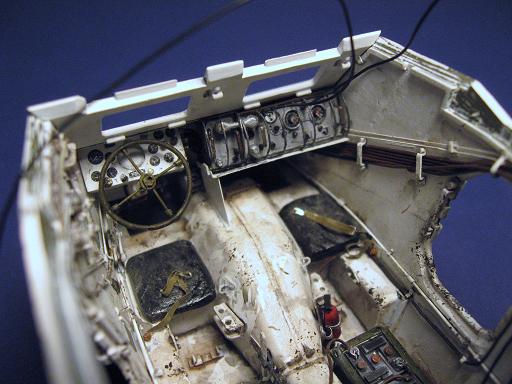
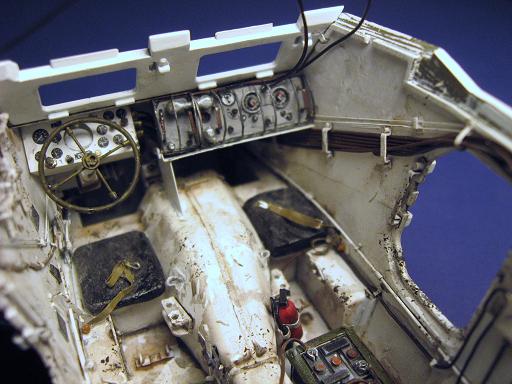
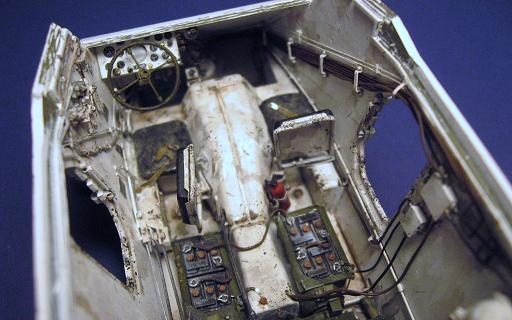
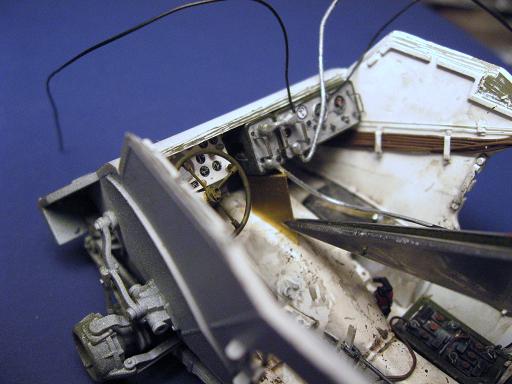
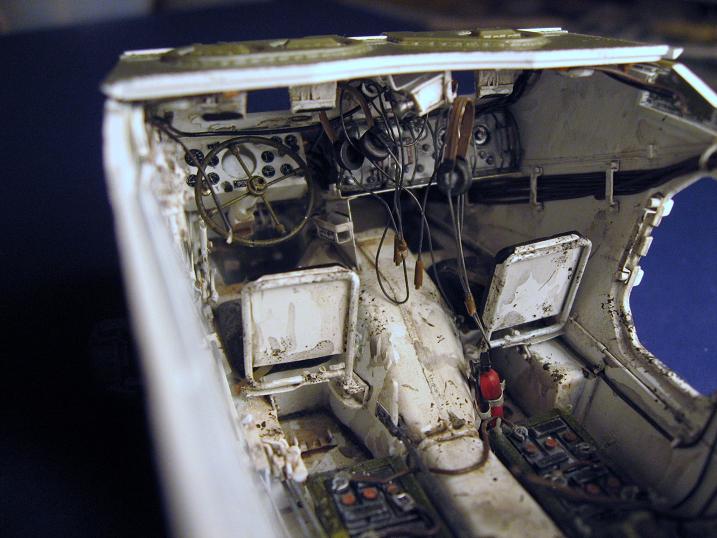
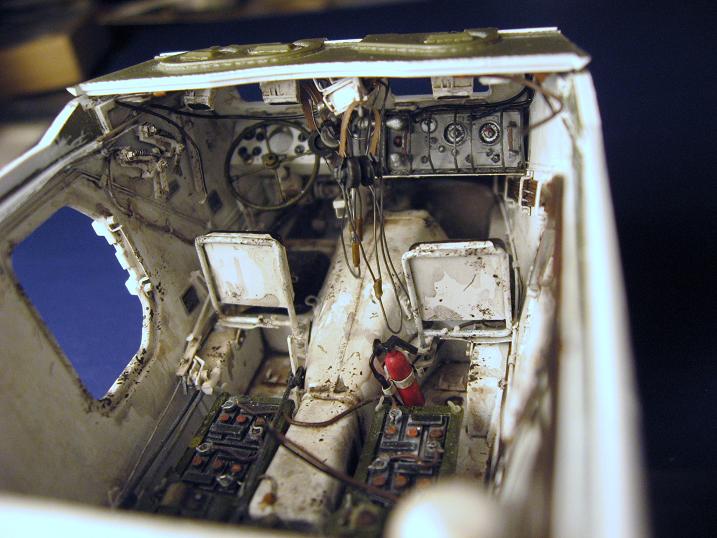
Decided I should continue the weathering while I can still get to it.
Added some chips and scratches on top of the stains I had done earlier.
United States
Joined: July 04, 2009
KitMaker: 241 posts
Armorama: 199 posts
Posted: Thursday, September 03, 2009 - 05:46 AM UTC
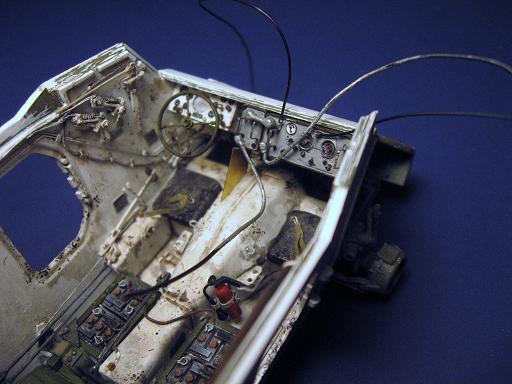
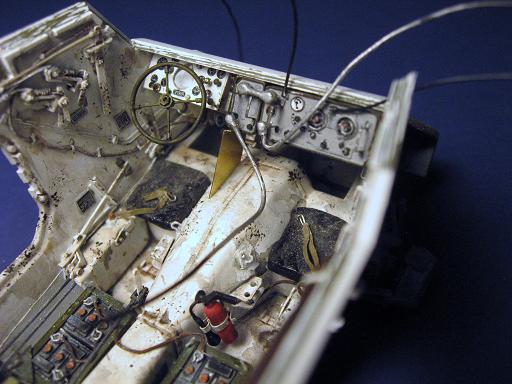
A couple of more pic.........
Thank you looking and comments are always welcome.
Randy
Stockholm, Sweden
Joined: January 31, 2003
KitMaker: 795 posts
Armorama: 472 posts
Posted: Thursday, September 03, 2009 - 05:59 AM UTC
Ahh, good weathering too.
Cheers
"A furore normannorum libera nos domine"
French prayer
"Bet Kinder bet, morgen kommt der Schwede
Der Schwede der kommt mit dem morgenstern
Er frist die kleine Kinder gern."
German bedtimethreat to children.
England - East Anglia, United Kingdom
Joined: August 12, 2005
KitMaker: 14,499 posts
Armorama: 11,675 posts
Posted: Thursday, September 03, 2009 - 06:24 AM UTC
Hi Randy,
Absolutely brillient work on the vehicle, a real joy to watch this build.
Al

'Action this Day'
Winston Spencer Churchill
United States
Joined: July 04, 2009
KitMaker: 241 posts
Armorama: 199 posts
Posted: Thursday, September 03, 2009 - 08:35 AM UTC
Thank you Janne,
Thank you Al, have been enjoying your Market Garden campaigne postings!
Randy
North Carolina, United States
Joined: February 06, 2006
KitMaker: 1,544 posts
Armorama: 1,464 posts
Posted: Thursday, September 03, 2009 - 08:45 AM UTC
You my friend need to seek professional help as soon as humanly possible! In the words of Popeye "Blow Me Down!" ........ The RR stuff is simply amazing as well - very inspiring Randy.

United States
Joined: July 04, 2009
KitMaker: 241 posts
Armorama: 199 posts
Posted: Thursday, September 03, 2009 - 10:24 AM UTC
Hi Chris, Thanks for looking in again and yea I'm probably a little nuts. Any progress on the Leb. staghound?
Randy
United States
Joined: July 04, 2009
KitMaker: 241 posts
Armorama: 199 posts
Posted: Monday, September 07, 2009 - 03:44 AM UTC
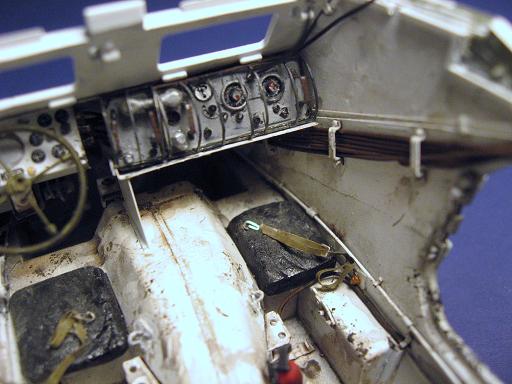
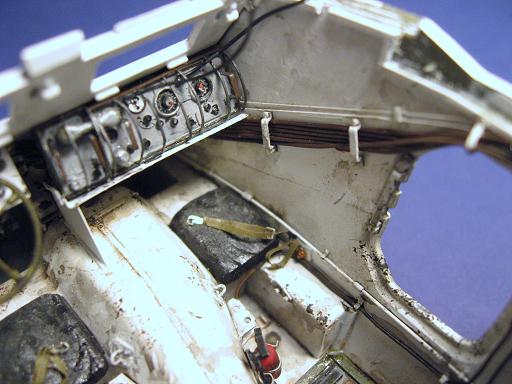
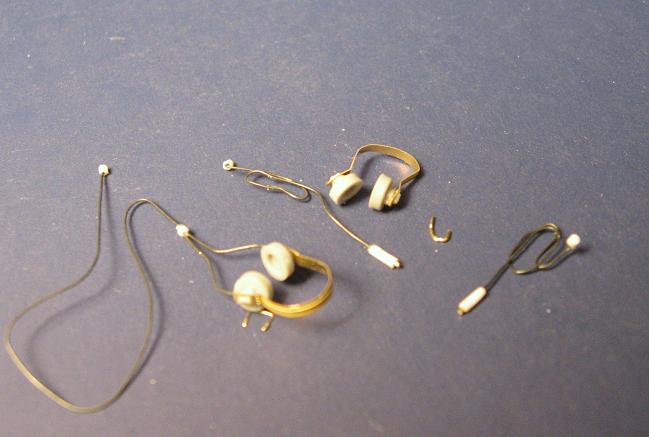
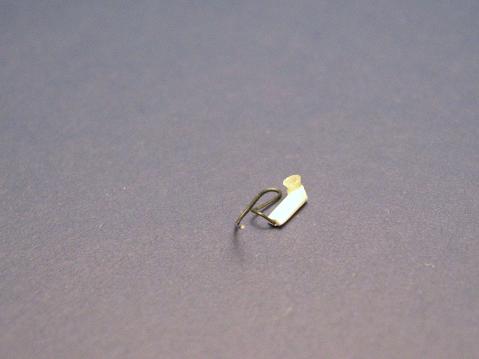
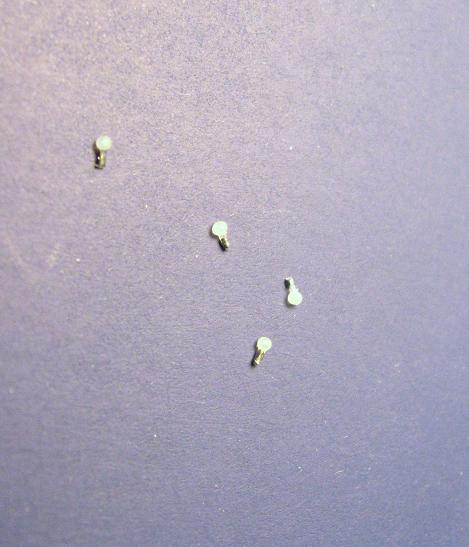
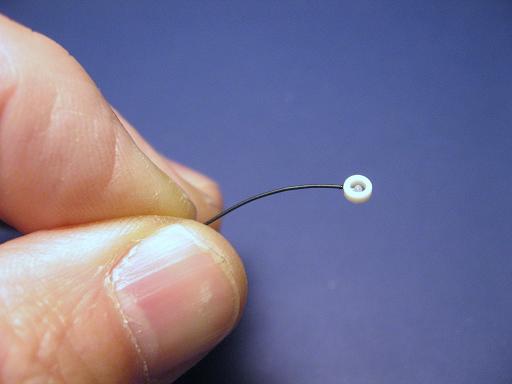
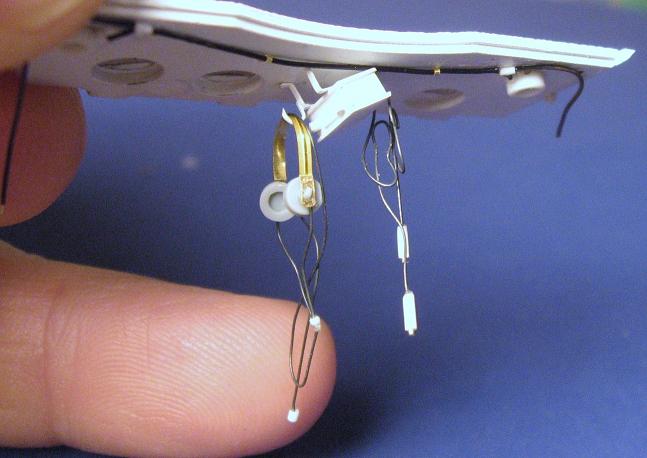
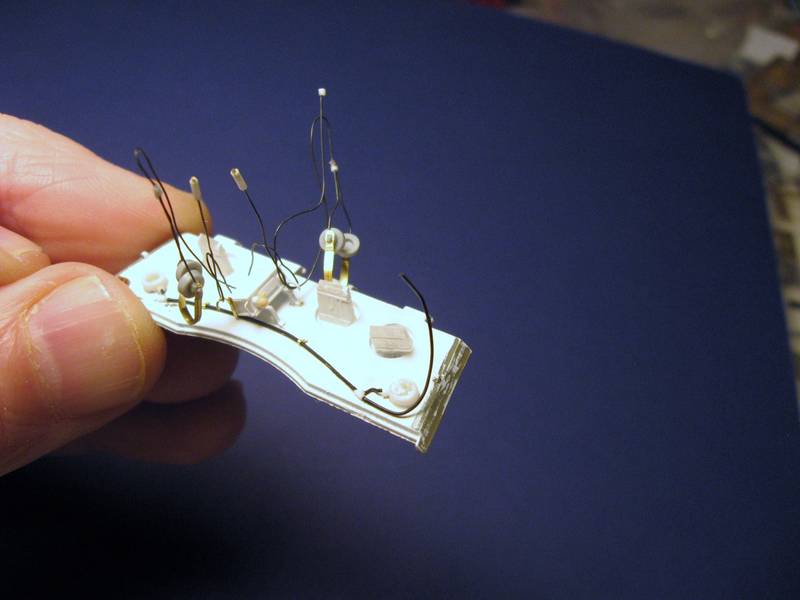
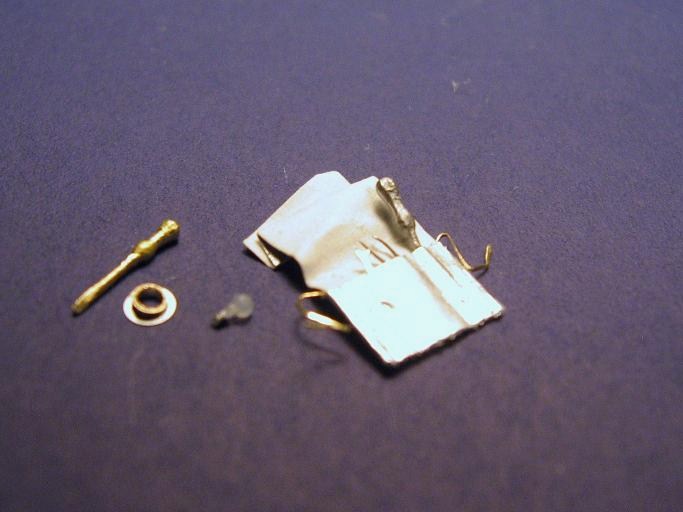
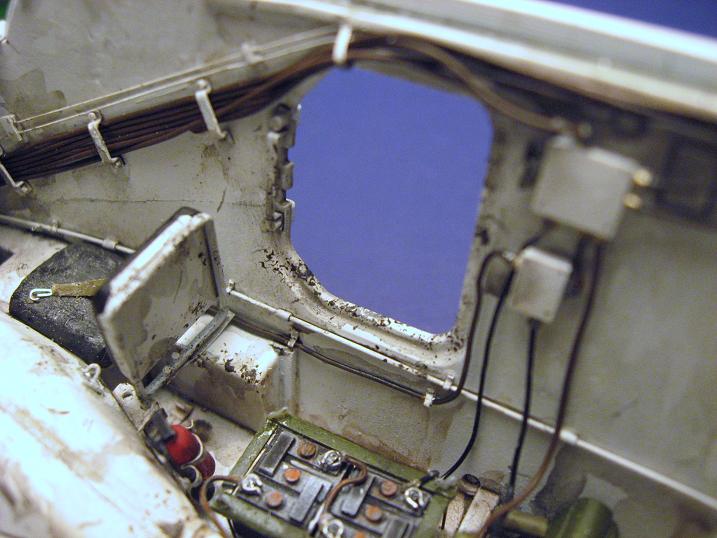
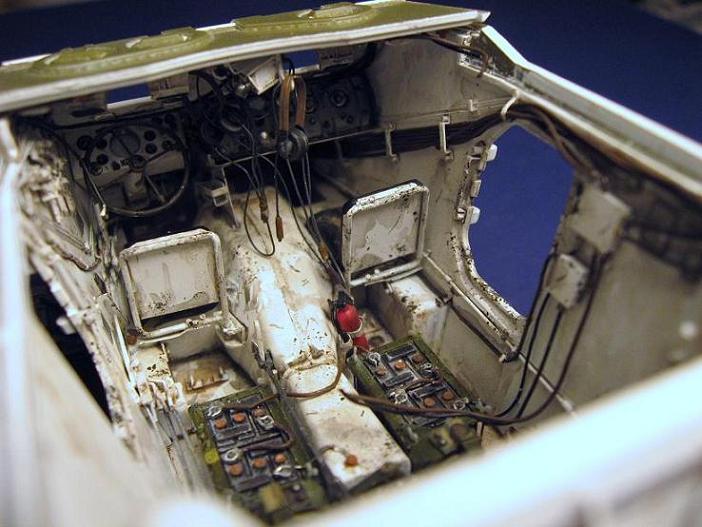
Progress has slowed down. Almost all of my really good interior reference material is for the Stag T17E1. This has not been a problem to date because the interiors are the same up to this point. The issue is the right hand side of the forward compartment.
The T17E2 was fitted with a No. 19 radio set where the other stags had the hull mounted .30 cal. machine gun installed and the position of several spare parts and small bits are different.
The few photos I have do not show the radio in place and are of cars that I'm not sure that they don't have changes made to them post WW2.
I've decided to go forward with what info I do have and try an be logical about the rest.
The Tamiya Unniversal Carrier kit donated it's radio set. Added some wiring for the two antennas and power cords .
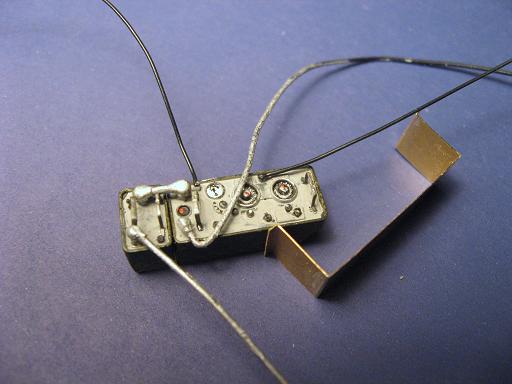
The shelf and brackets....
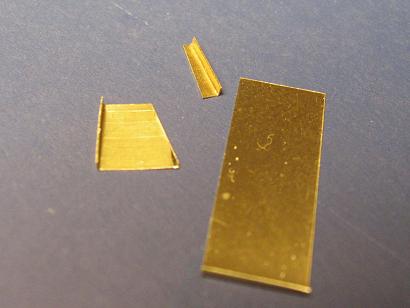
Some test fitting ......
Will try and post some stuff later. Thanks for looking in.
Randy
United States
Joined: July 04, 2009
KitMaker: 241 posts
Armorama: 199 posts
Posted: Monday, September 07, 2009 - 06:33 AM UTC
United States
Joined: July 04, 2009
KitMaker: 241 posts
Armorama: 199 posts
Posted: Tuesday, September 08, 2009 - 05:47 AM UTC
Scotland, United Kingdom
Joined: May 25, 2005
KitMaker: 2,218 posts
Armorama: 1,050 posts
Posted: Tuesday, September 08, 2009 - 10:55 AM UTC
I give up!
That is stunning work mate!

Florida, United States
Joined: May 04, 2008
KitMaker: 757 posts
Armorama: 518 posts
Posted: Tuesday, September 08, 2009 - 12:29 PM UTC
Wow........I had no idea that anything could be done with such detail. It is as if some little 1/35 scale guy is going to get in and drive it away. Most of us will NEVER get quite as good at it as you are and to you I say, fantastic job. How do you work so small ? Do you use jewelers optics and tools? Just curious........again ,great job...........Al .......the not quite as good modeler.

United States
Joined: July 04, 2009
KitMaker: 241 posts
Armorama: 199 posts
Posted: Wednesday, September 09, 2009 - 04:08 AM UTC
Murdo, Thank you for commenting, hope you like how it turns out.
Al V., Appreicate the kind words. Funny you should mention the scale , I'm an armor newbie who thinks this 1/35 stuff is huge

. Usually work in 1/87th or 1/48 for my train stuff.
Randy
Joined: July 30, 2007
KitMaker: 43 posts
Armorama: 36 posts
Posted: Wednesday, September 09, 2009 - 08:53 AM UTC
Quoted Text
I do have a question for all you folks, these cars were built with stuff like small arms(submachine gun) ,canteens, flashlights, and tool kits that were American. Would this be correct for British and Canadian units in WW2? Thanks for looking in.
Randy
Randy
i canot say for sure exactly what would be carried on board in real life, but the likelihood is that the tools woudl be American and supplied with the vehicle, but the personal equipment woudl be British or Canadian. These were built to british contracts whereas lend lease vehicles often included a full set of American issue kit including helmets and headsets
Personal arms woudl have been standard issue for the service that used them - at the time these entered service I believe this probably means Stens rather than Thompsons
Armoured car crews were remarkably gifted at "liberating" stuff so you've got a bit of latitude when it comes to adding the personal touch. Somewhere I havea photo of a Staghound with what looks like a folding picnic table and chairs strapped to the rear fender
Zaragoza, Spain / España
Joined: August 01, 2005
KitMaker: 2 posts
Armorama: 1 posts
Posted: Wednesday, September 09, 2009 - 09:20 AM UTC
simply awesome, keep posting please.
United States
Joined: July 04, 2009
KitMaker: 241 posts
Armorama: 199 posts
Posted: Wednesday, September 09, 2009 - 10:17 AM UTC
Thanks for the imput Aidrian, I think you are right. Since the flashlights and canteens had specific holders and clips built into the hull I'll keep a couple of those. Since I'm going Canadian with this one I will swap for sten guns and also add the british helmuts.
V , Thank you for looking in.
Randy
United States
Joined: July 04, 2009
KitMaker: 241 posts
Armorama: 199 posts
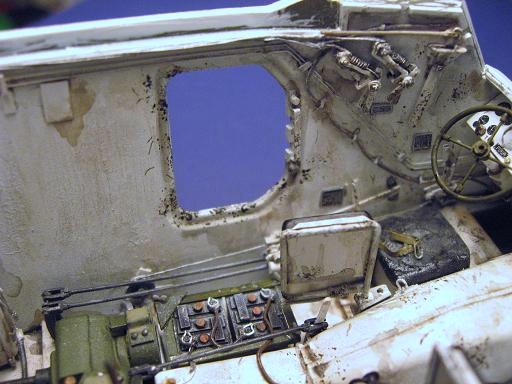
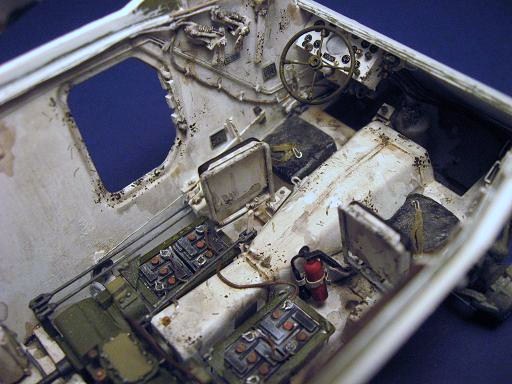
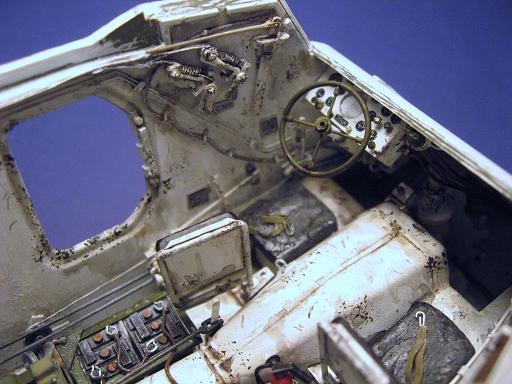
Posted: Friday, September 11, 2009 - 01:23 AM UTC
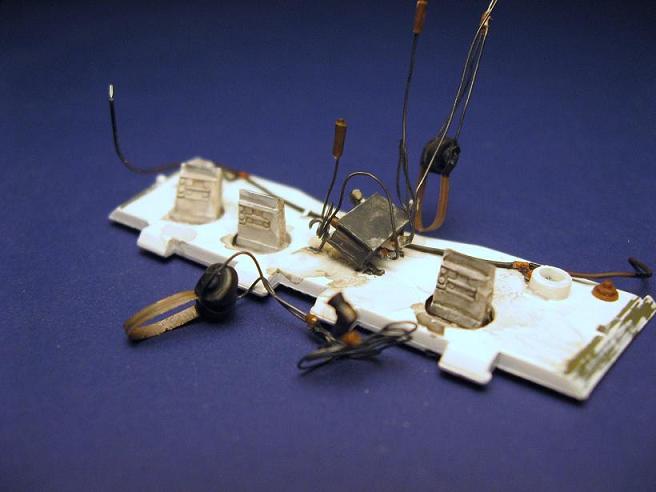
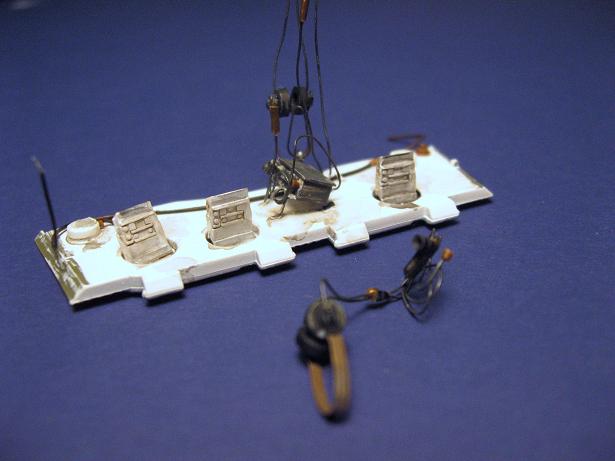
A few photos today...
Testing the roof section in place...
Thanks for looking in as always, Randy
Illinois, United States
Joined: March 24, 2006
KitMaker: 1,816 posts
Armorama: 1,402 posts
Posted: Friday, September 11, 2009 - 01:38 AM UTC
Once again... stunning work Randy.
I'd like to post these photos on WarWheels.Net website once you're done with the kit.
Incoming PM...
Patrick Keenan
Editor - WarWheels.net
IPMS/USA Armored Car/Wheeled Fighting Vehicle SIG Leader
Goias, Brazil
Joined: March 29, 2002
KitMaker: 730 posts
Armorama: 688 posts
Posted: Friday, September 11, 2009 - 01:46 AM UTC
Amazing !!!!!
Only this !!!!

Marcos Serra (Panzerserra)
Armed Forces Europe, United States
Joined: December 04, 2008
KitMaker: 216 posts
Armorama: 132 posts
Posted: Friday, September 11, 2009 - 03:12 AM UTC

Im pretty speachless right now....this is amazing, your scratch is insanely awesome!!!....SUBSCRIPTION COMPLETE
Some people spend an entire lifetime wondering if they made a difference in the world. But, the Marines don't have that problem.
Rio Grande do Sul, Brazil
Joined: February 22, 2004
KitMaker: 65 posts
Armorama: 58 posts
Posted: Friday, September 11, 2009 - 03:42 AM UTC
S!
I'm speechless.
Amazing work.

"Battles are won by slaughter and maneuver. The greater the general, the more he contributes in maneuver, the less he demands in slaughter"
Sir Winston Churchill (1874-1965)
United States
Joined: July 04, 2009
KitMaker: 241 posts
Armorama: 199 posts
Posted: Friday, September 11, 2009 - 08:40 AM UTC
Thanks Pat, feel free to post to the War Wheels site.
Marcos, Thank you
Thank you Alex ,for the kind words.
Samuel, Thank you for commenting.
Randy
Removed by original poster on 09/12/09 - 00:35:05 (GMT).
United States
Joined: July 04, 2009
KitMaker: 241 posts
Armorama: 199 posts
Posted: Friday, September 11, 2009 - 06:20 PM UTC
Thank you, Schultze
Randy
United States
Joined: July 04, 2009
KitMaker: 241 posts
Armorama: 199 posts
Posted: Friday, October 09, 2009 - 04:54 AM UTC