


Armor/AFV
For discussions on tanks, artillery, jeeps, etc.
For discussions on tanks, artillery, jeeps, etc.
Hosted by Darren Baker, Mario Matijasic
Tamiya Famo Sd Ah 116 trailer and DML Panzer

Plasticbattle

#003

Joined: May 14, 2002
KitMaker: 9,763 posts
Armorama: 7,444 posts

Posted: Friday, November 14, 2014 - 05:01 PM UTC
Great build Michael. Love the damaged panzer III. Will you wether the engine more or leave it like this?

airborne1

Joined: April 15, 2006
KitMaker: 915 posts
Armorama: 797 posts

Posted: Friday, November 14, 2014 - 06:26 PM UTC
Thanks Frank,
Yeah I will probably use some more sporadic washes around the engine compartment once the panzer 3 is painted .
It will be a small wash not too over the top but we will need to bring certain parts of the engine bay out.
Michael
Yeah I will probably use some more sporadic washes around the engine compartment once the panzer 3 is painted .
It will be a small wash not too over the top but we will need to bring certain parts of the engine bay out.
Michael
airborne1
Joined: April 15, 2006
KitMaker: 915 posts
Armorama: 797 posts
Posted: Friday, November 21, 2014 - 12:42 PM UTC
Hello
update to sd ah 116 trailer
ammo primer
ammo colours
ammo tyre colours
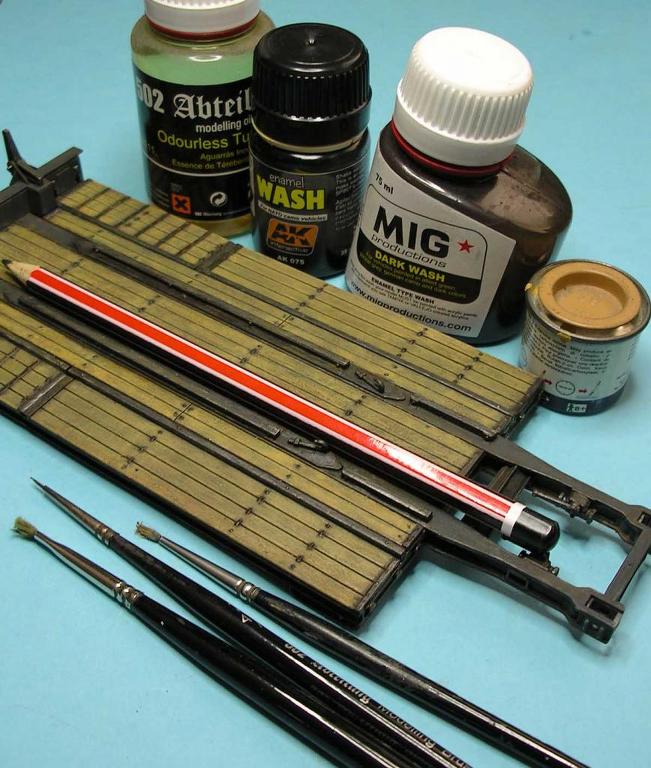
update to sd ah 116 trailer
ammo primer
ammo colours
ammo tyre colours
airborne1
Joined: April 15, 2006
KitMaker: 915 posts
Armorama: 797 posts
Posted: Friday, December 05, 2014 - 06:10 PM UTC
hello
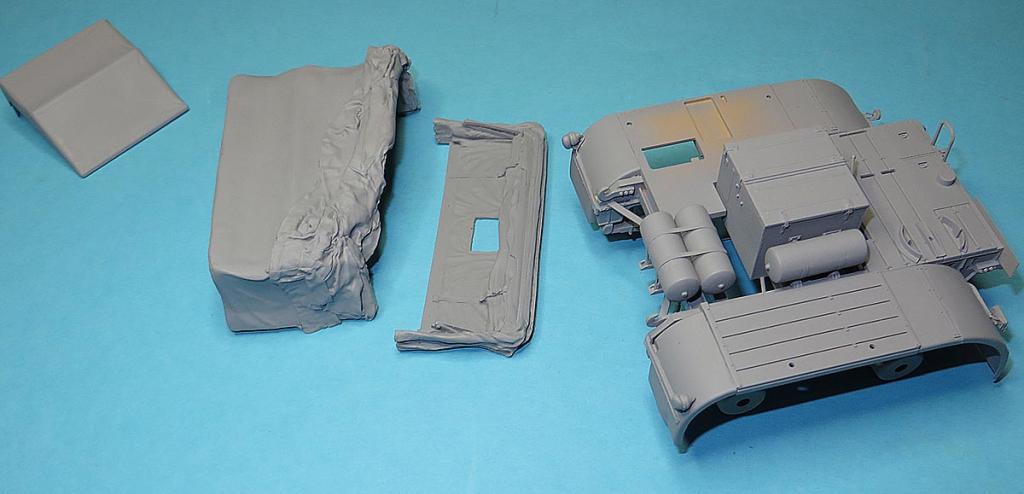
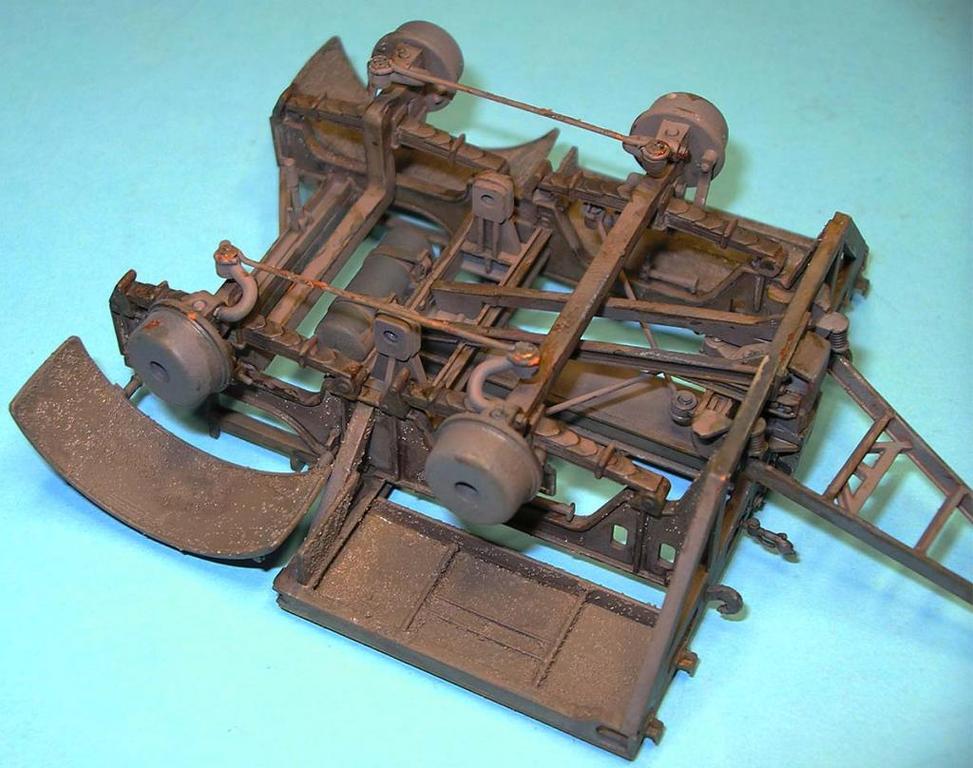
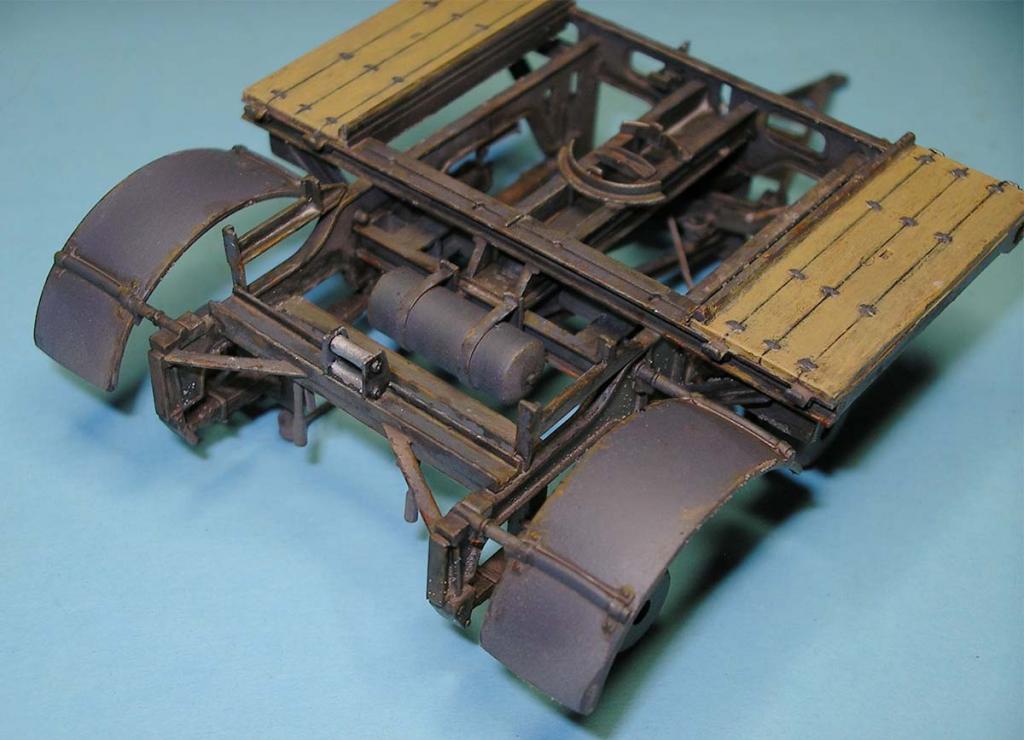
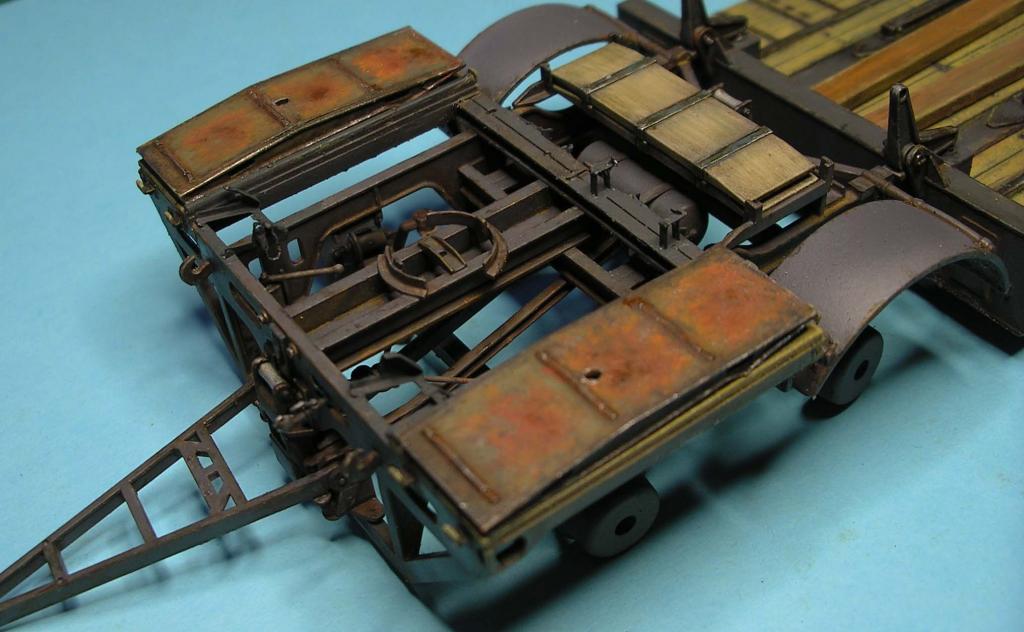
More work completed
I think this is way bigger than the dragon wagon because the trailer in 3 individual components makes lot more work on the famo trailer than the D/W trailer.
I was surprised to see so many decals on the tractor unit. This would be the hardest thing by far building the trailer .I suppose the easiest way would be to paint and mask it and I took the difficult way.
Here are the tools of the trade of what I use for decaling all my vehicles .
first : spray gloss on the area where the decal is to go and then use warm water , paintbrush to position the decal onto the model. use tissue paper to soak any water away from the decal so it sucks the decal flat onto the model . Then flat clear once done. I use Testers dullcote for most of my flat clearing.

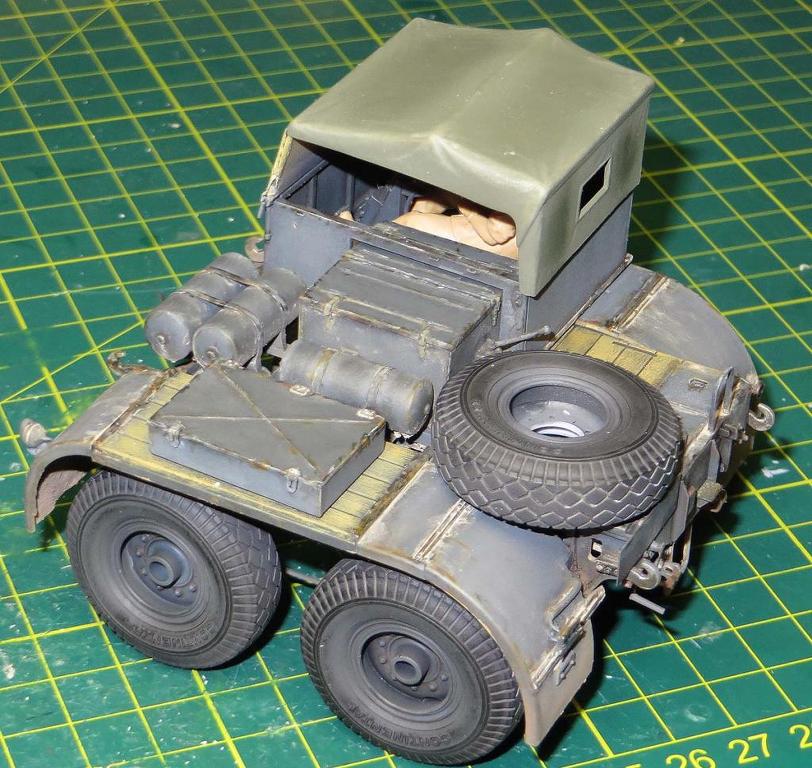
Here is the final appearance .
the tractor unit was toned down from earlier washes .
blue tac had been placed over the headlamps for the paint and wash section. More work to be done to the tilt over the cab .
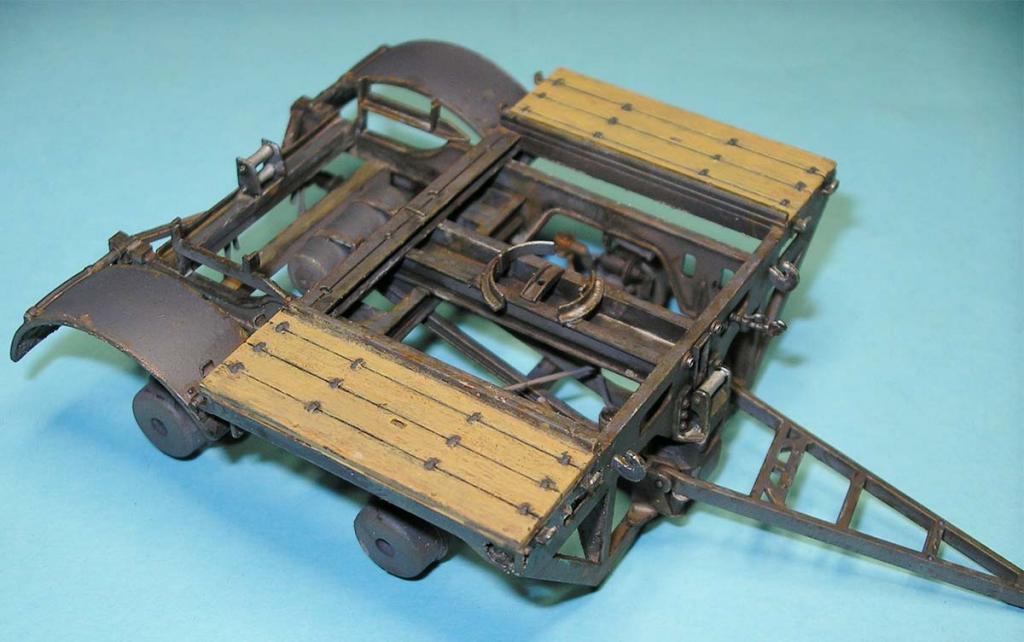
Upper deck painted with Mig Ammo Dark grey base and Humbrol 63 for the Timber appearance .
A dark pin wash by Mig (DARK WASH)was added to bring out the depth in the timber on the trailer bed
On the underside of the trailer I used the Tamiya earth effects mixed with Tamiya thinners broken down .
Gives a really good soil appearance .This will be painted with Tamiya earth to bring out the detail.
I moved my attention on creating a better looking tarp for the Famo .
Here I painted with Mig Ammo Olive green to give like a worn canvas appearance .
Highlighling the ridges of the tarp with Olivegreen and a mix of dark yellow
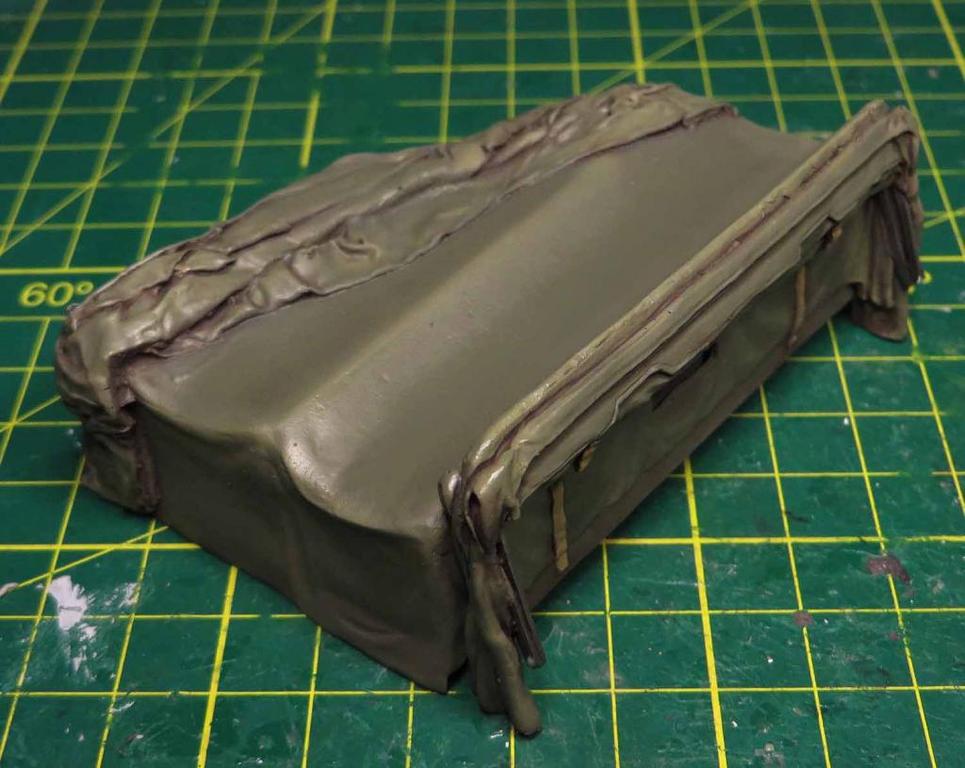
I used Mig (Dark Wash)as a pin wash mixed and broken down with 502 Abetelung thinners. By doing this it flows quicker along the recess.
applied in the recesses and once dry I highlighted again with the mix of olive green and dark yellow to show a slightly worn appearance on the raised edges.
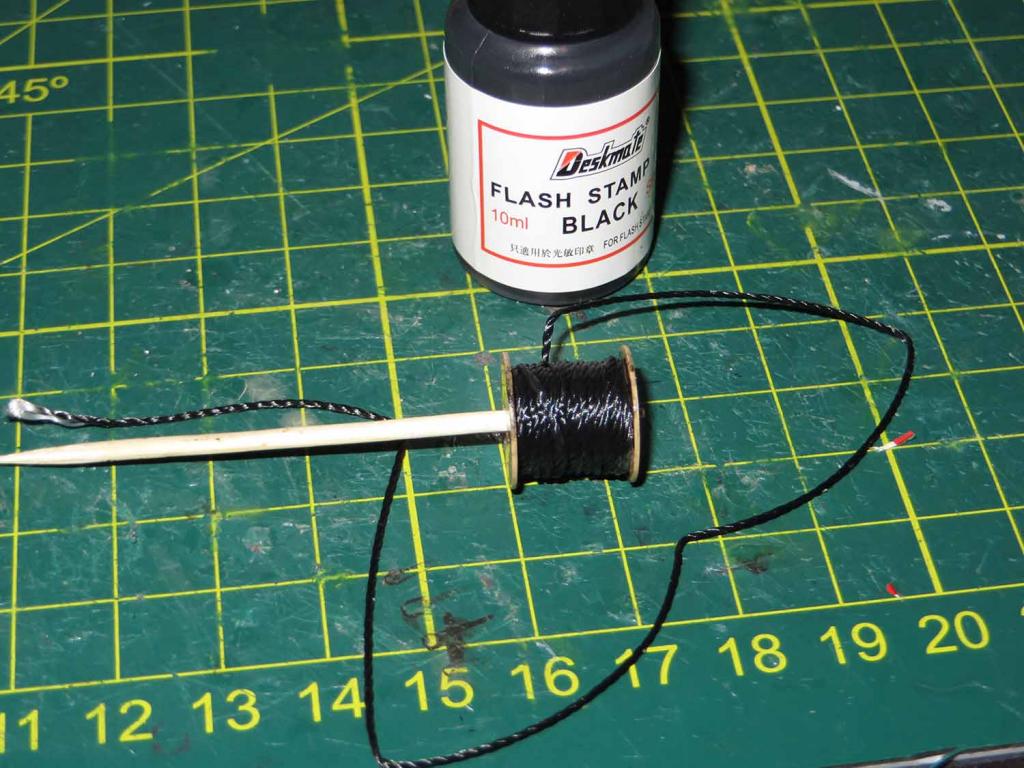
Slowly getting to the end of the tractor unit and I used black ink to seep into the tow cable .
Great for adding depth in detail once the cable is highlighted with a steel colour .
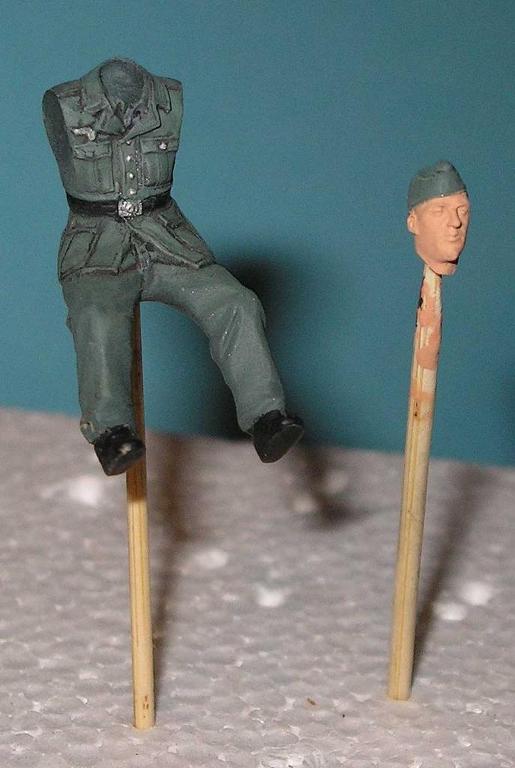
The driver had the neck area dremelled out and a hornet head test fitted .
The next stage is the figure painting .Wow , 6 months since last painting a figure.
I think I can do it

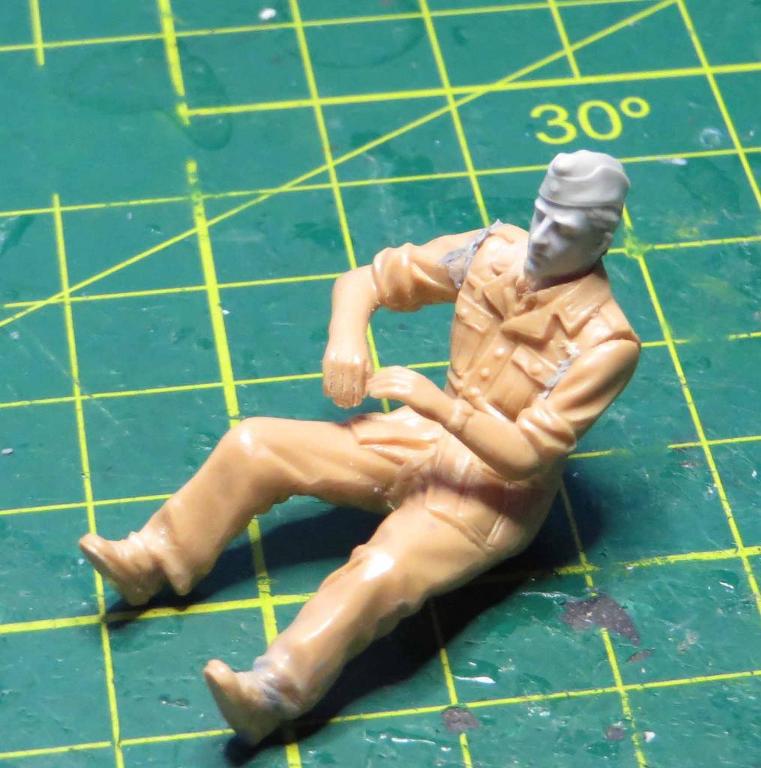
Michael
More work completed
I think this is way bigger than the dragon wagon because the trailer in 3 individual components makes lot more work on the famo trailer than the D/W trailer.
I was surprised to see so many decals on the tractor unit. This would be the hardest thing by far building the trailer .I suppose the easiest way would be to paint and mask it and I took the difficult way.
Here are the tools of the trade of what I use for decaling all my vehicles .
first : spray gloss on the area where the decal is to go and then use warm water , paintbrush to position the decal onto the model. use tissue paper to soak any water away from the decal so it sucks the decal flat onto the model . Then flat clear once done. I use Testers dullcote for most of my flat clearing.
Here is the final appearance .
the tractor unit was toned down from earlier washes .
blue tac had been placed over the headlamps for the paint and wash section. More work to be done to the tilt over the cab .
Upper deck painted with Mig Ammo Dark grey base and Humbrol 63 for the Timber appearance .
A dark pin wash by Mig (DARK WASH)was added to bring out the depth in the timber on the trailer bed
On the underside of the trailer I used the Tamiya earth effects mixed with Tamiya thinners broken down .
Gives a really good soil appearance .This will be painted with Tamiya earth to bring out the detail.
I moved my attention on creating a better looking tarp for the Famo .
Here I painted with Mig Ammo Olive green to give like a worn canvas appearance .
Highlighling the ridges of the tarp with Olivegreen and a mix of dark yellow
I used Mig (Dark Wash)as a pin wash mixed and broken down with 502 Abetelung thinners. By doing this it flows quicker along the recess.
applied in the recesses and once dry I highlighted again with the mix of olive green and dark yellow to show a slightly worn appearance on the raised edges.
Slowly getting to the end of the tractor unit and I used black ink to seep into the tow cable .
Great for adding depth in detail once the cable is highlighted with a steel colour .
The driver had the neck area dremelled out and a hornet head test fitted .
The next stage is the figure painting .Wow , 6 months since last painting a figure.
I think I can do it
Michael

panamadan

Joined: July 20, 2004
KitMaker: 1,513 posts
Armorama: 1,449 posts
Posted: Friday, December 05, 2014 - 06:30 PM UTC
Impressive work!
Dan
Dan

joepanzer
Joined: January 21, 2004
KitMaker: 803 posts
Armorama: 740 posts

Posted: Friday, December 05, 2014 - 07:22 PM UTC
The wood on the trailer and the look of the tarp are outstanding!
airborne1
Joined: April 15, 2006
KitMaker: 915 posts
Armorama: 797 posts
Posted: Saturday, December 06, 2014 - 02:55 PM UTC
Thanks Guys for the kind words .
Michael

justsendit
Joined: February 24, 2014
KitMaker: 3,033 posts
Armorama: 2,492 posts
Posted: Saturday, December 06, 2014 - 08:49 PM UTC
The wood and canvas are looking really good! Great progress! 
mike
mike

KevPak
Joined: June 04, 2014
KitMaker: 137 posts
Armorama: 128 posts
Posted: Saturday, December 06, 2014 - 09:13 PM UTC
Excellent interior work although I wonder if the interior color shouldn't be elfenbein rather than dunkelgelb. The link to panzer colors is very useful - I can see myself referring to it in the future!

ColinEdm


Joined: October 15, 2013
KitMaker: 1,355 posts
Armorama: 1,229 posts
Posted: Sunday, December 07, 2014 - 08:45 PM UTC
Outstanding work sir!
airborne1
Joined: April 15, 2006
KitMaker: 915 posts
Armorama: 797 posts
Posted: Tuesday, December 09, 2014 - 06:22 PM UTC
Thanks for the kind words Guys .They are appreciated and are motivational to me to continue on.
Sorry for the late reply I have been head down working on the chipping component , trying to get the right look .
I may scale this back a little, possibly blend and be more subdue, more to follow .
Here is where I am at the present , painfully slow and steady work .
Michael
Sorry for the late reply I have been head down working on the chipping component , trying to get the right look .
I may scale this back a little, possibly blend and be more subdue, more to follow .
Here is where I am at the present , painfully slow and steady work .
Michael

mag135

Joined: July 08, 2006
KitMaker: 146 posts
Armorama: 128 posts

Posted: Tuesday, December 09, 2014 - 06:43 PM UTC
I think that, after the fantastic job you are making with the vehicles, it is a pity to put a "cargo insert" instead of making your own cargo
only a modest opinion
only a modest opinion
airborne1
Joined: April 15, 2006
KitMaker: 915 posts
Armorama: 797 posts
Posted: Thursday, December 11, 2014 - 06:08 PM UTC
Thanks Javia,
I found The cargo insert to be a quick easy fill.
Hoping to get some more stuff to lay in and around the load and include figures, some fun times ahead .
.
Michael
I found The cargo insert to be a quick easy fill.
Hoping to get some more stuff to lay in and around the load and include figures, some fun times ahead
.Michael
airborne1
Joined: April 15, 2006
KitMaker: 915 posts
Armorama: 797 posts
Posted: Monday, December 15, 2014 - 07:24 PM UTC
Update
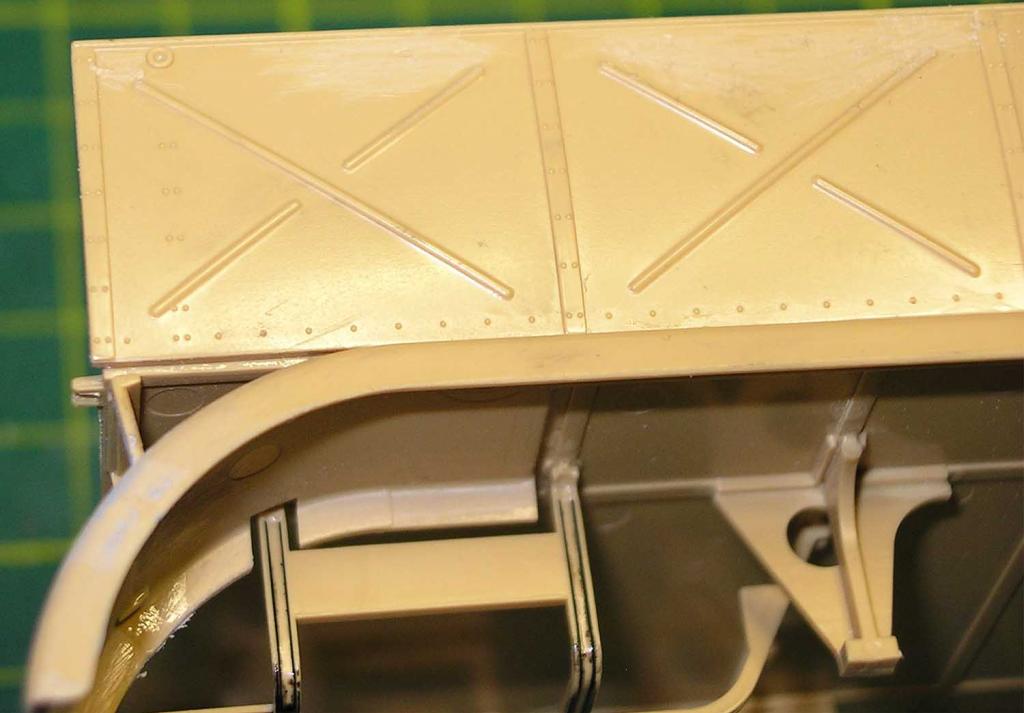
After further dry brushing and chipping I have a close up of the plastic deck.
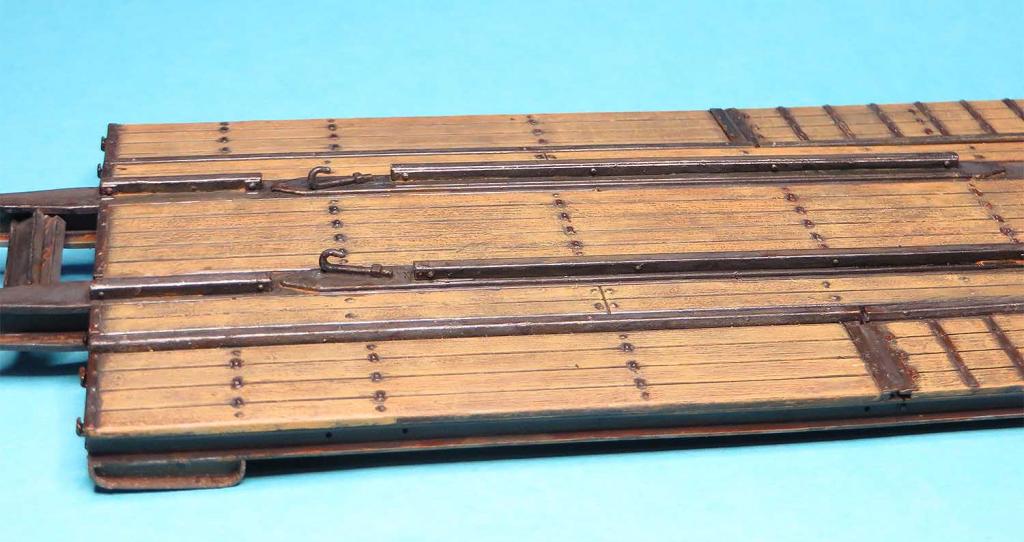
Airbrushed the trailer drivers uniform with the Andrea colour .Humbrol matt flesh was used for the face and arms for the base coat.
Oil paints will be used to highlight the face and arms .
Michael
After further dry brushing and chipping I have a close up of the plastic deck.
Airbrushed the trailer drivers uniform with the Andrea colour .Humbrol matt flesh was used for the face and arms for the base coat.
Oil paints will be used to highlight the face and arms .
Michael
SiStorey

Joined: March 14, 2014
KitMaker: 242 posts
Armorama: 161 posts

Posted: Monday, December 15, 2014 - 09:51 PM UTC
Hi Michael, love the Famo, how have you found the model so far? I know you said a little about the wood decking witht he grey base and the humbrol brown colour but what process did you use to get it looking so go as i struggle with painting wood. Oh and I'm loving the figure lol
Epic work though!
Epic work though!
airborne1
Joined: April 15, 2006
KitMaker: 915 posts
Armorama: 797 posts
Posted: Tuesday, December 16, 2014 - 08:26 AM UTC
Thanks Si,
I'll try and break this down to the best as I can .
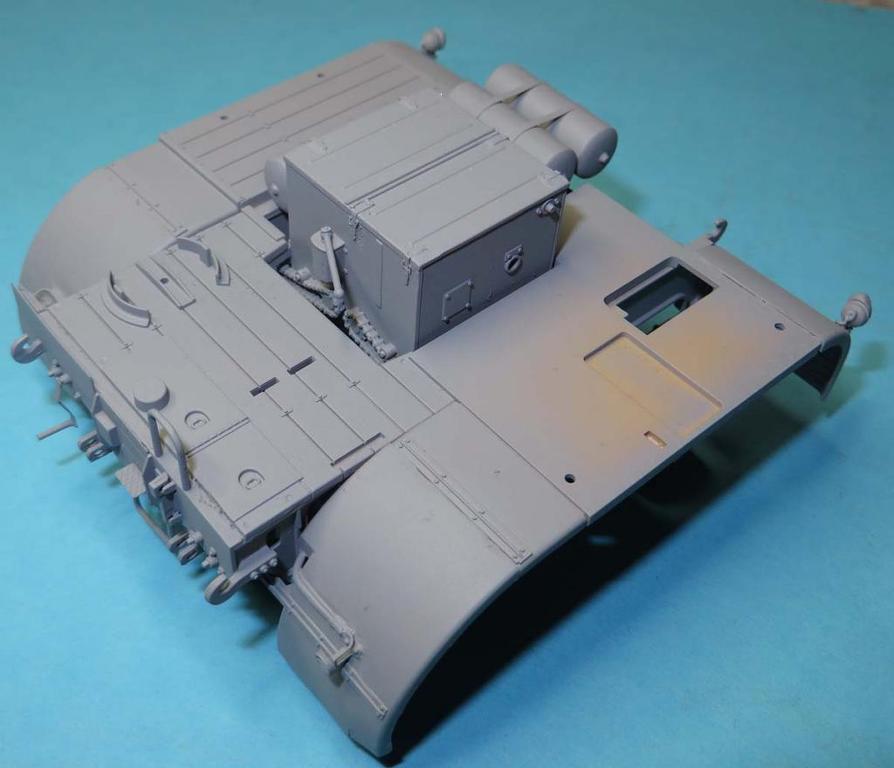
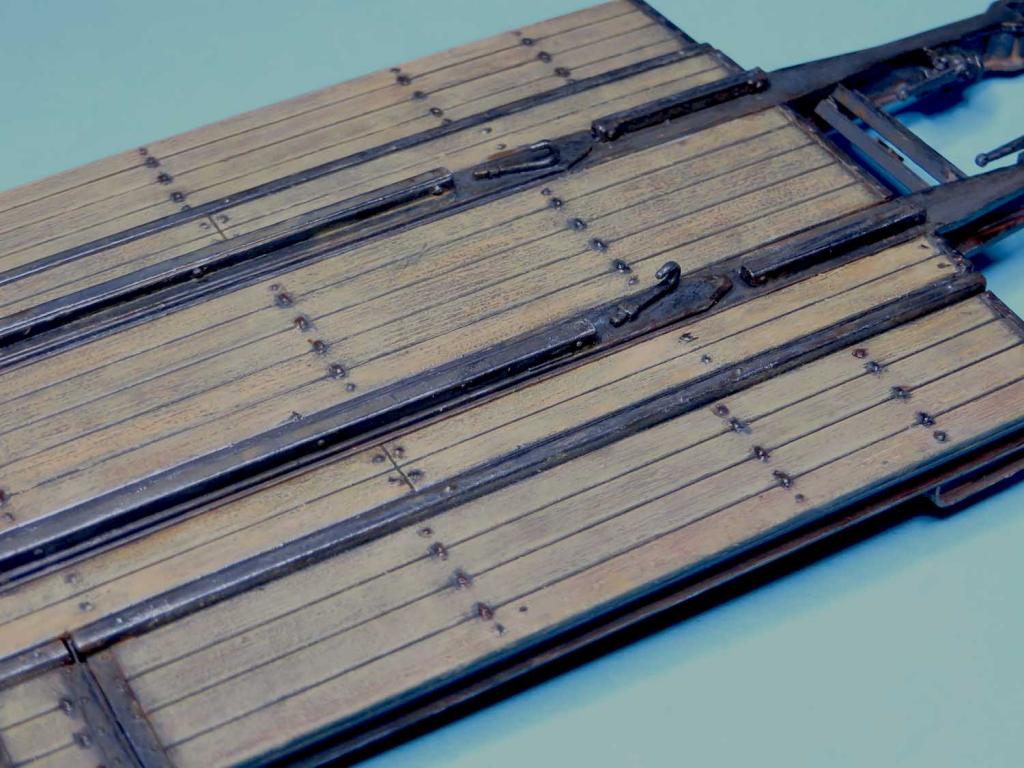
First step
get your base colour of dark grey , be it colour of choice
Ak, Mig Humbrol Velleo...ect
I use a combination of paints so there is no set rule in painting.
Step 2
The timber appearance .Humbrol 63 was hand brushed on the trailer bed
Step 3
Testers dullcote matt varnish was airbrushed to seal the trailer bed. Used this way for 16 years and it's the way it works for me . Let it sit for a day to let the varnish dry
Step 4
Get a couple of drops of Abteilung thinners in a jar and then start mixing the Mig dark wash with a 4/0 brush and work this around the trailer deck with the brush .
Use it sparingly because if it is used in large amounts the subject area will go ell crapo .The wash can be severe in areas so work up in stages .
Note the thinners breaks wash down and flows better across the subject
Step 5
Once the wash has dried go back over with the Humbrol 63 enamel in a dry brush motion using the side of the paint brush and not the tip of the brush .
use it in a backwards and forwards motion across the subject
make note the dry brushing works when there is very little paint on the brush, ie almost dry .
Step 6
use a HB pencil to highlight the steel sections .
I also like using small amounts of Testers Steel in high use areas .
Step 7
go over the deck with oils broken down with a couple of drops of Abteilung thinner , and use in small areas on your subject to bring out the highlights like bolt heads .
In this section you may want to go back and use some of the base coat colours to fix up any areas when you may have gone over a spot when the timber is not to show.
Step 8
Get some pigments and mix with methylated spirits and use a 4/0 brush and apply in small areas of the model. I have not got to this stage yet
here is what was used .
Hope it helps
Michael
I'll try and break this down to the best as I can .
First step
get your base colour of dark grey , be it colour of choice
Ak, Mig Humbrol Velleo...ect
I use a combination of paints so there is no set rule in painting.
Step 2
The timber appearance .Humbrol 63 was hand brushed on the trailer bed
Step 3
Testers dullcote matt varnish was airbrushed to seal the trailer bed. Used this way for 16 years and it's the way it works for me . Let it sit for a day to let the varnish dry
Step 4
Get a couple of drops of Abteilung thinners in a jar and then start mixing the Mig dark wash with a 4/0 brush and work this around the trailer deck with the brush .
Use it sparingly because if it is used in large amounts the subject area will go ell crapo .The wash can be severe in areas so work up in stages .
Note the thinners breaks wash down and flows better across the subject
Step 5
Once the wash has dried go back over with the Humbrol 63 enamel in a dry brush motion using the side of the paint brush and not the tip of the brush .
use it in a backwards and forwards motion across the subject
make note the dry brushing works when there is very little paint on the brush, ie almost dry .
Step 6
use a HB pencil to highlight the steel sections .
I also like using small amounts of Testers Steel in high use areas .
Step 7
go over the deck with oils broken down with a couple of drops of Abteilung thinner , and use in small areas on your subject to bring out the highlights like bolt heads .
In this section you may want to go back and use some of the base coat colours to fix up any areas when you may have gone over a spot when the timber is not to show.
Step 8
Get some pigments and mix with methylated spirits and use a 4/0 brush and apply in small areas of the model. I have not got to this stage yet
here is what was used .
Hope it helps
Michael
SiStorey
Joined: March 14, 2014
KitMaker: 242 posts
Armorama: 161 posts
Posted: Tuesday, December 16, 2014 - 01:08 PM UTC
That's a brilliant little step by step, thank you so much for that, my mind is now enlightened now to how to paint wood. Many thanks Michael
jrutman
Joined: April 10, 2011
KitMaker: 7,941 posts
Armorama: 7,934 posts
Posted: Wednesday, December 17, 2014 - 07:50 PM UTC
I don't know how I missed this up till now. Brilliant work so far. Looks great. Love the rear portion of the trailer.
J
J
airborne1
Joined: April 15, 2006
KitMaker: 915 posts
Armorama: 797 posts
Posted: Tuesday, December 23, 2014 - 07:36 PM UTC
Guys again , thanks for the kind words .
Merry Christmas
It has been near a year since starting this thread and we have the next instalment of images on the front trailer unit . Still not finished on the front trailer, more work to follow .
Here they are
Michael
Merry Christmas
It has been near a year since starting this thread and we have the next instalment of images on the front trailer unit . Still not finished on the front trailer, more work to follow .
Here they are
Michael
airborne1
Joined: April 15, 2006
KitMaker: 915 posts
Armorama: 797 posts
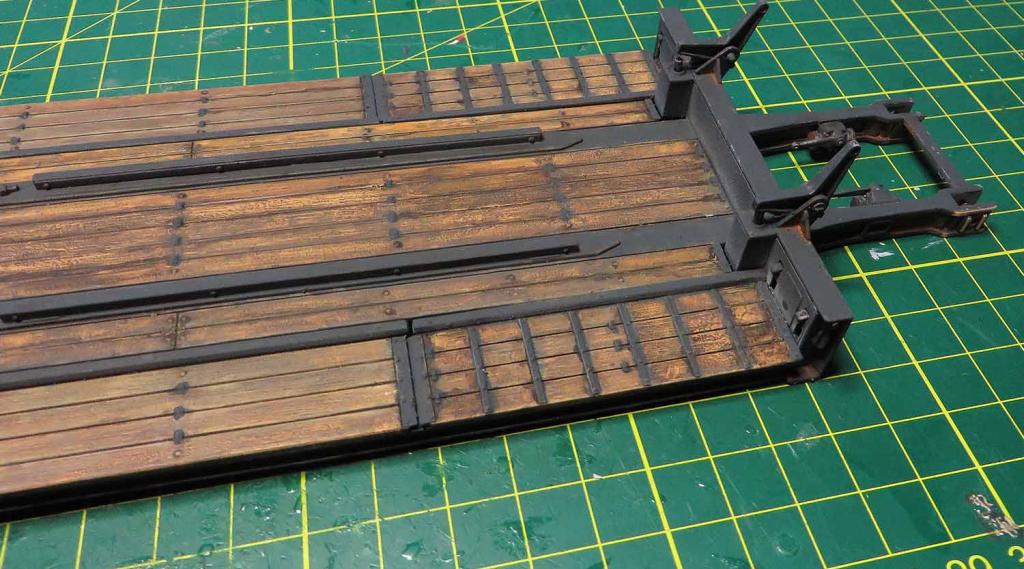
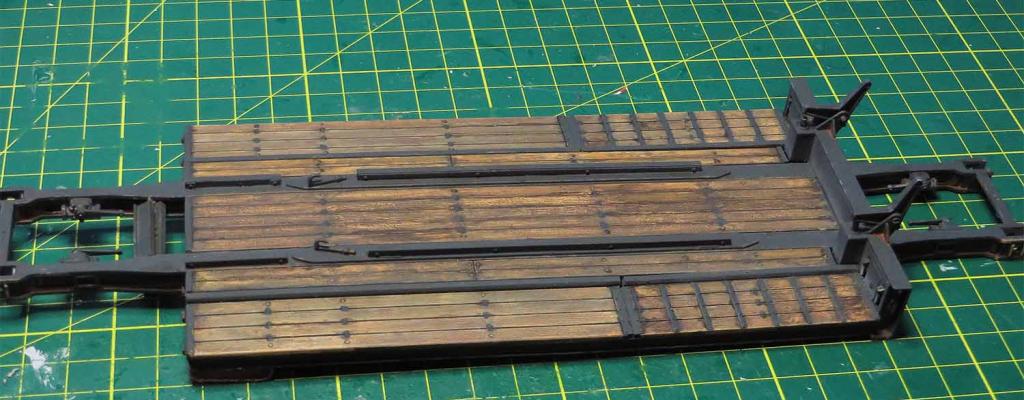
Posted: Saturday, December 27, 2014 - 07:20 PM UTC
Hello again,
More progress. The trailer has been screwed together to bring the front and back units together with the trailer bed. The jacks and shovels have been trimmed of all the plastic fittings and changed with brass enhancements.
The tools will be painted and detailed separately before being glued in place .
More to follow .
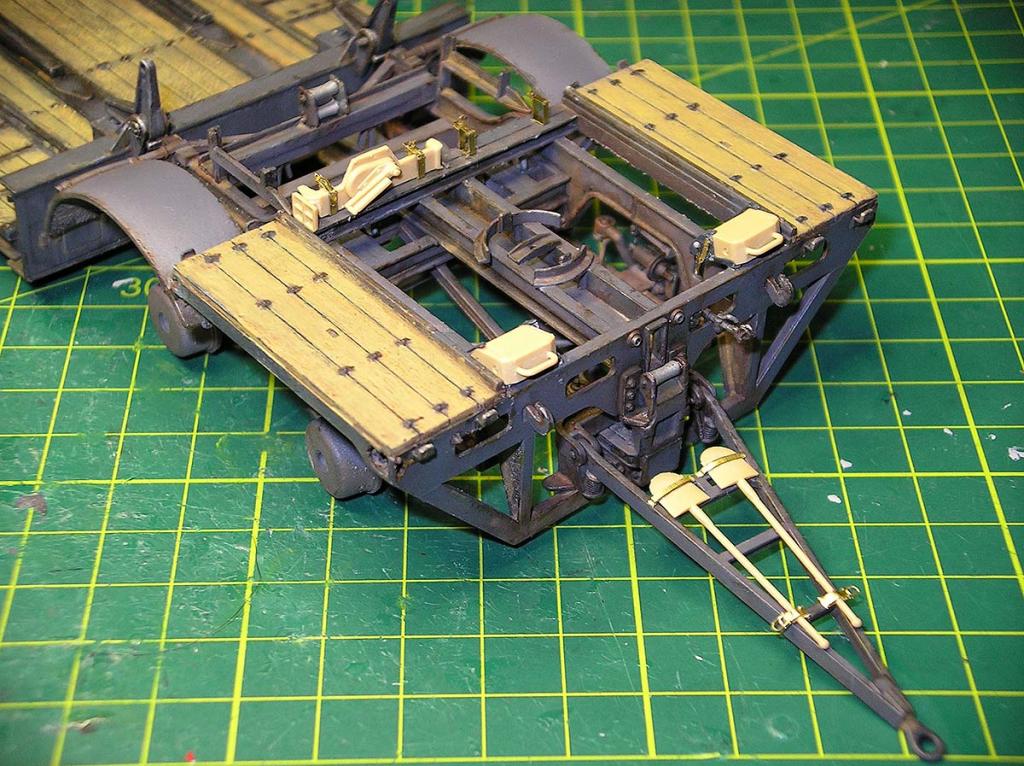
airborne1
Joined: April 15, 2006
KitMaker: 915 posts
Armorama: 797 posts
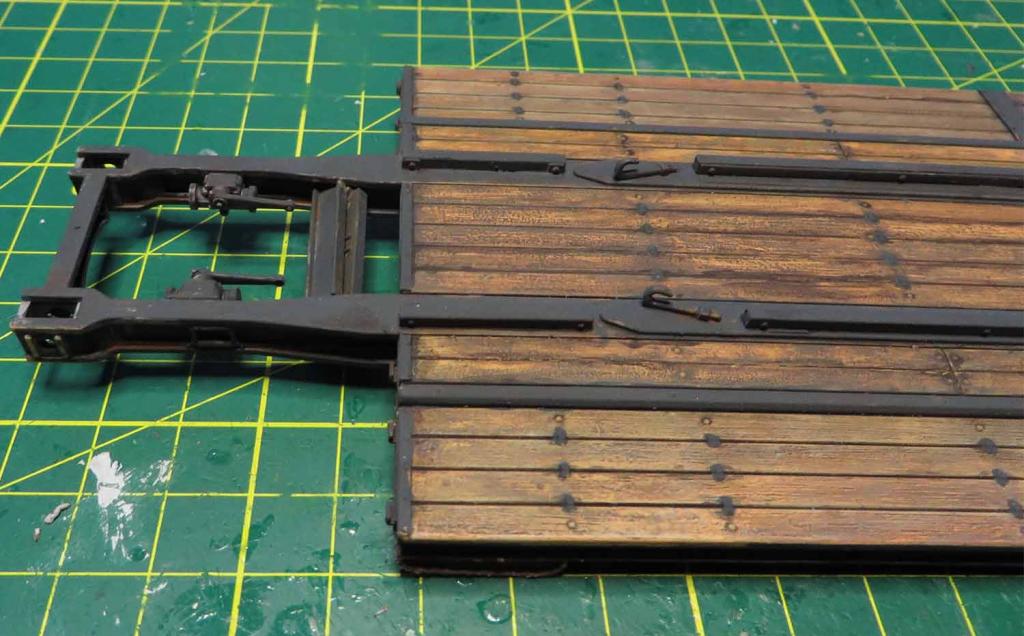
Posted: Monday, December 29, 2014 - 07:01 AM UTC
Back again
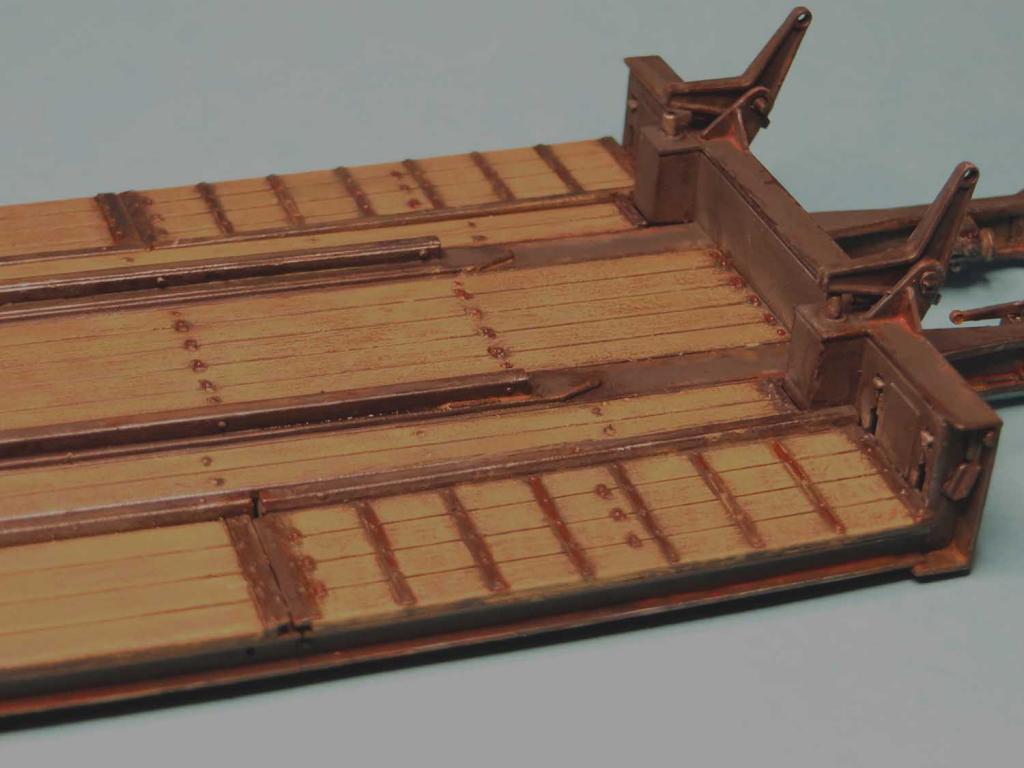
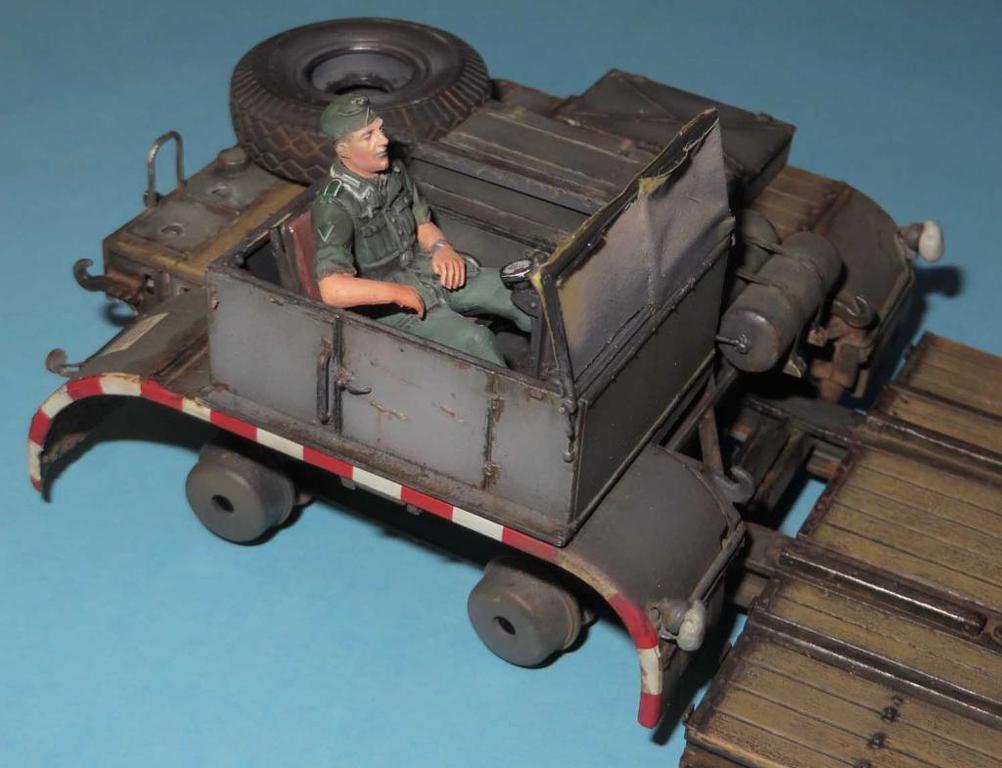
More progress shots on the ramps and the driver in the rear compartment .
Still more paint touch ups and he has to get his collar patch's and rank insignia applied. It may not be seen when the roof is on but I know It's there .
Happy New year
Cheers
Michael
More progress shots on the ramps and the driver in the rear compartment .
Still more paint touch ups and he has to get his collar patch's and rank insignia applied. It may not be seen when the roof is on but I know It's there .
Happy New year
Cheers
Michael
justsendit
Joined: February 24, 2014
KitMaker: 3,033 posts
Armorama: 2,492 posts
Posted: Monday, December 29, 2014 - 07:25 AM UTC
Nice updates. You are killin' it!
mike
mike
airborne1
Joined: April 15, 2006
KitMaker: 915 posts
Armorama: 797 posts
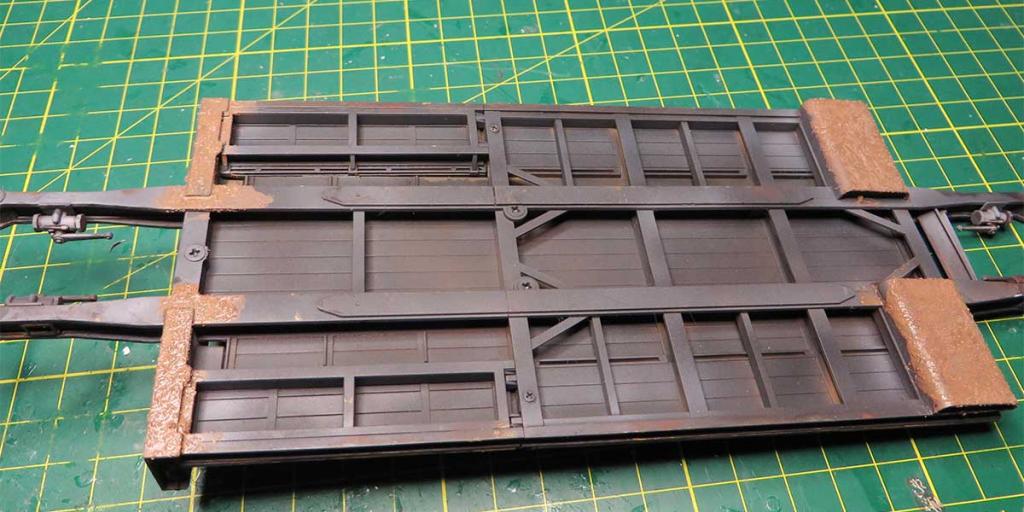
Posted: Friday, January 02, 2015 - 11:27 AM UTC
Thanks Mike,
Small update
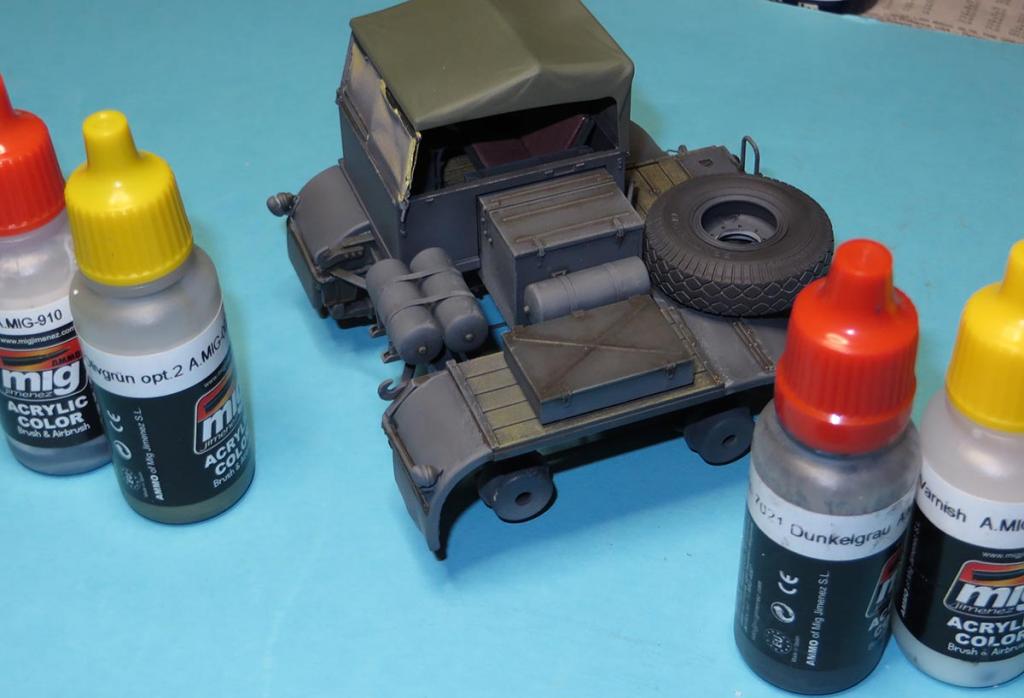
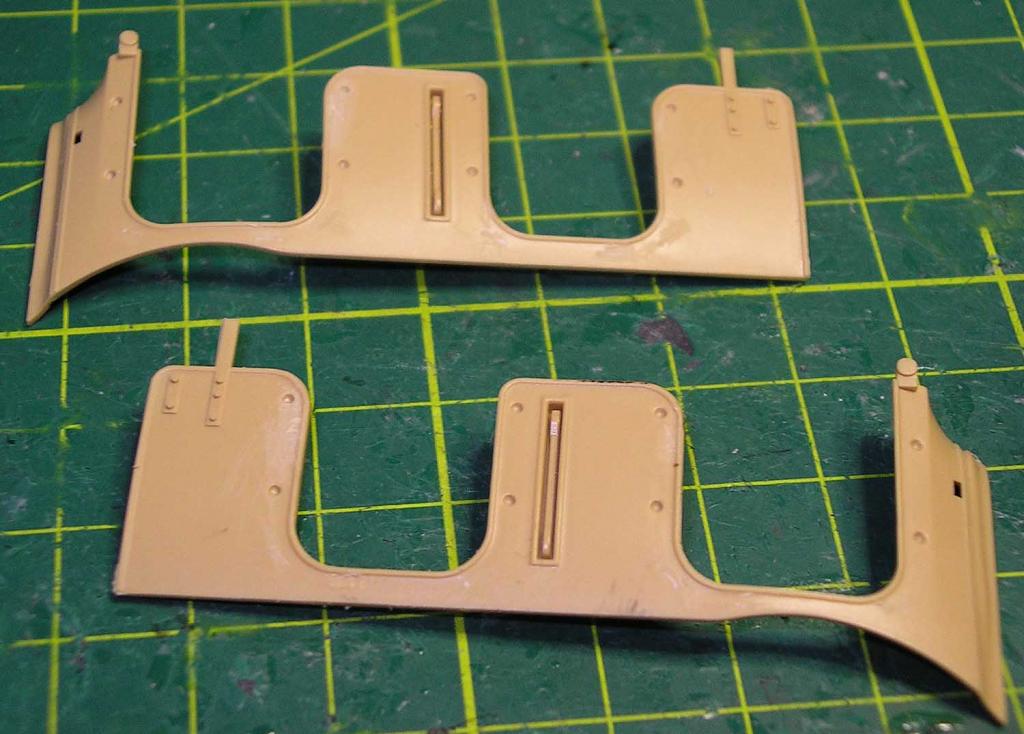
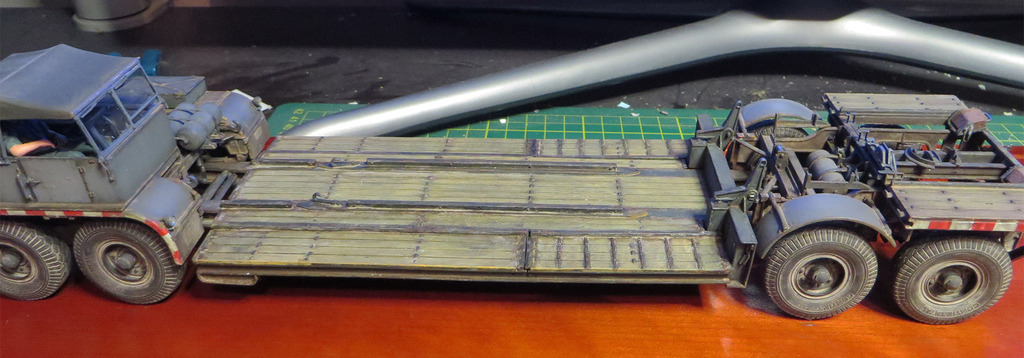
Trimmed off the plastic grab handles off the famo tray and the sides of the troop compartment .
Also included the pipework for the air tanks on the trailer.
Had a hell of a time trying to find some reference shots because it is rare on the internet .
Pretty much winged it for what I thought would be the way it worked.
Anyway here are some images.
Moving forward more to come

Michael
Small update
Trimmed off the plastic grab handles off the famo tray and the sides of the troop compartment .
Also included the pipework for the air tanks on the trailer.
Had a hell of a time trying to find some reference shots because it is rare on the internet .
Pretty much winged it for what I thought would be the way it worked.
Anyway here are some images.
Moving forward more to come
Michael
airborne1
Joined: April 15, 2006
KitMaker: 915 posts
Armorama: 797 posts
Posted: Saturday, January 10, 2015 - 08:34 AM UTC
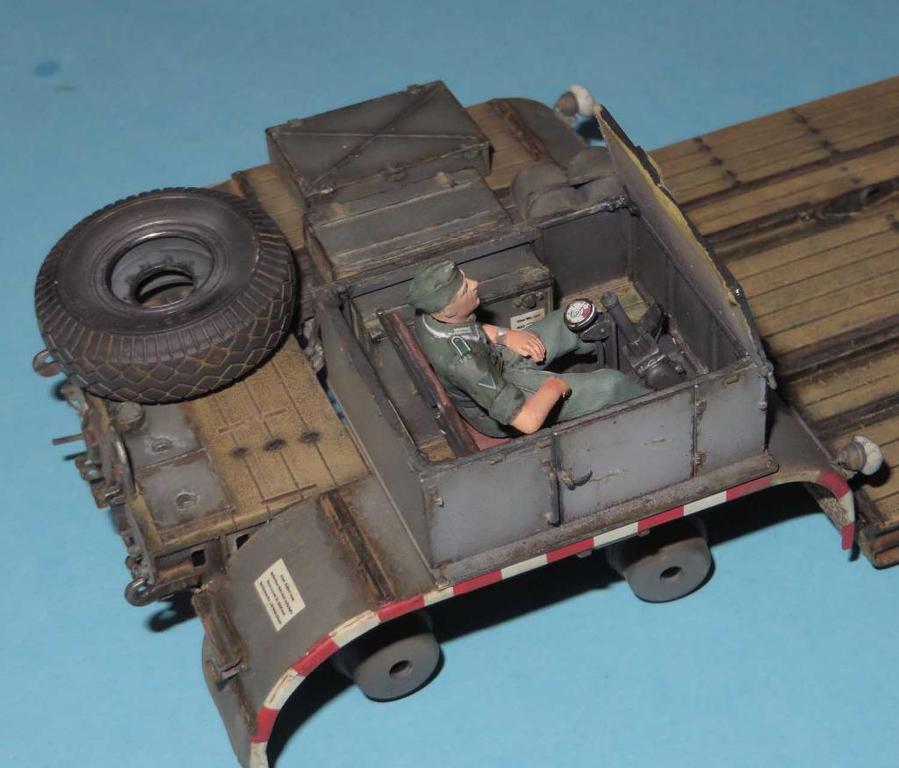
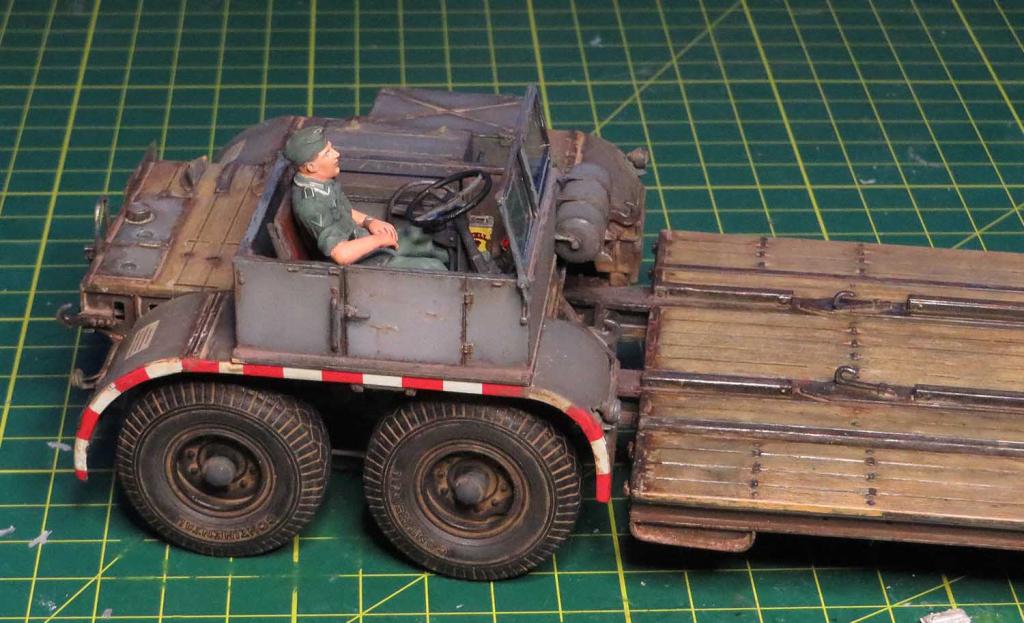
Hello again,
Just finished applying the decals to the driver. There is still more work to do .
Once the roof cover is on he may not be seen as clearly but at least we know he fits the part.
Michael
Just finished applying the decals to the driver. There is still more work to do .
Once the roof cover is on he may not be seen as clearly but at least we know he fits the part.
Michael
airborne1
Joined: April 15, 2006
KitMaker: 915 posts
Armorama: 797 posts
Posted: Thursday, January 15, 2015 - 07:00 PM UTC
back again with a small update
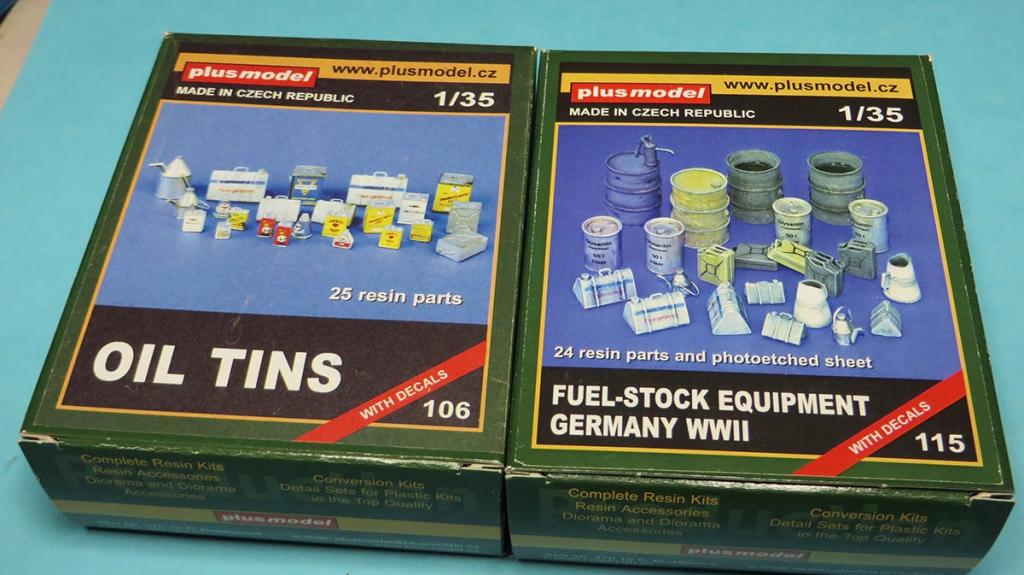
Managed to pick up the Plus Models oil and fuel cans .
Will drop a few of these around the cargo tray and in the rear of the trailer cab .
They will break up the resin load well .
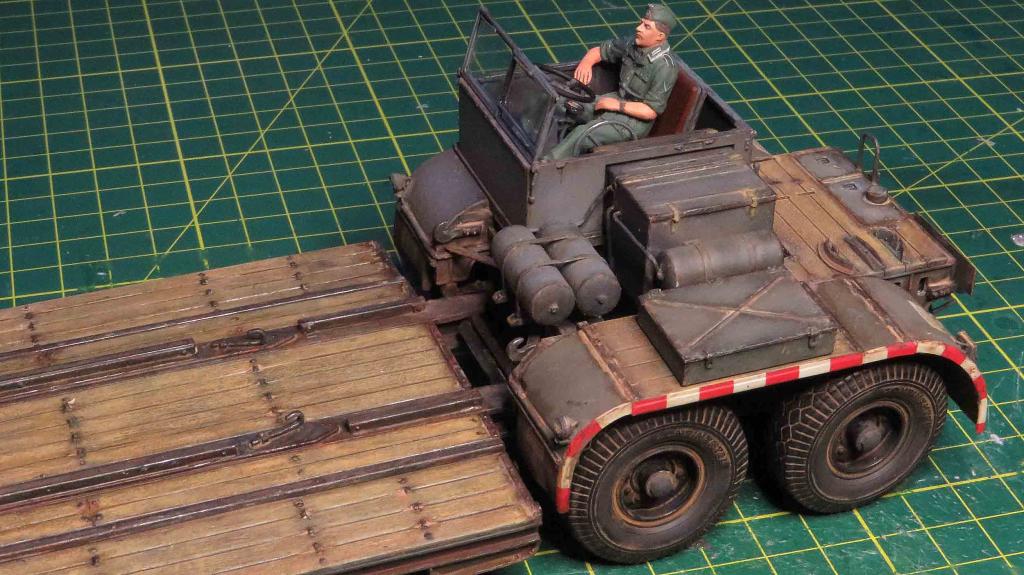
The driver is finally done, apart from a little weathering inside the cab he is ready to be glued in place .
I also included a lead foil cover over the rear cable reel .From looking at the references in books and on the net it looks like it remained covered until they used it
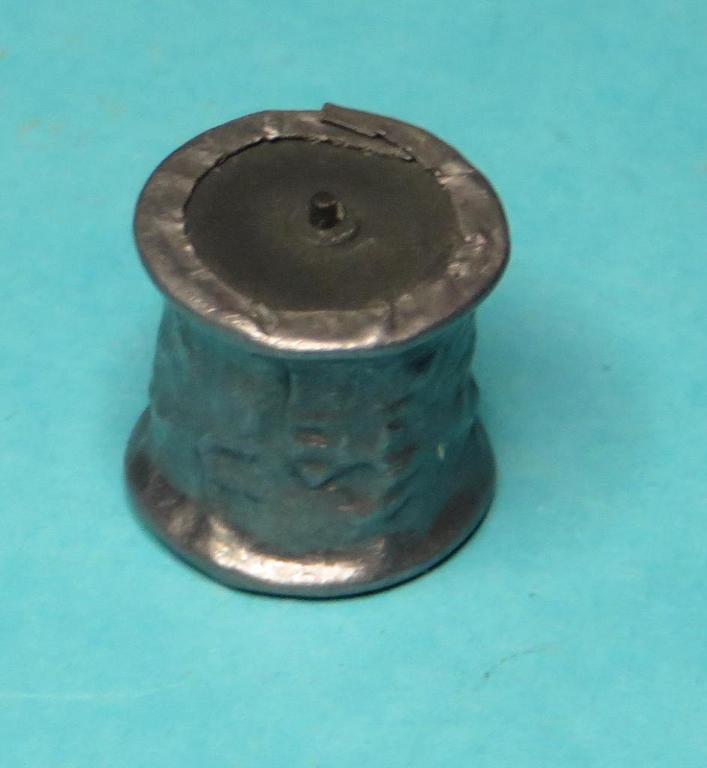
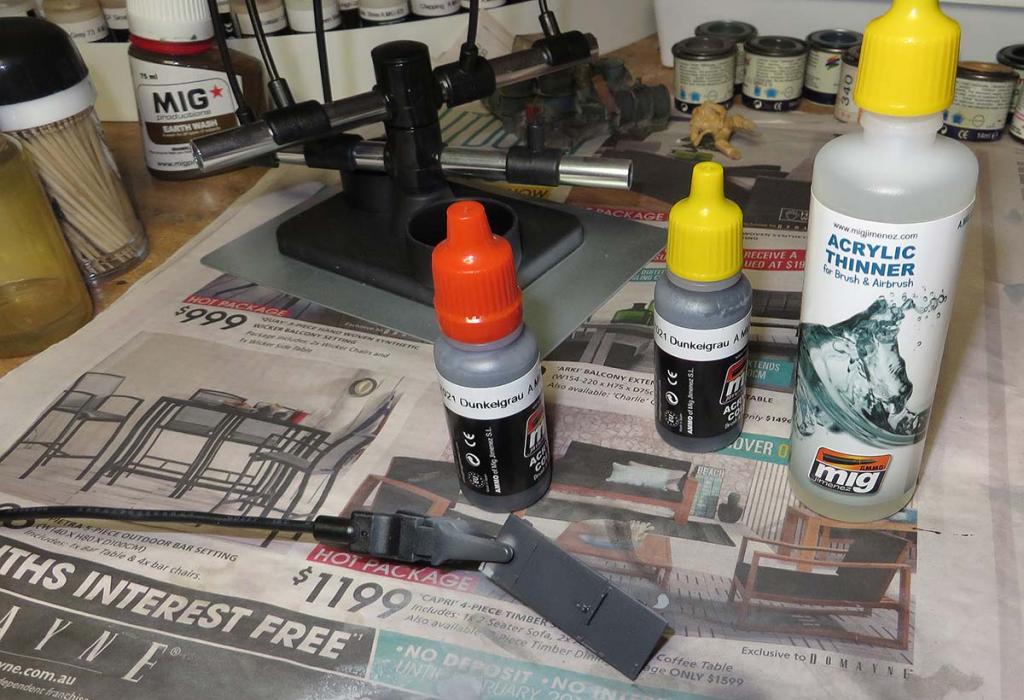
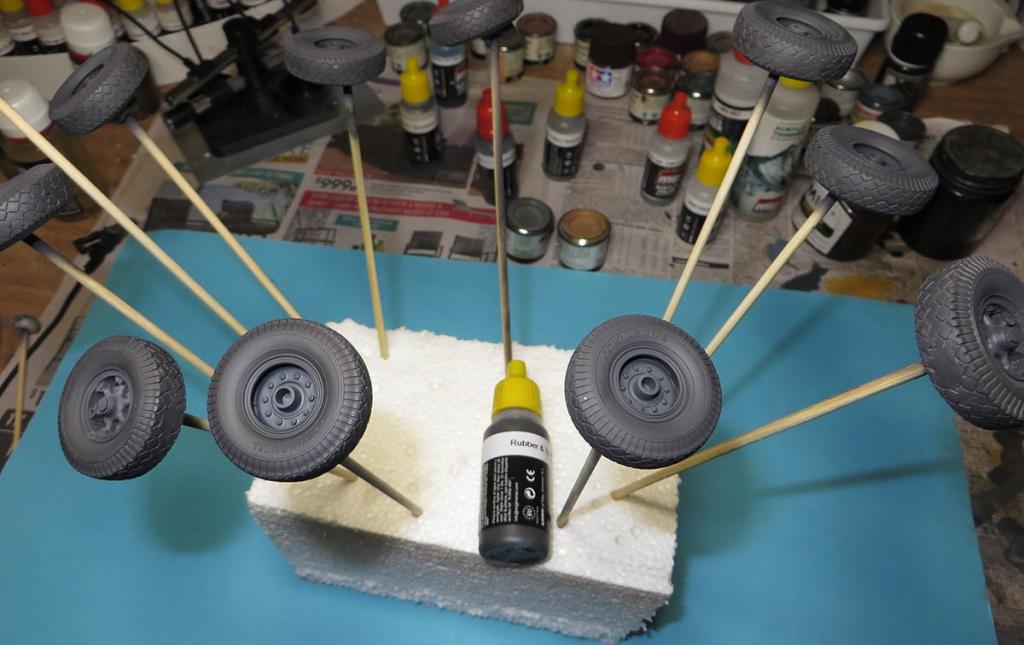
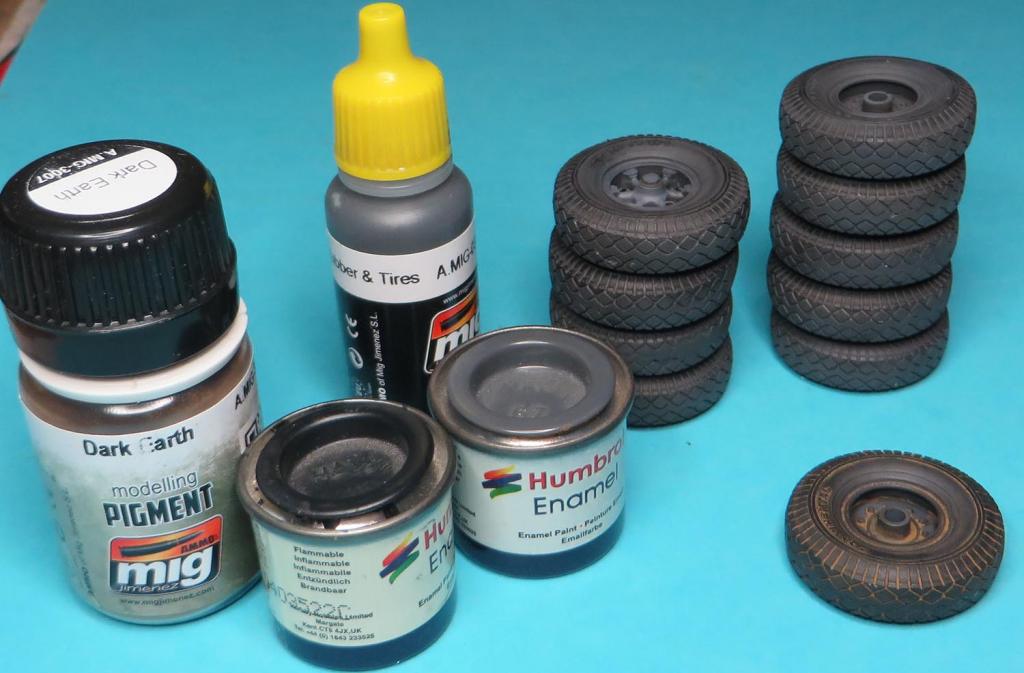
Moving on I started weathering the wheels .
The tyres received a base coat of the mig ammo tyre black .
This was followed by a pin wash with a fine brush of the Ammo dark earth pigments mixed with methylated spirits .
To bring the detail out on the tyre a coat of Humbrol matt black and panzer grey was mixed together and drybrushed across the tyre.
1 down 9 to go
Michael
Managed to pick up the Plus Models oil and fuel cans .
Will drop a few of these around the cargo tray and in the rear of the trailer cab .
They will break up the resin load well .
The driver is finally done, apart from a little weathering inside the cab he is ready to be glued in place .
I also included a lead foil cover over the rear cable reel .From looking at the references in books and on the net it looks like it remained covered until they used it
Moving on I started weathering the wheels .
The tyres received a base coat of the mig ammo tyre black .
This was followed by a pin wash with a fine brush of the Ammo dark earth pigments mixed with methylated spirits .
To bring the detail out on the tyre a coat of Humbrol matt black and panzer grey was mixed together and drybrushed across the tyre.
1 down 9 to go
Michael
 |

WEB HOSTING BY


Copyright ©2021 Armorama and Kitmaker Network, a subsidiary of Silver Star Enterprises
All Rights Reserved. Please read our Conditions of Use and Privacy Policy.
All Rights Reserved. Please read our Conditions of Use and Privacy Policy.