_GOTOBOTTOM
Armor/AFV: Allied - WWII
Armor and ground forces of the Allied forces during World War II.
Hosted by Darren Baker
Darby’s Rangers M3 75mm GMC Build
Delta42
Visit this Community
Georgia, United States
Joined: August 27, 2002
KitMaker: 616 posts
Armorama: 511 posts
Posted: Sunday, February 23, 2014 - 11:58 AM UTC
In September 1943, Darby’s rangers landed at Maiori, Italy and charged inland 12 miles to seize the Chiunzi pass overlooking the Plain of Napoli and the German Army’s rear. They had 4 M3 75mm GMC Halftracks with them for support. These vehicles would pull up to the crest of the pass, fire several rounds at German targets and then retreat back down the pass before German artillery could fire back.

Ever since Dragon came out with their M3 75mm GMC Halftrack and Archer produced decals for the Ranger vehicle, this conversion has been on my list of “to-dos.”


I will be using the Dragon kit, the Archer decals, the Griffon Model M3 75mm GMC after market set, and some Tank Workshop tires for the build. There will also be lots of white plastic and parts from the scrap box before I finish.


As references, I have found 5 photos (above)of the #3 vehicle produced by Life Magazine. As far as I know, these are the only photos of the vehicles. If anyone knows of or has access to other pictures or information, it would be appreciated.

I plan to build the model in three sub-assemblies. 1)the undercarriage 2) Driver’s compartment (to include engine area) and 3) the gun compartment.

That's it for tonight. More to come later this week as I start on the undercarriage.

Questions and comments are always welcome.

Dave
pseudorealityx
Visit this Community
Georgia, United States
Joined: January 31, 2010
KitMaker: 2,191 posts
Armorama: 1,814 posts
Posted: Sunday, February 23, 2014 - 03:02 PM UTC
Looking forward to this one Dave.
kunjuro
Visit this Community
Philippines
Joined: October 27, 2013
KitMaker: 520 posts
Armorama: 488 posts
Posted: Monday, February 24, 2014 - 01:38 AM UTC
Looking forward this as well. I had read a book roughly 5-6 years ago entitled Rangers in World War II. It was one of the first WW-II books I read and it really got me interested in the lives and experiences of the men who served. I remember these four particular Halftracks from the Italian Campaign. Didn't they name them Ace of hearts, ace of spades, Ace of diamonds and ace of clubs respectively? I also vaguely remember infantry men cursing these gunners as whenever they did their scoot and shoot routine, the infantry who were dug in and could not retreat were the ones whom the angry returning german fire sought out.
panamadan
Visit this Community
Minnesota, United States
Joined: July 20, 2004
KitMaker: 1,513 posts
Armorama: 1,449 posts
Posted: Monday, February 24, 2014 - 01:59 AM UTC
Dave, I built the same project a few years ago and could find no other pics that what you have shown here. I even ought the Life magazine issue that some of the photos are credited to.
Dan
Delta42
Visit this Community
Georgia, United States
Joined: August 27, 2002
KitMaker: 616 posts
Armorama: 511 posts
Posted: Monday, February 24, 2014 - 02:12 AM UTC
Nigel - You may be right about the naming and the feelings of the Infantry. My research did not find names for the vehicles, but then I was only looking for pictures or drawings. As far as the soldiers, Infantry dislikes anything that attracts fire. LOL (Former Infantry guy, so I know)

Dan - This is a tough subject when it comes to pictures. I contacted Life magazine and these are they have in their archive. It will be an interesting build, as many of the details are going to be "educated" guesses. I've enlarged several of the pictures as best I can, and details are still hard to make out.

Just an observation before I continue with the assembly of the undercarriage. The Griffon PE set is quite extensive. As usual, there are far more PE parts than I will ever use on my model. I see no advantage in using PE parts that in no way will be seen on the model, unless it is displayed upside down or you look at it using a Dental mirror or electron microscope. Also I am not interested in removing a perfectly good plastic part just to replace it with an exact copy in PE. However if the PE part is for a feature that is not contained in the plastic model, or corrects an incorrect item, then I will most assuredly use it.

Okay, off the soapbox and on to modeling.
kunjuro
Visit this Community
Philippines
Joined: October 27, 2013
KitMaker: 520 posts
Armorama: 488 posts
Posted: Monday, February 24, 2014 - 02:34 AM UTC
So the book I read can be seen through google transcript )

Here's two books (the book I read and Darby's Rangers) that says the halftracks were named as such:

http://books.google.com.ph/books?id=Yrhh30YpKhYC&pg=PA109&lpg=PA109&dq=rangers+in+world+war+II+ace+of+spades&source=bl&ots=2jq6XXBtN5&sig=zFystmZCrM64G1ulhYCw0vjeVMg&hl=en&sa=X&ei=_lcLU9rRD8SWkQXtmYHwCw&ved=0CDsQ6AEwAQ#v=onepage&q=rangers%20in%20world%20war%20II%20ace%20of%20spades&f=false

http://books.google.com.ph/books?id=YNhZVB99J-QC&pg=PA62&lpg=PA62&dq=Darby%27s+Rangers+ace+of+spades&source=bl&ots=1gNgaWPVCA&sig=Dnybs_XQi19glVbprFW_Z9yTM9o&hl=en&sa=X&ei=5FcLU_OBOYjukAXJloD4Dg&ved=0CCYQ6AEwAA#v=onepage&q=Darby%27s%20Rangers%20ace%20of%20spades&f=false
Delta42
Visit this Community
Georgia, United States
Joined: August 27, 2002
KitMaker: 616 posts
Armorama: 511 posts
Posted: Monday, February 24, 2014 - 03:14 AM UTC
Good information Nigel.

Thanks.

Dave
CDK
Visit this Community
Massachusetts, United States
Joined: September 24, 2006
KitMaker: 358 posts
Armorama: 339 posts
Posted: Monday, February 24, 2014 - 03:37 AM UTC
Those two scans from the LIFE book look familiar.
AlanL
Visit this Community
England - East Anglia, United Kingdom
Joined: August 12, 2005
KitMaker: 14,499 posts
Armorama: 11,675 posts
Posted: Monday, February 24, 2014 - 03:44 AM UTC
Hi Dave,

I haven't see many of these built yet so will follow along with interest.

Cheers

Al
gmat5037
Visit this Community
Hawaii, United States
Joined: November 24, 2008
KitMaker: 103 posts
Armorama: 102 posts
Posted: Monday, February 24, 2014 - 07:28 AM UTC
After the debacle at Cisterna, the Rangers were absorbed by the First Special Service Force along with the four M3 75mm GMCs which later participated in Operation Dragoon.
There are a few photographs in The Supercommandos: First Special Service Force, 1942-1944 an Illustrated History. You can see the playing card symbols used.
First Airborne Task Force by Michel de Trez has one very blurred, a partial side rear shot and a good forward shot of an M3 75mm GMC. This one does not have the mine racks nor the reinforcing? straps at the rear, but you can see some detail of the empty rear racks.

Best wishes,
Grant
Delta42
Visit this Community
Georgia, United States
Joined: August 27, 2002
KitMaker: 616 posts
Armorama: 511 posts
Posted: Tuesday, February 25, 2014 - 02:28 AM UTC
Undercarriage:

Steps #1 - #7 were built as stated in the Dragon instructions, except for the following.

In steps #2 and #3, the drain holes in the boogie assembly parts #32, were made using the etched brass parts from the Griffon set. The instructions show to drill out the holes and then place the brass parts over the holes. I elected to glue the brass in place and then once that was dry to drill out the holes and clean them up using an Xacto knife. This seemed much more controlled and kept me from making the holes too large.


I also attached the etched brass exhaust pipe mount to the appropriate boogie assembly.


I decided to use the Hussar M3 tires instead of the Tank Workshop tires. No particular reason other than the Hussar tires had less resin to clean up. These were substituted for the kit ones.

In step #6, I assembled the roller as shown with the exception of sanding off the plates on the front of the bumper for the roller mounts. These were not there on the real vehicle. NOTE: Be sure to shorten the locator pins on the roller mounts when you do this. Otherwise, they will stick out from the bumper.


Axels and boogie mounts were attached to the frame per the instructions. The one modification I did make, was to cut short lengths of Evergreen plastic tubing to place between the boogie wheel frames. I did this because the two posts on the frames do not meet well and therefore make it difficult to glue. The addition of the tubing allows for a better fit. You can see these tubes(dark grey)in this pictures.


This is a picture of the completed undercarriage. The wheels, track, boogies, drive and idler sprockets are just dry fitted.


I also did not do anything to the motor accept assemble it per the instructions since I plan to have the hood closed.
That is pretty much it for the undercarriage, now on to the cab.

As always, questions and comments are welcome.

Dave B
CDK
Visit this Community
Massachusetts, United States
Joined: September 24, 2006
KitMaker: 358 posts
Armorama: 339 posts
Posted: Tuesday, February 25, 2014 - 04:17 AM UTC
Well Dave, that's great work as usual everything looks clean and well done. Thing is, and I hate to be the guy to tell you but since I did the research for that transfer set...

if you look at the photos carefully, the Darby's Rangers track has the early style bogies without the large oval lightening hole.

It also has the early single idler spring, not the dual spring that is included in the kit. (Tank Workshop makes one)


I mean hey, don't let that stop you and feel free to ignore it and build on, I aint here to knock your stuff or try to be 'that' guy but I thought I'd just point it out.


You can see an earlier build of this vehicle by Bob Britt where I helped him with a few of the other details and tweaks:

http://planetarmor.com/forums/showthread.php?t=6633
210cav
Visit this Community
Virginia, United States
Joined: February 05, 2002
KitMaker: 6,149 posts
Armorama: 4,573 posts
Posted: Tuesday, February 25, 2014 - 04:23 AM UTC
Dave-- coming nicely along
Rangers, Lead The way!
DJ
Delta42
Visit this Community
Georgia, United States
Joined: August 27, 2002
KitMaker: 616 posts
Armorama: 511 posts
Posted: Tuesday, February 25, 2014 - 05:01 AM UTC

Quoted Text

Darby's Rangers track has the early style bogies without the large oval lightening hole.

It also has the early single idler spring, not the dual spring that is included in the kit. (Tank Workshop makes one)


Never feel reluctant to point out where I can fix things that are wrong. That's why I post here to tap into the vast knowledge.

I will go back and fix those later. Right now, I am in a fierce battle with minuet PE parts and a soldering iron

The "Cab" area is taking a good bit of work. I may post some in-progress photos tomorrow.

"RANGERS Lead the Way"....I always heard it was RANGERS Eat Their Young, but what do I know.

Dave
Delta42
Visit this Community
Georgia, United States
Joined: August 27, 2002
KitMaker: 616 posts
Armorama: 511 posts
Posted: Wednesday, February 26, 2014 - 04:09 AM UTC
The correction on the undercarriage is coming along. It should be done by this evening. I will post pictures once it is done.

The Cab area required a lot of PE work. The floorboard on the driver’s side was replaced with the pedals. The water tank, heater and dashboard were converted. There are also various other PE parts that are added behind the passenger seat and under the floorboard.


I removed the molded on gas can mounts and replaced them with the PE ones. This is a task that I always dreaded, because I always seemed to take too much off, including rivet and other detail. So this time took extra special care and a long time and did a much better job. The holes were filled with plastic sheet and then finished off with Squadron White putty thinned with Testor’s Plastic cement. This makes the putty much easier to work with.


Next I started on the radio. This kit does not come with one, but there is one provided in the PE set. I opted not to use the PE one after I saw how difficult it would be to assemble. So I went to scrap box and found a radio from another Dragon kit that I had build previously. It was modified to be realistic and the PE radio mount was used. It will be mounted between the two seats, as that seems to be the appropriate location according to the various references I have.

More later.

Dave
Delta42
Visit this Community
Georgia, United States
Joined: August 27, 2002
KitMaker: 616 posts
Armorama: 511 posts
Posted: Wednesday, February 26, 2014 - 12:28 PM UTC
Radio detail. Sorry for the bad picture.


These are pictures of the corrected springs and drain holes that Ken pointed out.


Progress on the cab, including the fold down windshield armor.


As always, questions and comments are welcome.

Dave
bat-213
Visit this Community
Canada
Joined: December 30, 2011
KitMaker: 902 posts
Armorama: 788 posts
Posted: Wednesday, February 26, 2014 - 05:49 PM UTC
great work on the kit.?did you make the srings?if so how do you do it. very nice work.
Delta42
Visit this Community
Georgia, United States
Joined: August 27, 2002
KitMaker: 616 posts
Armorama: 511 posts
Posted: Thursday, February 27, 2014 - 02:13 AM UTC
Hey Roy,

I did make the springs from scratch.

I used these pictures from the Hunnicutt Halftrack book for reference.


The springs are actually very easy to make if you have the parts available. They are made from the idlers wheel tension screw assembly from an old Tamiya halftrack kit (dark green part in picture), the spring assembly from the Dragon kit, some copper wire and a piece of plastic rod.


I started by cutting down the Dragon kit spring as shown by the 3 black lines. Then I reassembled the parts.


Next I drilled out the ends (shown by arrows) to fit the plastic rod. I cut off the rod part so that only the nut was left and glued it to the bolt/hub. (It will be easier to see in the picture following this one)


Once that is done, I wrapped the wire around another piece of the same size wire to form the spring.
After measuring and cutting the rod to length, I cut down the spring to fit. (be sure to use a metal file to flatten the ends of the spring for a more realistic look.)


Last step is to just assemble all of the parts.


Hope this answers your question.

Dave
Delta42
Visit this Community
Georgia, United States
Joined: August 27, 2002
KitMaker: 616 posts
Armorama: 511 posts
Posted: Friday, February 28, 2014 - 04:34 AM UTC
The cab is basically finished now. I will add the tools, dashboard, gas cans and doors after the initial painting. A lot of this is because I find it easier to paint some things before they are attached to the finished model. Personal flaw on my part.

Here are some pictures of the cab dry fitted to the undercarriage. Note the field-mod gun mount on the hood. This is my best guess based on the photos I have. Also from the pictures, it appears that the rearview mirror mount is on the cab, but the mirror is missing. So I am building mine that way.


Here are closer pictures of the gun and mirror mounts.


Some pictures of the parts that are finished, but not attached to the cab.


Next up is the gun compartment. I expect this to take the longest since it is by far the most complicated in terms of PE and scratch building. I will try to include dimensions of anything I modify or scratch build when possible.

The masses are being unusually quiet

If I am posting too much information and pictures, let me know. I just know when I follow builds, I like lots of explanation and photos, so that's what I am trying to do here.

Till next week......

Questions and comments are welcome.

Dave
pseudorealityx
Visit this Community
Georgia, United States
Joined: January 31, 2010
KitMaker: 2,191 posts
Armorama: 1,814 posts
Posted: Friday, February 28, 2014 - 04:45 AM UTC
Dave, it's looking good. I've been reading along, but don't know enough to comment on anything. See you tomorrow.

The .50 mount on the hood looks right according to the photos. I won't how that worked when they had to open the hood.
Delta42
Visit this Community
Georgia, United States
Joined: August 27, 2002
KitMaker: 616 posts
Armorama: 511 posts
Posted: Friday, February 28, 2014 - 04:48 AM UTC

Quoted Text

I won't how that worked when they had to open the hood.


I'm guessing they only opened one side at a time.
AlanL
Visit this Community
England - East Anglia, United Kingdom
Joined: August 12, 2005
KitMaker: 14,499 posts
Armorama: 11,675 posts
Posted: Friday, February 28, 2014 - 07:14 PM UTC
Hi Dave,

Excellent work, the detail looks terrific. I remember now why I hesitated to get one of these .

You should have a real gem of a build once done.

Cheers

Al
Delta42
Visit this Community
Georgia, United States
Joined: August 27, 2002
KitMaker: 616 posts
Armorama: 511 posts
Posted: Tuesday, March 04, 2014 - 10:29 AM UTC
Gun Compartment:

The very first dilemma I encountered was the rear panel of the compartment. Since the Rangers added a storage bin on the back, I knew I would have to remove all of the precast plastic location items for the two back storage boxes and the bucket.

I conclude this was a lot more work than I really wanted to do. I came up with the idea to look at my Dragon M3A1 kit. It has two rear panels. One for the M3 and one for the M3A1 options. Since I have two of these kits, I decided to use the M3A1 rear panel for my M3 75mm GMC build. The only problem would be to add the gas tank mounting/reinforcing structures on the inside of the panel. I did this by using the M3 75mm panel as a guide.


I decided to use the lower part of the rear compartment door seat that is provided in PE. It is a better representation than the kit version. Also I am using replacement resin gas tanks from an old Trakz M3 75mm conversion.

The walls and floor were assembled, and then the gas tanks, storage boxes, seats and water cans were installed. I also filled the locating holes for the cleaning rods on the top of the side walls.


The three major sub assemblies once dry fitted, begin to look like a halftrack.


Next up is the large storage box on the back of the vehicle which will be entirely scratch built.

Then I will begin assembly of the gun and gun shield.

All questions and comments are welcome as always.

Dave
Delta42
Visit this Community
Georgia, United States
Joined: August 27, 2002
KitMaker: 616 posts
Armorama: 511 posts
Posted: Thursday, March 06, 2014 - 09:46 AM UTC
Rear Storage Bin:

I started out by doing some measuring on the model and then studying the photos. My copies of the photos aren’t really that good, and when I tried to enlarge them they get very grainy. Plus they are very dark, and for that reason detail is hard to see in them. So what I have is my best guess based on that information.

I assumed (and I know what you are thinking) that all framing and ribbing/bracing was done with steel strapping and angle iron. The back, sides and bottom could have been steel sheet or wood sheets. I prefer to think it was wood sheets as steel would have been heavy and hard to come by. The wood could come from packing crates.

Here are the dimensions and plastic I used to construct the bin. Note that all bracing was cut long and then sanded or cut to size once assembled. This is much easier than possibly cutting it too short and having to cut more.


Here is a picture of all of the parts prior to assembly. Note a small notch in the bottom frame. This is so it will fit around the hardware of the rear door. I guess they could have removed the hardware, but I’m betting they were lazy and just fit around it.


These are several pictures of the assembled bin. Dry fitting confirms it mates up perfectly. The four rear under braces will be mounted once the bin is glued to the model. These braces are 14/16ths inches long. Also cut longer than need so they can be adjusted once mounted.


I still have some cleaning to do once the bin has cured overnight, but it is basically done. Once mounted, I will determine what to put in it and hang off of it. Again I will try to go as much by the pictures as I can.

That's it for now. As always, your questions and comments are welcome.

Dave
HEINE-07
Visit this Community
Ohio, United States
Joined: February 28, 2007
KitMaker: 392 posts
Armorama: 198 posts
Posted: Thursday, March 06, 2014 - 10:20 PM UTC
Wow. It is great to fall in with the likes of Nigel, Dan, Grant, Jesse, Ken, Alan, DJ, Roy, and yourself, Dave.

I fell in love with those canon half-tracks in Italy the moment I saw one rounding a cliff-road when the TV movie: "The Execution of Private Slovak," was shown, as a child. This was a 105mm, and it appeared again in "Kelly's Heroes." Back then, I never knew anything different, with regard to the Rangers. As a thirteen-year old, I got 'SACREDLY CONFIRMED' a modeler upon seeing the grown man, J Carson [whom has recently re-appeared at our modeling club, "CSM," after decades and decades of absence], build this sort of weapon as a conversion, in our local model club. During the mid-70's, Mom dropped me off there downtown, and picked me up at the Frische's restaurant some blocks away, later that night…each month…way back then.

My Uncle served in the 1st Armored Division, and in later years I learned how C Co. of the 81st Rcn. Bn. went through Africa, and on to Pisa, with those little T-30 Pack howitzers mounted in the half-tracks. One actually shot a pillar out of the leaning tower, as Jerry had observers up there.

I heard how everyone got out of the half-track and sat on the front bumper when advancing up a mountain curve, as the front tires would have otherwise lifted so far off the ground that the vehicle would not turn.

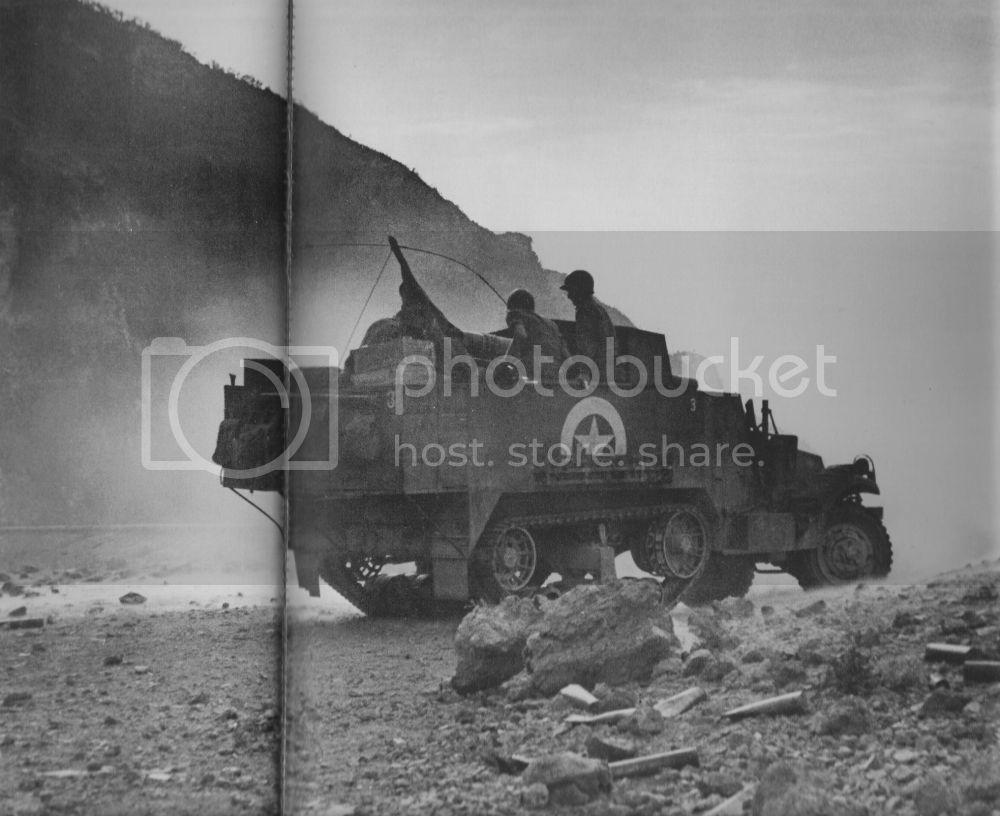
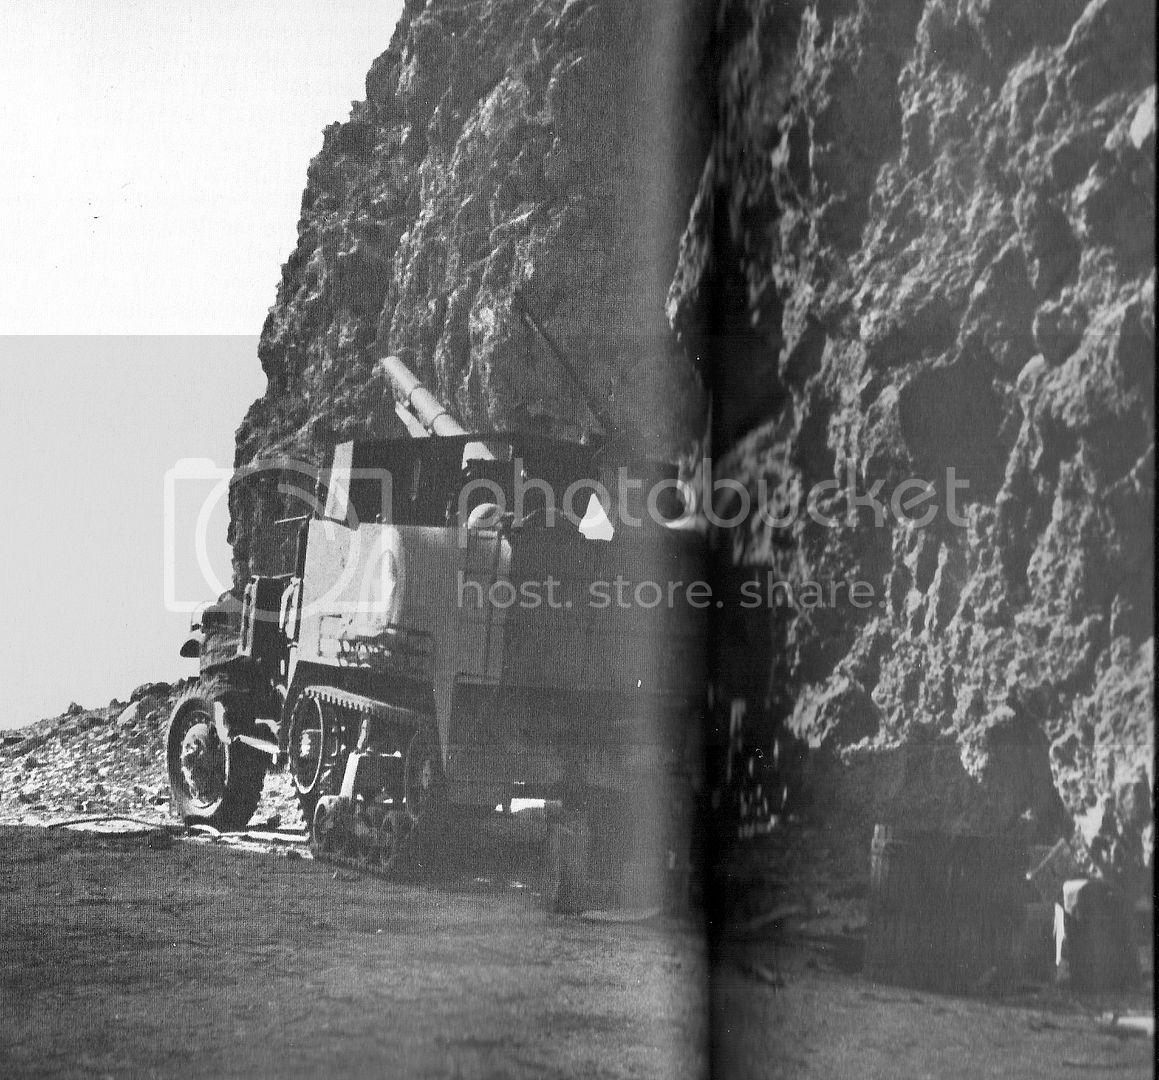
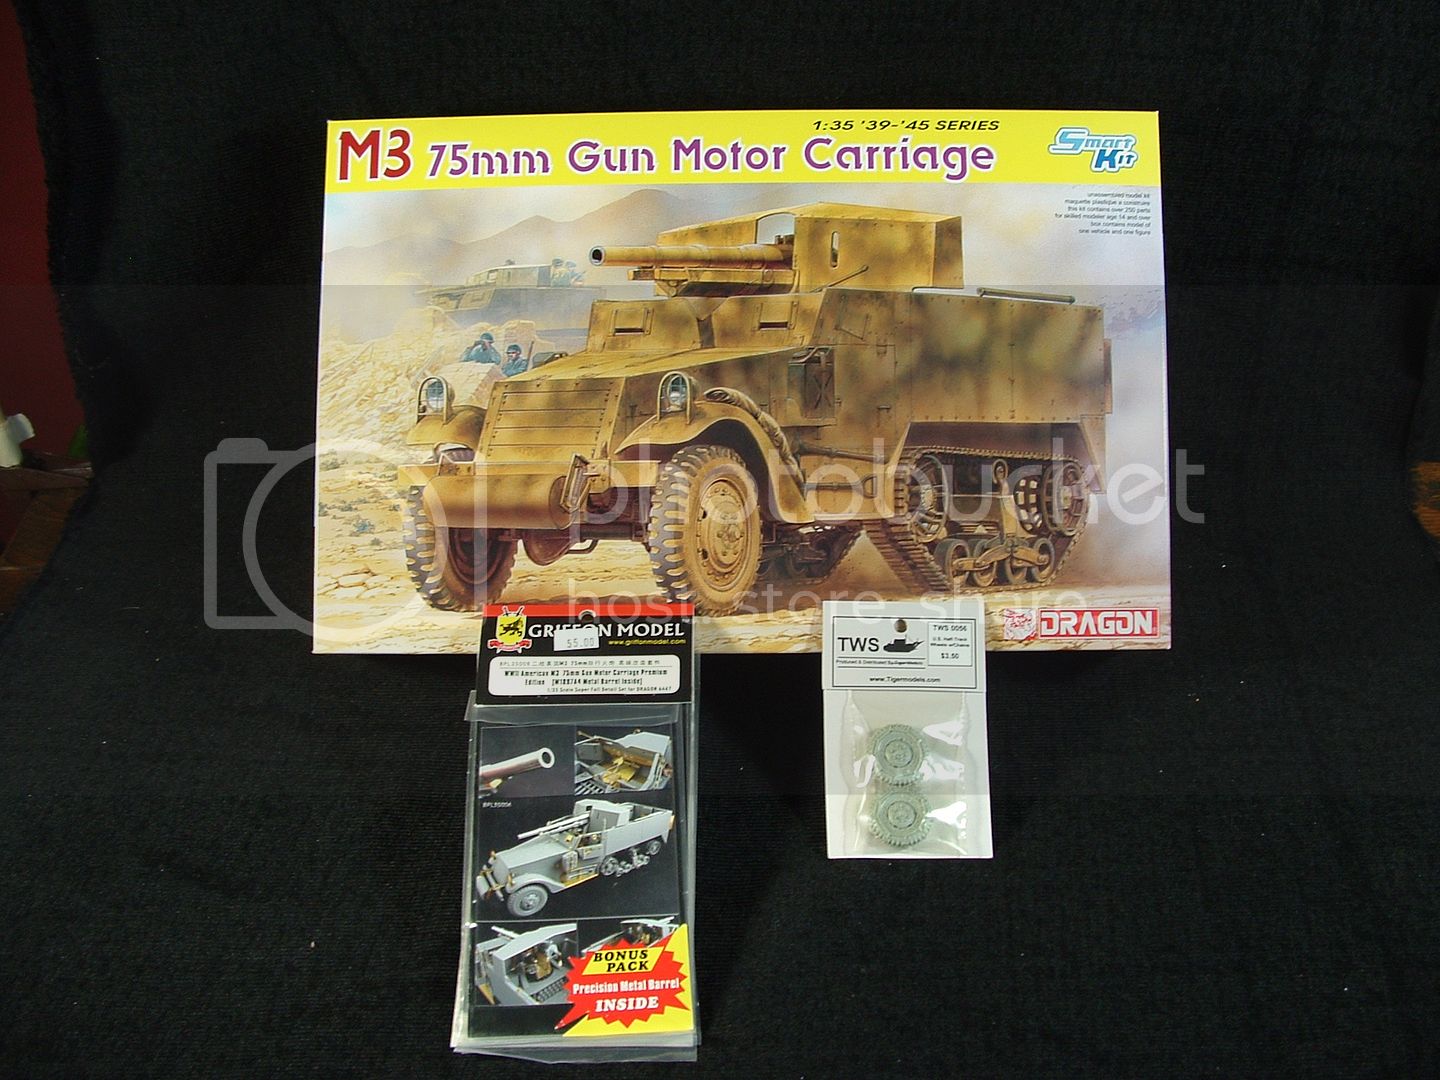
Back to the subject of this build: American Tank Destroyer units had the T-12 three-inch half-track canon in Africa, as did some of the English units, months later, around Cassino. I think the canon was of French design--but as to this Ranger version: 'Time Life' has published a late 1970's series of hard-back volumes on WWII. The one about "The Italian campaign" has a re-print of the Magazine photos. This book could be had for under ten dollars at any good used book store.

In reading about the Rangers, I am very impressed by the Winter Line. The Rangers were lined up in the mud on the back side of the mountain range lobbing those half-track projectiles over the ridge--I think the area was called Fontana--while the 1st Special Service Force to the west went climbing an insanely unapproachable angle to over-run Mount La Difensa, the high point of that line. A movie producer named Huston made a movie about the 353rd Tank Battalion moving forward into San Pietro, with the Texas T-Patchers' after that break in the Winter line. Further study will find that my Uncle's 6th Armored Infantry, 1st Armored Division, with the 760th Tank Battalion, was in on the assault of the hill just west of San Pietro called Mt. Porchia. Mt. Porchia was defended by the Herman Goering Division. Some Allied Italian troops were instrumental at this point as well.

The Rangers were hit hard at Anzio, and I believe a whole Company was captured. The 1st Special Service force came in and took up the line along the canal to the east and south of Cisterna. Audie Murphy's 3rd Infantry Division was alongside to the north, towards Cisterna. An evocative photo of a 1st Special Force T12 half-track appears on page 217 of the 1947 book by Lt. Col. Robert D. Burhans: "The First Special Service Force: A War History of The North Americans: 1942-1944." This book is re-printed in 1996 by The Battery Press, Inc. P.O. Box 198885; Nashville, Tennessee, 37219. The Battery Press is a premiere publisher of unit history re-prints. Everyone should become familiar with their product line.

Those pictures in the Michel de Trez book appear on pp. 474-475.

Dave, I read all this stuff back in the 1990's, and have commented here by line of memory. I dimly re-call other images of this subject, and will hopefully find more particular reference in the weeks ahead, as your build proceeds.

Incidentally, these T-12 half-tracks were used in 1942 as coastal artillery there on Guadalcanal for several weeks up until the 3rd Marine Defense Battalion got set up and established…I mean, the U.S.N. pulled out before the defense weapons were unloaded.

http://www.youtube.com/watch?v=BIgbZIksHWs


 _GOTOTOP