

Figures
Military figures of all shapes and sizes.
Military figures of all shapes and sizes.
Hosted by Darren Baker, Mario Matijasic
Painting modern Russian camouflage?

faze4

Joined: August 18, 2003
KitMaker: 188 posts
Armorama: 45 posts

Posted: Sunday, April 05, 2015 - 05:46 PM UTC
Bump 2

brodiebear

Joined: May 16, 2014
KitMaker: 91 posts
Armorama: 90 posts
Posted: Wednesday, May 25, 2016 - 03:30 PM UTC
did the SBS get posted ?

Karl187

#284

Joined: October 04, 2006
KitMaker: 3,094 posts
Armorama: 2,942 posts

Posted: Wednesday, May 25, 2016 - 03:53 PM UTC
Quoted Text
did the SBS get posted ?
*Guilty Face* Uh...Nope
 !
!I think I know where it is though, I'll try and get it up today now that you've reminded me!

brodiebear
Joined: May 16, 2014
KitMaker: 91 posts
Armorama: 90 posts
Posted: Wednesday, May 25, 2016 - 04:18 PM UTC
Quoted Text
Quoted Textdid the SBS get posted ?
*Guilty Face* Uh...Nope
I think I know where it is though, I'll try and get it up today now that you've reminded me!
Excellent Smithers !
Karl187
#284
Joined: October 04, 2006
KitMaker: 3,094 posts
Armorama: 2,942 posts
Posted: Wednesday, May 25, 2016 - 09:28 PM UTC
Painting Digital Russian Camouflage Part One
These Blackdog figures nicely capture the shape of the new generation of Russian military kit down to the shape of the radio unit the troops in Crimea seemed to be wearing in the same place (left upper chest). The most challenging thing about these figures is definetly the Russian digital camo. It is vastly different from US Army ACU's or USMC MARPAT- the pixels are much smaller and the effect from a distance means you can really only make out a green shade- and when it gets wet you can barely discern any pattern at all. I'll dicuss how I went about tackling the pattern in a minute.
Here are a couple of pictures of Russian troops in Ukraine:


So here are the assembled figures- one had a pair of binoculars but I've left them out of my build. The only things I've added are the weapon slings- a few of the troops seemed to favour both their sling connections on the AK butt instead of the more traditional butt and forestock connection so thats what I am depicting.


And after some primer:


The kits also come with very small radio mic booms for speaking into and a small resin wire coil connecting the handset to the earpieces. However, I'm not sure the sculptor has the coil shape correct- I think some of them may have just been a long wire, not a coil. I have some more references to look at for this.
So- to painting. I've done US ACU pattern before and been sort of satisfied at the result. It was painted by hand and it is a real difficult subject to get looking even semi-okay. The US pattern has such a level of clarity and size in its pixelation that the pattern, even in 1/35, is best attempted by hand so the sharp dilineations between colors are captured to some extent. This Russian pattern though, is trickier. The pixels are much smaller and very different to the US ACUs- it is also much more subdued in terms of the color differences- like I said at a distance it appears merely green.
I decided to experiment a little. I chose Russian 4BO Base Green from an old AK set (when Vallejo made their stuff) as my base. It is a very mid-green and gave me a decent place to start so I can darken or fade the uniforms later on.

Then I took some Ammo by Mig paint, Light Green Khaki from their Russian AFV colors set, gave it a bit of dilution with water on a brush and then used the brush flicked against a steel ruler to spatter the figures and helmets with fine flecks of paint. It turned out better than I expected- it was subtle but didn't completely fade into the base coat. I think it does a decent job of tricking the eye into thinking there is a digital pattern (or a very fine camouflage pattern) on the uniform. The light green khaki I spattered liberally as it seems to be the second largest color in the pattern besides the base color.


Next color up was a wood or medium tan brown-ish color. I used Andrea Wood and spattered it again only not so liberally as before.


Then, and most sparingly of all, I spattered Vallejo Black Grey in some areas.


And here is the other figure and the two heads (I have also now painted their jacket collars in the same digital pattern):


These Blackdog figures nicely capture the shape of the new generation of Russian military kit down to the shape of the radio unit the troops in Crimea seemed to be wearing in the same place (left upper chest). The most challenging thing about these figures is definetly the Russian digital camo. It is vastly different from US Army ACU's or USMC MARPAT- the pixels are much smaller and the effect from a distance means you can really only make out a green shade- and when it gets wet you can barely discern any pattern at all. I'll dicuss how I went about tackling the pattern in a minute.
Here are a couple of pictures of Russian troops in Ukraine:
So here are the assembled figures- one had a pair of binoculars but I've left them out of my build. The only things I've added are the weapon slings- a few of the troops seemed to favour both their sling connections on the AK butt instead of the more traditional butt and forestock connection so thats what I am depicting.


And after some primer:


The kits also come with very small radio mic booms for speaking into and a small resin wire coil connecting the handset to the earpieces. However, I'm not sure the sculptor has the coil shape correct- I think some of them may have just been a long wire, not a coil. I have some more references to look at for this.
So- to painting. I've done US ACU pattern before and been sort of satisfied at the result. It was painted by hand and it is a real difficult subject to get looking even semi-okay. The US pattern has such a level of clarity and size in its pixelation that the pattern, even in 1/35, is best attempted by hand so the sharp dilineations between colors are captured to some extent. This Russian pattern though, is trickier. The pixels are much smaller and very different to the US ACUs- it is also much more subdued in terms of the color differences- like I said at a distance it appears merely green.
I decided to experiment a little. I chose Russian 4BO Base Green from an old AK set (when Vallejo made their stuff) as my base. It is a very mid-green and gave me a decent place to start so I can darken or fade the uniforms later on.

Then I took some Ammo by Mig paint, Light Green Khaki from their Russian AFV colors set, gave it a bit of dilution with water on a brush and then used the brush flicked against a steel ruler to spatter the figures and helmets with fine flecks of paint. It turned out better than I expected- it was subtle but didn't completely fade into the base coat. I think it does a decent job of tricking the eye into thinking there is a digital pattern (or a very fine camouflage pattern) on the uniform. The light green khaki I spattered liberally as it seems to be the second largest color in the pattern besides the base color.


Next color up was a wood or medium tan brown-ish color. I used Andrea Wood and spattered it again only not so liberally as before.


Then, and most sparingly of all, I spattered Vallejo Black Grey in some areas.


And here is the other figure and the two heads (I have also now painted their jacket collars in the same digital pattern):


Karl187
#284
Joined: October 04, 2006
KitMaker: 3,094 posts
Armorama: 2,942 posts
Posted: Wednesday, May 25, 2016 - 09:38 PM UTC
Painting Russian Digital Camouflage Part Two
After getting the main camo colors on it was time to pick out the various areas of detail. The knee and elbow pads I did in black-grey- some of them were wearing green ones but I reckon that might have been too much green! Boots were painted black-grey too and so were the goggles. The pouch piping was picked out in a dark green and so were the face masks. The helmet straps were painted an olive color and the facial detail was also added. The AK slings were all in a khaki color so thats what I've gone with here.


Once all the main colors were sorted I wanted to differentiate the colors between the assault vest and the rest of the uniform. In the reference pictures most of the vests appear to be darker in terms of fabric than the rest of the uniform so I did what I call a 'color shift' where I use Windsor and Newton Slow Drying Medium to dilute a paint (dark green in this case) and then apply it in very thin coats. It is weak and barely noticeable at first but it builds with more coats into a translucent finish to give a subtle but noticeable difference without obscuring the camo colors beneath completely.
I also did a color shift using a green olive color on other parts of the uniform (pants, jacket and helmet cover) to give it a more olive green hue as per reference pictures.


Lastly was just a bit of highlighting and shading plus final assembly and placement.
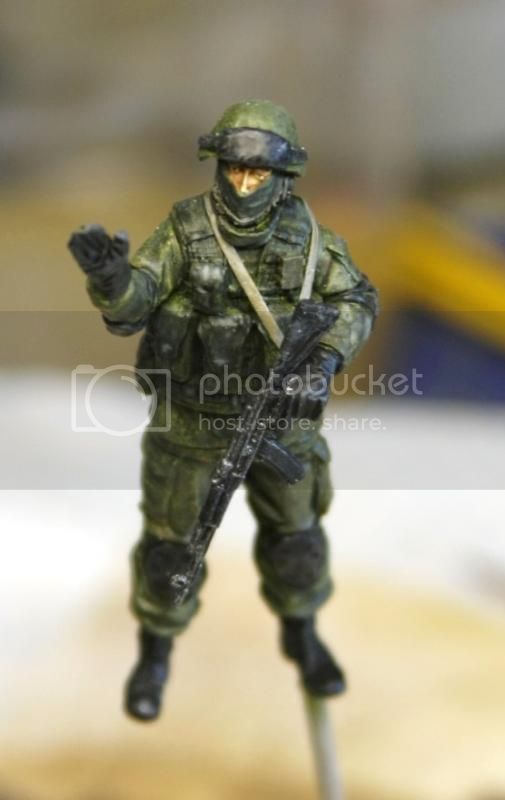
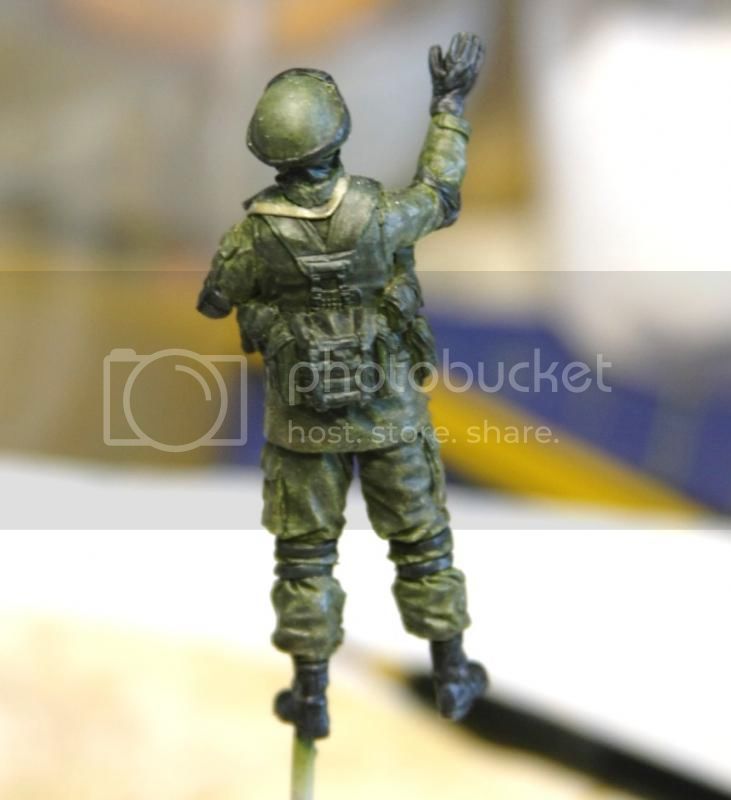
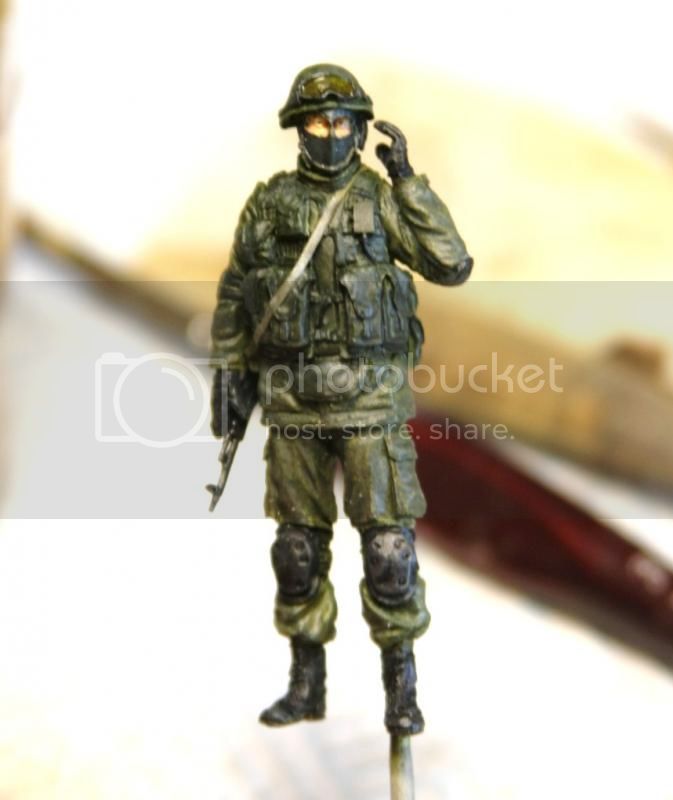
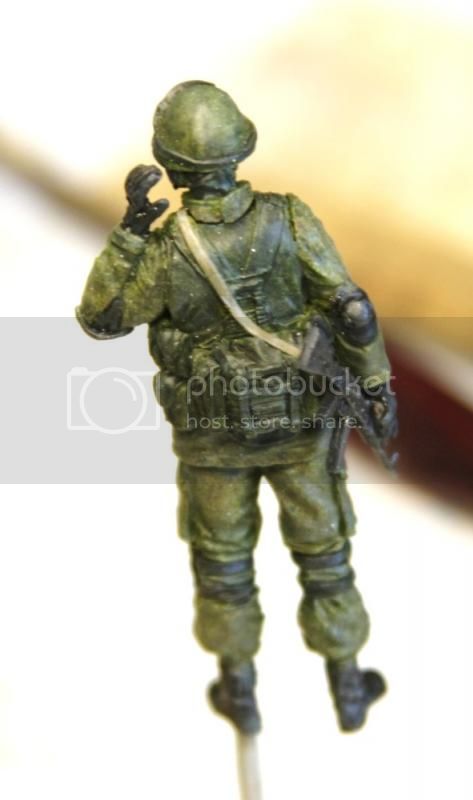


Here they are in place in their scene.


I hope this helps you guys out a bit. Thanks to Steve for reminding me to do this! Also thanks to Hisham for letting me kind of hi-jack his thread!
After getting the main camo colors on it was time to pick out the various areas of detail. The knee and elbow pads I did in black-grey- some of them were wearing green ones but I reckon that might have been too much green! Boots were painted black-grey too and so were the goggles. The pouch piping was picked out in a dark green and so were the face masks. The helmet straps were painted an olive color and the facial detail was also added. The AK slings were all in a khaki color so thats what I've gone with here.


Once all the main colors were sorted I wanted to differentiate the colors between the assault vest and the rest of the uniform. In the reference pictures most of the vests appear to be darker in terms of fabric than the rest of the uniform so I did what I call a 'color shift' where I use Windsor and Newton Slow Drying Medium to dilute a paint (dark green in this case) and then apply it in very thin coats. It is weak and barely noticeable at first but it builds with more coats into a translucent finish to give a subtle but noticeable difference without obscuring the camo colors beneath completely.
I also did a color shift using a green olive color on other parts of the uniform (pants, jacket and helmet cover) to give it a more olive green hue as per reference pictures.


Lastly was just a bit of highlighting and shading plus final assembly and placement.


Here they are in place in their scene.


I hope this helps you guys out a bit. Thanks to Steve for reminding me to do this! Also thanks to Hisham for letting me kind of hi-jack his thread!

Armored76

Joined: September 30, 2013
KitMaker: 1,615 posts
Armorama: 1,500 posts
Posted: Sunday, October 15, 2017 - 11:41 AM UTC
Karl, is there any chance you can update the images in the SBS?
Thank you!
Thank you!

Biggles2

Joined: January 01, 2004
KitMaker: 7,600 posts
Armorama: 6,110 posts

Posted: Sunday, October 15, 2017 - 08:04 PM UTC
I've used sponge. Tear off a small piece and dip into paint. I hold the sponge with a pair of forceps so I don't get paint all over my fingers. Squeeze out most of the paint like for drybrushing, and gently daub onto the figure. If you use the same piece of sponge in the same orientation you will get repeating patterns of dots. Use a differently shaped pieces of sponge for different colors. Like any other technique it will take some practice.

Armored76
Joined: September 30, 2013
KitMaker: 1,615 posts
Armorama: 1,500 posts
Posted: Monday, October 16, 2017 - 01:17 PM UTC
That's a good idea! Thanks for sharing! Applied before detail painting might lead to acceptably good results.
Karl187
#284
Joined: October 04, 2006
KitMaker: 3,094 posts
Armorama: 2,942 posts
Posted: Monday, October 16, 2017 - 02:58 PM UTC
Hi Christian- I do plan to update a great many of the pictures I had on photobucket- but they are spread across a couple of computers and memory cards- it will take a while to re-assemble and upload them to somewhere new.
What I can tell you about this technique for doing the pattern was- its simply a very controlled spattering- I used fairly dilute paints, a small brush and flicked it against a steel ruler onto the figure in certain areas. The reason I did this was because the digital pixel colors on the Russian uniform are very small and doing this spattering technique with fairly dilute paint produced lots of tiny dots. Plus, the paint was dilute enough that if you flicked some paint where you didn't want you could simply wipe it off with a moist brush so it was quite forgiving as well as being fairly straightforward to do. I hope that helps you out a bit.
What I can tell you about this technique for doing the pattern was- its simply a very controlled spattering- I used fairly dilute paints, a small brush and flicked it against a steel ruler onto the figure in certain areas. The reason I did this was because the digital pixel colors on the Russian uniform are very small and doing this spattering technique with fairly dilute paint produced lots of tiny dots. Plus, the paint was dilute enough that if you flicked some paint where you didn't want you could simply wipe it off with a moist brush so it was quite forgiving as well as being fairly straightforward to do. I hope that helps you out a bit.
Armored76
Joined: September 30, 2013
KitMaker: 1,615 posts
Armorama: 1,500 posts
Posted: Monday, October 16, 2017 - 04:30 PM UTC
Is sure helps, Karl! Thanks a lot!
Being a visual type, I was hoping to see at least the results you achieved and maybe some interim steps.
Being a visual type, I was hoping to see at least the results you achieved and maybe some interim steps.
 |

WEB HOSTING BY


Copyright ©2021 Armorama and Kitmaker Network, a subsidiary of Silver Star Enterprises
All Rights Reserved. Please read our Conditions of Use and Privacy Policy.
All Rights Reserved. Please read our Conditions of Use and Privacy Policy.