


Hosted by Richard S.
Half a Year for a Half Track

Namabiiru

#399

Joined: March 05, 2014
KitMaker: 2,888 posts
Armorama: 1,920 posts

Posted: Monday, January 09, 2017 - 05:55 AM UTC
Cheers, Clayton.

justsendit
Joined: February 24, 2014
KitMaker: 3,033 posts
Armorama: 2,492 posts
Posted: Monday, January 09, 2017 - 08:31 AM UTC
Hi guys, Thanks to this campaign, the M21 will be my first OD build to get off the ground I'm psyched!
@ Mark The new springs look great!
@ DML US Half-Track builders: I started building my M21 the other night and BAM! right out of the gate ... parts confusion (steps 1 and 2)! Then, I happened to recall the following thread Building the DML M2A1 Halftrack by Vinnie Branigan
In his concise build log, Vinnie does a wonderful job of noting some minor DML instruction sheet errors, inaccuracies, and offers a few tips. Upon rereading the thread, I came across some of the same issues which Im guessing may apply to most DML US Half-Tracks currently available, as in the M21 which Im building for this campaign.
Didnt mean to stop you halfway in your tracks, but I hope this helps.
Carry on!🍺
mike
JohnDoe4th
Joined: March 03, 2016
KitMaker: 142 posts
Armorama: 137 posts
Posted: Monday, January 09, 2017 - 10:00 AM UTC
JustJohn..As I mention in a previous post about a minor issue. Part D34 needs to be rotated 180. Then the part will fit properly. I drew arrows (below pic) to show the rotation of the part. Im half way through step 4 with no other problems so far.

 " BORDER="0">
JohnA
" BORDER="0"> JohnA
JohnDoe4th
Joined: March 03, 2016
KitMaker: 142 posts
Armorama: 137 posts
Posted: Monday, January 09, 2017 - 10:16 AM UTC
@Mark..springs look excellent!! I was going to buy that same kit for this campaign. But the hobby store didn't have it so I pick up the m3a1 (3n1).
@Mike..did you have the same issue has I did in the above post?
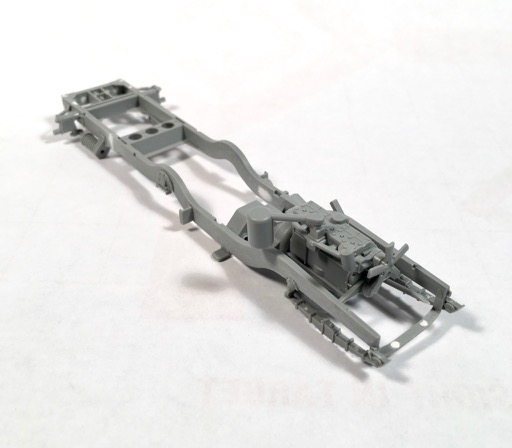
Here is a little update on my captured M3. Parts have been sanded and some have been glued. I do have to putty an area at the rear of the frame and finish sanding a couple of parts. Then its off to the pre primer wash. After the wash and rinse, I let the parts sit overnight in a tupperware container with the lid cracked. Then off to the paint both for some primer.
 " BORDER="0">
 " BORDER="0">
JohnA
@Mike..did you have the same issue has I did in the above post?
Here is a little update on my captured M3. Parts have been sanded and some have been glued. I do have to putty an area at the rear of the frame and finish sanding a couple of parts. Then its off to the pre primer wash. After the wash and rinse, I let the parts sit overnight in a tupperware container with the lid cracked. Then off to the paint both for some primer.
" BORDER="0">" BORDER="0"> JohnA
justsendit
Joined: February 24, 2014
KitMaker: 3,033 posts
Armorama: 2,492 posts
Posted: Tuesday, January 10, 2017 - 08:04 AM UTC
Quoted Text
Mike..did you have the same issue has I did in the above post?
@ JohnA Thanks for taking point! You guessed it the very same issue. And sanding lots and lots of sanding! There were a ton of mold seams running the entire length of the frame to deal with inside and out, but only a few pin marks that needed filling so far. This frame reminds me of a Zvezda 'Soviet BA-10' that I "didn't" bother to clean up years ago! 😄
Here's my first M21 installment.
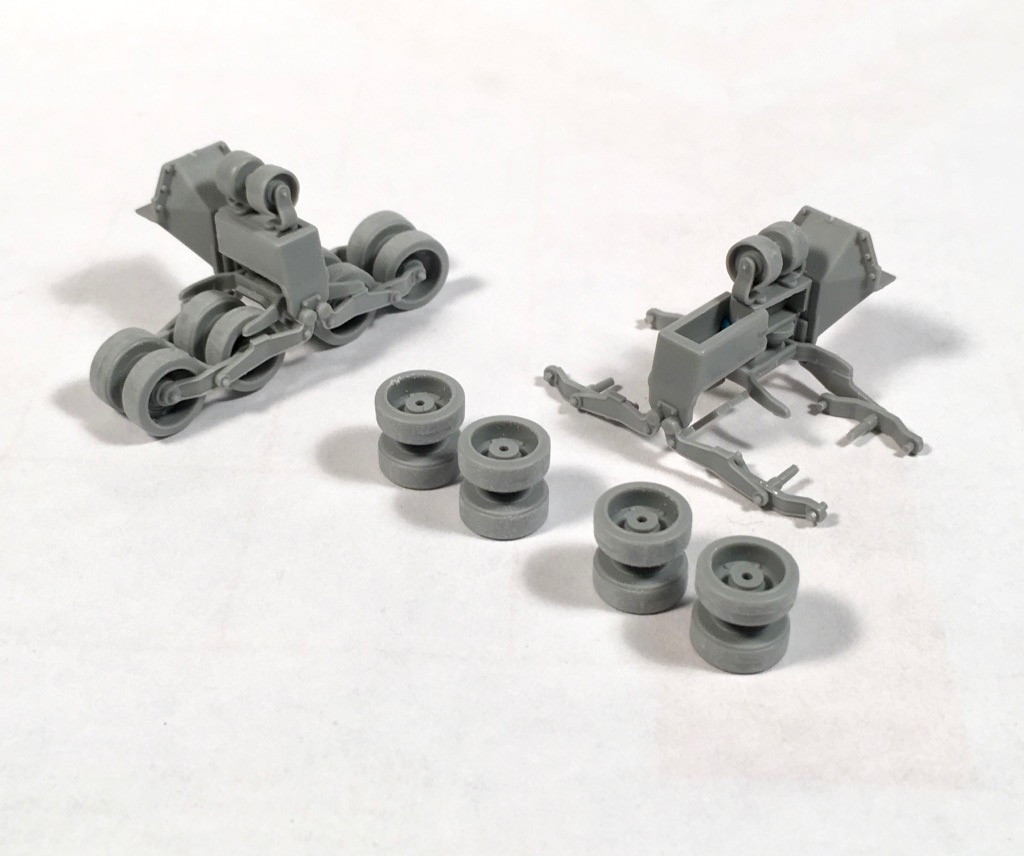
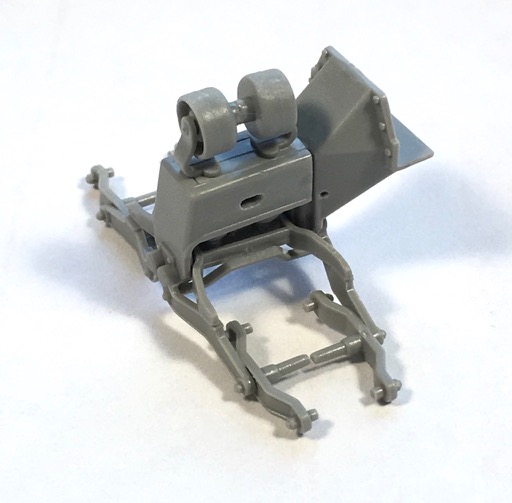
In Step No. 2 (Ref. JohnA's DML instruction sheet above), I revised the assembly recommendation just a bit, i.e. gluing the bogie-wheel assemblies (D1, D6) to the suspension. Instead, I came up with the following detail painting solution. The bogie frame assemblies (D32, D34) have been left unglued and free to slide apart. The smaller floating suspension parts (D22) have been glued onto the bogie frames. Thus, all wheels are removable so they can be painted off-model.
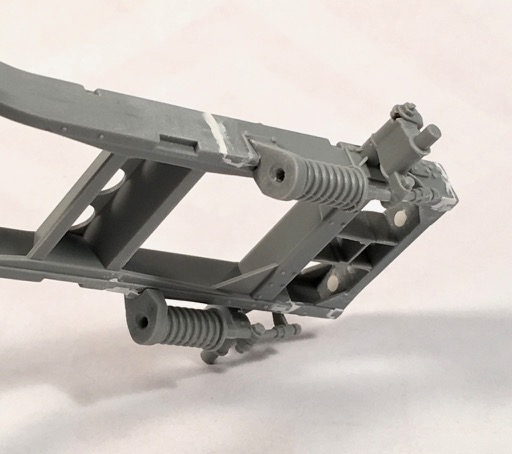
A tip I found on another thread, was to drill holes into the flat ends of the coil-spring frame brackets (A21, A22).
Cheers!🍺
mike
petbat

Joined: August 06, 2005
KitMaker: 3,353 posts
Armorama: 3,121 posts
Posted: Tuesday, January 10, 2017 - 03:31 PM UTC
Quoted Text
Unfortunately, no way to get the springs exactly right as the real ones are not constant diameter, but I think these are still an improvement.
They do look better.
One of the guys in my club used soft coat hanger wire and after making a test one to determine the correct length, proceeded to sand the two ends of the wire on emery paper to taper the wire. A lot of work, but it looked sensational when done.... and when he pointed it out to us, as we didn't notice it at first

The rest of you guys seem to be motoring on too. I have a 3/4 finished M3 75mm GMC on the shelf... started so not eligible for here.
Great walk around reference photos on Prime Portal if you are interested, especially for the missing detail on the suspension arms:
xxhttp://data6.primeportal.net/tanks/rob_tittle/m3_half-track/images/m3_half_track_02_of_27.jpgxx (remove the x's)
Griifin Model also have an inexpensive etch set for the details
L35A035
I hope to have pics of progress this weekend. The Dragon 250/9 neu is also taking shape. And yes, after a 'what the moment', I found a little square of paper lurking face down in the bottom of the box with an 'update to instructions' showing the inclusion of the transmission not in the original instructions...
Also the parts call out for bits used/not used also has errors - obviously call outs for other versions that were not updated

Namabiiru
#399
Joined: March 05, 2014
KitMaker: 2,888 posts
Armorama: 1,920 posts
Posted: Tuesday, January 10, 2017 - 05:38 PM UTC
That's not a bad idea, Peter. Maybe I'll give that a try, and see what I come up with before I get to the point that I can no longer get access to the springs to swap them out.

tatbaqui

#040

Joined: May 06, 2007
KitMaker: 2,713 posts
Armorama: 2,451 posts

Posted: Wednesday, January 11, 2017 - 04:09 AM UTC
Quoted Text
Good to have you in, Mark!
I had a Mail Call today, so I'm officially in with Rommel's Ride!
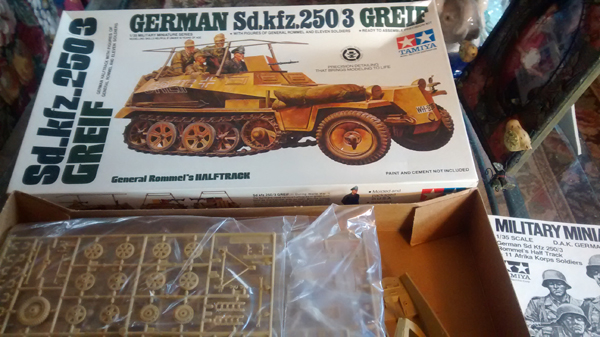
Looks like I'll have to add the figures (since it includes Rommel),so that'll be a first for me
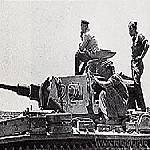
Lucky catch you got there Clayton. I read this one has the correct colors for the "Greif" stencils on the sides. I believe Tamiya and Dragon kits are both OOP, so when I saw a Dragon release the other day at the LHS, I jumped on it and ran home, only to find out that they got the "Greif" colors wrong -- red for both sides. Oh well...

69mudbone
Joined: April 26, 2016
KitMaker: 362 posts
Armorama: 285 posts
Posted: Wednesday, January 11, 2017 - 04:27 AM UTC
 free image uploading
Hey Guys, update on my M-21. Now I remember, even with the age of this kit, how well Tamiya builds. It is a real pleasure.

erichvon

Joined: January 17, 2006
KitMaker: 1,694 posts
Armorama: 1,584 posts

Posted: Wednesday, January 11, 2017 - 04:27 AM UTC
Tat, if you're after a set of the Tamiya decals for the Greif 250/3 I've got some you can have. I've just checked through my decals box and I've got some. I only used some number plate's and crosses off them as I did a straightforward half track when I built it 20 odd years ago so all the Greif and Adler markings are still there. The letters are red with a white border. Let me know if you want me to send them.
Namabiiru
#399
Joined: March 05, 2014
KitMaker: 2,888 posts
Armorama: 1,920 posts
Posted: Wednesday, January 11, 2017 - 05:53 AM UTC
Quoted Text
Quoted TextGood to have you in, Mark!
I had a Mail Call today, so I'm officially in with Rommel's Ride!
Looks like I'll have to add the figures (since it includes Rommel),so that'll be a first for me
Lucky catch you got there Clayton. I read this one has the correct colors for the "Greif" stencils on the sides. I believe Tamiya and Dragon kits are both OOP, so when I saw a Dragon release the other day at the LHS, I jumped on it and ran home, only to find out that they got the "Greif" colors wrong -- red for both sides. Oh well...
I picked up an ancient Gunze-Sangyo kit of Greif awhile ago and it also had red on both sides. I had to carefully cut the red part out of the outline, and of course the old decals disintegrated anyway. had to do a LOT of chipping to hide that mess, but in the end it turned out not half bad.

ClaytonFromEllijay
#454
Joined: July 10, 2016
KitMaker: 1,273 posts
Armorama: 1,138 posts
Posted: Wednesday, January 11, 2017 - 07:27 AM UTC
Quoted Text
Quoted TextGood to have you in, Mark!
I had a Mail Call today, so I'm officially in with Rommel's Ride!
Looks like I'll have to add the figures (since it includes Rommel),so that'll be a first for me
Lucky catch you got there Clayton. I read this one has the correct colors for the "Greif" stencils on the sides. I believe Tamiya and Dragon kits are both OOP, so when I saw a Dragon release the other day at the LHS, I jumped on it and ran home, only to find out that they got the "Greif" colors wrong -- red for both sides. Oh well...
You wonder why some folks can make and charge large $$$ for decals, this is a prime example why!

accessdenied

Joined: December 07, 2016
KitMaker: 64 posts
Armorama: 35 posts
Posted: Thursday, January 12, 2017 - 04:58 AM UTC
After a bit of thought I've decided to withdraw from this campaign as looking under the work bench  there's a couple of projects that really deserve more attention and I don't really want to have yet another started project laying around - just yet.
So for those entered, hope your projects pan-out as planned.
Later.
there's a couple of projects that really deserve more attention and I don't really want to have yet another started project laying around - just yet.So for those entered, hope your projects pan-out as planned.
Later.
justsendit
Joined: February 24, 2014
KitMaker: 3,033 posts
Armorama: 2,492 posts
Posted: Thursday, January 12, 2017 - 07:15 AM UTC
@ R.J. Sorry to see you leave. I know how that goes. Good luck with the other projects.
@ Peter Thanks for the bogie frame reference pic; it was very useful!
Holes have been added.
Bumper/winch assembly.
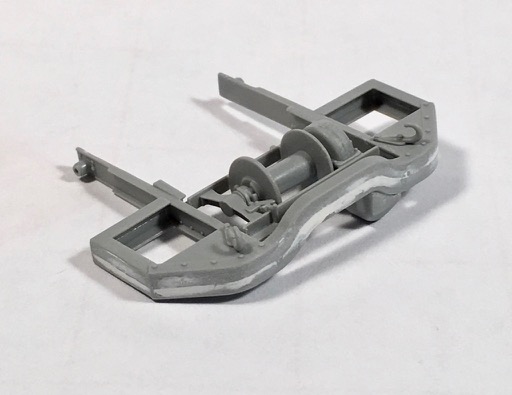
Pedal to the metal uuuh I mean Styrene!
And I just couldnt wait to assemble this little beauty!
In addition, the drive-sprockets and idler wheels have been dry-fit to the frame and track assemblies really nice fit! More to come soon ...
Cheers!🍺
mike
@ Peter Thanks for the bogie frame reference pic; it was very useful!
Holes have been added.
Bumper/winch assembly.
Pedal to the metal uuuh I mean Styrene!
And I just couldnt wait to assemble this little beauty!
In addition, the drive-sprockets and idler wheels have been dry-fit to the frame and track assemblies really nice fit! More to come soon ...
Cheers!🍺
mike
69mudbone
Joined: April 26, 2016
KitMaker: 362 posts
Armorama: 285 posts
Posted: Thursday, January 12, 2017 - 08:27 AM UTC
Hey Guys, any reference on the color of the mortar rounds on the M-21 half track. I have seen many pictures but they all seem to be "green" or a dark "gray" . Any brass? Thanks
iakarch
Joined: May 19, 2007
KitMaker: 459 posts
Armorama: 421 posts

Posted: Friday, January 13, 2017 - 02:33 AM UTC
Some progress on my Sd.Kfz.250

ClaytonFromEllijay
#454
Joined: July 10, 2016
KitMaker: 1,273 posts
Armorama: 1,138 posts
Posted: Friday, January 13, 2017 - 03:34 AM UTC
Lots of progress already, and they all look good, I'll be starting soon... 
petbat
Joined: August 06, 2005
KitMaker: 3,353 posts
Armorama: 3,121 posts
Posted: Friday, January 13, 2017 - 03:47 AM UTC
No Problem Mike. The hole details just adds a bit more interest to the big slab of metal, and doesn't take much to do. If you have a punch set you can add the bolts to the idler mount too.
Nice work Irvin. I see from the rear pic that your hull top fits as well as my 250/9 's does
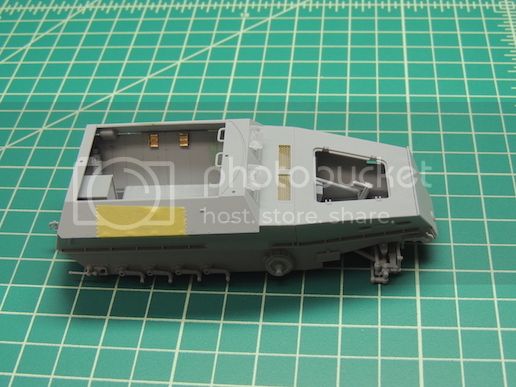
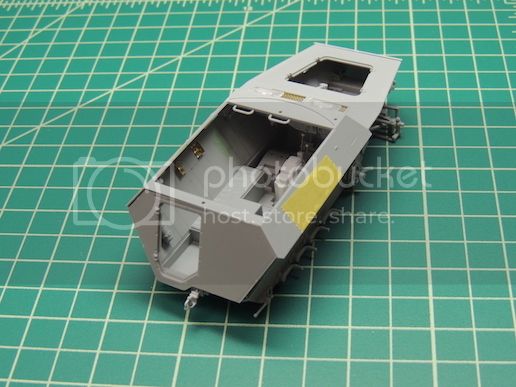
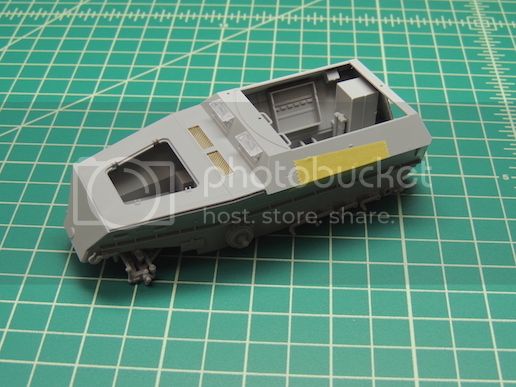
Here is where I am up to.

Not sure how much of the interior will be seen once the 2cm mount and turret goes in, but I added it anyway - I am sure the radio was not necessary.
If you look closely you will notice a 10 thou card shim between the upper hull and the front of the plate that the turret mounts on. There is a 5 thou shim at the rear too.
This one shows the fenders thinned down. The dragon ones are soooo thick... it is really noticeable if you don't


The 2 holes in the floor will be covered by other stuff later.
Nice work Irvin. I see from the rear pic that your hull top fits as well as my 250/9 's does
Here is where I am up to.
Not sure how much of the interior will be seen once the 2cm mount and turret goes in, but I added it anyway - I am sure the radio was not necessary.
If you look closely you will notice a 10 thou card shim between the upper hull and the front of the plate that the turret mounts on. There is a 5 thou shim at the rear too.
This one shows the fenders thinned down. The dragon ones are soooo thick... it is really noticeable if you don't
The 2 holes in the floor will be covered by other stuff later.
petbat
Joined: August 06, 2005
KitMaker: 3,353 posts
Armorama: 3,121 posts
Posted: Friday, January 13, 2017 - 04:17 AM UTC
Quoted Text
Hey Guys, any reference on the color of the mortar rounds on the M-21 half track. I have seen many pictures but they all seem to be "green" or a dark "gray" . Any brass? Thanks
Hi Ken
No Brass. It depends on the round itself as to what colour they are but most are 'Olive Drab'. Some pics (remove xx's)
M43A1 Light HE
xxhttp://www.90thidpg.us/Equipment/Weapons/81mmShells/M43A1/images/IMG_1373.jpgxx
M56 HE
xxhttp://www.usmilitariaforum.com/uploads//monthly_06_2014/post-2677-0-73979700-1402256080.jpg
M57 Smoke
xxhttp://www.90thidpg.us/Equipment/Weapons/81mmShells/M57/images/IMG_1387.jpgxx
M301 Illuminating round was white with Black stencilling, but if memory serves me correct, you don't get any of those in the kit.
Hope this helps
JohnDoe4th
Joined: March 03, 2016
KitMaker: 142 posts
Armorama: 137 posts
Posted: Friday, January 13, 2017 - 06:34 AM UTC
@Pete.. Thanks for the picture of the missing holes. That came in handy.
@Mike.. Great job on the pedals and looks much better!
JohnA
@Mike.. Great job on the pedals and looks much better!
JohnA
iakarch
Joined: May 19, 2007
KitMaker: 459 posts
Armorama: 421 posts
Posted: Friday, January 13, 2017 - 08:04 AM UTC
Petter,
I'll let you know when I have the interior painted and glue the top hull down. I see you used the top for the transmission. I couldn't get it to work out so I scratch built a completely new one.
I'll let you know when I have the interior painted and glue the top hull down. I see you used the top for the transmission. I couldn't get it to work out so I scratch built a completely new one.
69mudbone
Joined: April 26, 2016
KitMaker: 362 posts
Armorama: 285 posts
Posted: Friday, January 13, 2017 - 10:37 AM UTC
Hi Peter, thanks for the quick feedback 
petbat
Joined: August 06, 2005
KitMaker: 3,353 posts
Armorama: 3,121 posts
Posted: Friday, January 13, 2017 - 12:36 PM UTC
No Prob Ken
Hi Irvin
Actually, I had tried to fit it as per the instructions and cut down the long pin thinking it was a moulding fault, then I thought, "where is the transmission?"... That is when I found the correction in the box I mentioned earlier. So I fit the cover to the tranny and that to the floor, without the pin all the way down into the floor.
justsendit
Joined: February 24, 2014
KitMaker: 3,033 posts
Armorama: 2,492 posts
Posted: Saturday, January 14, 2017 - 04:06 AM UTC
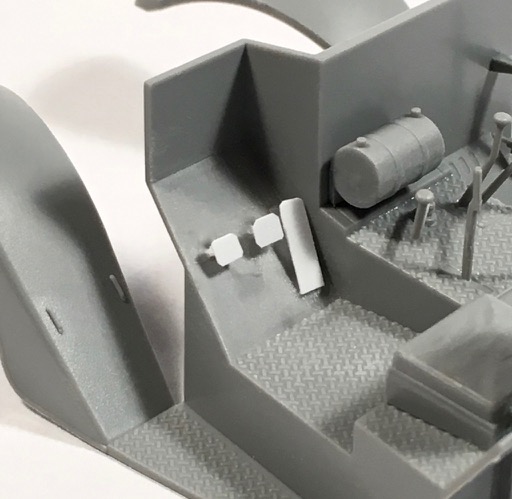
Hi guys! Heres a little more progress on the M21.
Epic tale! ... '81mm Mortar in Half a Year!' 🎥 ...
🎬 Take 1, Step 11 The kit comes with a nice two-piece aluminum barrel for the 81mm Mortar. However, this assembly got really messy while trying to true-up the three parts (MD1, T2, MD2) just couldnt make the wonkiness and gaps disappear!
🎬 Take 2 I joined the two aluminum cylinders together with CA. Once cured, I spun the barrel in a Dremel Tool to clean it up and check for wobble. For the bi-pod band, I took a piece of Evergreen Styrene Tube (No. 225) and thinned-out the wall thickness. Then, I split the band and slipped it onto the mortar tube and added the salvaged bi-pod details.
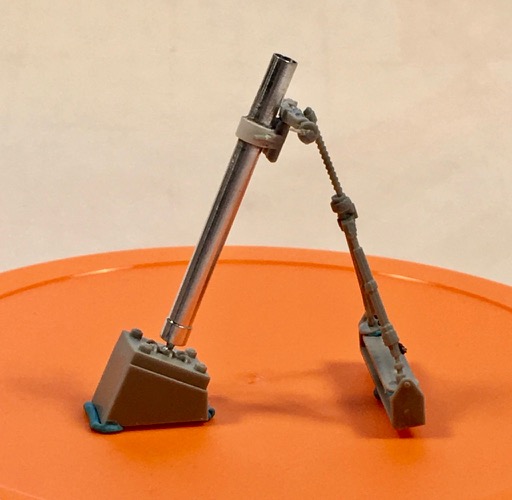
The chain is from LZ Models, Precision Very Fine Chain (No. 35601).

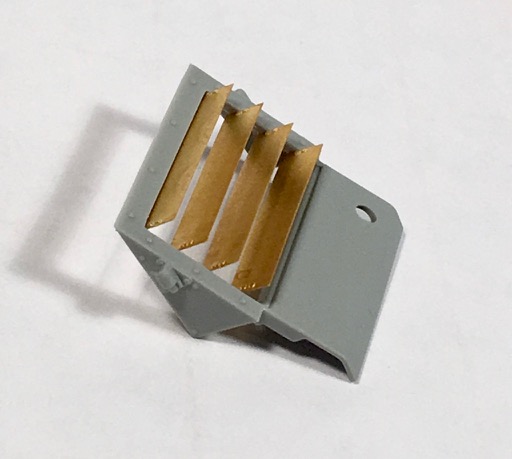
Question regarding the mortar base pedestal: The following image is from an M4A1 Mortar Carrier build thread by another member. Does anyone know if this pedestal design should apply to the M21 as well?

Thanks in advance!🍺
mike
Epic tale! ... '81mm Mortar in Half a Year!' 🎥 ...
🎬 Take 1, Step 11 The kit comes with a nice two-piece aluminum barrel for the 81mm Mortar. However, this assembly got really messy while trying to true-up the three parts (MD1, T2, MD2) just couldnt make the wonkiness and gaps disappear!
🎬 Take 2 I joined the two aluminum cylinders together with CA. Once cured, I spun the barrel in a Dremel Tool to clean it up and check for wobble. For the bi-pod band, I took a piece of Evergreen Styrene Tube (No. 225) and thinned-out the wall thickness. Then, I split the band and slipped it onto the mortar tube and added the salvaged bi-pod details.
The chain is from LZ Models, Precision Very Fine Chain (No. 35601).
Question regarding the mortar base pedestal: The following image is from an M4A1 Mortar Carrier build thread by another member. Does anyone know if this pedestal design should apply to the M21 as well?
Thanks in advance!🍺
mike
Removed by original poster on 01/15/17 - 15:49:22 (GMT).
 |

WEB HOSTING BY


Copyright ©2021 Armorama and Kitmaker Network, a subsidiary of Silver Star Enterprises
All Rights Reserved. Please read our Conditions of Use and Privacy Policy.
All Rights Reserved. Please read our Conditions of Use and Privacy Policy.