Campaigns: Completed Campaigns
Campaigns that are completed should be grouped here.
Hosted by Richard S.
Improvised Ingenuity
KoSprueOne
Visit this Community
Myanmar
Joined: March 05, 2004
KitMaker: 4,011 posts
Armorama: 1,498 posts
Posted: Saturday, June 24, 2017 - 05:37 AM UTC
Namabiiru, Very nice finish!
The Russian green looks on point and the muffler rust effect looks perfect. I guess you're right about the welds on a riveted hull. LOL I think I intentionally made weld effects on mine, Haha.


petbat
Visit this Community
Queensland, Australia
Joined: August 06, 2005
KitMaker: 3,353 posts
Armorama: 3,121 posts
Posted: Saturday, June 24, 2017 - 11:07 AM UTC
Looks fantastic Mark. You may not feel it is up to what you expected, but I would certainly be proud to have that in my collection. Cheers
Namabiiru
Staff MemberAssociate Editor
MODEL SHIPWRIGHTS
#399
Visit this Community
Rhode Island, United States
Joined: March 05, 2014
KitMaker: 2,888 posts
Armorama: 1,920 posts
Posted: Saturday, June 24, 2017 - 05:36 PM UTC
Thanks for all the kind words, Gents!

dioman13
Visit this Community
Indiana, United States
Joined: August 19, 2007
KitMaker: 2,184 posts
Armorama: 1,468 posts
Posted: Monday, July 03, 2017 - 02:16 AM UTC
Thanks for the kind words guys. Just a temp. thing I hope. Got too much in the stash to give up on it. I'll be back in the saddle some time soon. Bob D.
TimReynaga
Staff MemberAssociate Editor
MODEL SHIPWRIGHTS
Visit this Community
California, United States
Joined: May 03, 2006
KitMaker: 2,500 posts
Armorama: 297 posts
Posted: Wednesday, August 02, 2017 - 09:46 AM UTC
Let’s face it: the General Grant tank was not one of the most attractive designs in the American arsenal. No looker on its best day, to be sure, but at least it couldn’t get any worse... until someone got the bright idea to convert one into a recovery vehicle...


TimReynaga
Staff MemberAssociate Editor
MODEL SHIPWRIGHTS
Visit this Community
California, United States
Joined: May 03, 2006
KitMaker: 2,500 posts
Armorama: 297 posts
Posted: Wednesday, August 02, 2017 - 09:50 AM UTC

petbat
Visit this Community
Queensland, Australia
Joined: August 06, 2005
KitMaker: 3,353 posts
Armorama: 3,121 posts
Posted: Wednesday, August 02, 2017 - 11:15 AM UTC
Tim, I expect to see the same care and attention to scale details as you have done in the past on the Zis. Should only take a few months to more accurately detail that 'all but pre-assembled' sucker..


And who said a chunky body full of zits was not a looker


Welcome aboard
ClaytonFromEllijay
#454
Visit this Community
Georgia, United States
Joined: July 10, 2016
KitMaker: 1,273 posts
Armorama: 1,138 posts
Posted: Wednesday, August 02, 2017 - 05:56 PM UTC
Lordy, he loves those little ones...
TimReynaga
Staff MemberAssociate Editor
MODEL SHIPWRIGHTS
Visit this Community
California, United States
Joined: May 03, 2006
KitMaker: 2,500 posts
Armorama: 297 posts
Posted: Friday, August 04, 2017 - 09:01 PM UTC
1/100 scale M31 TRV Grant assembled and ready for primer.

These little kits do assemble quite rapidly, but even after clean up they are a little on the rough side...
petbat
Visit this Community
Queensland, Australia
Joined: August 06, 2005
KitMaker: 3,353 posts
Armorama: 3,121 posts
Posted: Saturday, August 05, 2017 - 02:05 AM UTC

Quoted Text


These little kits do assemble quite rapidly, but even after clean up they are a little on the rough side...


But they did get rid of the acne.....

Be interested to see what you do with this one from here Tim
TimReynaga
Staff MemberAssociate Editor
MODEL SHIPWRIGHTS
Visit this Community
California, United States
Joined: May 03, 2006
KitMaker: 2,500 posts
Armorama: 297 posts
Posted: Sunday, August 06, 2017 - 07:45 AM UTC
M31 Grant Tank Recovery Vehicle assembled and primed. The kit came with a single poorly molded fake gun, so I used brass pipes for both the 75mm and 37mm tubes instead.

The faux 37mm looks goofy, but I mounted the tube high on the turret that way so it would clear the big tool box on the upper deck. After this pic was taken I found photos showing that these were actually mounted lower but angled up to clear the box, so I have since remounted the tube that way.

Another discrepancy the pics revealed was that the real turret hatches were mounted to open side to side as opposed to front to back as the kit shows. This I left as is. Who knows, maybe some were built that way?
KoSprueOne
Visit this Community
Myanmar
Joined: March 05, 2004
KitMaker: 4,011 posts
Armorama: 1,498 posts
Posted: Sunday, August 06, 2017 - 08:48 AM UTC
Yeah, maybe the whole hatch rotated so either way was correct?

Nice little model. I want to someday build one of these in 1/35


petbat
Visit this Community
Queensland, Australia
Joined: August 06, 2005
KitMaker: 3,353 posts
Armorama: 3,121 posts
Posted: Monday, August 14, 2017 - 02:24 PM UTC

Quoted Text


After this pic was taken I found photos showing that these were actually mounted lower but angled up to clear the box, so I have since remounted the tube that way.


The Viagra method.....

Okay I'm back in this build... as usual running out of time.

I hate seam lines, especially on large curved sections to be joined. So after trying to get the kit plastic rounds to look decent, I decided to go another way. Trumpeter give you an Aluminium round and some brass to add to that for 1 round. So, I have used that to cast others:
In she goes...


Bubble, bubble, toil and trouble....


Definitely hot out of the mould....


Primer coat to check for moulding faults:


Also done some of the fiddly bits. Main assembly nearly done so pics soon.
ClaytonFromEllijay
#454
Visit this Community
Georgia, United States
Joined: July 10, 2016
KitMaker: 1,273 posts
Armorama: 1,138 posts
Posted: Monday, August 14, 2017 - 06:11 PM UTC
Wow, nice work,Peter, you make it look so easy...
eMan
#298
Visit this Community
Hong Kong S.A.R. / 繁體
Joined: August 08, 2002
KitMaker: 1,182 posts
Armorama: 665 posts
Posted: Saturday, August 19, 2017 - 12:12 PM UTC
ICM IT-28 Bridge-layer progress update.


petbat
Visit this Community
Queensland, Australia
Joined: August 06, 2005
KitMaker: 3,353 posts
Armorama: 3,121 posts
Posted: Saturday, August 19, 2017 - 12:47 PM UTC
Looking Good Lapman. Unfortunately, I got roped into being a volunteer and safety car occupant for my wife's cycle team racing event this weekend. Held on Stradbroke Island just far enough away that it was better to stay overnight... so no work on the Fahrgestell as I had hoped.

She now owes me some free time .... 11 days to go.....
ClaytonFromEllijay
#454
Visit this Community
Georgia, United States
Joined: July 10, 2016
KitMaker: 1,273 posts
Armorama: 1,138 posts
Posted: Saturday, August 19, 2017 - 07:44 PM UTC

Quoted Text

Looking Good Lapman. Unfortunately, I got roped into being a volunteer and safety car occupant for my wife's cycle team racing event this weekend. Held on Stradbroke Island just far enough away that it was better to stay overnight... so no work on the Fahrgestell as I had hoped.

She now owes me some free time .... 11 days to go.....


Yes, Peter, it's good when the wife owes YOU...a nice change of pace
barkingdigger
Staff MemberAssociate Editor
ARMORAMA
#013
Visit this Community
England - East Anglia, United Kingdom
Joined: June 20, 2008
KitMaker: 3,981 posts
Armorama: 3,403 posts
Posted: Saturday, August 19, 2017 - 08:01 PM UTC
I see the deadline looming towards me, but alas my Leopard tractor build stalled a few months back. (The usual cocktail of work and other time-thieves eating up my precious bench-time...) I've still got a few months' worth of stuff to do to it, so will have to drop out. Sorry!

Still, there are some mighty fine builds here - keep up the good work!
TimReynaga
Staff MemberAssociate Editor
MODEL SHIPWRIGHTS
Visit this Community
California, United States
Joined: May 03, 2006
KitMaker: 2,500 posts
Armorama: 297 posts
Posted: Saturday, August 19, 2017 - 09:40 PM UTC
M31 Grant TRV almost done: Tamiya Olive Green (XF-58) & Flat White (XF-2) 3:1 ratio (more or less) for the base color...

...and painted up details:

Tamiya German Grey (XF-63) bogey wheel tires, track pads
Tamiya Red Brown (XF-64) track connector ends
Tamiya Khaki Drab (XF-51) crewman uniform
Tamiya Khaki (XF-49) gloves
Tamiya Flat Brown (XF-10) helmet
Tamiya Dark Sea Grey (XF-54) goggles
Testors Light Tan (1170) skin tones

I then gave the model a brushed-on coat of Future acrylic floor polish and added the decals. Next up, a wash of Grumbacher Raw Umber artist’s oil paint to deepen shadows and a flat coat to kill the shine.
ClaytonFromEllijay
#454
Visit this Community
Georgia, United States
Joined: July 10, 2016
KitMaker: 1,273 posts
Armorama: 1,138 posts
Posted: Saturday, August 19, 2017 - 11:25 PM UTC
We'll get ya next time, Tom...
Very nice, Tim, great detail on such a small tank!
TimReynaga
Staff MemberAssociate Editor
MODEL SHIPWRIGHTS
Visit this Community
California, United States
Joined: May 03, 2006
KitMaker: 2,500 posts
Armorama: 297 posts
Posted: Tuesday, August 22, 2017 - 09:57 AM UTC
After a wash of Raw Umber artist’s oils and a flat coat to matt things down, the M31 Grant tank recovery vehicle is done!


You might have noticed the unusual name...

The Battlefront Miniatures 1/100 scale decal sheet US941(C) I used had included a bunch of mostly typical tank names like “Blood ‘N Guts”, “Cobra King”, “Destruction”, “Hurricane”, but ...“Laxitive” ? Who would name their vehicle something like THAT? Maybe because, like its namesake, this sturdy wrecker was used to “get things moving”...?

I couldn’t resist!
petbat
Visit this Community
Queensland, Australia
Joined: August 06, 2005
KitMaker: 3,353 posts
Armorama: 3,121 posts
Posted: Saturday, August 26, 2017 - 02:13 AM UTC
Looks great Tim. Still reckon it needs the zits!!!
Love the name...


petbat
Visit this Community
Queensland, Australia
Joined: August 06, 2005
KitMaker: 3,353 posts
Armorama: 3,121 posts
Posted: Saturday, August 26, 2017 - 02:29 AM UTC
Well I am not going to meet the deadline - again.

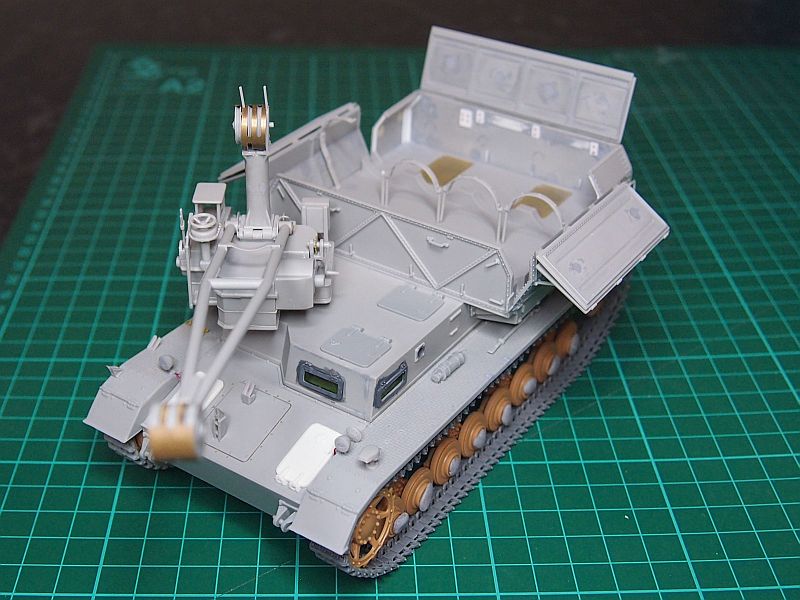
But here is where I am at - main construction complete, sub assemblies ready for paint.

This is a real Frankenpanzer with bits from different places.
Tristar Running Gear
Tristar Panzer IV Ausf D Brake housing coversand hinges(these are castings from a donor kit parts)
Dragon Magic tracks, Hatch covers, towing s hooks (Trumpeter gives you the wrong type), spare track links, starter crank, shovel, Fire extinguisher
Amusing Hobby jack block ( a casting off their Neubaufahrzeug kit)

I have added backing plates and nuts to the inside of the shell compartment, these are where the grab handles are on the outside. This is seen in the few interior pics of the compartment in the Allied AXIS #9 book. This book and the Panzer Tracts on the Karl Gerat and #17 Gepanzerte Nachschub Fahrzeuge are a great source of info on these.

You can see my initial Pencil 'v' lines on the interior where I planned to include the rivet detail that is missing. I did however, draw the line at adding the rivets on the inside as my smallest punch is twice the size and casting the outside compartment section and slicing off all the rivets to place one by one would be a nightmare at the size. The cyano used to hold it would be bigger than the rivet! So I just added the missing frame and rivet bits in the corners:


The cradle for the shell has been reworked considerably. Sink marks and knock out pins, etc. The kit one has various issues in length and the tops of the pointed end pieces are too short and do not represent the real thing where there is a bracket on one side each end. It is also missing carry handles. The bolt heads are just blobs (replaced with resin copies from a selection provided by Amusing Hobby on a tab in the their NBF kit.

The rivets around the cradle are punched discs as Trumpeter gives you a strip of pe with oversized circles etched on it. The PE cradle assembly that came with the kit as an option has the same issues in size and shape so I went with the easier to fix.
TimReynaga
Staff MemberAssociate Editor
MODEL SHIPWRIGHTS
Visit this Community
California, United States
Joined: May 03, 2006
KitMaker: 2,500 posts
Armorama: 297 posts
Posted: Saturday, August 26, 2017 - 03:30 AM UTC

Quoted Text

Looks great Tim. Still reckon it needs the zits!!!

Love the name...


Hi Peter,

I know what you mean! That multitude of bolts was such a characteristic feature of the Lee/Grant series my M31 looks a little weird without them - I guess I could say that it was one of the M31B1 variants which were based on M3A3s with welded rather than the usual riveted hulls.

Your "Frankenpanzer" is very cool, even if you don't finish on time for the campaign. Keep at it, the little monster is looking great!

ClaytonFromEllijay
#454
Visit this Community
Georgia, United States
Joined: July 10, 2016
KitMaker: 1,273 posts
Armorama: 1,138 posts
Posted: Saturday, August 26, 2017 - 07:50 PM UTC
Yes, don't miss a chance, even a coat of primer would qualify as Finished!!!!!