

Hosted by Richard S.
Campaign - Resin

Klaus-Adler

Joined: June 08, 2015
KitMaker: 1,505 posts
Armorama: 840 posts
Posted: Thursday, June 01, 2017 - 05:35 AM UTC
I was just wondering if this only for military kits or is it open to all types of subject matter e.g. sci fi?

SgtRam

#197

Joined: March 06, 2011
KitMaker: 3,971 posts
Armorama: 2,859 posts

Posted: Thursday, June 01, 2017 - 06:03 AM UTC
@David - sorry just military, but a great idea for a further campaign
I am seeing some great work starting, and am looking forward to more. I have not had a lot of chance to get at my build, with my work on Aeroscale, but am making slow progress.

I am seeing some great work starting, and am looking forward to more. I have not had a lot of chance to get at my build, with my work on Aeroscale, but am making slow progress.

bison126

Joined: June 10, 2004
KitMaker: 5,329 posts
Armorama: 5,204 posts
Posted: Thursday, June 01, 2017 - 09:16 PM UTC
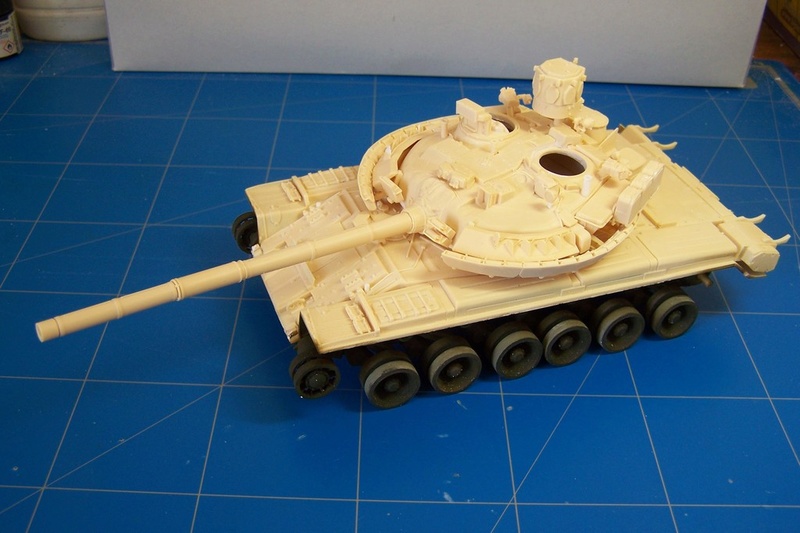
Some progress on the T-80.


The hull is close to the end. I'll add the side skirt after the running gear is weathered.
Olivier
The hull is close to the end. I'll add the side skirt after the running gear is weathered.
Olivier

JSSVIII

Joined: March 28, 2007
KitMaker: 1,169 posts
Armorama: 1,067 posts
Posted: Thursday, June 01, 2017 - 10:33 PM UTC
Looks good Oliver!
petbat

Joined: August 06, 2005
KitMaker: 3,353 posts
Armorama: 3,121 posts
Posted: Friday, June 02, 2017 - 02:29 AM UTC
Welcome aboard Robert.
Slow progress is better than no progress Kevin. I am in another build that finishes this month, so I am focussing on that one. Then back to the Striker.
Impressive hunk of resin so far Olivier. But, Are those air holes in the grill work? What is the rest of the kit like?
Slow progress is better than no progress Kevin. I am in another build that finishes this month, so I am focussing on that one. Then back to the Striker.
Impressive hunk of resin so far Olivier. But, Are those air holes in the grill work? What is the rest of the kit like?

bison126
Joined: June 10, 2004
KitMaker: 5,329 posts
Armorama: 5,204 posts
Posted: Friday, June 02, 2017 - 12:37 PM UTC
Quoted Text
Impressive hunk of resin so far Olivier. But, Are those air holes in the grill work? What is the rest of the kit like?
Yes Peter. But the grill is not correct so I'll shave it off and replace it by styrene strips to get the right rendition.
The kit is an old one but from what I would call the SP Design mid-period production. That means fewer air bubbles, better details but still huge pour plugs to cut off. This is time consuming. The turret is hollow which was new (for SP) at the time I bought this kit and some parts for the interior are provided, including the gun breech.
The instructions are a bit vague in some areas and reference pictures help a lot. Unfortunately for this tank, pictures are not that many. The good point is the UM1 BARS has a plain U hull which you have enough pictures of. The turret is another story.
Olivier
petbat
Joined: August 06, 2005
KitMaker: 3,353 posts
Armorama: 3,121 posts
Posted: Friday, June 02, 2017 - 02:18 PM UTC
Sounds like you have your work cut out for you Olivier, or should that be, your work is cutting it out....
Should be impressive when it is finished though
Should be impressive when it is finished though

SpeedyJ

Joined: September 17, 2013
KitMaker: 1,617 posts
Armorama: 1,150 posts
Posted: Sunday, June 04, 2017 - 04:27 PM UTC
Hi. My entry was delivered today.
I will be in with a WW1 piece of armour.

Will need some study and reference. Already found the reviews and pictures from 2014 by Alan, but there will be some issues left I think.
Starting this weekend with the piece.
Kind regards,
Robert Jan
I will be in with a WW1 piece of armour.
Will need some study and reference. Already found the reviews and pictures from 2014 by Alan, but there will be some issues left I think.
Starting this weekend with the piece.
Kind regards,
Robert Jan
bison126
Joined: June 10, 2004
KitMaker: 5,329 posts
Armorama: 5,204 posts
Posted: Tuesday, June 06, 2017 - 12:27 AM UTC
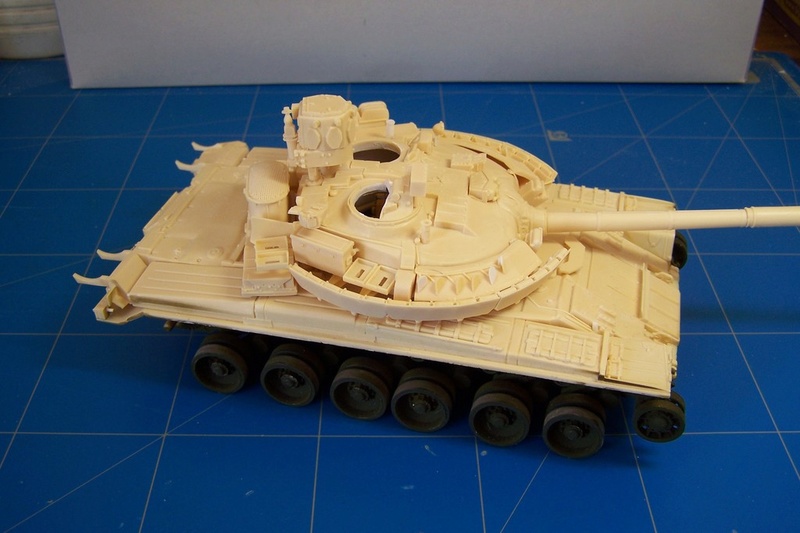
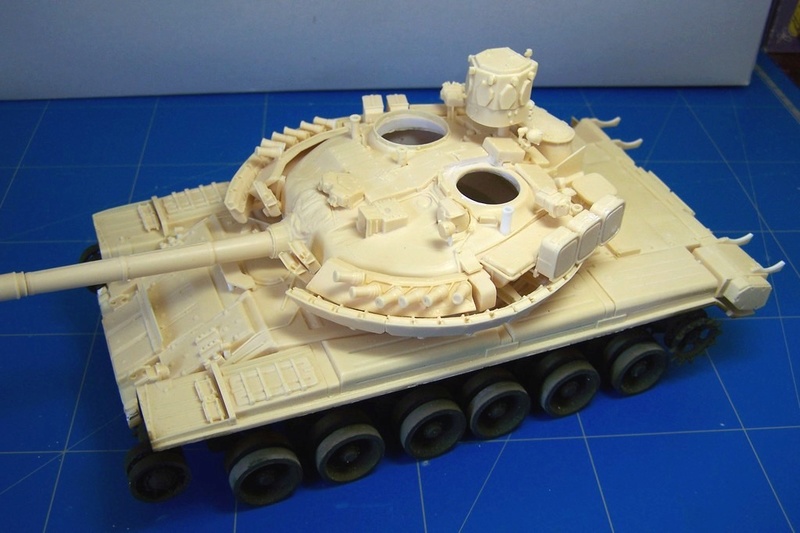
I managed to make some progress last week-end. The running gear is nearly complete. The interior of the turret is "filled" with some sights and a gun breech.


Next step, I'll add the armor plates around the turret but I need to clean the putty here and there.
Olivier
Next step, I'll add the armor plates around the turret but I need to clean the putty here and there.
Olivier
JSSVIII
Joined: March 28, 2007
KitMaker: 1,169 posts
Armorama: 1,067 posts
Posted: Tuesday, June 06, 2017 - 03:34 AM UTC
Nice Oliver, I forget, does the conversion come with the interior bits, or are those from your stash?
bison126
Joined: June 10, 2004
KitMaker: 5,329 posts
Armorama: 5,204 posts
Posted: Tuesday, June 06, 2017 - 10:58 AM UTC
John,
the interior parts come with the conversion. You get the gun breech, two sets of "sights" for the gunner, the main sight for the commander as separate parts. Inside the turret you have a couple of vision blocks which are molded solid.
Olivier
the interior parts come with the conversion. You get the gun breech, two sets of "sights" for the gunner, the main sight for the commander as separate parts. Inside the turret you have a couple of vision blocks which are molded solid.
Olivier
JSSVIII
Joined: March 28, 2007
KitMaker: 1,169 posts
Armorama: 1,067 posts
Posted: Wednesday, June 07, 2017 - 03:23 AM UTC
That's good to hear, thanks Oliver, looking forward to seeing the turret armor on, it is what really makes this tank interesting, to me at least. keep the glue flowing!
SpeedyJ
Joined: September 17, 2013
KitMaker: 1,617 posts
Armorama: 1,150 posts
Posted: Wednesday, June 07, 2017 - 10:09 AM UTC
Hello.
Change of subject. Entry picture will come later this day.
I am going to build the Holt Tractor from Resicast. The artillery piece will move to The Artillery Campaign 2017.
Kind regards,
Robert Jan
Change of subject. Entry picture will come later this day.
I am going to build the Holt Tractor from Resicast. The artillery piece will move to The Artillery Campaign 2017.
Kind regards,
Robert Jan
bison126
Joined: June 10, 2004
KitMaker: 5,329 posts
Armorama: 5,204 posts
Posted: Wednesday, June 07, 2017 - 10:55 AM UTC
Quoted Text
That's good to hear, thanks Oliver, looking forward to seeing the turret armor on, it is what really makes this tank interesting, to me at least. keep the glue flowing!
Yes, this exactly is what made me buy this conversion

I assmelbed half of the turret armor last night. It was a bit challenging as there is no mark to locate the parts on the turret. It ended up not too bad I think. No picture so far, I'll post tonignt when the complete armor is in place. It should be easier now that I know the proper sequence.
Olivier
bison126
Joined: June 10, 2004
KitMaker: 5,329 posts
Armorama: 5,204 posts
Posted: Thursday, June 08, 2017 - 12:57 AM UTC
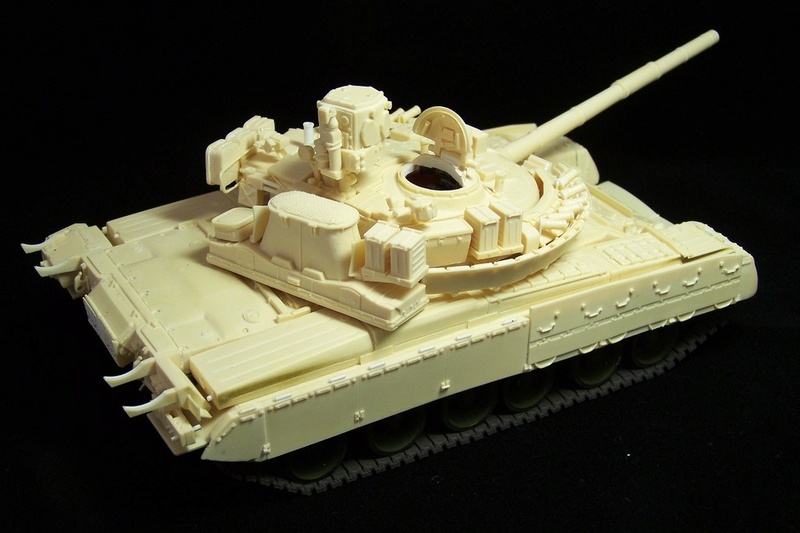
Here is the turret with the ring of Arena explosive charges.


Olivier
Olivier
JSSVIII
Joined: March 28, 2007
KitMaker: 1,169 posts
Armorama: 1,067 posts
Posted: Thursday, June 08, 2017 - 04:15 AM UTC
Quoted Text
Hello.
Change of subject. Entry picture will come later this day.
I am going to build the Holt Tractor from Resicast. The artillery piece will move to The Artillery Campaign 2017.
Kind regards,
Robert Jan
Looking forward to seeing your build also Robert, I have been trying to scratchbuild a Holt 120 for quite a long time now. The tracks are what is stopping me, they are quite complicated.
JSSVIII
Joined: March 28, 2007
KitMaker: 1,169 posts
Armorama: 1,067 posts
Posted: Thursday, June 08, 2017 - 04:21 AM UTC
Nice progress Oliver, I'm going to refer to those photos to help me align the armor when I tackle this project someday.
SpeedyJ
Joined: September 17, 2013
KitMaker: 1,617 posts
Armorama: 1,150 posts
Posted: Thursday, June 08, 2017 - 06:19 AM UTC
Hello. Here is my entry for this campaign.

Weekend is coming up.
Kind regards,
Robert Jan
Weekend is coming up.
Kind regards,
Robert Jan
bison126
Joined: June 10, 2004
KitMaker: 5,329 posts
Armorama: 5,204 posts
Posted: Thursday, June 08, 2017 - 11:52 AM UTC
Quoted Text
Nice progress Oliver, I'm going to refer to those photos to help me align the armor when I tackle this project someday.
Thank you John.
If this can help, I started by gluing the front reactive armor blocks welded to the turret then I added the explosive charges from the gun to the bustle. The two first parts are attached (like on the actual tank) on the reactive armor block and are quite easy to align.
The last part is a bit more tricky. Instead of gluing the bracket to the turret side (with no locating mark) I deciced to glue them to the explosive charges part and then only to glue the assembly to the turret. Likewise you can get a decent alignment of the three parts, not perfect though.
Do not glue the parts with the rounded top aft of the reactive armor before you have attached the stowage bin on the left and the ammo box bracket on the right. Those parts are a bit too large and need some trimming. I also noticed that the stowage box on the right does not exactly match the positioning pins. Not a big deal but you must be aware of it.
Enjoy your build when time comes
Olivier
bison126
Joined: June 10, 2004
KitMaker: 5,329 posts
Armorama: 5,204 posts
Posted: Thursday, June 08, 2017 - 10:21 PM UTC
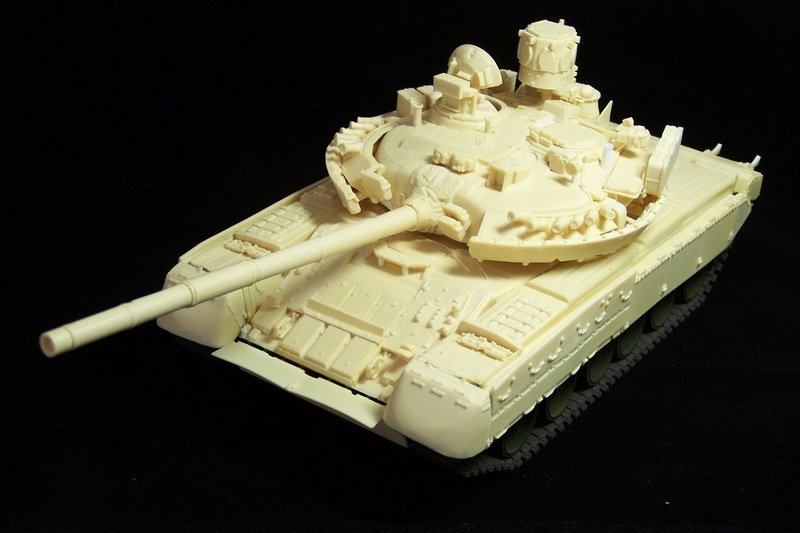
Some hours at the workbench helped nearly complete the turret. The Tucha smoke grenade dischargers are still missing. The MG provided in the conversion is merely a resin copy of the poor Skif MG so I won't use it.

There are some details to add to the hull and I guess the build will be finished soon.
Olivier
There are some details to add to the hull and I guess the build will be finished soon.
Olivier
petbat
Joined: August 06, 2005
KitMaker: 3,353 posts
Armorama: 3,121 posts
Posted: Friday, June 09, 2017 - 02:08 AM UTC
Welcome aboard Jan
Olivier, she is looking superb.
Olivier, she is looking superb.
JSSVIII
Joined: March 28, 2007
KitMaker: 1,169 posts
Armorama: 1,067 posts
Posted: Friday, June 09, 2017 - 06:27 PM UTC
Robert would you mind posting some closeup photos of the tracks during your build, I'm curious how they molded the tracks?
Nice progress Oliver, how are the castings on the turret, any air bubbles in difficult places? It's tough to tell in the photos due to the color of the resin.
Nice progress Oliver, how are the castings on the turret, any air bubbles in difficult places? It's tough to tell in the photos due to the color of the resin.
bison126
Joined: June 10, 2004
KitMaker: 5,329 posts
Armorama: 5,204 posts
Posted: Friday, June 09, 2017 - 10:02 PM UTC
Here are the latest progress.
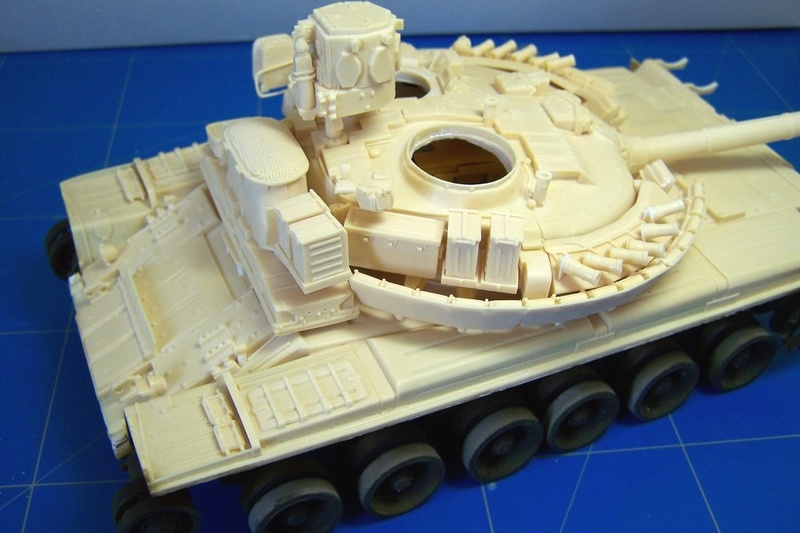


John, there some tiny air bubbles but nothing impossible to deal with. On the back of the turret there were two large holes that I had to fill. However the BROD-M system hides them.
Olivier
John, there some tiny air bubbles but nothing impossible to deal with. On the back of the turret there were two large holes that I had to fill. However the BROD-M system hides them.
Olivier
bison126
Joined: June 10, 2004
KitMaker: 5,329 posts
Armorama: 5,204 posts
Posted: Saturday, June 10, 2017 - 08:10 PM UTC
Tracks are assembled and in place. Side skirts are glued as well so I'm near completion for the build. I still need to create the headlights guards from wire.


With a plain background


Olivier
With a plain background
Olivier
JSSVIII
Joined: March 28, 2007
KitMaker: 1,169 posts
Armorama: 1,067 posts
Posted: Saturday, June 10, 2017 - 09:01 PM UTC
Very cool Oliver, can't wait to see it with some color!
 |

WEB HOSTING BY


Copyright ©2021 Armorama and Kitmaker Network, a subsidiary of Silver Star Enterprises
All Rights Reserved. Please read our Conditions of Use and Privacy Policy.
All Rights Reserved. Please read our Conditions of Use and Privacy Policy.