

No boredom going on here that's for sure.
J
Hosted by Darren Baker
BR 52 Kriegsdampflokomotive 1/35 Scratched

jrutman

Joined: April 10, 2011
KitMaker: 7,941 posts
Armorama: 7,934 posts
Posted: Tuesday, April 04, 2017 - 06:14 PM UTC

Blaubar

Joined: December 15, 2016
KitMaker: 261 posts
Armorama: 246 posts
Posted: Wednesday, April 05, 2017 - 11:58 AM UTC
Kenneth, will see how the next steps will go on, more new parts have been made yesterday.
Cheers Jerry.
I have an intriguing question regarding the design and planning for my diorama...as I want to start planning and building the engine shed and surroundings...
A Sd.Kfz 251 pioneer bridge Version... sitting beside the train together with my Waffentraeger Ardelt (1 of the six Ardelt ones produced)...
I mean this one:

Is that plausible or utter nonsense? (February 20th 1945 in Eberswalde as the Waffentraeger were in the city that day) And maybe the Panhard 178, i.e. "Panzerspaehwagen 204 (f) Schienenpanzer" the German captured Panhard of which 43 were converted to railway recon vehicles for the East...
Thanks for ideas, criticism, suggestions and or help.
A quick n dirty test fit before the end.

/Stefan
Cheers Jerry.
I have an intriguing question regarding the design and planning for my diorama...as I want to start planning and building the engine shed and surroundings...
A Sd.Kfz 251 pioneer bridge Version... sitting beside the train together with my Waffentraeger Ardelt (1 of the six Ardelt ones produced)...
I mean this one:
Is that plausible or utter nonsense? (February 20th 1945 in Eberswalde as the Waffentraeger were in the city that day) And maybe the Panhard 178, i.e. "Panzerspaehwagen 204 (f) Schienenpanzer" the German captured Panhard of which 43 were converted to railway recon vehicles for the East...
Thanks for ideas, criticism, suggestions and or help.
A quick n dirty test fit before the end.
/Stefan

celt15

Joined: September 16, 2016
KitMaker: 95 posts
Armorama: 91 posts
Posted: Thursday, April 06, 2017 - 03:57 AM UTC
Hi Stefan,your idea for a diorama seem plausible to me,who is to say where certain units were exactly, during the chaos of the last few weeks of the war.
Blaubar
Joined: December 15, 2016
KitMaker: 261 posts
Armorama: 246 posts
Posted: Saturday, April 08, 2017 - 01:37 PM UTC
Kenneth, thought so, too, but there are always smart folks out there who might know just more and have better ideas, and I will gladly listen.
Tim, aka Dioramartin and I are currently taking photos from similar angles and points of view in order to compare the OOB version with the modified one.
Tim has suggested that we do so and as such, we will try to organise and do a few comparative shots every here and there.
Tim, many thanks, in the end, it might help some modellers to decide whether it is worth it for them or useful to do some modifications or to just leave it as it is.
We thought of it kind of like below (at least that is how I understood Tim).
The kit tender floor, i.e. Tim's great work:

WIP of updated one

Engine front (Tim's again)

WIP modifiied one:

/Stefan
Here a link to Tim's awesome stuff:
https://armorama.kitmaker.net/forums/247372
Tim, aka Dioramartin and I are currently taking photos from similar angles and points of view in order to compare the OOB version with the modified one.
Tim has suggested that we do so and as such, we will try to organise and do a few comparative shots every here and there.
Tim, many thanks, in the end, it might help some modellers to decide whether it is worth it for them or useful to do some modifications or to just leave it as it is.
We thought of it kind of like below (at least that is how I understood Tim).
The kit tender floor, i.e. Tim's great work:
WIP of updated one
Engine front (Tim's again)
WIP modifiied one:
/Stefan
Here a link to Tim's awesome stuff:
https://armorama.kitmaker.net/forums/247372

Dioramartin

Joined: May 04, 2016
KitMaker: 1,476 posts
Armorama: 1,463 posts
Posted: Saturday, April 08, 2017 - 08:09 PM UTC
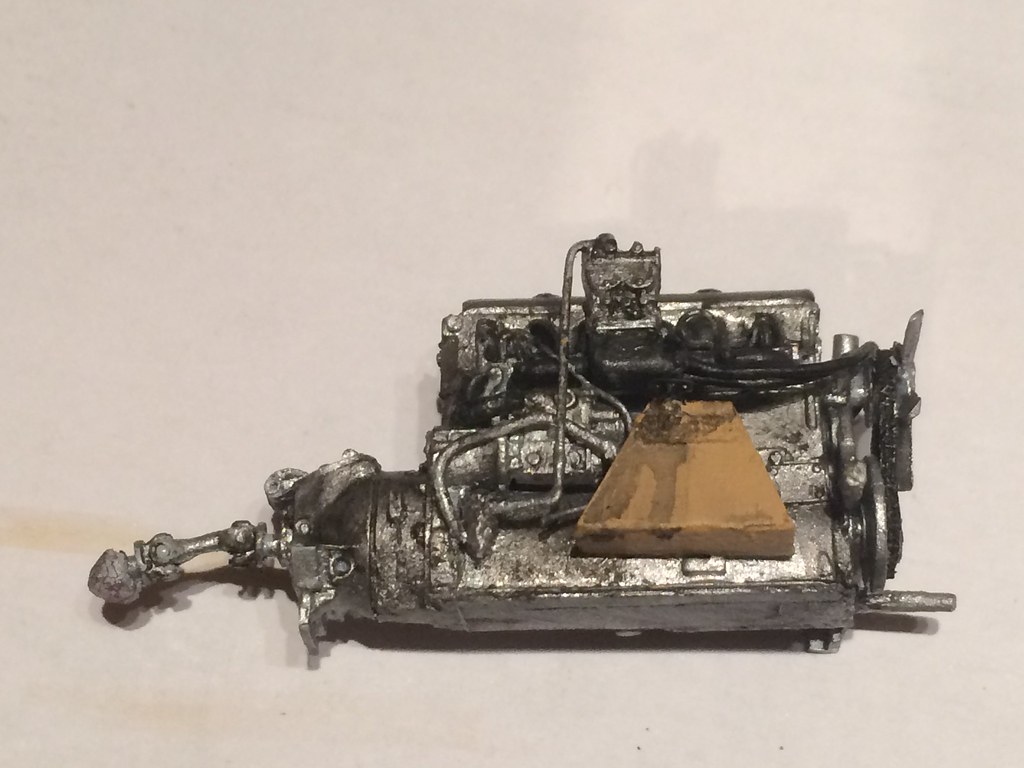
Ahem gulp little did I realise my crap underside painting would go on show
but as Stefan says the point is to compare Trumpys oob with the staggering mods/corrections hes doing.
Hes far too modest, I just think that those who are interested and there seem to be a lot should be able to better appreciate this project. I found this kit one of the more challenging Ive built - and it is a great kit if you want a decent-looking train like I did - but it just boggles me how far hes going to upgrade it.
Er Stefan I think in the engine photo Ive been further exposed those rod thingies coming forward from the piston housings theres a rectangular hole in them have I put them on upside down or something?
Blaubar
Joined: December 15, 2016
KitMaker: 261 posts
Armorama: 246 posts
Posted: Sunday, April 09, 2017 - 10:33 AM UTC
Tim,
None cares about the underside^^, well usually at least. I already put too many parts together, painting it now is hell (started yesterday).
As to that piston rod, I am not sure, have not looked into the piston plans and technical drawings yet, as their construction is still far away at this stage.It is invisible for humans (only spiders crawling underneath would notice it if it were wrong)
I need to build the ICM railway Panzerspähwagen now.
/Stefan
Blaubar
Joined: December 15, 2016
KitMaker: 261 posts
Armorama: 246 posts
Posted: Thursday, April 13, 2017 - 12:23 PM UTC
Happy Easter-Weekend to all.
Those who do not celebrate it (I don't do it either) have a few great days
/Stefan
Those who do not celebrate it (I don't do it either) have a few great days
/Stefan
Blaubar
Joined: December 15, 2016
KitMaker: 261 posts
Armorama: 246 posts
Posted: Friday, April 14, 2017 - 09:21 PM UTC
Good day together,
I have noticed that I forgot to share some interesting information which I should share with the ones interested in BR52s. The original technical drawings and early photographs from 1943 show the spark arrestor as a cylinder, as can be seen below.

*1)
However, as some of you might have noticed, mine is cone shaped:

This is the case, as of on July 29th, 1943, the "Arbeitsausschuss Reichsbahn" was briefed by Friedrich Witte that the cylinder shape did not allow for proper cleaning of the pipes and the more complex cone shaped spark arrestors are to be implemented and produced again. *2)
Just in case anyone wondered or was thinking why my build differs from drawings with this respect.
In the meantime, I have begun priming the thing... At least parts of the front frame structure, it does need a lot more attention and more painting though.

Have a great weekend all.
/Stefan
*1) Propaganda movie (on youtube) as quoted above.
*2) see Eisenbahnjournal II/96 - "Die Baureihe 52" page 19
I have noticed that I forgot to share some interesting information which I should share with the ones interested in BR52s. The original technical drawings and early photographs from 1943 show the spark arrestor as a cylinder, as can be seen below.
*1)
However, as some of you might have noticed, mine is cone shaped:
This is the case, as of on July 29th, 1943, the "Arbeitsausschuss Reichsbahn" was briefed by Friedrich Witte that the cylinder shape did not allow for proper cleaning of the pipes and the more complex cone shaped spark arrestors are to be implemented and produced again. *2)
Just in case anyone wondered or was thinking why my build differs from drawings with this respect.
In the meantime, I have begun priming the thing... At least parts of the front frame structure, it does need a lot more attention and more painting though.
Have a great weekend all.
/Stefan
*1) Propaganda movie (on youtube) as quoted above.
*2) see Eisenbahnjournal II/96 - "Die Baureihe 52" page 19
Dioramartin
Joined: May 04, 2016
KitMaker: 1,476 posts
Armorama: 1,463 posts
Posted: Saturday, April 15, 2017 - 03:37 PM UTC
Happy Easter to you too Stefan
Mmm detecting the whiff of coal dust already. Im not that familiar with loco engineering so these may be a dumb questions, but (a) this is the funnel right? (b) and if so presumably the smaller pipes around the arrestor clogged with accreted ash deposit if not cleaned what were the smaller pipes for? (c) From what I can see the smoke passes along the big pipe and through the arrestor, the sparks are trapped or continue through while the smoke comes up through the mesh? (d) What happens to the ash after its passed through the arrestor to the other side of the big pipe?

Mmm detecting the whiff of coal dust already. Im not that familiar with loco engineering so these may be a dumb questions, but (a) this is the funnel right? (b) and if so presumably the smaller pipes around the arrestor clogged with accreted ash deposit if not cleaned what were the smaller pipes for? (c) From what I can see the smoke passes along the big pipe and through the arrestor, the sparks are trapped or continue through while the smoke comes up through the mesh? (d) What happens to the ash after its passed through the arrestor to the other side of the big pipe?
Blaubar
Joined: December 15, 2016
KitMaker: 261 posts
Armorama: 246 posts
Posted: Saturday, April 15, 2017 - 06:24 PM UTC
Tim,

Smoke (green lines) comes from the fire box via the thick diameter smoke pipes and the flues (the small heat pipes of which there are much more). Within the smoke pipes are the superheater pipes. Water runs through here to get exposed to the hot smoke (after being heated already in the boiler and the steam is thus heated again). The superheater "dries" the steam and makes it much hotter and faster. These are the many red lines. After exiting the superheater, (4 pipes run towards each cylinder collector) the superheated steam is then directed towards the cylinder via the pipes on the left and the right. See the red lines below:

After the steam is used in the cylinders, some of it is used to power the blast pipe which shoots out of the funnel/chimney on top in the center (red-blue line of the used steam). This draws more smoke from the fire box and keeps the fire running as it is creating a constant air flow. The fire itself draws air from around and through the ash pan air intakes.
The sparks and ash that are sucked into the smoke box are stopped by the spark arrestor and are collected on the bottom (yellow stuff) once the train is standing safe (away from wooden tracks). Often the floor is covered in clay and stuff, in order to prevent structural damage to the floor, afaik.
Here another drawing, thiis shows the steam being sucked into the superheater through the right side pipes into each smoke pipe (purple), while the superheated steam (red again) is coming back out towards the left pipe and is then directed to the cylinders.

As such, there will not be smoke or ash debris or anything in the water pipes, other than what is in the water (if bad water was used and not treated right).
Hth,
/STefan
Smoke (green lines) comes from the fire box via the thick diameter smoke pipes and the flues (the small heat pipes of which there are much more). Within the smoke pipes are the superheater pipes. Water runs through here to get exposed to the hot smoke (after being heated already in the boiler and the steam is thus heated again). The superheater "dries" the steam and makes it much hotter and faster. These are the many red lines. After exiting the superheater, (4 pipes run towards each cylinder collector) the superheated steam is then directed towards the cylinder via the pipes on the left and the right. See the red lines below:
After the steam is used in the cylinders, some of it is used to power the blast pipe which shoots out of the funnel/chimney on top in the center (red-blue line of the used steam). This draws more smoke from the fire box and keeps the fire running as it is creating a constant air flow. The fire itself draws air from around and through the ash pan air intakes.
The sparks and ash that are sucked into the smoke box are stopped by the spark arrestor and are collected on the bottom (yellow stuff) once the train is standing safe (away from wooden tracks). Often the floor is covered in clay and stuff, in order to prevent structural damage to the floor, afaik.
Here another drawing, thiis shows the steam being sucked into the superheater through the right side pipes into each smoke pipe (purple), while the superheated steam (red again) is coming back out towards the left pipe and is then directed to the cylinders.
As such, there will not be smoke or ash debris or anything in the water pipes, other than what is in the water (if bad water was used and not treated right).
Hth,
/STefan
celt15
Joined: September 16, 2016
KitMaker: 95 posts
Armorama: 91 posts
Posted: Tuesday, April 18, 2017 - 04:04 AM UTC
Its wonderful what you can learn on this forum,great stuff. 
Dioramartin
Joined: May 04, 2016
KitMaker: 1,476 posts
Armorama: 1,463 posts
Posted: Wednesday, April 19, 2017 - 09:40 AM UTC
Stefan thanks & great tutorial, now I get it! And it explains something I almost hadnt realized Id noticed with real locos, the rush coming out of the funnel doesnt always look like just smoke.
Blaubar
Joined: December 15, 2016
KitMaker: 261 posts
Armorama: 246 posts
Posted: Wednesday, April 19, 2017 - 04:19 PM UTC
Kenneth, that's what forums are for I guess. I read up most of this in books in the recent two years and a friend on milmod taught me a lot! Glad you like it.
Tim, welcome. I just ordered acnew book about steam technology ^^, more to come.
Tim, welcome. I just ordered acnew book about steam technology ^^, more to come.
Removed by original poster on 04/24/17 - 07:39:21 (GMT).
Blaubar
Joined: December 15, 2016
KitMaker: 261 posts
Armorama: 246 posts
Posted: Sunday, April 23, 2017 - 12:42 PM UTC
Good day together,
I have become to realise now need to buy an air pressure thing for a spray gun/airbrush, as I have none. Any Compressor or Airbrush suggestions?
As there will be engines to follow and tanks to be added to the diorama, brush painting it all will probably not be possible and would not lead to good results?!!?
Any ideas or help would be appreciated.
Cheers,
/Stefan
Blaubar
Joined: December 15, 2016
KitMaker: 261 posts
Armorama: 246 posts
Posted: Wednesday, April 26, 2017 - 10:45 PM UTC
D'day,
Still looking for compressor info if anyone with ideas is going through the trouble and reading this.
Just a tiny bit of progress, some more parts were added and I continued adding paint to the front of the frame.
From below

From above


Have a good one. What do you think?
/Stefan
Still looking for compressor info if anyone with ideas is going through the trouble and reading this.
Just a tiny bit of progress, some more parts were added and I continued adding paint to the front of the frame.
From below
From above
Have a good one. What do you think?
/Stefan
jrutman
Joined: April 10, 2011
KitMaker: 7,941 posts
Armorama: 7,934 posts
Posted: Thursday, April 27, 2017 - 06:32 PM UTC
Nice progress as usual. I don't know if you use them in Germany but here we have a lot of air powered tools like nail guns and socket wrenches. I bought an inexpensive compressor from the big hardware store. It works great. I think anything from the hobby world is always more expensive.
J
J
Blaubar
Joined: December 15, 2016
KitMaker: 261 posts
Armorama: 246 posts
Posted: Saturday, April 29, 2017 - 10:25 PM UTC
Ok, thanks there mate!
Glad you like it. It's taking a long time but I ill do some more work on it this week.
/Stefan
Glad you like it. It's taking a long time but I ill do some more work on it this week.
/Stefan
Blaubar
Joined: December 15, 2016
KitMaker: 261 posts
Armorama: 246 posts
Posted: Saturday, May 13, 2017 - 07:49 PM UTC
I have moved my modelling chamber into the basement now,
as such, work will be easier and the background rather constant and not all over the house as it used to be. It is still basic compared to many mancave pictures I have seen, but it is good enough for me.

The laid tracks would be the length of the engine. While thinking about the dio and the arrangements, I have continued work on some vehicles which will go along with it for sure.
The HL42 TRM for the Waffentrager is getting closer to completion and I have begun spraying the hull partially with primer.
Turns out, it needs some fixing before continuing.

Have a good day, comments and ideas as always welcome.
Prost
as such, work will be easier and the background rather constant and not all over the house as it used to be. It is still basic compared to many mancave pictures I have seen, but it is good enough for me.
The laid tracks would be the length of the engine. While thinking about the dio and the arrangements, I have continued work on some vehicles which will go along with it for sure.
The HL42 TRM for the Waffentrager is getting closer to completion and I have begun spraying the hull partially with primer.
Turns out, it needs some fixing before continuing.
Have a good day, comments and ideas as always welcome.
Prost
Blaubar
Joined: December 15, 2016
KitMaker: 261 posts
Armorama: 246 posts
Posted: Thursday, November 30, 2017 - 04:47 PM UTC
Good day foolks,
During late fall, I began working on the 52 again.
The engine saw some major modifications and adjustments. I had to scrap and bin old parts and especially the whole frame, as yet more faults and deficiencies were discovered. Also much of my early bad work had to be trashed as it was just too bad and awful to look at. As such, the ash pan is being built anew, as is the whole cabin, as it is totally warped. Despite heating it and trying to bend it into shape, it is impossible to use the kit cabin (which is actually of very good quality and the only kit part that is correct and good).
Back to the frame:
Sadly, the kit frame does not resemble this at all.

As the support beam L-lip is by far too wide and wrong, the interior support structure is missing completely and the general shape is sadly also off (mixed plate and bar frame stuff).

Off to the drawing board:


A 3D frame view:

Redesgining the cabin floor, adjusting it for internal floor heating pipes and adjusting the shape.

The new frame parts, not yet all done, but getting there.


This now includes the new coupling support block, which holds the weight of the 1200ton train being pulled at 65km/h. The weight is held by one single bolt and steel bar, as opposed to 3 (1 main + 2 additional safety ones were standard for the BR50, but to save weight, labour and materials, safety was neglected during the war!)
The two holes to each side were the ones for the safety rods (BR50).
 Ohne Titel by Blaubar, auf Flickr
It is quite an enjoyable build. Sadly, the kit was wasted, hwoever.
Prost
/Stefan
During late fall, I began working on the 52 again.
The engine saw some major modifications and adjustments. I had to scrap and bin old parts and especially the whole frame, as yet more faults and deficiencies were discovered. Also much of my early bad work had to be trashed as it was just too bad and awful to look at. As such, the ash pan is being built anew, as is the whole cabin, as it is totally warped. Despite heating it and trying to bend it into shape, it is impossible to use the kit cabin (which is actually of very good quality and the only kit part that is correct and good).
Back to the frame:
Sadly, the kit frame does not resemble this at all.
As the support beam L-lip is by far too wide and wrong, the interior support structure is missing completely and the general shape is sadly also off (mixed plate and bar frame stuff).
Off to the drawing board:
A 3D frame view:
Redesgining the cabin floor, adjusting it for internal floor heating pipes and adjusting the shape.
The new frame parts, not yet all done, but getting there.
This now includes the new coupling support block, which holds the weight of the 1200ton train being pulled at 65km/h. The weight is held by one single bolt and steel bar, as opposed to 3 (1 main + 2 additional safety ones were standard for the BR50, but to save weight, labour and materials, safety was neglected during the war!)
The two holes to each side were the ones for the safety rods (BR50).
Ohne Titel by Blaubar, auf FlickrIt is quite an enjoyable build. Sadly, the kit was wasted, hwoever.
Prost
/Stefan
jrutman
Joined: April 10, 2011
KitMaker: 7,941 posts
Armorama: 7,934 posts
Posted: Thursday, November 30, 2017 - 07:54 PM UTC
Impressive update as always !
J
J
Blaubar
Joined: December 15, 2016
KitMaker: 261 posts
Armorama: 246 posts
Posted: Saturday, December 02, 2017 - 02:53 AM UTC
Quoted Text
Impressive update as always !
J
Cheers there, it is kind of a slow progress^^.
Dioramartin
Joined: May 04, 2016
KitMaker: 1,476 posts
Armorama: 1,463 posts
Posted: Saturday, December 02, 2017 - 12:47 PM UTC
Hi Stefan - Ouch it always hurts the most self-destructing, commiserations, and Ouch all those round-cornered frame openings again I vaguely wonder why they were designed so if economy/simplicity was the aim? Also noticed youre working from Cyrillic plans...relics from East Germany? Anyway delighted youve got this er back on the rails too
Blaubar
Joined: December 15, 2016
KitMaker: 261 posts
Armorama: 246 posts
Posted: Saturday, December 02, 2017 - 08:00 PM UTC
Tim, the round cutouts keep the steel stronger as there are no corners. A rectangle will always have a weak point at 4 edges and corners. As such, round recesses are always, structurally speaking, stronger and needed to save weight without having weak corners.
The plans are from 1953, German originals translated for the Russian Ministry of Transportation. As such, many pages are not useful, as they show post-war Russian TE3 modifications, some are for bar and others for plate frames. It takes time to read all the Russian stuff, but it is quite straightforward and the good and structured nomenclature from the Russian's side, helps. Sadly the German museum did not hand out their drawings, I need to wait till I am in Berlin again to inspect them at the archives. As I don't like Berlin, it will not happen soon, been there twice this year already and that's enough.
The plans are from 1953, German originals translated for the Russian Ministry of Transportation. As such, many pages are not useful, as they show post-war Russian TE3 modifications, some are for bar and others for plate frames. It takes time to read all the Russian stuff, but it is quite straightforward and the good and structured nomenclature from the Russian's side, helps. Sadly the German museum did not hand out their drawings, I need to wait till I am in Berlin again to inspect them at the archives. As I don't like Berlin, it will not happen soon, been there twice this year already and that's enough.

ColinEdm


Joined: October 15, 2013
KitMaker: 1,355 posts
Armorama: 1,229 posts
Posted: Saturday, December 02, 2017 - 09:00 PM UTC
Wow, great work Stef!
 |

WEB HOSTING BY


Copyright ©2021 Armorama and Kitmaker Network, a subsidiary of Silver Star Enterprises
All Rights Reserved. Please read our Conditions of Use and Privacy Policy.
All Rights Reserved. Please read our Conditions of Use and Privacy Policy.