Thanks gents
Jerry crossed my mind too but Heydrichs ride was a stretch limo compared to this jalopy. Although thinking about a variation
if these officers were driving at night and pulled over for a comfort stop when ambushed
would Darren let me call it A Sh*t in the Dark?
Bob thanks for spotting, looks like that ICM set is the only one especially clothes-wise given its a summer setting. Now that Ive searched a bit too I like Corsars Red Army Medical Sister (CR35006) in a skirt letting loose with a burp gun cute, never seen her before but alas this is looking like an aftermath dio. Maybe I can Russify some other-nationality partisan types as extras.
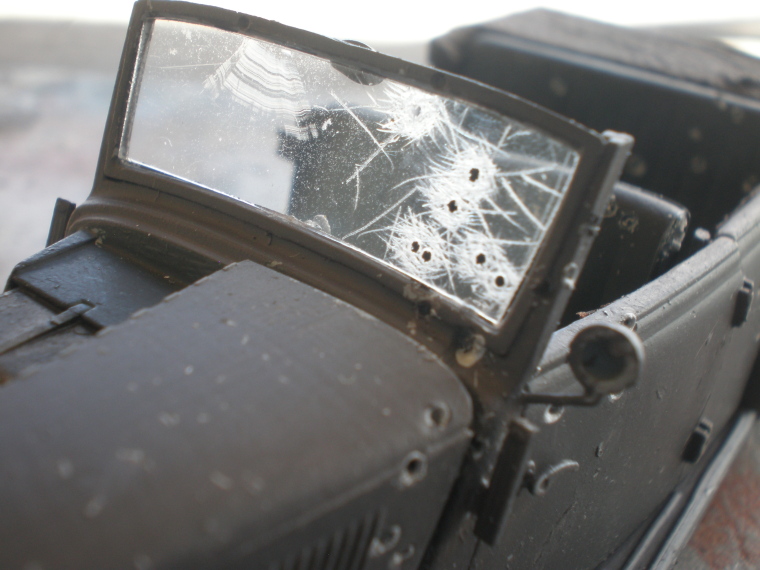
Cheyenne I guess now Ill have to put my money where my mouth was on your thread recently, and attempt shattered glass in the windscreen
Stef maybe it needs more damage - a second shooter
from a grassy knoll perhaps (dont get me started, I know what happened & it wasnt from there), because Im discovering chassis-to-body fit problems now.
So now to do something/anything with the folded tilt, as seen in the first image at the top of this thread in the bottom right corner, looking like some miniature constructivist sculpture - assumed to be a fitted material cover intended to protect the concertinad rig. Im doing this in some detail in case it helps others with a more realistic representation of fabric & material in general.
Step 1 assembling the entire Acrylic Paints Inventory (because every colour/shade/tone in the visible spectrum is here), a worm-let of pigment from each tube seasoned with a dab of Tamiya X21 Flat Base to take away the sheen when dry
maybe a sheen would be more correct (water-proofed material?) but in photos it can look seriously unrealistic.

Step 2 Add water to taste and stir into a thickish darkish nameless colour. My point being theres rarely any such thing as black (Colour Theory 101) at least at 1/35th scale. At its darkest its usually a dark blue/green/brown (Tamiyas enamel Rubber Black is dark blue-green, used here on the seats as a base coat) and even if the real item started out as near-black, after a couple of years in Russia its going to be faded/dirty/dusty. The final shade can always be adjusted later with a wash of paint and/or pastel dust. Besides, student-quality acrylic paints dry a couple of shades darker than when wet so theres no point obsessing about colour-accuracy yet.

Step 3 laying 2 sheets of plain 2-ply tissue over the mix and gently pressing with a soft brush until it soaks through, then peeling away and allowing to dry.


(hey its high summer here so I can do this for quick-drying)
Step 4 Releasing The Blob wrinkling/creases have occurred naturally, enhance-able by re-soaking with clean water and gently working it around with a soft brush.

Step 5 The blobs big enough so that if the first attempt failed/tore, I had enough left for another try. Cutting to shape and gluing to the kit's plastic tilt with pva/Elmers - only a very thin layer necessary, otherwise itll soak right through and leave shiney patches on the surface.

Step 6 - test-fit


Needs fine-tuning - and bullet damage - but itll do for now.
Maybe this technique has potential for individual figures (particularly large-scale); even a matt/flat topcoat can leave crease-edges unrealistically reflecting light because the paints always being applied to a smooth plastic surface. The grain of a single 2-ply tissue breaks up that smoothness maybe even 1-ply for ultra thin-ness, and although very delicate to handle while wet the acrylic paint will hold it together when dry. A large bolt of dried fabric could be then tailored to fit arms, legs, torso etc., re-wetted to make it pliable and applied with a thin solution of Elmers. When dry again, adjusting colour-washes can always be applied if necessary. Then open a Bespoke Emporium for the Smaller Man.
Yeah I know it, shouldnt be mixing my drinks.
Next time: Murk-y paint-job.