Germany
Joined: October 03, 2010
KitMaker: 134 posts
Armorama: 134 posts
Posted: Tuesday, July 18, 2017 - 02:28 AM UTC
Time to build one model that you see not that often: a BREM-2 conversion made by SP Designs.
The BREM-2 is the recovery version of the BMP-1/2 family. The turret was removed and replaced with a winch, complimented by a crane, an open storage box and everything else useful to pull a BMP out of a bog or to replace the drivetrain and other larger parts of the vehicle. Armament is reduced to a pintle mounted light MG at the commanders hatch. Gunports are welded shut, most of the vision devices removed.
Here we go: SP Designs conversion set and the donor kit, a chinese BMP clone - the chapest BMP body available by Trumpeter.
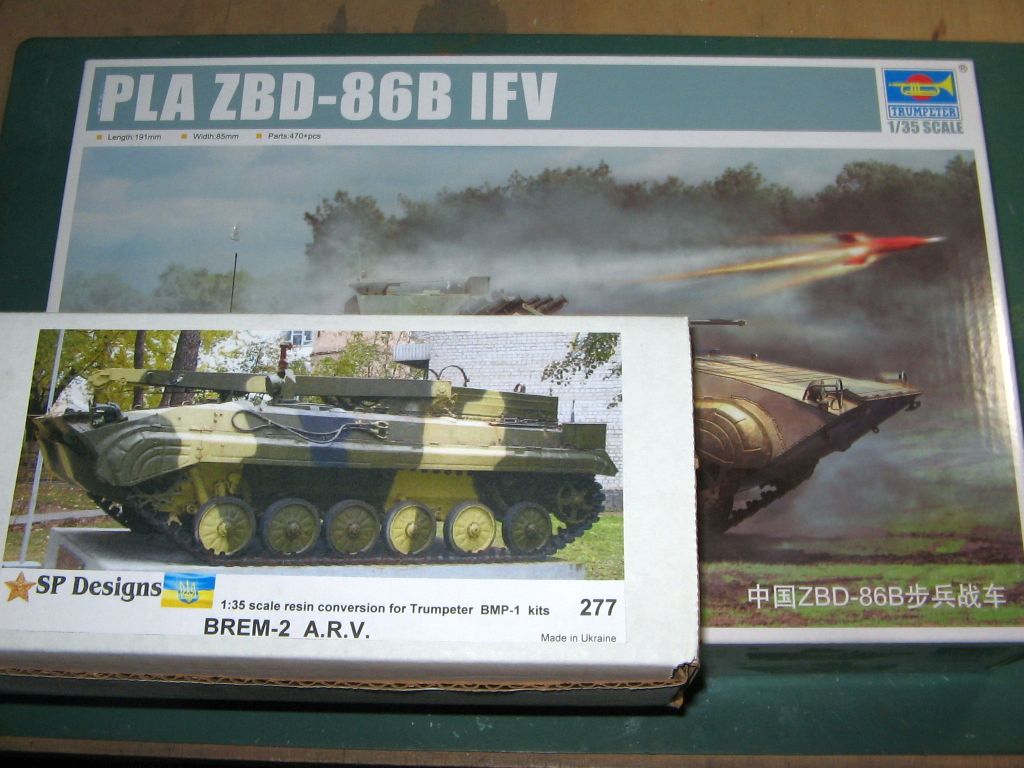
Enjoy
- dutik
Germany
Joined: October 03, 2010
KitMaker: 134 posts
Armorama: 134 posts
Posted: Tuesday, July 18, 2017 - 02:32 AM UTC
First step: Mating the resin upper hull with the styrene lower body, filling all gaps and seams and sanding the whole thing smooth. The SP part is a drop fit after a very small amount of sanding at the styrene sponsons.
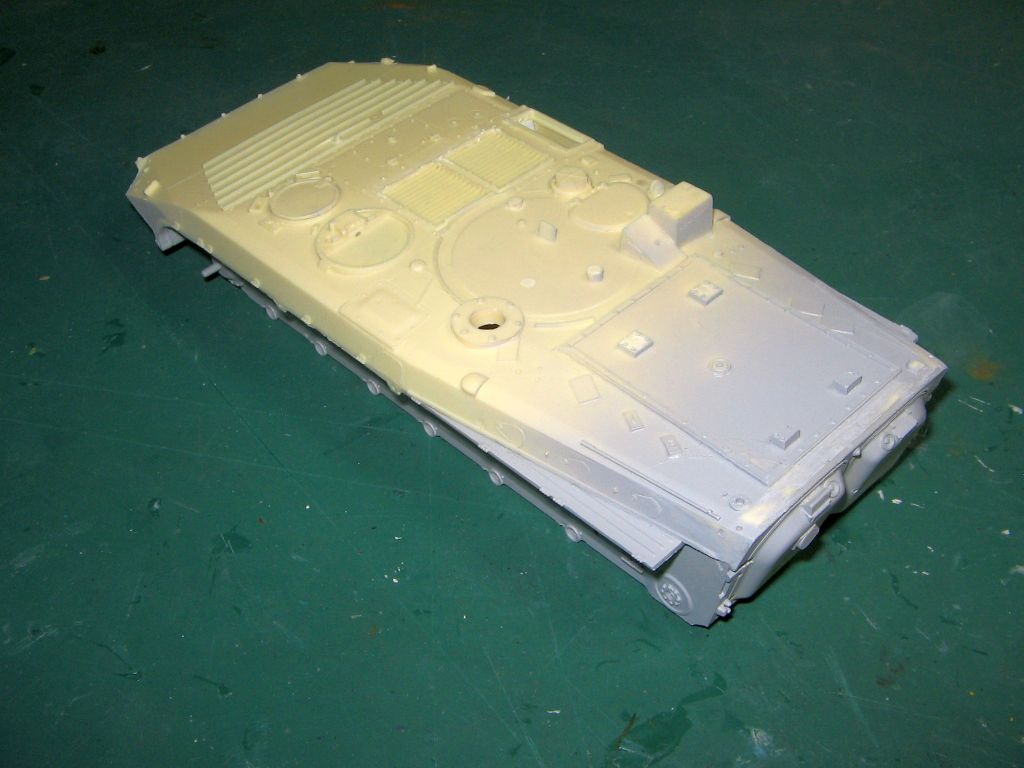
Enjoy
- dutik
Minnesota, United States
Joined: March 04, 2003
KitMaker: 4,630 posts
Armorama: 4,498 posts
Posted: Tuesday, July 18, 2017 - 03:39 AM UTC
Watching this with interest.

Ex-34th ID MNANG - 13F and 63D
"Fire For Effect."
North Carolina, United States
Joined: January 20, 2005
KitMaker: 916 posts
Armorama: 758 posts
Posted: Tuesday, July 18, 2017 - 04:19 AM UTC
Ditto.
One of my favorite BMP mod's...
Old Chinese Proverb:
The journey of a thousand miles begins with the first step
Old Modelers Proverb:
The building of a thousand kits begins with the first sprue
Bayern, Germany
Joined: September 30, 2013
KitMaker: 1,615 posts
Armorama: 1,500 posts
Posted: Tuesday, July 18, 2017 - 01:47 PM UTC
Great mod! Looking forward to more!
Building logs: http://armored76.wordpress.com/
Finished projects: http://armored76.wordpress.com/portfolio/
Germany
Joined: October 03, 2010
KitMaker: 134 posts
Armorama: 134 posts
Posted: Wednesday, July 19, 2017 - 11:53 PM UTC
Sanded all seams smooth and building up the running gear:
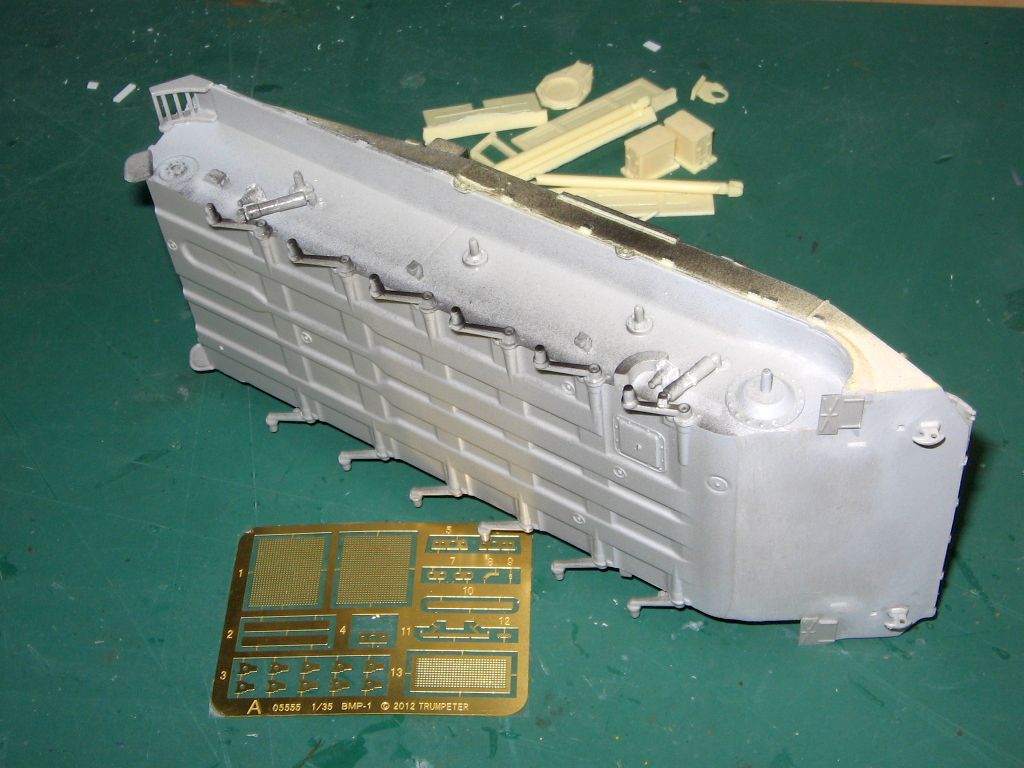
Trumpeters PE is strong as steel. There are also no bending lines. Tried to bend the bumper guards but it didn't work proper. So I made my own gurads from styrene.
Enjoy
- dutik
Texas, United States
Joined: March 11, 2007
KitMaker: 977 posts
Armorama: 976 posts
Posted: Thursday, July 20, 2017 - 01:09 AM UTC
Heat the brass over a flame for a couple of minutes, it should help some.
Gregovich "I paint all my Models in 4BO Green" Beckman
Holder of the Knight's Cross, Hero of the Soviet Union, Dragon Slayer and Slinger of Massive BS.
Dubayy, United Arab Emirates
Joined: February 22, 2013
KitMaker: 46 posts
Armorama: 46 posts
Posted: Thursday, July 20, 2017 - 01:19 AM UTC
Hi Dutik,
That is a very interesting subject indeed!
Regards,
Maher

Florida, United States
Joined: October 21, 2013
KitMaker: 751 posts
Armorama: 751 posts
Posted: Thursday, July 20, 2017 - 01:29 AM UTC
Been thinking of getting one of these conversion kits for a while.Will be watching with great interest to see how this looks when finished.
Myanmar
Joined: March 05, 2004
KitMaker: 4,011 posts
Armorama: 1,498 posts
Posted: Thursday, July 20, 2017 - 09:39 AM UTC
I like these Recovery Conversions. Good putty work.

i watched a scale plastic figure crawl along the edge . . . of an exacto blade . . . that's my dream , it's my nightmare . . . . . . . crawling , slithering . . . . . along the edge . . . . . . of an exacto . . . . . blade . . . . and surviving
Germany
Joined: October 03, 2010
KitMaker: 134 posts
Armorama: 134 posts
Posted: Thursday, July 20, 2017 - 05:52 PM UTC
Quoted Text
Heat the brass over a flame for a couple of minutes, it should help some.
Thank you for pointing out to this technique. I should have mentioned it, or why I did not use it.
The Trumpeter PE is like the stainless steel PE from the first Dragon kits decades ago, so I am familiar with annealing PE parts or steel cables. But with a styrene body it was for me just a simpler approach to cut and drill a few styrene strips and glue them with Tamiya cement, saving me some more hassling with superglue

@sanding
Guess I mastered the technique of wet sanding. Simply used coarse grain wet sanding paper, a handle and some water and anything worked like a charm without the need for finer grit or polishing afterwards.
Regards
- dutik
Germany
Joined: October 03, 2010
KitMaker: 134 posts
Armorama: 134 posts
Posted: Friday, July 21, 2017 - 06:13 PM UTC
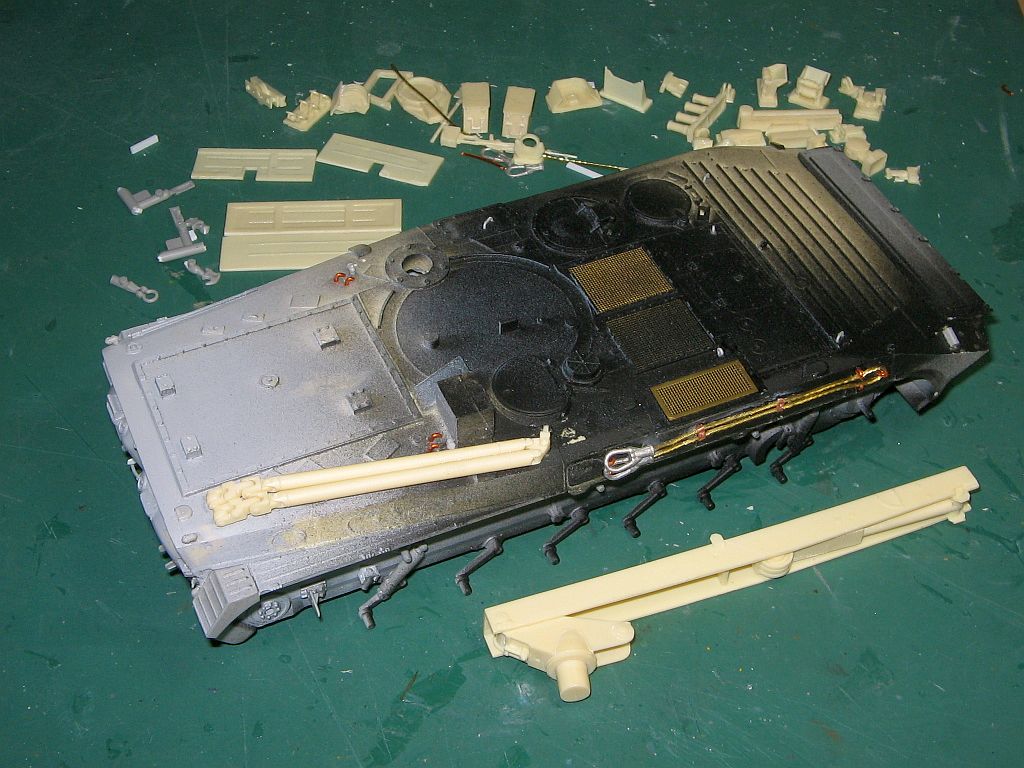
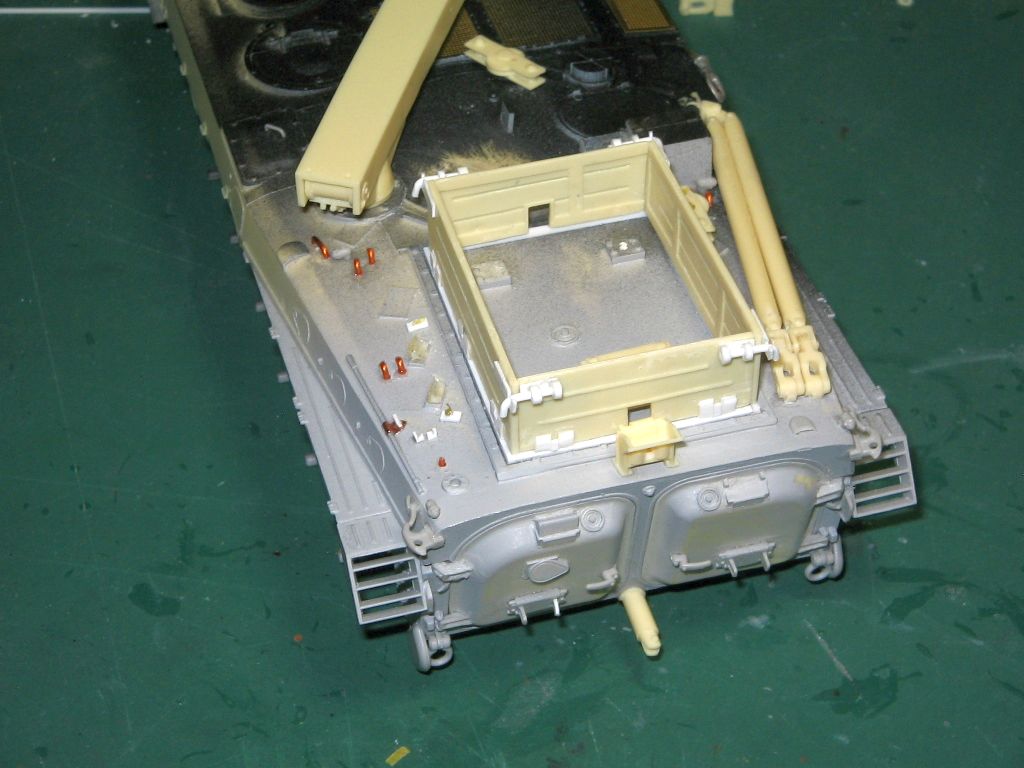
Started to add the exterior details. I boxed in the exhaust before mating the hull halves, but it is not really nessessairy given the shutters inside and the tight mesh on top if you paint the insides black. The conversion requires to use a lot of styrene parts from the donor kit. I replaced some of the styrene for wire. Tow cable is the light modern soviet one from Accurate Armour. To avoid a burnout due to the sheer number of small parts involved I divided the exterior build into subassemblies: 3 tow cable assemblies, storage boxes, top box, commanders hatch, bow plate, recovery equipment. Well, I finished one tow cable assembly and started the recovery equipment. Good feeling to have finished something!
Regards
- dutik
Germany
Joined: October 03, 2010
KitMaker: 134 posts
Armorama: 134 posts
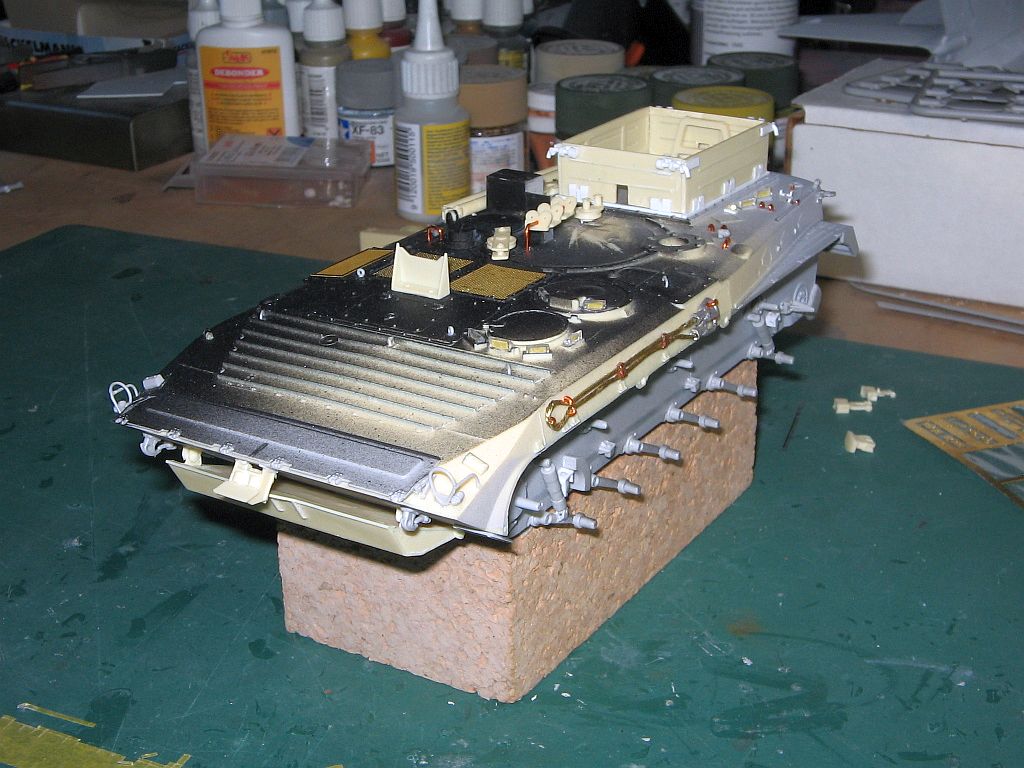
Posted: Sunday, July 23, 2017 - 08:19 PM UTC
Completed the rear deck: cargo box, tow bars and pulleys, empty tow cable holders, handles and tiedowns, the duct for the winch cable and other parts. The cargo box as given in the conversion is like at display vehicles. Simply welded shut sides without hinges and handles. Added the hinges, handles and other stuff as per service vehicles.
Enjoy
- dutik
Germany
Joined: October 03, 2010
KitMaker: 134 posts
Armorama: 134 posts
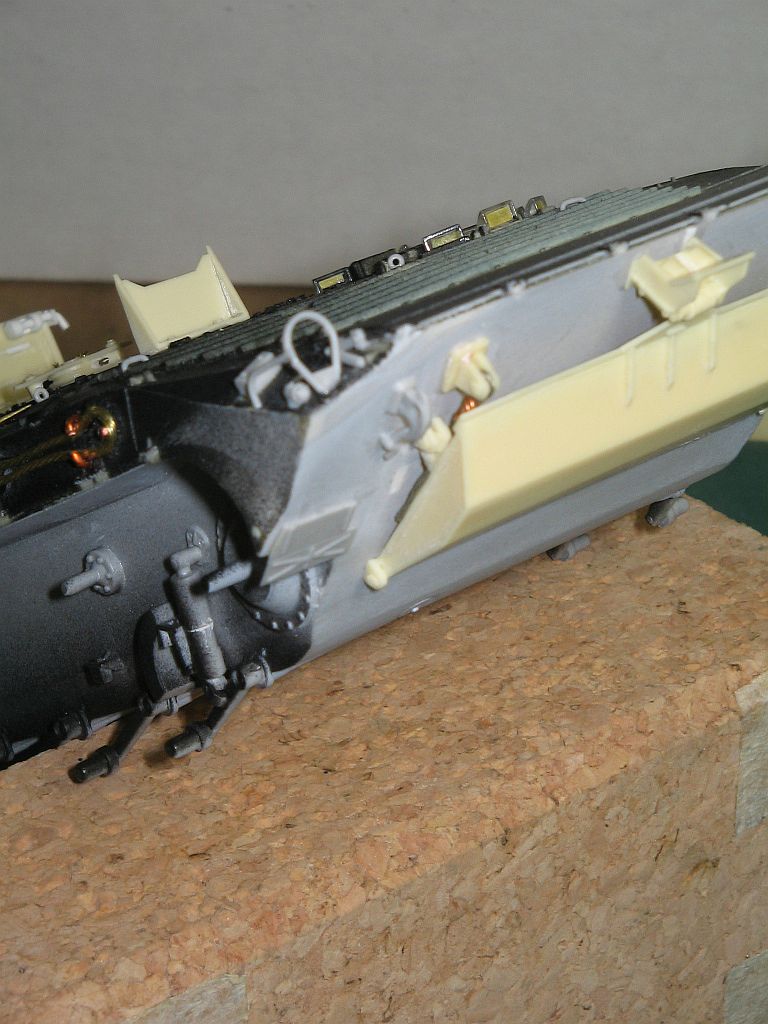
Posted: Tuesday, July 25, 2017 - 06:18 PM UTC
Added the light guards and the entrenching blade. Found an image that shows the entrenching blade in working condition. The common images (Vitaly Kuzmin; Kiev Memorial) are of museum vehicles that are missing parts. Added some more pulleys and stuff to the roof. Also had to take off and relocate some parts because I found more images that show more of the layout. Of course after I glued the parts the first time... Got the the last tow cable finished (2 supports at left and right front are with a cable, the third at the left roof is empty).
Regards
- dutik

#521
Kentucky, United States
Joined: April 13, 2011
KitMaker: 9,465 posts
Armorama: 8,695 posts
Posted: Tuesday, July 25, 2017 - 08:23 PM UTC
Fitters and Recovery Vehicles, some of my favorites!
Worked around M728, 578 and M88's. Drove the 578. Even had a few derelict BMPs in the bone yard at the Patton but have never seen this one before. Following with interest!
Germany
Joined: October 03, 2010
KitMaker: 134 posts
Armorama: 134 posts
Posted: Wednesday, July 26, 2017 - 08:07 PM UTC
The bow is ready. Left the headlights off for painting. Used soft copper wire for the blade supports and spliced cable eyes for the upper mounts. Went lazy at the blades mounting points by just gluing the wire from behind

The right support for the trim went went off during initial sanding so I made a replacement from styrene card.
Expect now a short break of this build for the weekend.
Regards
- dutik
Germany
Joined: October 03, 2010
KitMaker: 134 posts
Armorama: 134 posts
Posted: Saturday, July 29, 2017 - 08:44 PM UTC
Ready!

Close-up of the rear:
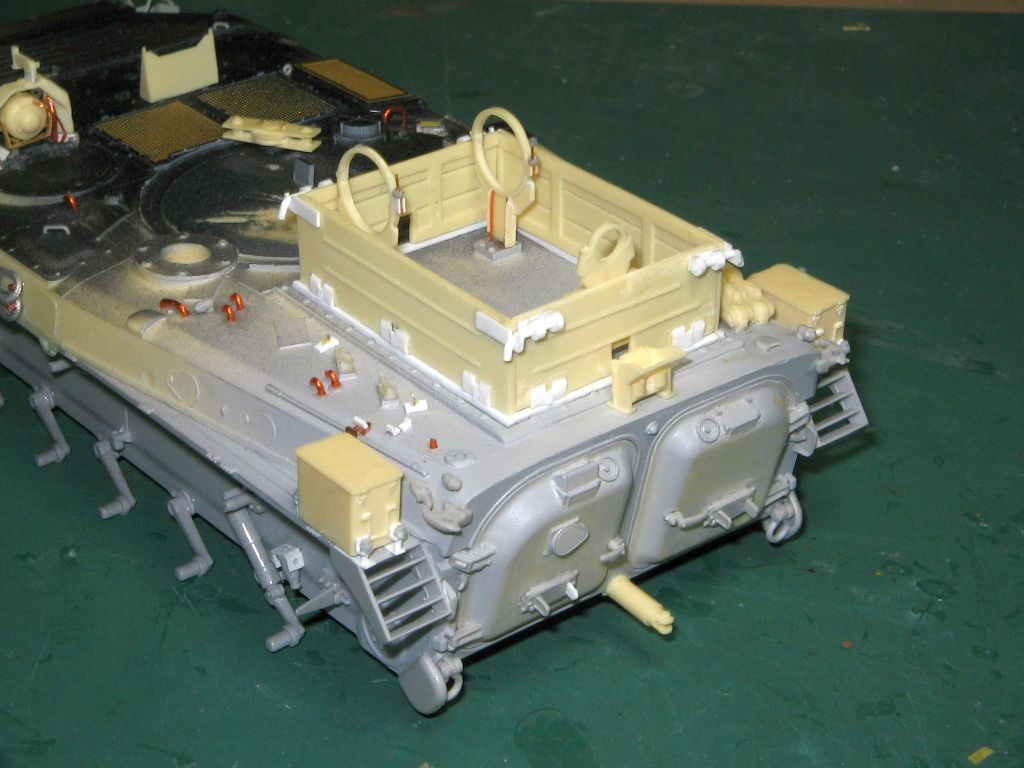
Close-up of the front:
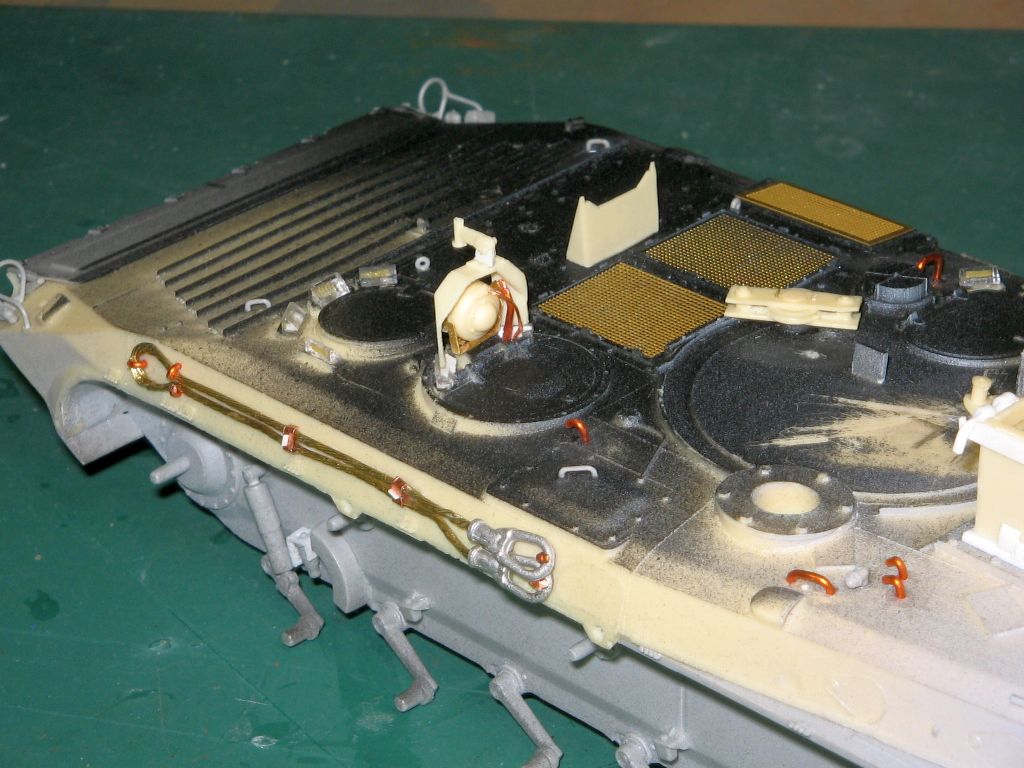
The support for the commanders MG was hard to glue in place - on top of two periscopes. Very small space to do so, so I glued sheet styrene to the back faces of the periscopes to enlarge the top face. It worked. The two brass parts are the hndle for the searchlight (lost the styrene part...) and the power line.
SP Designs provides two identical support loops for the cargo box. The real things are handed, so I cut off the hinge and lock from one andmade new ones at the correct sides. Also detailed the locks a bit with small nuts and wire. The support loops were pinned with fine wire (0,5 mm) to the sockets. It is a bit complicated to drill fine holes close to the outer rim of the sockets, but the results are worth the extra work.
Well, ready to add surfacer, polish off scratches and to start painting.
Regards
- dutik
Germany
Joined: October 03, 2010
KitMaker: 134 posts
Armorama: 134 posts
Posted: Tuesday, August 01, 2017 - 12:11 AM UTC
Painting. But how?
Plain soviet green is always an option. But there are more choices:
The current russian camouflage with sand and black offers a lot of tonal variation. The green base ranges from olive to dark green. The sand has a lot of variations from yellow (close to zinc chromate!) over sand and greyish sand to a light brown. At least the black is more or less a kind of dark grey.
Here is also one in Charkov in green and sand. This one is also in working conditon and shows a lot of details that are lacking at museum display vehicles.
The Oryx blog shows BREM vehicles in Syria
both in plain green and plain sand, just as a BREM or armed with a ZPU of your choice and even a 37mm AAA...
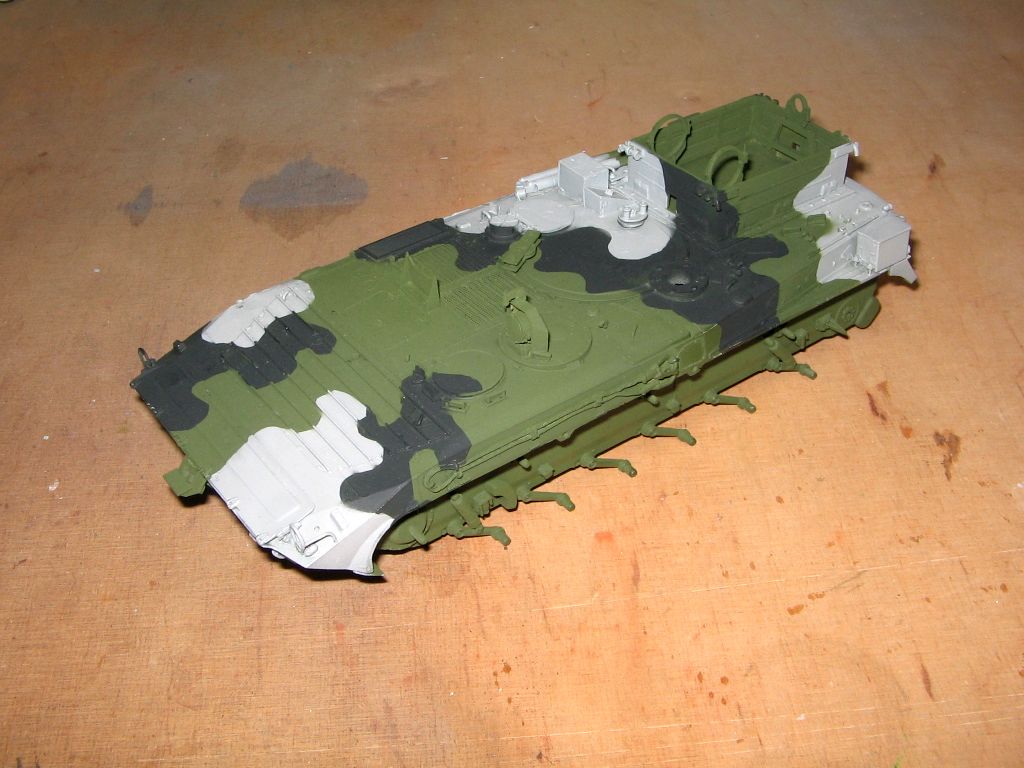
But my choice is finally the other soviet tricolor camo:
Green with grey and black.
Enjoy
- dutik
#521
Kentucky, United States
Joined: April 13, 2011
KitMaker: 9,465 posts
Armorama: 8,695 posts
Posted: Tuesday, August 01, 2017 - 06:16 PM UTC
dutik - Excellent reference in those walk-arounds!
Is that forward plow/spade dropped manually when needed or is it a powered arrangement in some way?
Germany
Joined: October 03, 2010
KitMaker: 134 posts
Armorama: 134 posts
Posted: Tuesday, August 01, 2017 - 10:55 PM UTC
I don't know for sure but there are no pulleys, levers or hydraulic cylinders visible. So I think the blade is lowerd and lifted up with the help of the recovery winch of the vehicle. The frontal return pulley is just above the tip of the blade, and images show some small holes in the tip to fit the hook. This would do the trick.
Regards
- dutik
Germany
Joined: October 03, 2010
KitMaker: 134 posts
Armorama: 134 posts
Posted: Wednesday, August 02, 2017 - 10:12 PM UTC
Something went wrong with the Humbrol maskol:
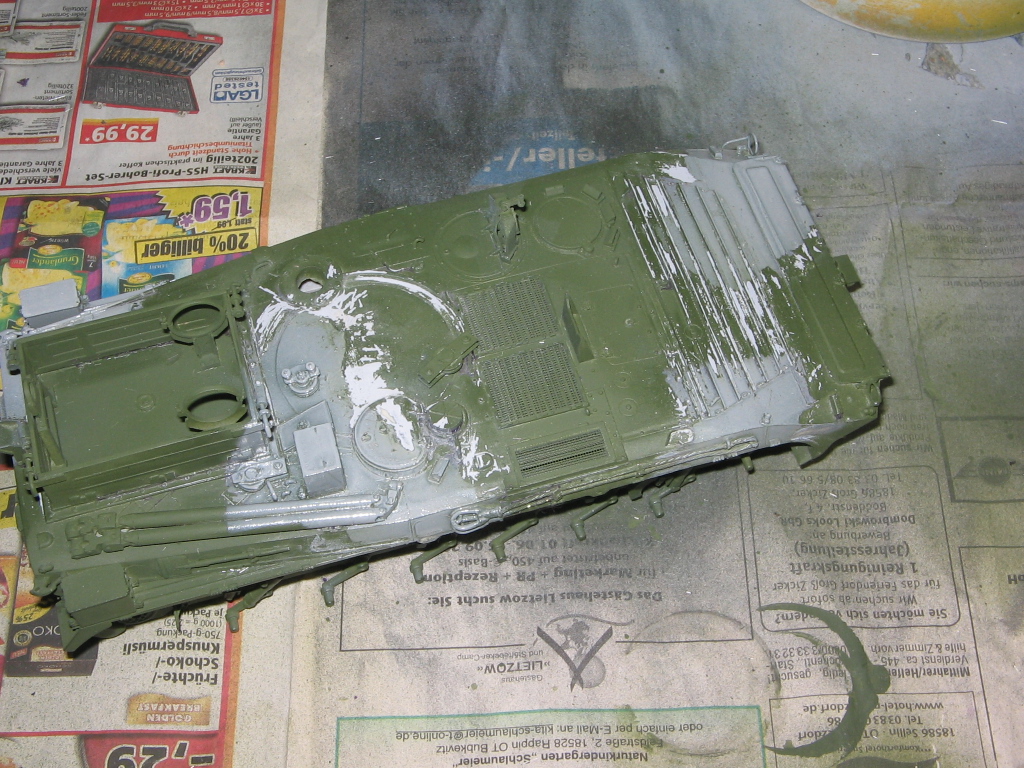
The paint peeled off...

Don't know why. Used Humbrol maskol the last builds without problems, regardless if Tamiya acryl or Lifecolor acryl paint. But here it peeled off the Tamiya paint. Odd. Maybe because I thinned the Tamiya acryl with Tamiya enamel thinner? Did so the first time. Makes airbrushing a really easy task compared to Tamya acryl thinner, but maybe the paint adheres less well in comparision? Don't know...
Regards
- dutik
Minnesota, United States
Joined: March 04, 2003
KitMaker: 4,630 posts
Armorama: 4,498 posts
Posted: Thursday, August 03, 2017 - 12:28 AM UTC
I am assuming you washed the model with hot water and liquid dish soap before applying paint? Resin has mold release agents on it.
Ex-34th ID MNANG - 13F and 63D
"Fire For Effect."
Germany
Joined: October 03, 2010
KitMaker: 134 posts
Armorama: 134 posts
Posted: Thursday, August 03, 2017 - 01:15 AM UTC
No, I didn't, but this is of course always a good advice. I used a good amount of Tamiya primer, which forms the whitish coat showing through the paint. The primer is still in place. Only the paint above went off.
Nevertheless, used this accidend to apply again some light gray and to correct the shape of the camo as well as to apply paint to places I missed the first time. And I used this time Tamiya tape only.
Regards
- dutik
Germany
Joined: October 03, 2010
KitMaker: 134 posts
Armorama: 134 posts
Posted: Tuesday, August 08, 2017 - 09:48 PM UTC
More painting. Fixed the peeled-off areas. Lots of masking to do, not so easy due to a myriad of small saised details all over the surface. Masks didn't stick well in some of these places, so I have to airbrush a second time to remove overspray at demarcation lines. As always - painting requires more time than the whole building

Enjoy
- dutik
Myanmar
Joined: March 05, 2004
KitMaker: 4,011 posts
Armorama: 1,498 posts
Posted: Wednesday, August 09, 2017 - 06:13 AM UTC
Nice recovery... hah get it?.. but seriously, look good now.
i watched a scale plastic figure crawl along the edge . . . of an exacto blade . . . that's my dream , it's my nightmare . . . . . . . crawling , slithering . . . . . along the edge . . . . . . of an exacto . . . . . blade . . . . and surviving


