Campaigns: Completed Campaigns
Campaigns that are completed should be grouped here.
Hosted by Richard S.
Trumpeter Mk. 4 Campaign
retiredyank
Visit this Community
Arkansas, United States
Joined: June 29, 2009
KitMaker: 11,610 posts
Armorama: 7,843 posts
Posted: Sunday, January 21, 2018 - 08:38 PM UTC

Quoted Text

I only knew where the fenders angle was wrong.
I'd be grateful if you tell me where the problem is.
Kalin


This article calls them out:

https://www.perthmilitarymodelling.com/reviews/vehicles/trumpeter/tr01514.html
d6mst0
#453
Visit this Community
Texas, United States
Joined: August 28, 2016
KitMaker: 1,925 posts
Armorama: 601 posts
Posted: Sunday, January 21, 2018 - 09:41 PM UTC
Bill,

Really great work with those figures.
Scipio2010
#401
Visit this Community
Washington, United States
Joined: December 08, 2013
KitMaker: 323 posts
Armorama: 221 posts
Posted: Monday, January 22, 2018 - 08:00 AM UTC
I haven't posted in here a while, and its impressive to see everyone's progress.

Ive made considerable progress on the NBCRV over the last week. This kit has over 750 pieces, and it has been quite an adventure assembling it all. I also started collecting and cleaning up the resin stowage.


RussianArmor
Visit this Community
Georgia, United States
Joined: February 06, 2017
KitMaker: 111 posts
Armorama: 96 posts
Posted: Monday, January 22, 2018 - 05:18 PM UTC
THAAD Completed, less a few screwed up decals. Seems Trumpeter didn't spell check their decals and had MANY misspelled items on the sheet (like "NO FORKLUFT", "DIESLE FUEL ONLE", "DRAIN TANK SAILE"...)


d6mst0
#453
Visit this Community
Texas, United States
Joined: August 28, 2016
KitMaker: 1,925 posts
Armorama: 601 posts
Posted: Monday, January 22, 2018 - 05:39 PM UTC
Shawn,

Very nice clean work considering all of the detail there is on this vehicle. Looking at the first picture and before the other two I thought it was a space ship of some type with all of the hardware on top, LOL. I hope it not to much of a challenge to paint and weather.

Mark
d6mst0
#453
Visit this Community
Texas, United States
Joined: August 28, 2016
KitMaker: 1,925 posts
Armorama: 601 posts
Posted: Monday, January 22, 2018 - 05:42 PM UTC
David,

Very nice assembly and camo work on your Thaad. To bad about the decals, did you use them anyway?

Mark
retiredyank
Visit this Community
Arkansas, United States
Joined: June 29, 2009
KitMaker: 11,610 posts
Armorama: 7,843 posts
Posted: Monday, January 22, 2018 - 05:51 PM UTC
Shawn - Congratulations, on your build. It looks detail heavy and makes me wish I had time to slot one in.

David - Looks great! I guess something was lost in translation, on those decals.
RussianArmor
Visit this Community
Georgia, United States
Joined: February 06, 2017
KitMaker: 111 posts
Armorama: 96 posts
Posted: Monday, January 22, 2018 - 06:09 PM UTC

Quoted Text

David,

Very nice assembly and camo work on your Thaad. To bad about the decals, did you use them anyway?

Mark


Mark

I did not use the mis-spelled ones. I made a post about the decals with pics of them on the Trumpeter/HobbyBoss build group Facebook page. I did get a response from Trumpeter that stated "The person responsible for the decals lost a half months pay" I'm guessing that they will correct them. Trumpeter is rather responsive on their build group - I even got an email address to order spare parts for Trumpeter kits, which worked fantastic. In about 2 days I was able to order a replacement decal set for my 1/350 Kitty Hawk. $4 for the 2 large sheets plus $4 to ship it from China.
hetzer44
Visit this Community
Maryland, United States
Joined: December 21, 2005
KitMaker: 241 posts
Armorama: 124 posts
Posted: Wednesday, January 24, 2018 - 05:13 AM UTC
Here is more progress on the KV-II turret. I'll hold off on adding the rear machine gun until I'm ready to start painting.


Had to replace one grab handle after losing it somewhere in the man cave.

I left the rear turret door workable as I may want to display it open just a crack when it sits in a diorama.


I drilled out the left side pistol port/plug and will attach the plug to a small chain when I've completed this project. Funny, Trumpeter only provides one pistol port plug in this kit.

It's really great to see everyone's builds coming along so well. It sure provides a lot of inspiration for the next project.
Cheers!

chuck
k_mero4
Visit this Community
Sofiya, Bulgaria
Joined: November 26, 2017
KitMaker: 393 posts
Armorama: 369 posts
Posted: Thursday, January 25, 2018 - 11:57 PM UTC
Great work. I've always been thinking about what the Soviet designers have been doing to make such mastodons. I look forward to the working progress. Success!
k_mero4
Visit this Community
Sofiya, Bulgaria
Joined: November 26, 2017
KitMaker: 393 posts
Armorama: 369 posts
Posted: Friday, January 26, 2018 - 12:10 AM UTC
Hi, David!
I am not very familiar with US military equipment, but it definitely looks impressive. I like.
Kalin
panzerman1
Visit this Community
Maryland, United States
Joined: September 30, 2010
KitMaker: 430 posts
Armorama: 291 posts
Posted: Friday, January 26, 2018 - 02:15 AM UTC
Matthew, The gear box looks nicely detailed...well done.
Mark, Thanks. I always like adding figures to my vehicle builds.
Shawn, Your NBCR Striker is quite impressive. Incredible surface detail.
David, The THAAD is awesome looking. Wow, what a bonehead move messing up the spelling on the decals by Trumpeter. Hahaha.
Chuck, The Gigant is shaping up nicely. Is there a large patriotic slogan for that massive turret?

Wishing everyone continued success on their projects. Bill
panzerman1
Visit this Community
Maryland, United States
Joined: September 30, 2010
KitMaker: 430 posts
Armorama: 291 posts
Posted: Friday, January 26, 2018 - 11:53 AM UTC
Update on my Marder I.

Camouflage pattern has been applied to the exterior of the tank.

Decal work is up next.

What's left to do? Weathering, adding the crew figures, and adding some stowage.

Thanks for viewing. Happy modeling everyone. Bill
ayovtshev
#490
Visit this Community
Sofiya, Bulgaria
Joined: September 22, 2016
KitMaker: 1,432 posts
Armorama: 1,390 posts
Posted: Friday, January 26, 2018 - 06:49 PM UTC
Nice!Nice!Nice!
d6mst0
#453
Visit this Community
Texas, United States
Joined: August 28, 2016
KitMaker: 1,925 posts
Armorama: 601 posts
Posted: Saturday, January 27, 2018 - 10:39 PM UTC
Chuck,

That is some nice work you did there with that turret.
d6mst0
#453
Visit this Community
Texas, United States
Joined: August 28, 2016
KitMaker: 1,925 posts
Armorama: 601 posts
Posted: Saturday, January 27, 2018 - 10:40 PM UTC
Bill,

Great camo, how did you do it, freehand or airbrush?
panzerman1
Visit this Community
Maryland, United States
Joined: September 30, 2010
KitMaker: 430 posts
Armorama: 291 posts
Posted: Monday, January 29, 2018 - 12:10 AM UTC
Angel, Thank you Sir.
Mark, Thanks. I did the camouflage freehand using Vallejo paints.

Wishing everyone continued success on their projects. Bill
retiredyank
Visit this Community
Arkansas, United States
Joined: June 29, 2009
KitMaker: 11,610 posts
Armorama: 7,843 posts
Posted: Tuesday, January 30, 2018 - 09:52 PM UTC
Does anyone know if Black Dog's stowage for the sdkfz 8 will work, with the 7 or do I have to sculpt my own?
panzerman1
Visit this Community
Maryland, United States
Joined: September 30, 2010
KitMaker: 430 posts
Armorama: 291 posts
Posted: Wednesday, January 31, 2018 - 07:13 PM UTC
Update on my Marder I.

The kit only provided Balken cross decals. The vehicle number, division symbol, and tactical symbol I retrieved from my spares pile.


Initial weathering has begun. I applied a black grey wash to the recesses, and a dry brush highlighting of the raised areas.


The weathering will conclude with a dust filter on the upper surfaces, and a dirt filter on the lower areas. The dust filter will tone down the camouflage contrast significantly.

Thanks for viewing. Good luck to everyone on their projects.
Bill
canismalus
#465
Visit this Community
Nordrhein-Westfalen, Germany
Joined: September 12, 2014
KitMaker: 398 posts
Armorama: 394 posts
Posted: Wednesday, January 31, 2018 - 10:00 PM UTC
Bill, love the Marder. Excellent camo and tasteful weathering, not to mention the superb figures - getting those Waffen-SS patterns to look right is never easy.

Chuck, nice KV-2 so far.

Shawn, your NBCRV looks impressive and will look even more so with all that stowage.

David, awesome THAAD, shame about the decals, what a bummer.

And Kalin, thanks for the compliment!

I hope I haven't forgotten anybody....

I painted the suspension and tracks on my T-64BV and added the side skirts:


Next up is a coat of primer and the basecoat/camouflage.

Happy modelling, everybody!

Jerry
retiredyank
Visit this Community
Arkansas, United States
Joined: June 29, 2009
KitMaker: 11,610 posts
Armorama: 7,843 posts
Posted: Thursday, February 01, 2018 - 05:50 PM UTC
jbranca - You T64 looks amazing.

I took a few photos, before I left for Florida. The undercarriage and engine are pretty much complete. A layer of black grey on the engine, some detail and I will be adding the cable, after the pin wash. I plan on doing the Africa version, so I can add some extra armor and look forward to chipping. Hope you like it.


Bluestab
Visit this Community
South Carolina, United States
Joined: December 03, 2009
KitMaker: 2,160 posts
Armorama: 1,906 posts
Posted: Friday, February 02, 2018 - 02:00 AM UTC
I'll be building the Trumpeter German Entwicklungsfahrzeug E-10. This was one of the E-Series of proposed AFVs to standardize production. This was the origins of the Hetzer name.

The kit (00385) is pretty simple looking. Trumpeter has included PE and styrene side skirts. And has included both early and late style tracks, both in rubber band and in indie links. So you have four sets of track. The added track sets are noted on the box, so look for that if you want the full track options.

trumpeter-2018_00

Assembly began with the suspension. It's pretty simple. The fit on some of the parts needed some cleanup so the fit cleaner. The E-10's suspension was designed to be adjustable, so it could go hull-down. It would have been nice to have that option. It could be modified with a bit of work.
trumpeter-2018_01

Rear body plate. I left off the jack and the tools for now. And the crew hatches were given their handles. There are some heavy ejector marks on them that needed addressing. I'll probably add padding to cover them, as opposed to filling them.
trumpeter-2018_02

Assembly on the upper hull's front. Added the notek light, driver's vision blocks, and tow shackles. The gunner's sight was added. Instructions are a bit vague on that so I halved it, placing it roughly in the middle and pointing the sight straight ahead. And the ventilator.
trumpeter-2018_03

Added the upper-hull grab handles, fan-grill, and other intake things. I left off the pioneer tolls for now.
trumpeter-2018_04

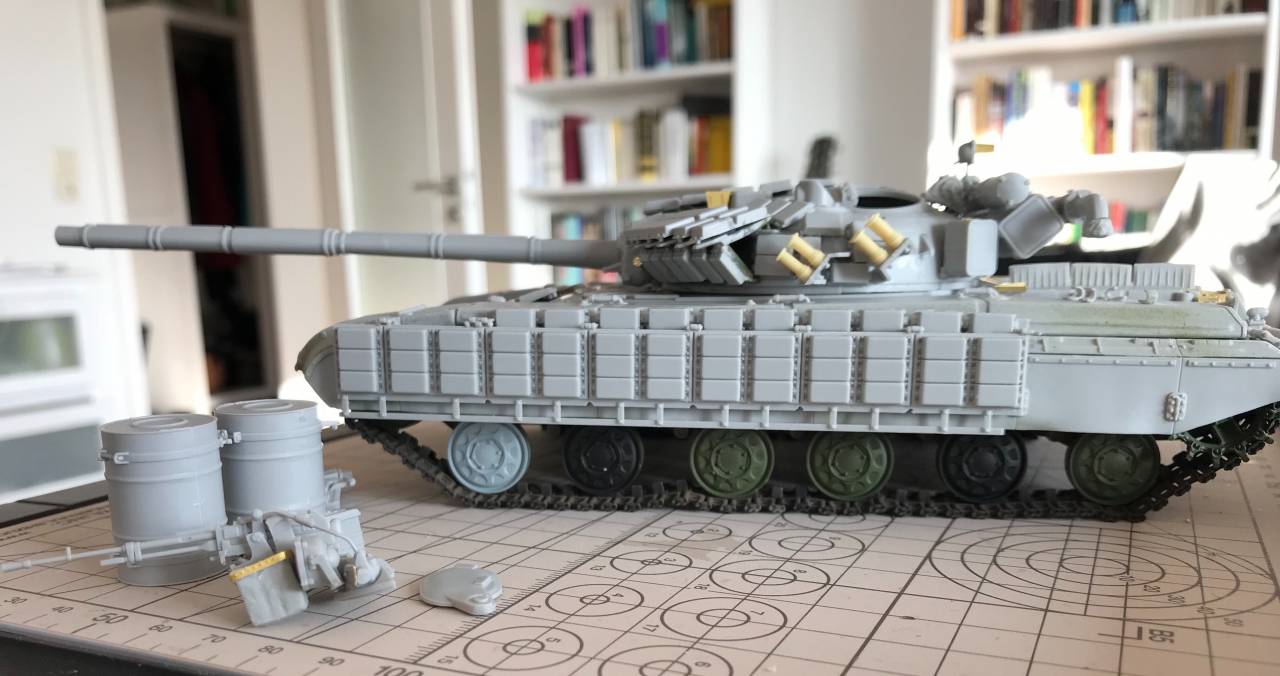
I went ahead and started prepainting the lower chassis, road-wheels, drive sprockets, and idlers. I used Tamiya dark yellow.
trumpeter-2018_05

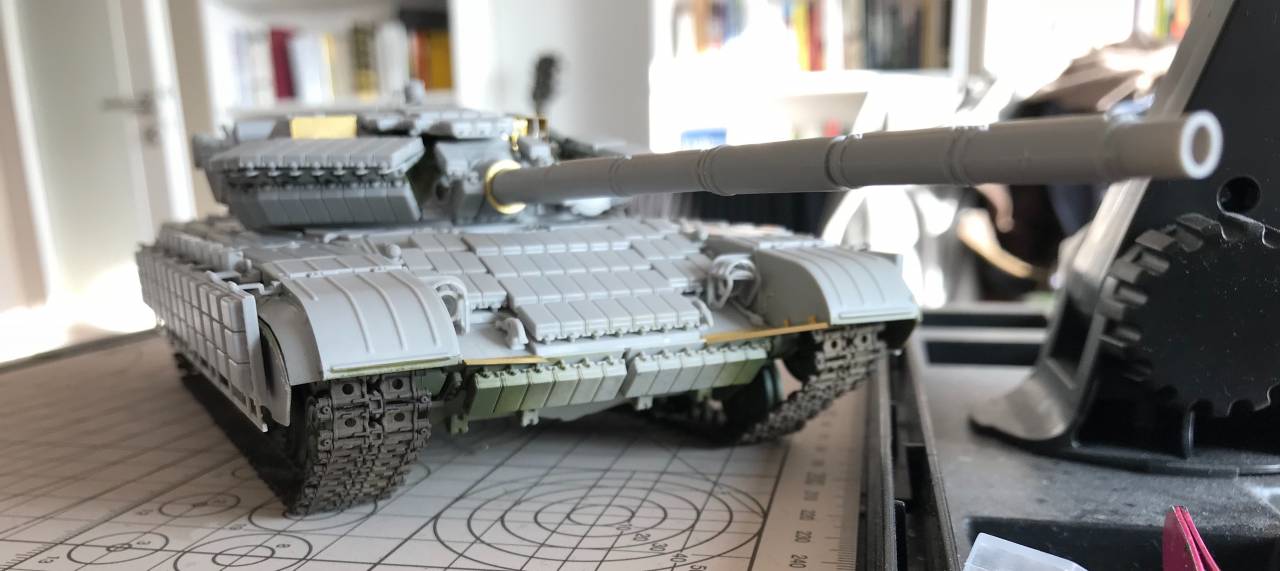
I painted the outside of every other roadwheel olive green. I went ahead and did some weathering to them before I start on the indie tracks.
trumpeter-2018_06

trumpeter-2018_07

Gun assembled and mounted. The gun is very loose and moves freely from side-to-side. The upper-hull was added to the lower-hull.
trumpeter-2018_08

All in all, assembly has been pretty smooth and quick. This update represents about two weeks of working on it sporadically.
I'll start on the tracks next. I'll be using the late indie tracks.
panzerman1
Visit this Community
Maryland, United States
Joined: September 30, 2010
KitMaker: 430 posts
Armorama: 291 posts
Posted: Friday, February 02, 2018 - 06:38 PM UTC
Jbranca, your T-64 looks terrific. All that reactive armor gives it a menacing appearance.
Alex, Good start on your E-10 paper panzer. It looks like a Hetzer on steroids.
Matthew, lots of great detail on your halftrack build.

Good luck everyone on their projects. Bill
panzerman1
Visit this Community
Maryland, United States
Joined: September 30, 2010
KitMaker: 430 posts
Armorama: 291 posts
Posted: Friday, February 02, 2018 - 06:48 PM UTC
Update on my Marder I.

Dust and dirt filters have been applied. I've also attached the tank tools.

Last bits of details are prepped and ready for installation. Final reveal will be up next.

Thanks for viewing. Bill
d6mst0
#453
Visit this Community
Texas, United States
Joined: August 28, 2016
KitMaker: 1,925 posts
Armorama: 601 posts
Posted: Sunday, February 04, 2018 - 09:12 AM UTC
Bill,

Really nice work with the dust, kinda softened the looks of the vehicle.

Mark