

Hi Gabriel. Nice work so far. Just a heads up - seems to me that you installed one of the tracks in wrong direction. I know you said they are just temporary placed for pics, but if they are glued, sag could be the problem.
Keep up the good work!
Яusso-Soviэt Forum: Cold War Soviet Armor
For discussions related to cold war era Russo-Soviet armor.
For discussions related to cold war era Russo-Soviet armor.
Hosted by Jacques Duquette
MiniArt 1/35 T-54-1 build review

Doodeck

Joined: August 15, 2014
KitMaker: 155 posts
Armorama: 154 posts
Posted: Friday, November 03, 2017 - 03:46 AM UTC

Szmann

Joined: September 02, 2014
KitMaker: 1,977 posts
Armorama: 305 posts
Posted: Friday, November 03, 2017 - 08:27 PM UTC
Thanks, Saa!
Good observation spirit! I have noticed the mistake while taking pictures. Fortunately the track was still workable and I changed direction. I forgot to take new pictures, though.
Cheers!
Gabriel
Good observation spirit! I have noticed the mistake while taking pictures. Fortunately the track was still workable and I changed direction. I forgot to take new pictures, though.
Cheers!
Gabriel

Szmann
Joined: September 02, 2014
KitMaker: 1,977 posts
Armorama: 305 posts
Posted: Sunday, November 05, 2017 - 09:11 PM UTC
UPDATE
I moved to the turret now and completed most of the upper and lower halves (safe the hand rails and PEs) because the interior needs some painting and I'm afraid not to break them:


As you can see, some detail is missing in this version, but I think I have enough to leave the hatches open, which I'm seriously considering:

From the lower half is also missing the co-axial MG which has to be assembled and painted separately.
Thank you for following.
Cheers!
Gabriel
I moved to the turret now and completed most of the upper and lower halves (safe the hand rails and PEs) because the interior needs some painting and I'm afraid not to break them:
As you can see, some detail is missing in this version, but I think I have enough to leave the hatches open, which I'm seriously considering:
From the lower half is also missing the co-axial MG which has to be assembled and painted separately.
Thank you for following.
Cheers!
Gabriel

timcc2008

Joined: May 12, 2010
KitMaker: 139 posts
Armorama: 135 posts
Posted: Sunday, November 05, 2017 - 10:40 PM UTC
Very nicely detailed build process, Gabriel. Keep up the great work!
vr
Tim
vr
Tim
Szmann
Joined: September 02, 2014
KitMaker: 1,977 posts
Armorama: 305 posts
Posted: Monday, November 06, 2017 - 04:55 PM UTC
Thank you, Tim!
Working on... slowed down a bit because many fiddly parts on the turret hatches. More updates soon.
Cheers!
Gabriel
Working on... slowed down a bit because many fiddly parts on the turret hatches. More updates soon.
Cheers!
Gabriel

sgtreef
Joined: March 01, 2002
KitMaker: 6,043 posts
Armorama: 4,347 posts
Posted: Monday, November 06, 2017 - 05:22 PM UTC
Nice job on the build.
Do you think models are getting a little too much detailed?
Suspension when all done is all hidden.
Maybe Tamiya and there way is better.
But I do like miniart have done a bunch of their buildings.
Nice job and I might pick up a lesser part kit.
Used in Nam was it not?
Or was that what they called the M 59?
Cheers
Szmann
Joined: September 02, 2014
KitMaker: 1,977 posts
Armorama: 305 posts
Posted: Monday, November 06, 2017 - 09:36 PM UTC
Hi, Jeff!
Wow! That's a nice battery of questions you raised here.
First: thank you for attending my blog - it's a great pleasure to have you as visitor and also thank you for the appreciative comment.
Yes, sometimes I feel the models are quite complicated but I'll recommend caution here: we, as modelers, are constantly in quest for the ultimate detail and companies as ICM, Dragon and now MiniArt are helping us to reach that level. Personally, after this kind of 500+ builds, I always go for a simple, like 100- or so - what they are calling practice builds.
Suspension question: you're right, but: I bought the old Tamiya SdKfz 251/1 Hanomag just to make it as a destroyed vehicle to use it in one of my dioramas. I couldn't - or I have chosen not to - because the suspension wasn't detailed enough to depict an APC which threw a track. In conclusion: I prefer if the kit offers me as many possibilities as it gets, regardless if I'm going to use them or not. For Tamiya I have a very high regard: I always built with pleasure their soft-skins and I also have in my stash aircraft and auto models. For their niche, they are the best.
I'm glad to say MiniArt have done a wonderful job regarding the fitting, which alleviates considerably the big parts count. The only problem (minor) I see here is the amount of cleaning due many injection gates, located most of the time in key positions. They also put the slide molding to very good use and manage a very nice 3D one-part pieces. At times, they can be accused of over-engineering - but I'm inclined to believe we should talk about poor engineering.
I'm not familiar with the employment of T54-1 in Vietnam, but the time frame makes it a very good candidate. You gave some fodder to my curiosity now...
Thanks again,
Gabriel
Szmann
Joined: September 02, 2014
KitMaker: 1,977 posts
Armorama: 305 posts
Posted: Wednesday, November 08, 2017 - 09:27 PM UTC
UPDATE
Hi, guys!
I finished the hatches and moved to the last sub-assemblies (i.e. co-axial MG and AA MG, as good as some external stowage):


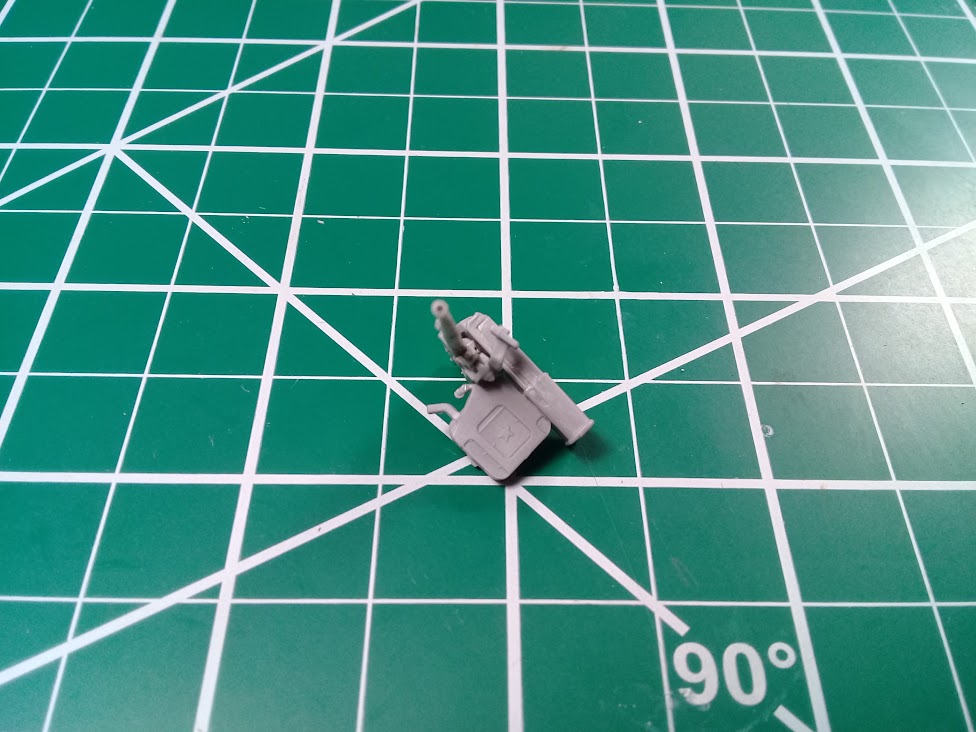

The co-axial MG muzzle had to be drilled out, since is the only feature that can be seen when turret in its place. I decided to let the commander's hatch open. According to instructions, they should be movable, but I dare think most appropriate is to say positionable.
Cheers!
Gabriel
Hi, guys!
I finished the hatches and moved to the last sub-assemblies (i.e. co-axial MG and AA MG, as good as some external stowage):
The co-axial MG muzzle had to be drilled out, since is the only feature that can be seen when turret in its place. I decided to let the commander's hatch open. According to instructions, they should be movable, but I dare think most appropriate is to say positionable.
Cheers!
Gabriel
Szmann
Joined: September 02, 2014
KitMaker: 1,977 posts
Armorama: 305 posts
Posted: Sunday, November 12, 2017 - 09:46 PM UTC
Hi, guys!
UPDATE
Finished to assemble the AA MG as well. It was a little fiddly and parts don't fit too well...


Nonetheless, it has huge visual impact on the complete build.
And there is a view with the assembled parts before painting - still missing bits and bobs, but you can make an idea...

I made new towing cables from hanging wire. In the center you have the one provided by the kit, for comparison.

One of the cables dry-fitted:

Periscopes lenses masked before painting:


The interior of the turret painted with off-white, ready to be detailed with other colors:


Parts that need to be painted separately primed with some off-black:

I mixed the camo colors last night as well, but I didn't have the time to test them.
More updates soon
Thank you for following!
Gabriel
UPDATE
Finished to assemble the AA MG as well. It was a little fiddly and parts don't fit too well...
Nonetheless, it has huge visual impact on the complete build.
And there is a view with the assembled parts before painting - still missing bits and bobs, but you can make an idea...
I made new towing cables from hanging wire. In the center you have the one provided by the kit, for comparison.
One of the cables dry-fitted:
Periscopes lenses masked before painting:
The interior of the turret painted with off-white, ready to be detailed with other colors:
Parts that need to be painted separately primed with some off-black:
I mixed the camo colors last night as well, but I didn't have the time to test them.
More updates soon
Thank you for following!
Gabriel
Szmann
Joined: September 02, 2014
KitMaker: 1,977 posts
Armorama: 305 posts
Posted: Monday, November 13, 2017 - 09:23 PM UTC
Hi, guys!
UPDATE
I brewed my own colors, trying to get as close as possible to the manual's scheme:

The test spoons were primed first with the same primer used earlier.

And I also started painting the inside of the turret, to be able to close it and move forward, to the final painting.

Thank you for following!
Cheers!
Gabriel
UPDATE
I brewed my own colors, trying to get as close as possible to the manual's scheme:
The test spoons were primed first with the same primer used earlier.
And I also started painting the inside of the turret, to be able to close it and move forward, to the final painting.
Thank you for following!
Cheers!
Gabriel

pgb3476
Joined: March 11, 2007
KitMaker: 977 posts
Armorama: 976 posts

Posted: Monday, November 13, 2017 - 11:58 PM UTC
Colors look great!
Szmann
Joined: September 02, 2014
KitMaker: 1,977 posts
Armorama: 305 posts
Posted: Tuesday, November 14, 2017 - 12:18 AM UTC
Thank you, Greg! Yellow might appear a little too dark, but it's only one coat over black. There is some place for modulation, also.
Thanks for stopping by!
Gabriel
Thanks for stopping by!
Gabriel
Szmann
Joined: September 02, 2014
KitMaker: 1,977 posts
Armorama: 305 posts
Posted: Wednesday, November 15, 2017 - 09:19 PM UTC
UPDATE
Hi, guys!
I slowed down a little for being overloaded at work, but I still had the time for some progress:
The upper side of turret interior painted:

It still needs some weathering and couple of clear coats.
I also started painted the wheels - work still in progress:

Thank you for following!
More updates soon
Gabriel
Hi, guys!
I slowed down a little for being overloaded at work, but I still had the time for some progress:
The upper side of turret interior painted:
It still needs some weathering and couple of clear coats.
I also started painted the wheels - work still in progress:
Thank you for following!
More updates soon
Gabriel
JSSVIII
Joined: March 28, 2007
KitMaker: 1,169 posts
Armorama: 1,067 posts
Posted: Thursday, November 16, 2017 - 06:36 AM UTC
Nice progress Gabriel! I think your color mixes look just right, what brand of paint did you use?
Szmann
Joined: September 02, 2014
KitMaker: 1,977 posts
Armorama: 305 posts
Posted: Thursday, November 16, 2017 - 04:52 PM UTC
Thank you, John!
I used Liquitex soft body acrylics, diluted with 50% IPA.
Gabriel
I used Liquitex soft body acrylics, diluted with 50% IPA.
Gabriel
Szmann
Joined: September 02, 2014
KitMaker: 1,977 posts
Armorama: 305 posts
Posted: Saturday, November 18, 2017 - 07:33 PM UTC
Hi, guys!
UPDATE
I moved on to some washes and weathering... detail painting... almost finished the interior assembly:


I also painted the external's stowage few parts and added some worn effect on the metallic wheels:


The only thing holding me back now to close the turret and enter the final stage is the co-axial MG, which I don't like the way I've got it on the first pass... same goes for the AA MG:


Thank you for following!
Gabriel
UPDATE
I moved on to some washes and weathering... detail painting... almost finished the interior assembly:
I also painted the external's stowage few parts and added some worn effect on the metallic wheels:
The only thing holding me back now to close the turret and enter the final stage is the co-axial MG, which I don't like the way I've got it on the first pass... same goes for the AA MG:
Thank you for following!
Gabriel
JSSVIII
Joined: March 28, 2007
KitMaker: 1,169 posts
Armorama: 1,067 posts
Posted: Saturday, November 18, 2017 - 08:58 PM UTC
Nice work Gabriel, looking good. One thing though, I think your DShK is mounted upside down.
Szmann
Joined: September 02, 2014
KitMaker: 1,977 posts
Armorama: 305 posts
Posted: Saturday, November 18, 2017 - 09:05 PM UTC
John, Thanks!
Duh! But of course! Now that's some serious embarrassment. What was I thinking?! And I have now a nice problem on my hands
Gabriel
Duh! But of course! Now that's some serious embarrassment. What was I thinking?! And I have now a nice problem on my hands
Gabriel
Szmann
Joined: September 02, 2014
KitMaker: 1,977 posts
Armorama: 305 posts
Posted: Monday, November 20, 2017 - 06:31 PM UTC
Hi, guys!
UPDATE
My first mugshots with the almost-complete (11 parts to go) T-54-1:


After my horrendous mistake with the AA MG (thanks again John for the head-up!), I was considering to let the MG outside. But I still felt is my duty to try and fix it. And tearing and cutting and cursing myself... and there it is:


Tracks base coated with "rust" base:

Ready for priming, once I have installed the hand rails and the stowage support at the back of the turret:

Thanks for following
Gabriel
UPDATE
My first mugshots with the almost-complete (11 parts to go) T-54-1:
After my horrendous mistake with the AA MG (thanks again John for the head-up!), I was considering to let the MG outside. But I still felt is my duty to try and fix it. And tearing and cutting and cursing myself... and there it is:
Tracks base coated with "rust" base:
Ready for priming, once I have installed the hand rails and the stowage support at the back of the turret:
Thanks for following
Gabriel
JSSVIII
Joined: March 28, 2007
KitMaker: 1,169 posts
Armorama: 1,067 posts
Posted: Tuesday, November 21, 2017 - 05:54 AM UTC
Nice save Gabriel, looks great! Man, I need to get more bench time, you've gotten more done than I have this year, and you've done it while living through a hurricane!
Szmann
Joined: September 02, 2014
KitMaker: 1,977 posts
Armorama: 305 posts
Posted: Tuesday, November 21, 2017 - 05:01 PM UTC
Thanks, John!
I agree - bench time is very important to keep yourself in shape. I felt sick every night after the hurricane - still no electricity - watching my stash and my modelling desk collecting dust! But, thankfully, once things restored, this added extra motivation
I hope for you to find the quietness and motivation to build as much as you like, asthere is an invasion of Soviet "hot" kits right now on the market.
And thanks again for constantly following and posting on this blog. Your help is priceless.
Gabriel
Szmann
Joined: September 02, 2014
KitMaker: 1,977 posts
Armorama: 305 posts
Posted: Wednesday, November 22, 2017 - 11:45 PM UTC
Hi, guys!
UPDATE
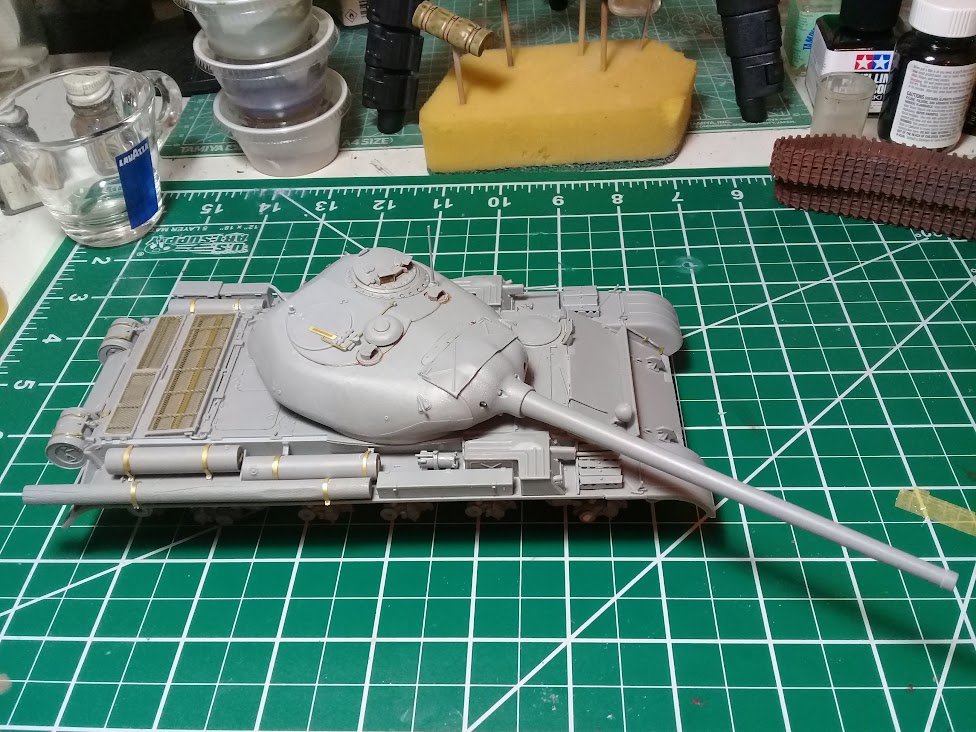
Completely assembled and primed model:


The turret has some small imperfections I need to address; the same goes for the gun barrel:

Thank you for following
Gabriel
UPDATE
Completely assembled and primed model:
The turret has some small imperfections I need to address; the same goes for the gun barrel:
Thank you for following
Gabriel

Pongo_Arm

Joined: January 27, 2017
KitMaker: 147 posts
Armorama: 147 posts
Posted: Thursday, November 23, 2017 - 01:15 AM UTC
Fantastic work and such a sexy tank, they did a great job on this kit but sure is complex
Szmann
Joined: September 02, 2014
KitMaker: 1,977 posts
Armorama: 305 posts
Posted: Thursday, November 23, 2017 - 05:34 PM UTC
Greg: thank you, sir! Yes, quite complicated build. It comprises 970 parts in total... the result is worthy, definitely!
UPDATE
As indicated earlier, the turret and the gun barrel needed some refinement:


I started painting the "belly" of the AFV, as definitive test for my paint mix:


Photographed against the color reference:

Thank you for following,
Gabriel
UPDATE
As indicated earlier, the turret and the gun barrel needed some refinement:
I started painting the "belly" of the AFV, as definitive test for my paint mix:
Photographed against the color reference:
Thank you for following,
Gabriel
Szmann
Joined: September 02, 2014
KitMaker: 1,977 posts
Armorama: 305 posts
Posted: Friday, November 24, 2017 - 06:49 PM UTC
Hi, guys!
UPDATE
Not having too much time at my disposal in last couple of days, I still managed to do small thing around this build:
Turret seam line sanded:


Tracks dry-brushed with toned down silver:

External stowage assembly finished:

Thanks for following,
Gabriel
UPDATE
Not having too much time at my disposal in last couple of days, I still managed to do small thing around this build:
Turret seam line sanded:
Tracks dry-brushed with toned down silver:
External stowage assembly finished:
Thanks for following,
Gabriel
 |

WEB HOSTING BY


Copyright ©2021 Armorama and Kitmaker Network, a subsidiary of Silver Star Enterprises
All Rights Reserved. Please read our Conditions of Use and Privacy Policy.
All Rights Reserved. Please read our Conditions of Use and Privacy Policy.