Italian Campaign 1943-1945
Georgia, United States
Joined: July 26, 2013
KitMaker: 2,272 posts
Armorama: 1,860 posts
Posted: Thursday, December 06, 2018 - 03:14 PM UTC
Quoted Text
Shell,
Glad to see more done on Annie, and enjoyed gawking at your 109's, too.
Can't say I blame you for not adding the framework. I'm more of an OOB kind of guy, myself.
Gaz
If you were gawking at them, you may have noticed the unpainted tires. They were originally ceiling queens when I had my 21st Century Toys collection OOB and on display, so I just put the gear in the flight position and didn't bother painting them. Have to rectify that someday. They themselves are actually 21st Century kits of their prebuilt toys that I got an amazing deal for a case of years ago; something like six for $20. They all came with figures, some of which I used in my He 111. They are done up as Italian, Bulgarian, and Finnish birds.
On the Campaign Trail:
Tank Destroyer 2020

#456
Oklahoma, United States
Joined: September 22, 2016
KitMaker: 654 posts
Armorama: 638 posts
Posted: Friday, December 07, 2018 - 03:29 AM UTC
#424
Queensland, Australia
Joined: April 23, 2015
KitMaker: 4,648 posts
Armorama: 2,248 posts
Posted: Friday, December 07, 2018 - 08:07 AM UTC
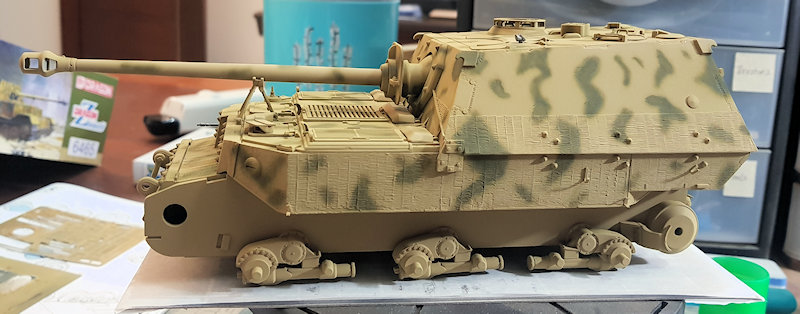
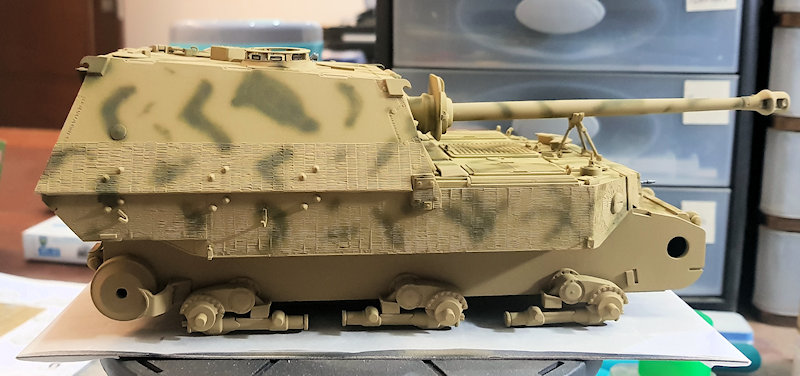
Mark,
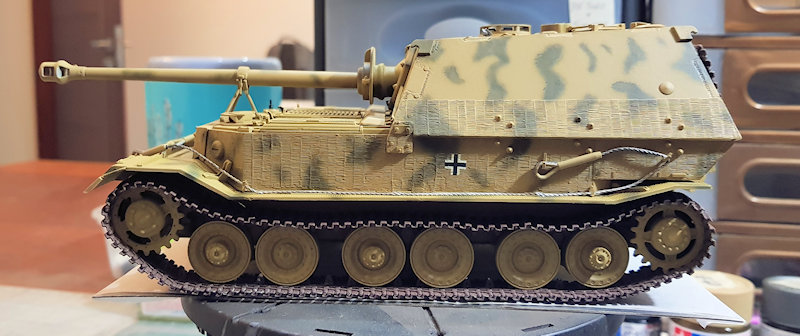
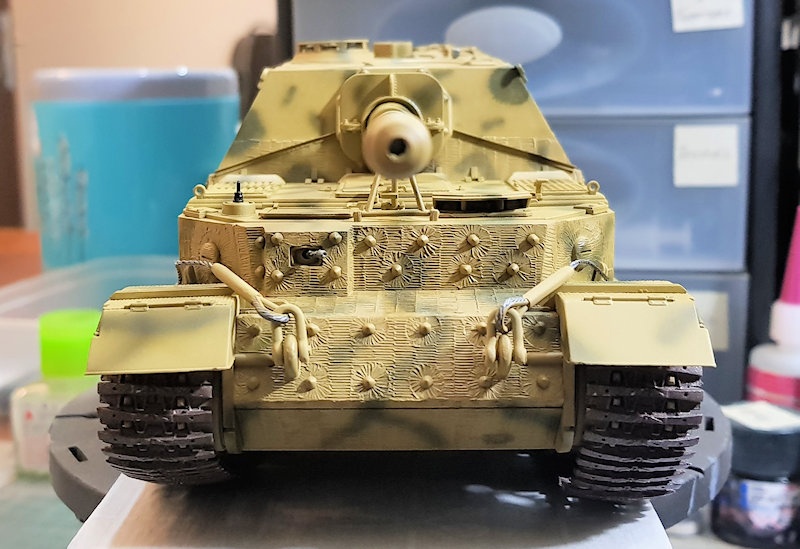
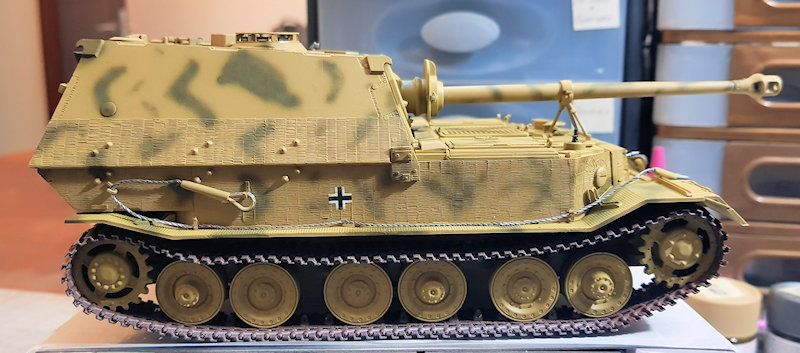
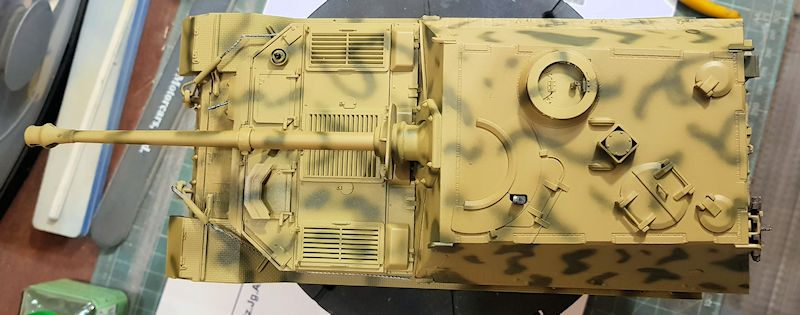
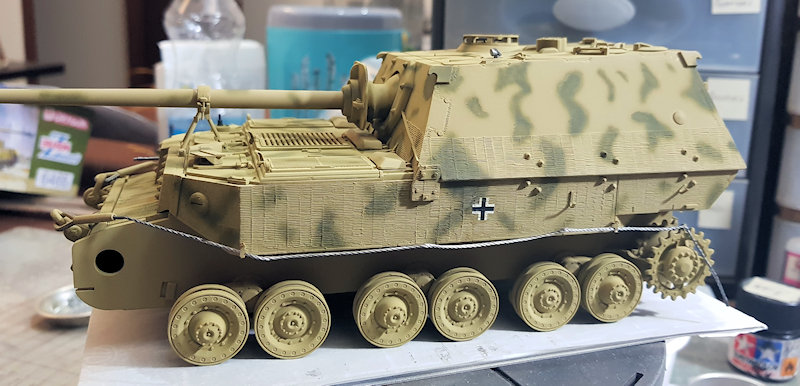
Love the camo on your Elefant!
Gaz
"Artillery adds dignity, to what would otherwise be an ugly brawl."
Frederick The Great
#424
Queensland, Australia
Joined: April 23, 2015
KitMaker: 4,648 posts
Armorama: 2,248 posts
Posted: Friday, December 07, 2018 - 08:08 AM UTC
Shell,
I got so lost in the excellent paint jobs on your 109's that I didn't even notice the wheels.
Gaz
"Artillery adds dignity, to what would otherwise be an ugly brawl."
Frederick The Great
Queensland, Australia
Joined: August 06, 2005
KitMaker: 3,353 posts
Armorama: 3,121 posts
Posted: Friday, December 07, 2018 - 09:11 AM UTC
Shell, nice to see Annie is coming along. Fits in nicely with the armoured carriages behind it too.
Mark. I agree with Gaz, the camo work is very nicely done.
On the Bench:
Dust, styrene scraps, paint splotches and tears.
#123
New Mexico, United States
Joined: November 17, 2008
KitMaker: 1,202 posts
Armorama: 635 posts
Posted: Friday, December 07, 2018 - 12:01 PM UTC
Mark-Nice work! Looking forward to seeing more. I have the same kit in my stash so I'm very interested.
Take care,
Don "Lakota"

Working on Campaigns:
1/72 Hasegawa Ki-84 Frank
1/144 Dragon Armor
#456
Oklahoma, United States
Joined: September 22, 2016
KitMaker: 654 posts
Armorama: 638 posts
Posted: Wednesday, December 12, 2018 - 04:12 AM UTC
Thanks for the comments guys.
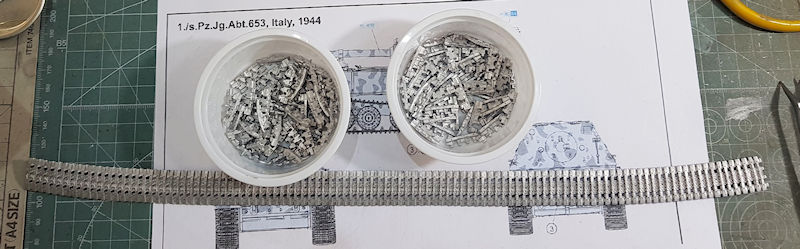
Making more progress. The road wheels and rear drive sprocket are attached. Decals have been added, all three of them.

Work has started on the Friulmodel tracks. One side is complete.
#424
Queensland, Australia
Joined: April 23, 2015
KitMaker: 4,648 posts
Armorama: 2,248 posts
Posted: Wednesday, December 12, 2018 - 10:27 AM UTC
Mark,
Looks great! I certainly wish the Elefants and Ferdinands had more color and marking options.
Gaz
"Artillery adds dignity, to what would otherwise be an ugly brawl."
Frederick The Great
Singapore / 新加坡
Joined: August 30, 2012
KitMaker: 265 posts
Armorama: 186 posts
Posted: Friday, December 14, 2018 - 02:54 AM UTC
Orderer radio set has arrived today. Three different radios with accessories, PE fret and super thin decals. Very nice indeed and now I can finish my M3 scout model.

God created Arrakis to train the faithful.
Queensland, Australia
Joined: August 06, 2005
KitMaker: 3,353 posts
Armorama: 3,121 posts
Posted: Friday, December 14, 2018 - 08:04 AM UTC
They look very nice Damian. What is the casting quality like - no bubbles, etc?
On the Bench:
Dust, styrene scraps, paint splotches and tears.
#424
Queensland, Australia
Joined: April 23, 2015
KitMaker: 4,648 posts
Armorama: 2,248 posts
Posted: Friday, December 14, 2018 - 09:59 AM UTC
Damian,
The radio set looks nicely detailed! I bet it will enhance the model a lot.
Gaz
"Artillery adds dignity, to what would otherwise be an ugly brawl."
Frederick The Great
#424
Queensland, Australia
Joined: April 23, 2015
KitMaker: 4,648 posts
Armorama: 2,248 posts
Posted: Friday, December 14, 2018 - 10:07 AM UTC
Hi everyone,
Three big zimmerit sessions have allowed me to complete three sides of the fighting compartment. I tried a new method this time. Instead of spreading the putty on to as many rows as possible, I did each row individually. The goal was to eliminate a raised ridge between each row of toolmarks.

I started with a base row, and locations where interior angles dictated as places to start.

Once a row is dried, the excess is scraped away leaving tool marks approximately 4mm wide.

This is what the rows looked like before trimming away the excess. There were places where a new row would cross over an older row. I would use a water moistened paint brush to clean up the error. But because the putty is always water soluble, it has to be done quickly, and gently with as little water as possible.

The Result... I still have to back side of the fighting compartment to do as well as the driver's armor.

Gaz
"Artillery adds dignity, to what would otherwise be an ugly brawl."
Frederick The Great
Singapore / 新加坡
Joined: August 30, 2012
KitMaker: 265 posts
Armorama: 186 posts
Posted: Friday, December 14, 2018 - 02:20 PM UTC
@ Peter & Gaz
Resins are very clear, especially precise one like radio sets. They require very minor cleaning, but with care not to damage any details. No bubbles and warping noted. As I mentioned before two radio sets will be installed - SCR 506 at the rear of the cabin with an antenna on the top of the box containing radio set, and SCR 510 mounted on the left side floor with an antenna mount at ammo box over the rear wheel. Only thing I need now is to read the manual from mini CD attached to the kit. Unfortunately, my Mac hardware is not compatible with

God created Arrakis to train the faithful.
#456
Oklahoma, United States
Joined: September 22, 2016
KitMaker: 654 posts
Armorama: 638 posts
Posted: Friday, December 14, 2018 - 06:10 PM UTC
Gaz,
That zimmerit work on the superstructure looks fantastic!!! Your build is coming together very nicely.
#456
Oklahoma, United States
Joined: September 22, 2016
KitMaker: 654 posts
Armorama: 638 posts
Posted: Saturday, December 15, 2018 - 02:43 AM UTC
#453
Texas, United States
Joined: August 28, 2016
KitMaker: 1,925 posts
Armorama: 601 posts
Posted: Saturday, December 15, 2018 - 04:31 AM UTC
Mark,
Sweet looking Elephant you put together. I don't think you have to do to much weathering as these vehicles had a very short life in Italy.
Mark

#424
Queensland, Australia
Joined: April 23, 2015
KitMaker: 4,648 posts
Armorama: 2,248 posts
Posted: Saturday, December 15, 2018 - 09:07 AM UTC
"Artillery adds dignity, to what would otherwise be an ugly brawl."
Frederick The Great
Georgia, United States
Joined: July 26, 2013
KitMaker: 2,272 posts
Armorama: 1,860 posts
Posted: Saturday, December 15, 2018 - 09:56 AM UTC
Gaz, I know you wanted to avoid the raised ridges but I don't think you wanted to leaves the gaps between each column either:

On the Campaign Trail:
Tank Destroyer 2020
#424
Queensland, Australia
Joined: April 23, 2015
KitMaker: 4,648 posts
Armorama: 2,248 posts
Posted: Saturday, December 15, 2018 - 05:40 PM UTC
Shell,
Thanks for the photo. I hear what you're saying as the gaps bother me as well. It may be something I never master. I tried another variation today, which while it looks a little better isn't perfect.
The raised ridges left before were too rounded, and wide. What a guy needs is a substance that's firm yet easily conforms to shapes and capable of hard edges.
Then there's drying time to consider. I'll show the results of my new technique on the next update. But I won't be going back to make changes as the new technique is even more tedious than the previous technique.
Gaz
"Artillery adds dignity, to what would otherwise be an ugly brawl."
Frederick The Great
#123
New Mexico, United States
Joined: November 17, 2008
KitMaker: 1,202 posts
Armorama: 635 posts
Posted: Sunday, December 16, 2018 - 02:30 AM UTC
Gaz-You're doing a great job! You make it look easy-that always scares me. How about a tutorial of your techniques some day? I've always tried to stay away from zimmerit because it looks so hard.
Take care,
Don "Lakota"
Working on Campaigns:
1/72 Hasegawa Ki-84 Frank
1/144 Dragon Armor
#424
Queensland, Australia
Joined: April 23, 2015
KitMaker: 4,648 posts
Armorama: 2,248 posts
Posted: Tuesday, December 18, 2018 - 08:17 PM UTC
Thanks Don,
It's not as difficult if you have the right materials and tools. I need to make some more tools.
Hi everyone,
This is just a small update. I am now populating the outside of the sturmpanzer with bits of plastic.


Gaz
"Artillery adds dignity, to what would otherwise be an ugly brawl."
Frederick The Great
Queensland, Australia
Joined: August 06, 2005
KitMaker: 3,353 posts
Armorama: 3,121 posts
Posted: Tuesday, December 18, 2018 - 08:42 PM UTC
Love the Elephant mark. Can't wait to see what you do from here.
Great job on the Zim Gaz. Nothing beats the satisfaction of doing it yourself.
On the Bench:
Dust, styrene scraps, paint splotches and tears.
#456
Oklahoma, United States
Joined: September 22, 2016
KitMaker: 654 posts
Armorama: 638 posts
Posted: Friday, December 21, 2018 - 04:22 AM UTC
Gaz, that Strumpanzer is looking great. Looking forward to seeing it painted.
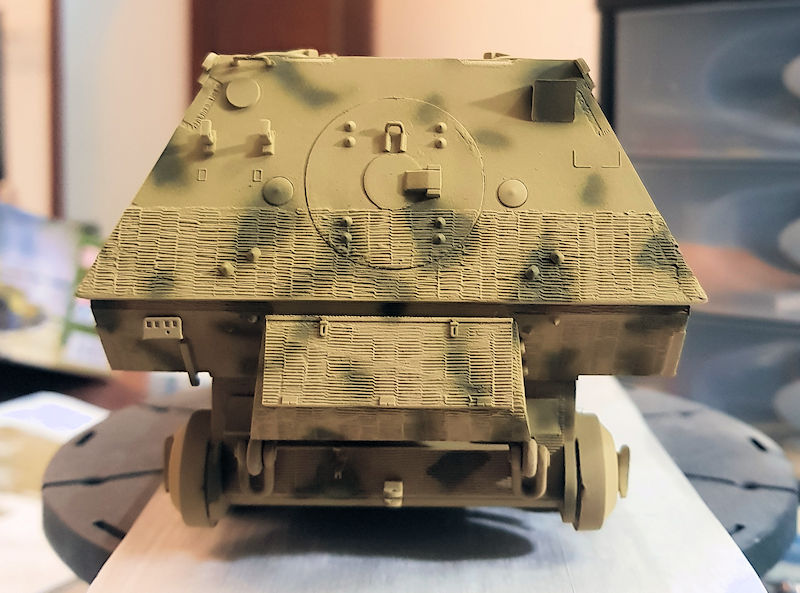
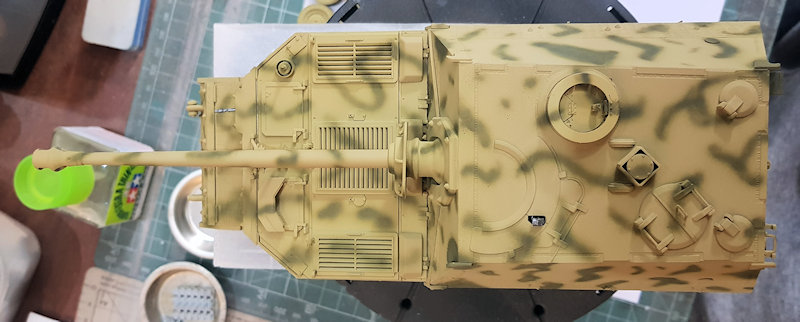
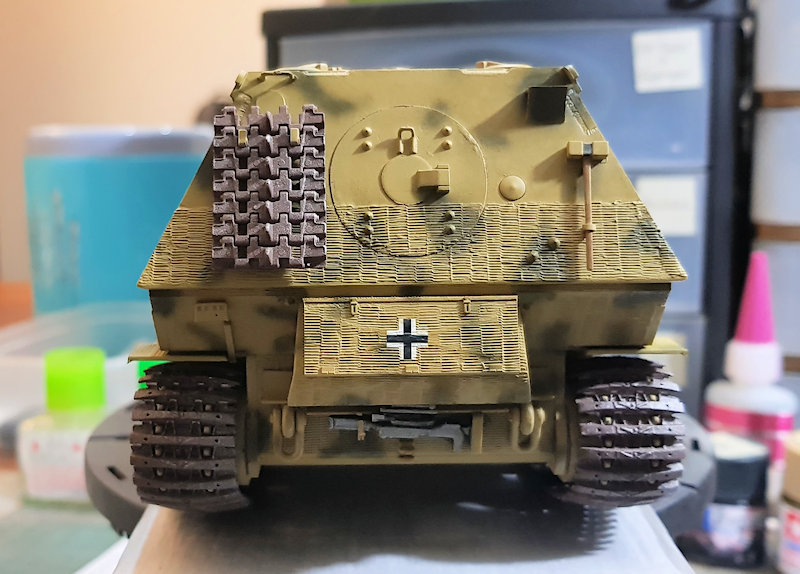
I've declared my Elefant complete. I just gave it a light coating of dust to give it a flatter appearance.
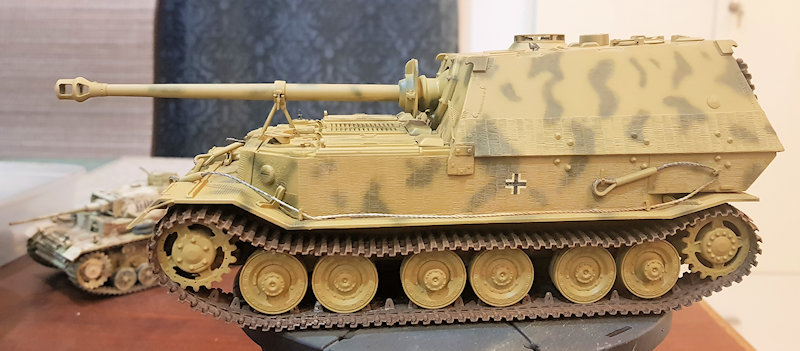

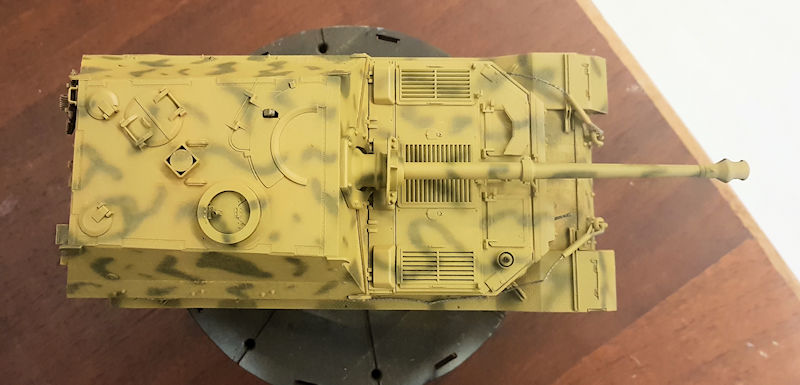
#424
Queensland, Australia
Joined: April 23, 2015
KitMaker: 4,648 posts
Armorama: 2,248 posts
Posted: Friday, December 21, 2018 - 09:21 AM UTC
AMark,
Congrats on completing your Elefant! It looks great! I don't mind some gentle weathering, and find that often my own methods go too far.
I'm also interested in that Pz III. The camo is intriguing.
Gaz
"Artillery adds dignity, to what would otherwise be an ugly brawl."
Frederick The Great
Queensland, Australia
Joined: August 06, 2005
KitMaker: 3,353 posts
Armorama: 3,121 posts
Posted: Friday, December 21, 2018 - 09:43 AM UTC
Congrats on finishing Mark. Well done.
On the Bench:
Dust, styrene scraps, paint splotches and tears.