Dioramas
Do you love dioramas & vignettes? We sure do.
Liberation, Italy 1944
strongarden
Visit this Community
Florida, United States
Joined: May 14, 2012
KitMaker: 730 posts
Armorama: 624 posts
Posted: Thursday, October 25, 2018 - 03:25 AM UTC
Lookin' good Tim, thanks for all your efforts in trying to replicate this scene. You have mad skills dude.

Regards
Dave
TanksForTheMemory
Visit this Community
England - South East, United Kingdom
Joined: August 31, 2016
KitMaker: 154 posts
Armorama: 152 posts
Posted: Sunday, December 30, 2018 - 12:41 PM UTC
Thanks guys. Sorry it's been a while...

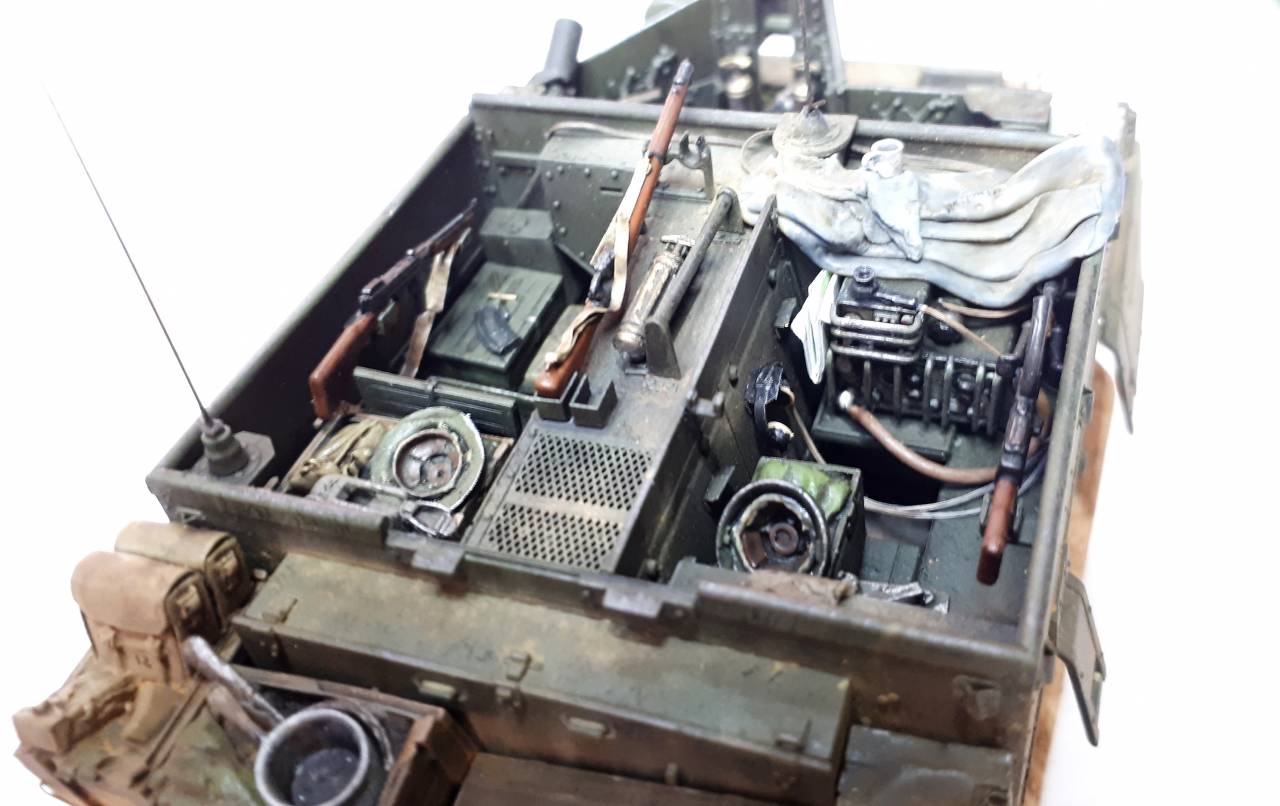
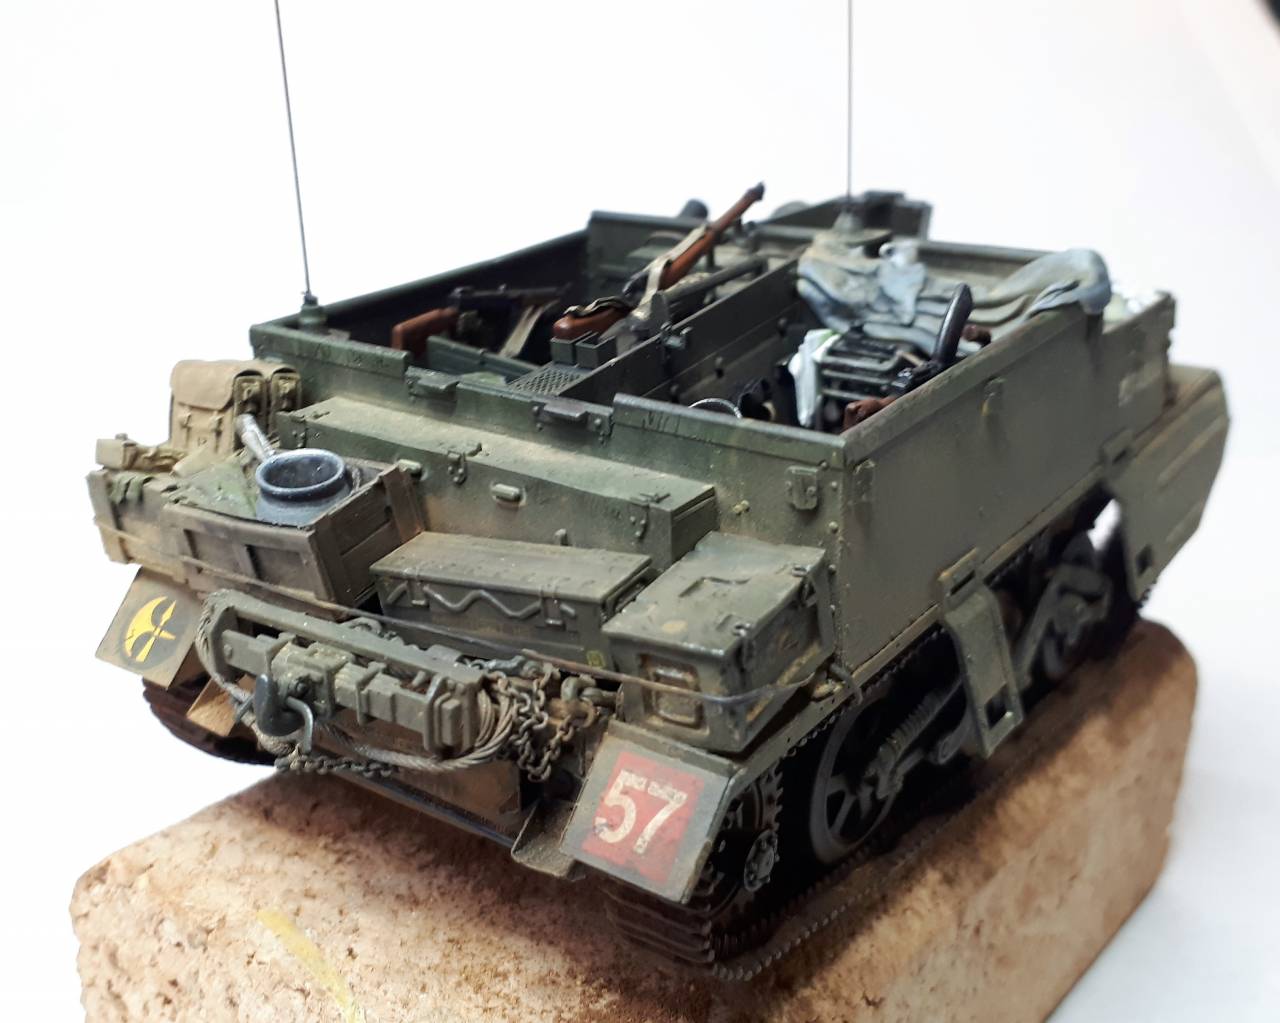
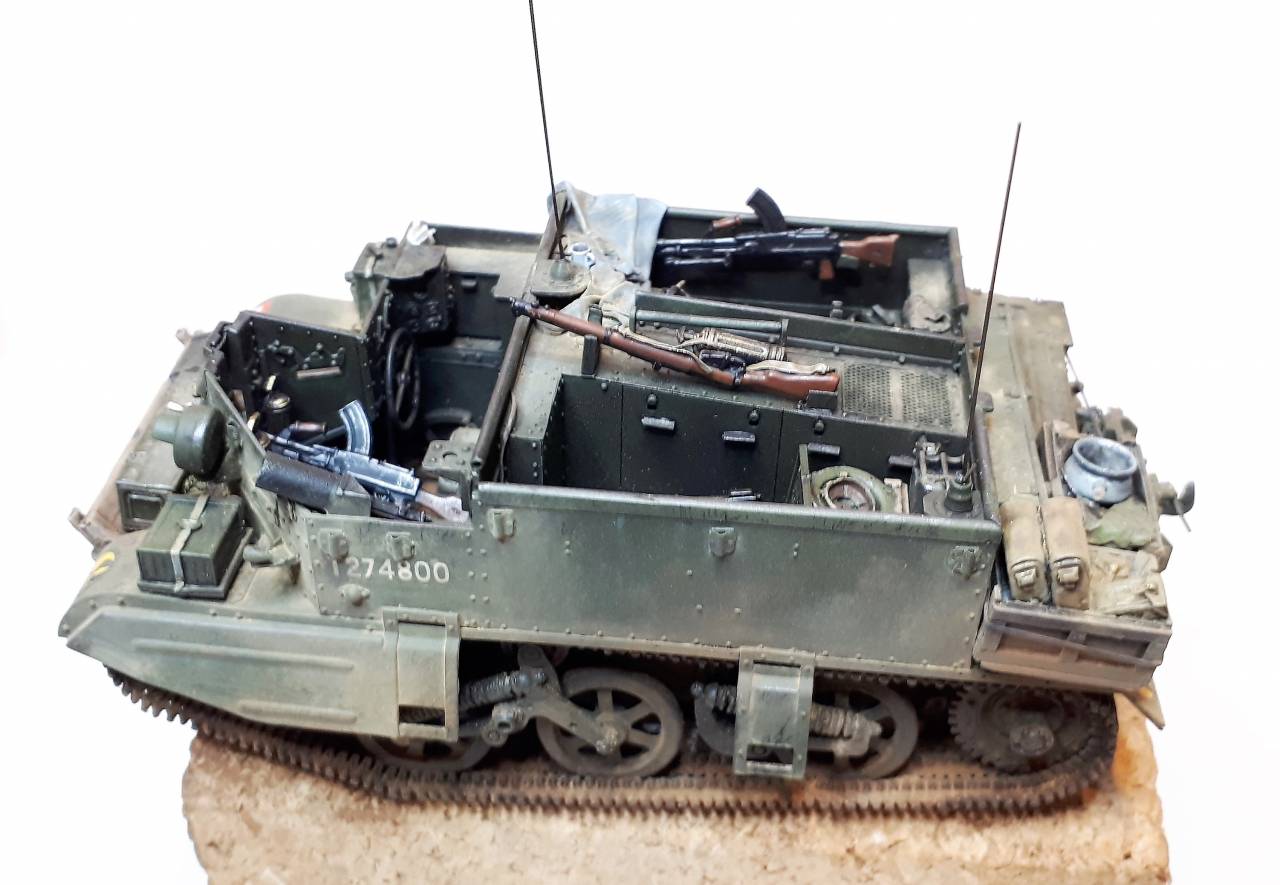
The Carrier has now acquired more stowage and a coat of dust...


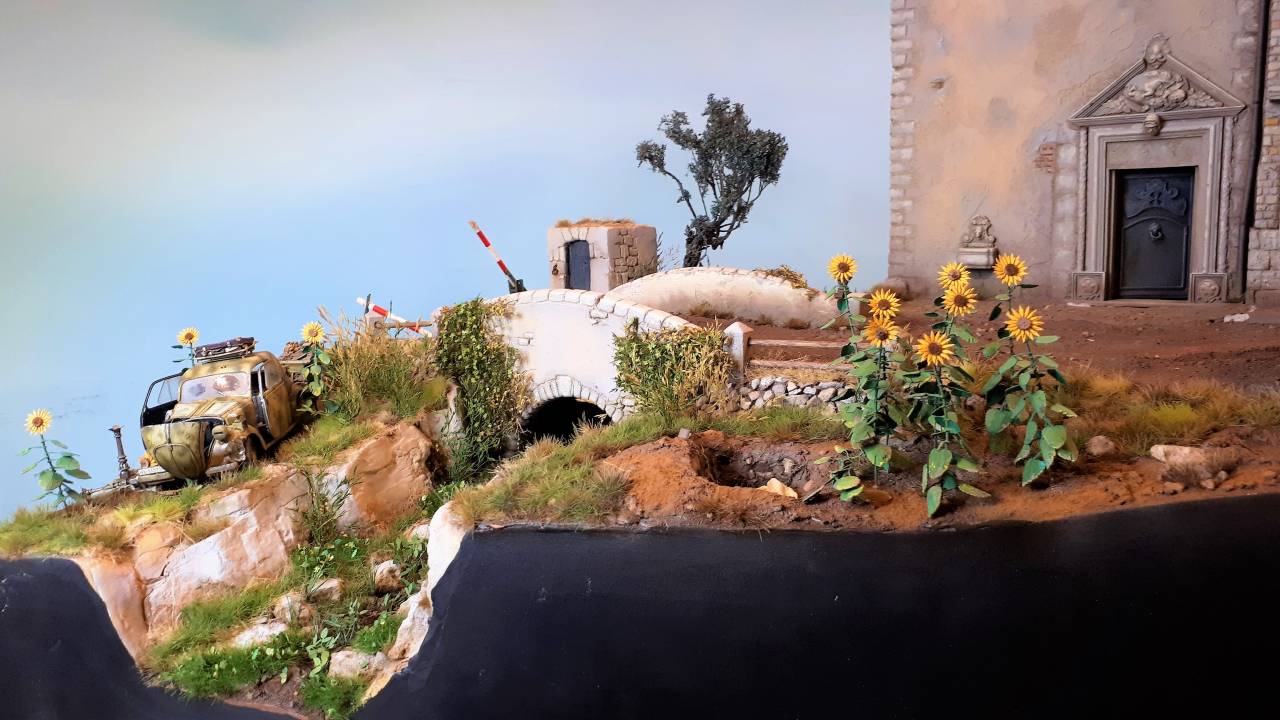
The latter is a variety of pigments, including some authentic Tuscan earth which I brought home from our holiday a couple of year back and grounded down in a coffee blender.

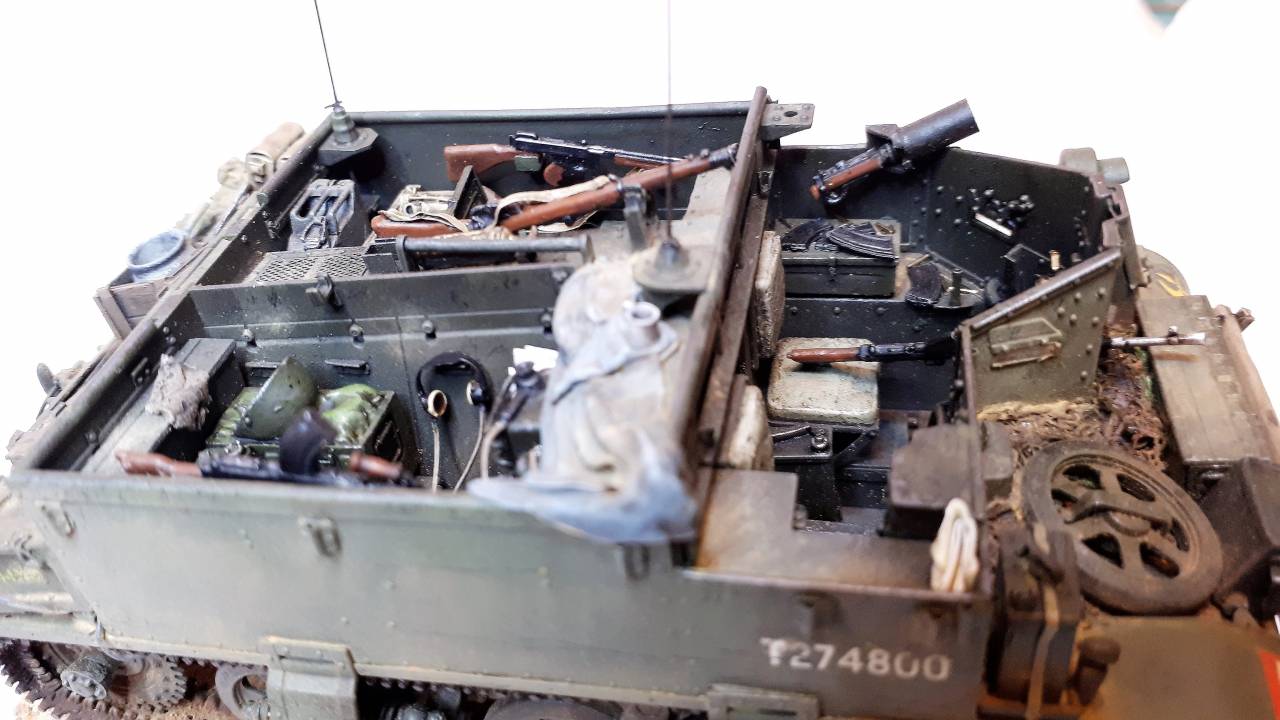
As for the stowage, what you see includes what came with the Riich kit (although weapons have straps added from lead foil or masking tape), additional ammo boxes and petrol cans from the Bronco British Field Accessories Set, more items from Resicast (e.g. crates filled with packs and helmets, etc, dented ammo crates) and, perhaps best of all, Bren ammo boxes and magazines from Ultracast. There are also spent rounds from brass wire snipped to shape.

The no.19 wireless set is fine as it comes, but it needs wiring - so I added mine. I am certainly no expert! The thicker cable, I believe, is the power supply which plugs into the front of the set. The cylindrical object which sits on top comes with the kit - but the instructions don't tell you what it is or where to put it. In fact, it's a 'variometer'.

There is also a control unit, which is missing from the kit completely. As far as can tell, the headphones and microphone actually plug into this unit and not directly into the wireless set. I basically copped out by making a carpet (using Tamiya quick dry putty) to cover the rear of the set and the area where the control box would be located - and all my wires conveniently disappear behind it. I used the excuse that the troops would be likely to have some sort of improvised cover to protect the set from the sun and rain...

The headphones and microphone also come with the kit. For the wiring I used EZ Line, which is fine, stretchable plastic thread mainly used for rigging ships and aeroplanes.

The aerials / antennae were added from guitar strings. After a little research and help from another site it seems that, among those commonly used on the Carrier, were the thinner variety which came in 4ft lengths (which equates to roughly 3.5 cms in 1/35 scale) and could be screwed into each other. So I went for one 4ft in length and another 8ft. These generally appear to have been straight, not curved, although in videos of carriers on the move they can be seen swinging about considerably!

Finally, everything was painted using either Vallejo or MIG acrylics...

TanksForTheMemory
Visit this Community
England - South East, United Kingdom
Joined: August 31, 2016
KitMaker: 154 posts
Armorama: 152 posts
Posted: Sunday, December 30, 2018 - 12:51 PM UTC
Another shot shows the detail inside the gunner's position, including Bren ammo box, magazines, spent cartridges and a scratch-built smoke discharger (which was, quite literally, triggered by a sawn-off Lee Enfield rifle!)

Dioramartin
Visit this Community
New South Wales, Australia
Joined: May 04, 2016
KitMaker: 1,476 posts
Armorama: 1,463 posts
Posted: Sunday, December 30, 2018 - 01:54 PM UTC
That's one impressive vehicle – busy, untidy, lived-in. Special award for Goldilocks weathering too i.e. not too much, not too little. Superb
obg153
Visit this Community
Texas, United States
Joined: April 07, 2009
KitMaker: 1,063 posts
Armorama: 1,049 posts
Posted: Sunday, December 30, 2018 - 03:51 PM UTC
Amazing finish on the Carrier! The Thompson stowed in the back looks unusual for a British unit. I ask cause I wonder how often they'd be able to obtain more clips/ammo for it.
jrutman
Visit this Community
Pennsylvania, United States
Joined: April 10, 2011
KitMaker: 7,941 posts
Armorama: 7,934 posts
Posted: Monday, December 31, 2018 - 05:20 AM UTC
Nice and dirty and well used plus filled with logical equipment. Looks the part!
J
JPTRR
Staff MemberManaging Editor
RAILROAD MODELING
#051
Visit this Community
Tennessee, United States
Joined: December 21, 2002
KitMaker: 7,772 posts
Armorama: 2,447 posts
Posted: Monday, December 31, 2018 - 05:25 AM UTC
Hi Tim,

Here's a tutorial for loading pix via this site.

https://railroadmodeling.kitmaker.net/forums/256943

cheyenne
Visit this Community
New Jersey, United States
Joined: January 05, 2005
KitMaker: 2,185 posts
Armorama: 1,813 posts
Posted: Monday, December 31, 2018 - 11:10 PM UTC
Nicely done Tim , beauty build !!!
The Thompson was a widely used lend lease weapon for British and commonwealth troops just about everywhere during WW2 .
mariointer
Visit this Community
Italy
Joined: April 01, 2012
KitMaker: 65 posts
Armorama: 57 posts
Posted: Monday, January 07, 2019 - 07:53 AM UTC
Hi your diorama is astonished indeed....your buildings are really incredible ..you have a big skill about that.....i appreciate so much the base too and the realisation of the vehicle is first rate too...but overall i love the figure choice.....i have toothe Corsar rex figures and when i saw yours i run to change the heads mine too with fantastic Hornet british soldiers and they became wonderful......i kike so much the officer of Miniature Alliance...buris in resin??? And where didi you carry the cane??? Interesting too the wee friend gb soldier....by the moment that your diorama is so big, do you ll add other british soldiers on it? For example a crew for scout car????

Bye bye from italy

Mario.
mariointer
Visit this Community
Italy
Joined: April 01, 2012
KitMaker: 65 posts
Armorama: 57 posts
Posted: Monday, January 07, 2019 - 08:00 AM UTC
Tim...i mean if your Miniature Alliance gb officer is in resin or metal "buris".....i make a mistake writing about that...before...!!!!

Mario.
TanksForTheMemory
Visit this Community
England - South East, United Kingdom
Joined: August 31, 2016
KitMaker: 154 posts
Armorama: 152 posts
Posted: Friday, January 11, 2019 - 12:19 PM UTC
Ciao Mario!

Thank you for your kind words. I am always especially pleased to have praise from Italy!

You were asking about the British officer. He is a Dog Tag resin figure (see above). I just replaced the bush hat with a helmet (Royal Models, which are a little bigger than any others I could find) and the cane is stretched sprue.

For now I have no plans for any figures in the Universal Carrier - too hard to fit! However, there are more figures on the way...

Regards,

Tim

TanksForTheMemory
Visit this Community
England - South East, United Kingdom
Joined: August 31, 2016
KitMaker: 154 posts
Armorama: 152 posts
Posted: Saturday, January 26, 2019 - 07:53 AM UTC
Things have been rather busy since New Year, but at last the Topolino is in place - AND the sunflowers have come out to play!


M4A3E8Easy8
Visit this Community
Washington, United States
Joined: February 04, 2006
KitMaker: 302 posts
Armorama: 300 posts
Posted: Saturday, January 26, 2019 - 08:02 AM UTC
looks good, the univeral is spot on. I must ask this though. You mentioned grinding dirt in a coffee grinder (one hopes dedicated to this task or the morning cup of joe.. well I will pass) Does the grinder actually make the dirt finer or just break up the clumps? I normally use the powdered dirt from ball fields or walking paths... This may give me an easy option to get the same fine powder.
TanksForTheMemory
Visit this Community
England - South East, United Kingdom
Joined: August 31, 2016
KitMaker: 154 posts
Armorama: 152 posts
Posted: Saturday, January 26, 2019 - 08:36 AM UTC
Hi Easy8.

I can assure you the grinder was well washed!

As for what you end up with the answer is simply this: a powder that - in terms of texture - is indistinguishable from my commercially produced pigments.

Try it!
cheyenne
Visit this Community
New Jersey, United States
Joined: January 05, 2005
KitMaker: 2,185 posts
Armorama: 1,813 posts
Posted: Tuesday, January 29, 2019 - 02:18 AM UTC
Tim , beauty work on the Topo , I like the partially opened suitcase too , nice touch .
TanksForTheMemory
Visit this Community
England - South East, United Kingdom
Joined: August 31, 2016
KitMaker: 154 posts
Armorama: 152 posts
Posted: Tuesday, January 29, 2019 - 02:42 AM UTC
Thanks Cheyenne.

The suitcase is my the Czech PlusModels. Just going through their website is virtually an evening's work - but they have such a fantastic range of accessories...

I ordered in bulk to save postage, but now I have luggage for life!
jrutman
Visit this Community
Pennsylvania, United States
Joined: April 10, 2011
KitMaker: 7,941 posts
Armorama: 7,934 posts
Posted: Tuesday, January 29, 2019 - 02:44 AM UTC
This is beautiful destruction to be sure. Nice veggies as well.
J
TanksForTheMemory
Visit this Community
England - South East, United Kingdom
Joined: August 31, 2016
KitMaker: 154 posts
Armorama: 152 posts
Posted: Tuesday, January 29, 2019 - 03:24 AM UTC
Thanks guys.

The sunflowers are spreading - a bit like triffids!

cheyenne
Visit this Community
New Jersey, United States
Joined: January 05, 2005
KitMaker: 2,185 posts
Armorama: 1,813 posts
Posted: Tuesday, January 29, 2019 - 05:02 AM UTC
Good Lord a 1951 B horror movie reference , love it !! Saturday morning Creature Features .
TanksForTheMemory
Visit this Community
England - South East, United Kingdom
Joined: August 31, 2016
KitMaker: 154 posts
Armorama: 152 posts
Posted: Tuesday, January 29, 2019 - 05:17 AM UTC
What I find most creepy about sunflowers is the way they ALL face the same way...
obg153
Visit this Community
Texas, United States
Joined: April 07, 2009
KitMaker: 1,063 posts
Armorama: 1,049 posts
Posted: Wednesday, January 30, 2019 - 06:06 AM UTC
Perhaps even creepier, is that time-lapse filming will show them "following" the sun during the day. And speaking of following, watching your scene come together is like taking a class in artistry. Awesome work, Tim, looking forward to your next update!
SRAMSEY
Visit this Community
South Carolina, United States
Joined: January 28, 2010
KitMaker: 28 posts
Armorama: 27 posts
Posted: Monday, February 04, 2019 - 04:40 AM UTC
Tim

I have been following this build since you started it. Everything from the buildings, to the scenery, and the vehicles are really well done.

Shawn
TanksForTheMemory
Visit this Community
England - South East, United Kingdom
Joined: August 31, 2016
KitMaker: 154 posts
Armorama: 152 posts
Posted: Wednesday, February 13, 2019 - 05:26 AM UTC
Thanks guys,

Next I turned my attentions to my bella donna on the balcony.

This is another excellent Mk 35 Editions figure (like my Partisan, originally French) called 'Woman cutting a bunch of grapes'.

In order to make her pose more suitable I had to change the position of her right arm to rest on the balcony, remove the knife, twist the left wrist and remove the bunch of grapes (so that she would hold a bottle). I also replaced her head with one from Hornet so that I could give her a more interesting hairstyle. Ironically, I am pretty sure that the original sculptor used the same head (which is a bit cheeky). The hair was sculpted from Tamiya Quick Type epoxy putty which was then detailed with a scalpel blade. I'm not exactly confident that it's an Italian hairstyle of the 1940s era - but let's just pretend she had just got out of the bath to greet the liberating Allies!


The billowing sheet hanging from the balcony (which will be white to indicate surrender) was also made from the same putty. This replaced a much rougher effort which I had made earlier from Magicsculp (see the first photo in this post). Although the Tamiya putty is very sticky (you need to use a lot of talcum powder to stop it sticking) it is absolutely the right thing to make thin sheets, clothing, etc. After a few minutes drying time it can be manipulated very easily to obtain realistic folds - as if blowing in a light breeze.
jrutman
Visit this Community
Pennsylvania, United States
Joined: April 10, 2011
KitMaker: 7,941 posts
Armorama: 7,934 posts
Posted: Thursday, February 14, 2019 - 03:36 AM UTC
Really nice conversion on the Donna and also the sheet rocks,
J
cheyenne
Visit this Community
New Jersey, United States
Joined: January 05, 2005
KitMaker: 2,185 posts
Armorama: 1,813 posts
Posted: Saturday, February 16, 2019 - 04:07 AM UTC
Nice work Tim , the babe turned out great and adds nicely to the story .