_GOTOBOTTOM
AFV Painting & Weathering
Answers to questions about the right paint scheme or tips for the right effect.
Weathering Canvas cargo truck covers
Denimo
Visit this Community
British Columbia, Canada
Joined: August 29, 2017
KitMaker: 186 posts
Armorama: 173 posts
Posted: Thursday, February 21, 2019 - 07:07 AM UTC
Ive searched youtube for info on how to add a bit of realism to my AFV M35a2. No luck there.

I want the canvas cargo cover or "tilt" as I used to know it, to look faded and weathered during use in ODS.

Any suggestions, ideas or links would be much appreciated.

Thanks Guys
M4A1Sherman
Visit this Community
New York, United States
Joined: May 02, 2013
KitMaker: 4,403 posts
Armorama: 4,078 posts
Posted: Thursday, February 21, 2019 - 08:59 AM UTC

Quoted Text

Ive searched youtube for info on how to add a bit of realism to my AFV M35a2. No luck there.

I want the canvas cargo cover or "tilt" as I used to know it, to look faded and weathered during use in ODS.

Any suggestions, ideas or links would be much appreciated.

Thanks Guys


Hi, Denis!

I generally don't use Youtube as a reference because they tend to be "too general" in nature. If you have access to "GOOGLE", I would use that instead. Just enter "M35A", and you should be able to view many M35As in a variety of color schemes nearly instantaneously. If you like to use books for reference, I can suggest the CONCORD series of books dealing with ODS, and as far as colors are concerned, you can look at newer vehicles US vehicles that took part in OIF. The colors themselves in general haven't changed by much, but only in the way that they were/are used.

I don't know of any specific links to send you to that show M35A2s during ODS, but as far as weathering the canvas "Cargo Bed Tarps", "Tilts" or what have you, I would use ANY color photos of modern-day US "Soft-skins" for reference- I say this because whichever color you are going to use as a base, the "tarps", "covers" or "tilts" are going to weather in the same way, depending on the severity of the environment in which the vehicle is deployed.

As to the weathering process, I can give you a few suggestions, in any case...

First, the top surface will necessarily fade in color much quicker that the sides and the interiors, so that's something that you will want to keep in mind.

I personally like to start out with a slightly "faded" OD BASE COLOR, i.e, FS34087. Take your pick of favorite paint manufacturers... Once my base coat is completely dry, I will first "DUST" on a very light coat of TESTORS Model Master ("rattle-can") No. 1960 LUSTERLESS (Flat) LACQUER OVERCOAT over my base coat as my sealer. Once this is completely dry, I will then apply a darker, thin "benign"-type of wash in order to emphasize the "valleys" of my tarp. You will want to go easy with this wash, and wipe away the "excess" as you would normally do in a case where you are painting "fabric materials" such as clothing, packs, etc. When I say "benign", I mean that the wash shouldn't be thinned with any kind of an aggressive thinner that could harm the base coat and the sealer, even though the TESTORS 1960 is pretty tough once it has dried...

Once this process has been done properly, I like to dust on another very light coat of my Lusterless Flat and set it aside to dry properly. So what's a good "drying time"..? As for myself, I like to give drying time 24 hours- Yes, that draws the working time of any project out, but believe me, it's worth it in the end. Fortunately, I have a lot of patience.

I STILL like to use a subtle dry-brushing technique in order to emphasize the "high-spots" of my folds, wrinkles, and the ridge lines of the "Tarp Supports" that show through the material of the canvas. I also like to do this with the clothing and equipment of my figures. This, of course will necessarily be a lighter shade of my base color- The "trick" to this is NOT TO GO HEAVY on the dry-brushing- I DON'T LIKE OILS for this kind of thing- Based on my own personal experience, I like to keep ALL of my paints MADE BY THE SAME MANUFACTURER on any given project. Yours truly is a "traditional" (read: "old-fashioned") old cuss- I STILL use TESTORS MODEL MASTER II ENAMELS for ALL of my paintwork. It has worked for me over many years, so I stick with what works for me. I also like to use certain shades of my weathering powders/pigments to "blend" shadows and high spots. I do this in order to give these "hills and valleys" a more natural appearance.

In my dry-brushing, I like to add a miniscule amount of lighter-colored weathering powder to the paint mix on my palette- I choose my light colors to fit into the general color range that I'm using. These lighter colors will not appreciably alter the color of the dry-brushing mix, whereas using darker colors of weathering powders will DEFINITELY ruin your dry-brushing mix. I do this to prevent my "flat" dry-brushing mix from turning glossy, as enamels are wont to do in any brush applications. The weathering powders/pigments will tend to make the dry-brushing mix to dry out on my palette very quickly. I keep my mix moistened with my TESTORS enamel Thinners. One tiny dip of a small-to-medium-sized brush into my small handy-dandy jar of clean thinner and one quick dab of this into my dry-brushing mix every so often keeps the dry-brushing process running smoothly. The thing that many modelers forget when dry-brushing is this little rule: "Less Is More, so keep it LIGHT"...

It saves "heartaches and headaches" to use the same paint and thinner manufacturer in all of my paintwork. And THIS should be one of the maxims in painting models. Time and time again, I've read through forums on this site where modelers are running into trouble when they mix paints and thinners from different manufacturers; globbing, scaling, cracking, "orange-peeling", you name it- The culprit is usually because the modeler has used a thinner made by a different manufacturer from their paints...

Once this is all done, I like to airbrush a VERY TRANSLUCENT coat of "dust" over the top surface and a little bit along the bottom edges of my tarp/tilt/cargo bed cover. This sort of "melds" the whole thing together, and also "softens" the effect of the different colors used in the painting of my tarp's folds and wrinkles, etc. "Dust" should be a mixture of mostly thinners with just a few drops of a color that matches the DRY earth/sand/dried mud of whichever environment that you've chosen for your vehicle. Replicating "wet" mud is another story, entirely.

A great thing that I like about using the TESTORS Model Master Lusterless Flat is that once it is sprayed on as final coat, it somehow makes everything blend together smoothly so that one can still see the shadows and high points of the whole weathering process, yet there is none of the starkness left between the different colors. More "natural-looking" I guess you'd want to call it...

I hope this little bit of info helps you, even if it's only some small way...
SSGToms
Visit this Community
Connecticut, United States
Joined: April 02, 2005
KitMaker: 3,608 posts
Armorama: 3,092 posts
Posted: Thursday, February 21, 2019 - 04:52 PM UTC
Tamiya Olive Drab drybrushed with Tamiya Dark Yellow has always given me good results...
M4A1Sherman
Visit this Community
New York, United States
Joined: May 02, 2013
KitMaker: 4,403 posts
Armorama: 4,078 posts
Posted: Thursday, February 21, 2019 - 06:40 PM UTC

Quoted Text

Tamiya Olive Drab drybrushed with Tamiya Dark Yellow has always given me good results...


THIS is PRECISELY what I'm talking about when I'm referring to "using the SAME paints, (and thinners), made by the same manufacturer"...

Thanks, Matthew...
Tank1812
Visit this Community
North Carolina, United States
Joined: April 29, 2014
KitMaker: 1,112 posts
Armorama: 886 posts
Posted: Thursday, February 21, 2019 - 10:12 PM UTC
Here is a good YouTube reference
https://m.youtube.com/watch?v=ioOO8u_2N_A&index=50&list=PLJexk848lGiQx-sk7n5OuF-bEbqJ8ZGxF&t=0s

There was another beginners type video someone made using a Revell Landrover that had a sand color canvas that had some tips using vallejio paints that I cannot find right now.

HTH
165thspc
#521
Visit this Community
Kentucky, United States
Joined: April 13, 2011
KitMaker: 9,465 posts
Armorama: 8,695 posts
Posted: Friday, February 22, 2019 - 03:50 AM UTC
Consider too using some of the popular shader paints over a base color coat.

I also choose Tamiya Dark Yellow as my most often used base color.

_________________________________________

You might check out the following thread on shaders. It mostly covers vehicle weathering and making wood grains using shaders but there is one reference to doing canvas tilts.

https://armorama.kitmaker.net/forums/274950


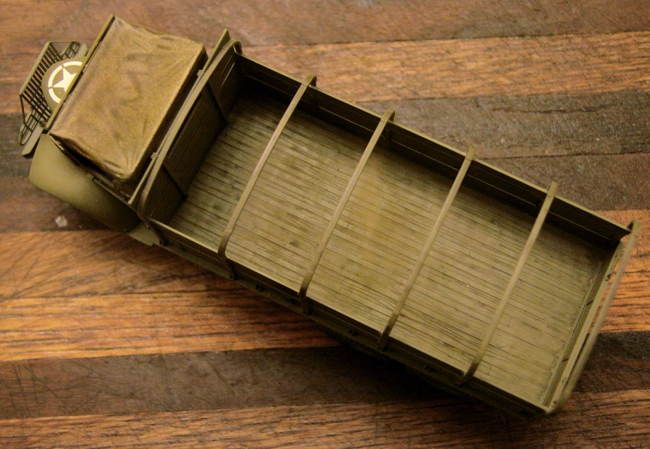
Loadbox floor done with black shader over olive drab and canvas done with brown shader over dark yellow.

_________________________________________

Also consider using pastels over a base coat of paint plus matte clear to achieve the shading and variations of color tone you are looking for in the canvas.


Color variations and dark areas over the canvas support hoops achieved using pastel chalks "scrubbed" into a matte clear coating using a short bristle brush.

With either technique try using different base colors to alter the overall color shade. I have used colors as light as a modern Desert Sand to as dark as Red Rust or Olive Drab.

Again check out the link above.
165thspc
#521
Visit this Community
Kentucky, United States
Joined: April 13, 2011
KitMaker: 9,465 posts
Armorama: 8,695 posts
Posted: Friday, February 22, 2019 - 04:07 AM UTC
Dennis, just a suggestion:

I have used the Model Masters Flat Clear for years but suggest you consider trying the Tamiya (TS-80) Matte Clear product. I feel the nozzle atomizes to a smaller droplet size so you get an even finer tooth to the finished matte surface. Also the spray is more forgiving if you happen to lay it on a little too thick.

Honestly I think it creates the "flatest", most matte surface in the model industry. With my final coating I hold the can way back from the model so the paint is almost dry before it hits the model.

Needless to say I am very happy with the results and use it on nearly everything.
165thspc
#521
Visit this Community
Kentucky, United States
Joined: April 13, 2011
KitMaker: 9,465 posts
Armorama: 8,695 posts
Posted: Friday, February 22, 2019 - 09:30 PM UTC
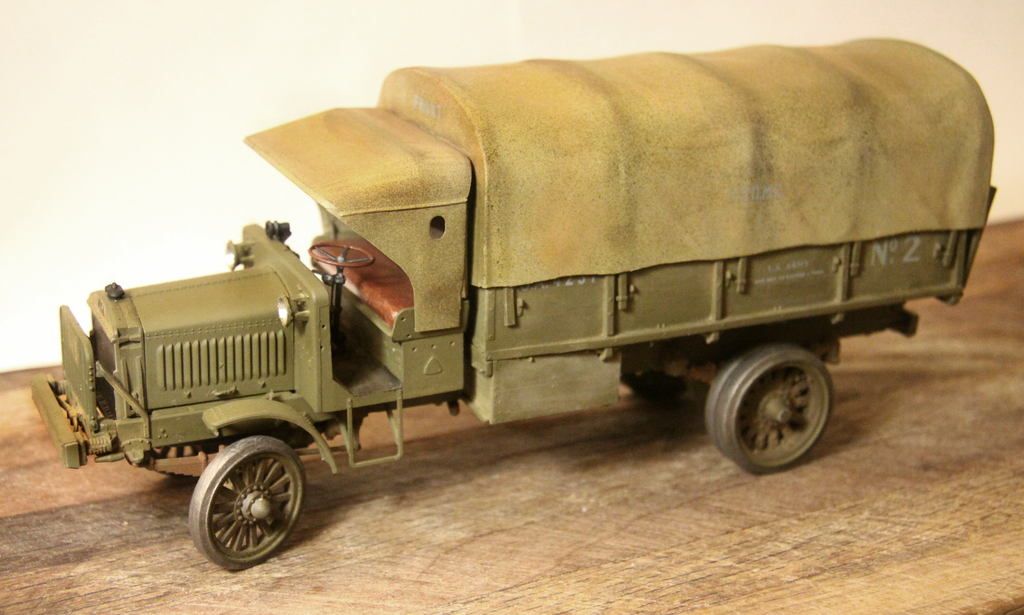
Another shot I came up with from the files - this one showing a canvas top again with a base coat of Taniya Dark Yellow, then Tamiya Matte Clear (TS-80) and then pastel chalks scrubbed into it.

(One year it won a special award for "Best Halftrack" and the judge said publicly the reason it won was the canvas top. - I don't think it is all that great but I didn't refuse the award either!)


All dust and dirt weathering in this photo achieved using pastel chalks.
165thspc
#521
Visit this Community
Kentucky, United States
Joined: April 13, 2011
KitMaker: 9,465 posts
Armorama: 8,695 posts
Posted: Friday, February 22, 2019 - 09:54 PM UTC
Pastel set I bought around 1974. Except for replacing a few color sticks along the way this set has handled most all my modeling & weathering needs for all those years!


Please disregard the black arrow pointing to that Russian color.
165thspc
#521
Visit this Community
Kentucky, United States
Joined: April 13, 2011
KitMaker: 9,465 posts
Armorama: 8,695 posts
Posted: Saturday, February 23, 2019 - 08:37 PM UTC
A set of shader paints by Citadel that I got this past Christmas that I am liking very much:

165thspc
#521
Visit this Community
Kentucky, United States
Joined: April 13, 2011
KitMaker: 9,465 posts
Armorama: 8,695 posts
Posted: Saturday, February 23, 2019 - 09:43 PM UTC
Even over a camo painted tarp you can use a light coating of pastel white or lite gray to signify fading in the sunlight or simply that the cloth takes the paint differently than the sheet metal and should look slightly different.
165thspc
#521
Visit this Community
Kentucky, United States
Joined: April 13, 2011
KitMaker: 9,465 posts
Armorama: 8,695 posts
Posted: Saturday, February 23, 2019 - 10:01 PM UTC
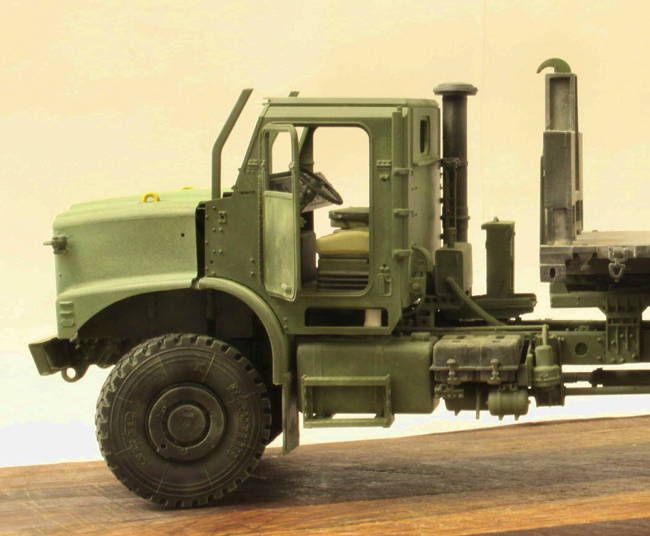
This example isn't canvas but it still shows the affect of what the white pastel chalk can do.

This is the Marine Mark 23 cargo truck, very common in the Corp. (Converted here to a LHS) On the real truck the hood and front fenders are a one piece fiberglass molding that reacts with the OD paint differently than the body sheet metal. So it fades really fast and almost always looks way different than the painted metal after just a short time in the field.**

This entire model was been painted the SAME shade of green but then I went back over the hood with the pastels to show the fade difference.


** The real Mk23 hood may not even be painted at all. It may just be a tint added to the fiberglass when it is molded. Either way the truck comes out of the factory with everything looking the same but then the different materials don't stay the same color for very long.
Denimo
Visit this Community
British Columbia, Canada
Joined: August 29, 2017
KitMaker: 186 posts
Armorama: 173 posts
Posted: Sunday, February 24, 2019 - 05:04 AM UTC
My thanks to everybody who has contributed their knowledge, ideas and expertise to this post.

I really appreciate your efforts and feel I will make less of a disaster of the canvas now!👏
Denimo
Visit this Community
British Columbia, Canada
Joined: August 29, 2017
KitMaker: 186 posts
Armorama: 173 posts
Posted: Saturday, March 02, 2019 - 05:49 AM UTC

Quoted Text

Here is a good YouTube reference
https://m.youtube.com/watch?v=ioOO8u_2N_A&index=50&list=PLJexk848lGiQx-sk7n5OuF-bEbqJ8ZGxF&t=0s

There was another beginners type video someone made using a Revell Landrover that had a sand color canvas that had some tips using vallejio paints that I cannot find right now.

HTH

I checked out the video and bought the paint as directed. All too late, I realise that this is for a Euro theatre vehicle.

I realize the Vallejo Splinter and Stencil paints will lighten the basic khaki green of
the Canvas paint but I think I need to go again using Vallejos Ivory, Iraqi sand or the IDF Sand I painted the truck in, then lighten it for shading the creases etc.

Any thoughts (apart from what a stupid mistake I made withe video info!)
Denimo
Visit this Community
British Columbia, Canada
Joined: August 29, 2017
KitMaker: 186 posts
Armorama: 173 posts
Posted: Saturday, March 02, 2019 - 05:59 AM UTC
Thanks Dennis, that's hugely helpful and I will try and use your methodology on the canvas Im working on.

 _GOTOTOP