ColinEdm
 Associate Editor
Alberta, Canada
Joined: October 15, 2013
KitMaker: 1,355 posts
Armorama: 1,229 posts
Posted: Sunday, March 17, 2019 - 05:25 AM UTC
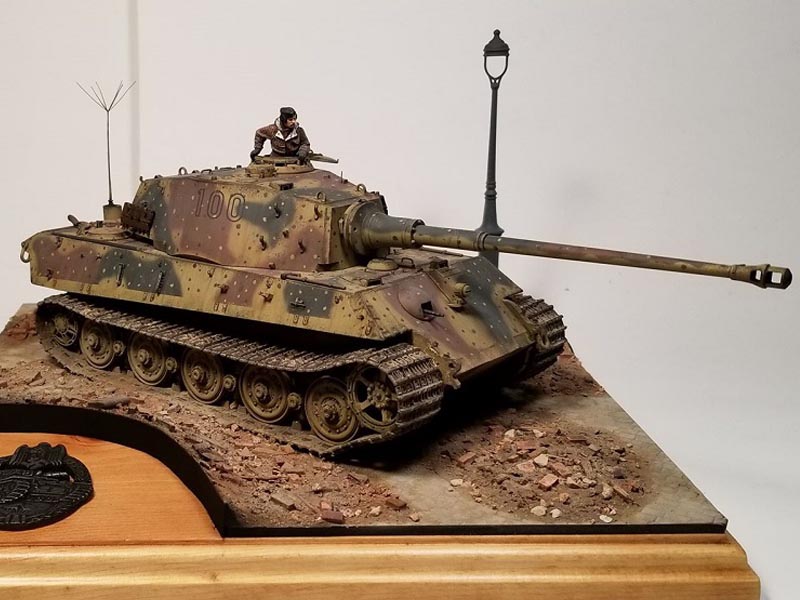
Luc Harvey shares some pictures of his build of Tamiya's King Tiger.
 Link to Item
If you have comments or questions please post them here.
Thanks!
The voices are back.....excellent....
North Carolina, United States
Joined: June 06, 2006
KitMaker: 4,691 posts
Armorama: 3,509 posts
Posted: Sunday, March 17, 2019 - 08:52 AM UTC
Really nice,blend perfectly with the base.I really like the appearance of the weathering,a good amount,but not overdone,and the figure is posed nicely.
Quebec, Canada
Joined: October 21, 2005
KitMaker: 60 posts
Armorama: 56 posts
Posted: Sunday, March 17, 2019 - 09:46 AM UTC
Thank you for the comment, for this project I wanted to apply an weathering process that was neither too heavy and not too light.
Texas, United States
Joined: April 07, 2009
KitMaker: 1,063 posts
Armorama: 1,049 posts
Posted: Sunday, March 17, 2019 - 12:26 PM UTC
I agree with Anthony,, I think you've got the weathering down perfectly. In the close-up pic of the figure in the cupola, even his gloves look used & worn! That's some really fine detail painting! Thanks for showing us.
Even my pick-up is panzer grey.
Quebec, Canada
Joined: October 21, 2005
KitMaker: 60 posts
Armorama: 56 posts
Posted: Sunday, March 17, 2019 - 10:15 PM UTC
Thank you, well with each project I always try to do better than the previous one, for the painting of the figurine I was not sure of the result because I used a new brand of paint.
Alberta, Canada
Joined: December 20, 2007
KitMaker: 93 posts
Armorama: 91 posts
Posted: Monday, March 18, 2019 - 05:11 AM UTC
Excellent overall display Luc! As previously stated the weathering is great and very convincing as seen around the cupola. I like the way you've placed the elements in the display angeling the turret in relation to the road. I always think the base is as important as the finished piece. Outstanding sir.
Quebec, Canada
Joined: October 21, 2005
KitMaker: 60 posts
Armorama: 56 posts
Posted: Monday, March 18, 2019 - 10:04 AM UTC
Thank you for the comment ,I appreciate it I always try to present a model in a natural environment as realistic as possible and from a dynamic angle.
Manitoba, Canada
Joined: January 03, 2016
KitMaker: 3,791 posts
Armorama: 3,778 posts
Posted: Tuesday, March 19, 2019 - 11:50 AM UTC
Nicely done Lucas! I really like that you remembered to mask where the side fenders would have been. The commander figure is top-notch!
Quebec, Canada
Joined: October 21, 2005
KitMaker: 60 posts
Armorama: 56 posts
Posted: Tuesday, March 19, 2019 - 09:42 PM UTC
Thank you for your comment, I always try to follow a logic with the assembly of each model and to follow the original idea
Klaus-Adler
Campaigns Administrator Scotland, United Kingdom
Joined: June 08, 2015
KitMaker: 1,505 posts
Armorama: 840 posts
Posted: Wednesday, March 20, 2019 - 06:18 AM UTC
a fabulous build and an excellent diorama, the ground work is well executed indeed. my only crumble is the black edge of the diorama as it draws your eye away from it and I find it a little distracting but I guess you chose that to tie in with the badge on the lower left part of the base.
well done mate
Quebec, Canada
Joined: October 21, 2005
KitMaker: 60 posts
Armorama: 56 posts
Posted: Thursday, March 21, 2019 - 06:29 AM UTC
Thanks for the comment, yes it was to separate the diorama from the base that I used the black band, but I did not realize that it caused a distraction, I take good note of it for my next project.

#136
Distrito Federal, Mexico
Joined: April 06, 2002
KitMaker: 437 posts
Armorama: 391 posts
Posted: Saturday, March 23, 2019 - 06:11 PM UTC
Excellent work my friend!. The weathering and the figure looks great, well done!!
Regards!
Rodolfo
Current Project:
I am building a Kingtiger Ausf. B, Version: March 1945 - AMMO/MIG, 1/35
Quebec, Canada
Joined: October 21, 2005
KitMaker: 60 posts
Armorama: 56 posts
Posted: Saturday, March 23, 2019 - 08:14 PM UTC
Thank you for your comment, I appreciate it very much.
Alabama, United States
Joined: September 11, 2017
KitMaker: 77 posts
Armorama: 69 posts
Posted: Saturday, March 30, 2019 - 11:54 AM UTC
As with everybody else - great job!!! Could you give us some pointers about how you did the "ambush" camo?? Again absolutly superb!
Quebec, Canada
Joined: October 21, 2005
KitMaker: 60 posts
Armorama: 56 posts
Posted: Saturday, March 30, 2019 - 11:14 PM UTC
I painted the camo by freehand with an Iwata hp-ch 0. 3mm airbrush, then I painted the dots with a brush with very diluted paint for the barrel I used a camo mask.


