

1⁄35An LCM3 Adventure
12
Comments
Introduction
A little over twelve years ago I began my model building hobby with the construction of a Tamiya Dragon Wagon, which at the time was brand new and state of the art. I enjoyed building it and was proud to display it on my shelf, at least for a time. After returning to the hobby a couple of years ago I was amazed by the advances in both the quality and availability of the aftermarket accessories and finishing options, as well as the tremendous resources now available online in relation to the original machines themselves. As my skills developed I began to look back at the old Dragon Wagon model and think to myself wow, I thought that was fantastic when I first built it, but now what a hunk of junk. Admittedly it was the first of my models and I am probably being overly critical of myself, but the urge to build a new one grew and grew until one day I saw this image This image, taken in Maastricht, Holland, 1945 caught my eye. At first, like so many others, I planned to just put the LCM3 loaded onto the Dragon Wagon, add a figure or two, and voila, done. But after discovering Accurate Armour makes an RN 17/19 crane, that while not identical, is very close in both size and shape, I decided to go for it. If only I knew what I was in for at the time!
Covering the construction of the entire diorama, or even the Dragon Wagon and LCM3 would be far too long an article, so Im going to focus on the model which benefits most from the additional work I put into it, namely the LCM3.
There are two kits available for modeling the LCM3 in 1/35th scale, namely the Trumpeter and Italeri kits. There is a very nice comparison review of them on the Perth military modeling website. In case you havent read the comparison review, the Trumpeter kit is dimensionally wrong in a way thats almost impossible to correct (the hull is too tall), and frankly has several other accuracy flaws which Ive found in my research that the review didnt mention. These include the machine gun mount bases, the size of the steering cabin, the ramp lowering mechanism, etc. Frankly, unless you already have the Trumpeter one or get it for free, go for the Italeri if you want an accurate LCM3.
There arent many aftermarket add-ons for the LCM3 available these days. The only ones available are the Eduard photo etch sets for the Trumpeter and Italeri kits (sets 35735 and 35739 respectively), their structural support framework set, a Thatchweave bumper set, and a U-models French Indochina conversion set. Since I didnt have the Trumpeter kit, and didnt plan to build the French Indochina version, I settled on the Thatchweave bumper set, the Eduard Italeri-specific photo etch set and their structural support framework set, although in the end I didnt use the structural support framework and dont recommend it, as none of my research turned up any LCM3s which look like what is provided in that set.
This image, taken in Maastricht, Holland, 1945 caught my eye. At first, like so many others, I planned to just put the LCM3 loaded onto the Dragon Wagon, add a figure or two, and voila, done. But after discovering Accurate Armour makes an RN 17/19 crane, that while not identical, is very close in both size and shape, I decided to go for it. If only I knew what I was in for at the time!
Covering the construction of the entire diorama, or even the Dragon Wagon and LCM3 would be far too long an article, so Im going to focus on the model which benefits most from the additional work I put into it, namely the LCM3.
There are two kits available for modeling the LCM3 in 1/35th scale, namely the Trumpeter and Italeri kits. There is a very nice comparison review of them on the Perth military modeling website. In case you havent read the comparison review, the Trumpeter kit is dimensionally wrong in a way thats almost impossible to correct (the hull is too tall), and frankly has several other accuracy flaws which Ive found in my research that the review didnt mention. These include the machine gun mount bases, the size of the steering cabin, the ramp lowering mechanism, etc. Frankly, unless you already have the Trumpeter one or get it for free, go for the Italeri if you want an accurate LCM3.
There arent many aftermarket add-ons for the LCM3 available these days. The only ones available are the Eduard photo etch sets for the Trumpeter and Italeri kits (sets 35735 and 35739 respectively), their structural support framework set, a Thatchweave bumper set, and a U-models French Indochina conversion set. Since I didnt have the Trumpeter kit, and didnt plan to build the French Indochina version, I settled on the Thatchweave bumper set, the Eduard Italeri-specific photo etch set and their structural support framework set, although in the end I didnt use the structural support framework and dont recommend it, as none of my research turned up any LCM3s which look like what is provided in that set.
ribbing and venting
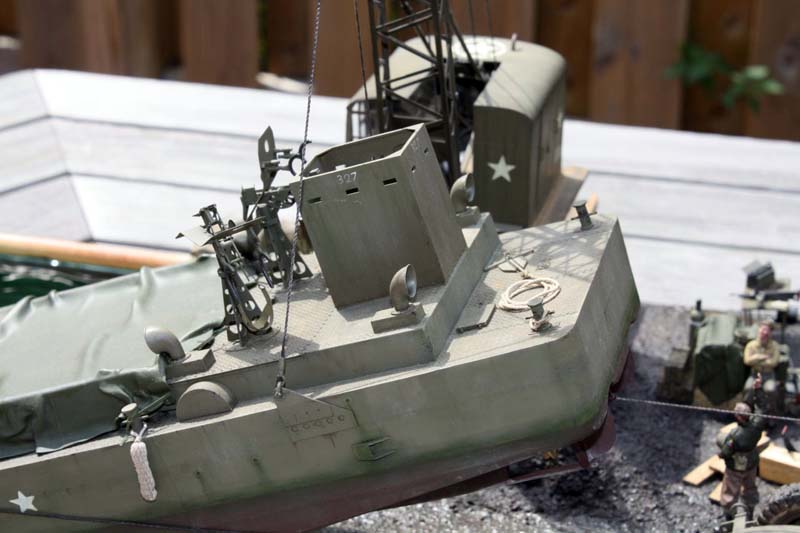
I began by tracing the ribs on the lower hull with a pencil. The LCM3 has a thin steel hull stretched over underlying support ribs, and depending on the age, wear and tear, etc, these ribs show through. In some images theyre barely visible, in some they are moderately visible, and in some images theyre so pronounced the hull looks like a waffle.
 I decided to go for a mild or moderately-stretched look, so I traced on the pattern of the ribs as accurately as I could based on the images I had (there should be three horizontal ribs, not including the top and bottom of the hull) and four spaces between them. Ive seen some modelers add five or more, but the Dragon Wagon transport images, and several others are very clear in this regard). The white evergreen styrene filled the locating slots for the lifting plates, which I plan to replace with the Eduard photo etched ones later.
Once that was done 0.010 x 0.030 strip was glued on top of the pencil lines and allowed to dry.
I decided to go for a mild or moderately-stretched look, so I traced on the pattern of the ribs as accurately as I could based on the images I had (there should be three horizontal ribs, not including the top and bottom of the hull) and four spaces between them. Ive seen some modelers add five or more, but the Dragon Wagon transport images, and several others are very clear in this regard). The white evergreen styrene filled the locating slots for the lifting plates, which I plan to replace with the Eduard photo etched ones later.
Once that was done 0.010 x 0.030 strip was glued on top of the pencil lines and allowed to dry. About the Author


Comments
A lot of congratulations for this beautiful diorama which is based on a historical event. Well done sir !
SEP 27, 2014 - 09:22 PM


Just some awsome work Jason. I love large dio's and this is one fantastic one you have created. Ending up with the Trump kit when my L.H.S. closed, I see I have some work to do on her. This will be of great help when it does get on the bench. Thanks for sharing the info and the adventure with us. bob d.
OCT 01, 2014 - 04:47 AM


It seems that the clinic has excellent treatment and rehabilitation area!
Well done!
OCT 06, 2014 - 06:15 AM

Maybe I'm daft but the photos in the linked article all show a tank being constructed. The solo photos of the diorama are great but methinks the 9 page written description has photos of a tank!
Am I just working on a possessed computer?
MAR 13, 2018 - 10:48 PM
I can't even place the running gear of the tank...
But yes the build appears to have mixed up pictures.
MAR 13, 2018 - 11:47 PM

The tank looks to be one of the Bronco models of the British Cruiser tank.


MAR 13, 2018 - 11:51 PM
Copyright ©2021 by Jason Lehrer. Images and/or videos also by copyright holder unless otherwise noted. The views and opinions expressed herein are solely the views and opinions of the authors and/or contributors to this Web site and do not necessarily represent the views and/or opinions of Armorama, KitMaker Network, or Silver Star Enterrpises. All rights reserved. Originally published on: 2014-09-27 22:22:35. Unique Reads: 15005

WEB HOSTING BY


Copyright ©2021 Armorama and Kitmaker Network, a subsidiary of Silver Star Enterprises
All Rights Reserved. Please read our Conditions of Use and Privacy Policy.
All Rights Reserved. Please read our Conditions of Use and Privacy Policy.