

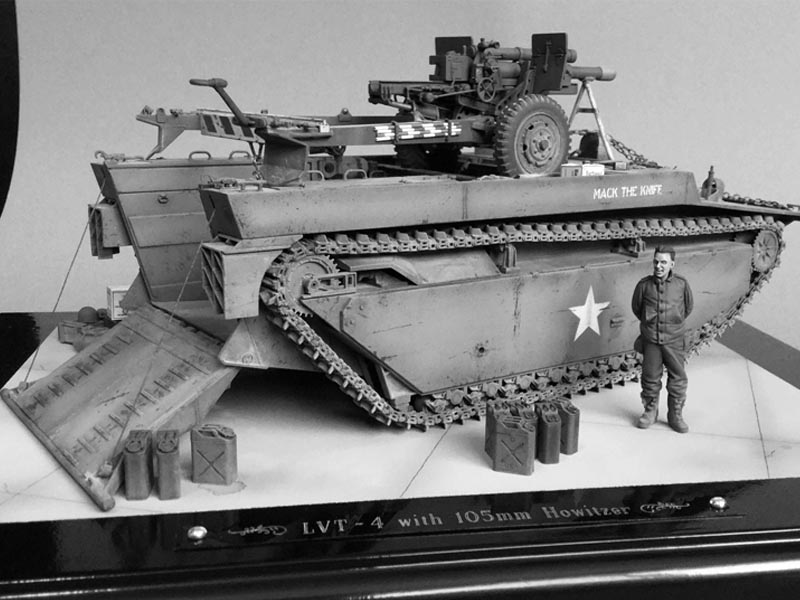
1⁄35LVT 4 and 105mm Howitzer
14
Comments
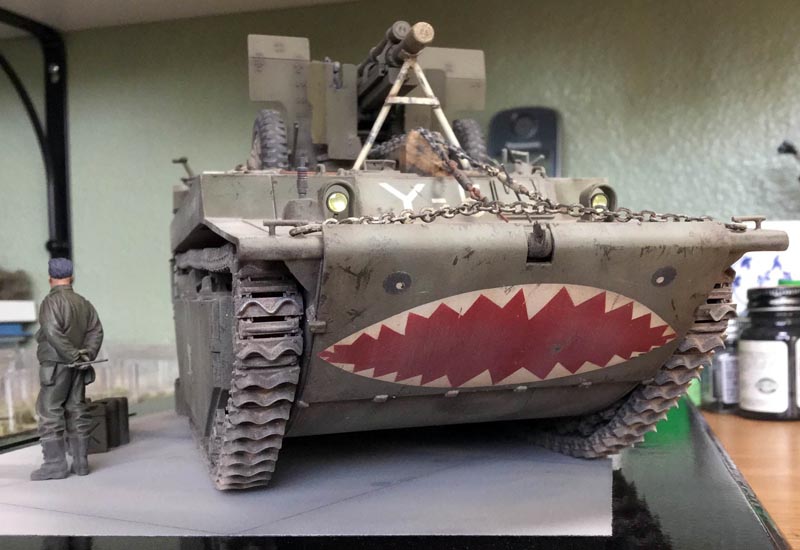
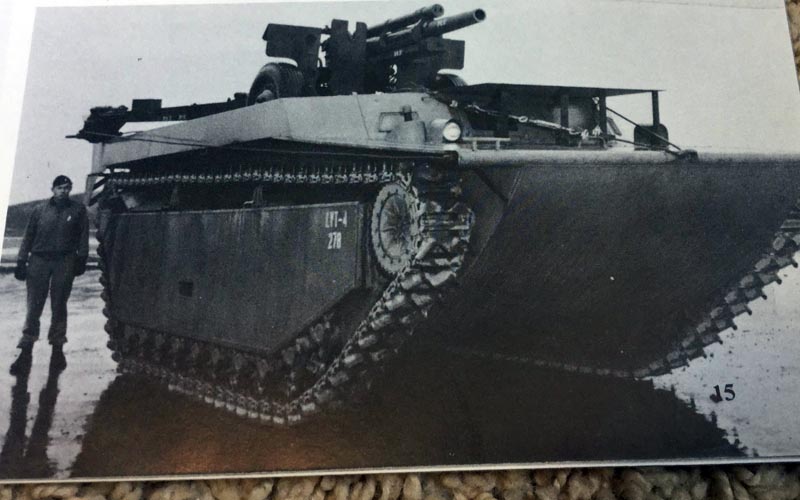
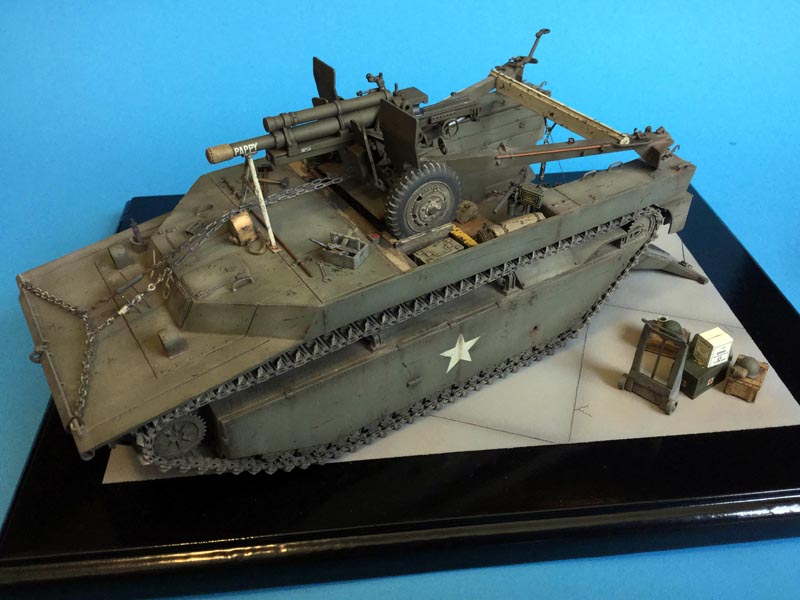
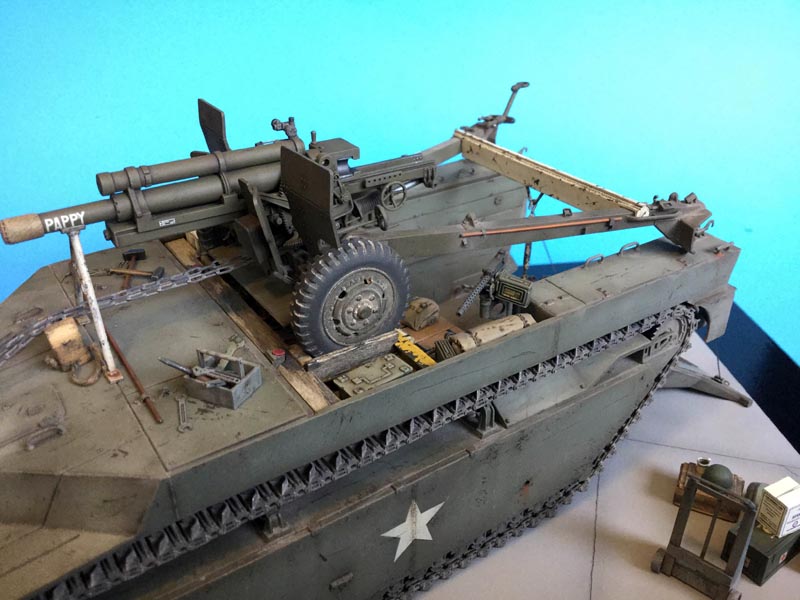
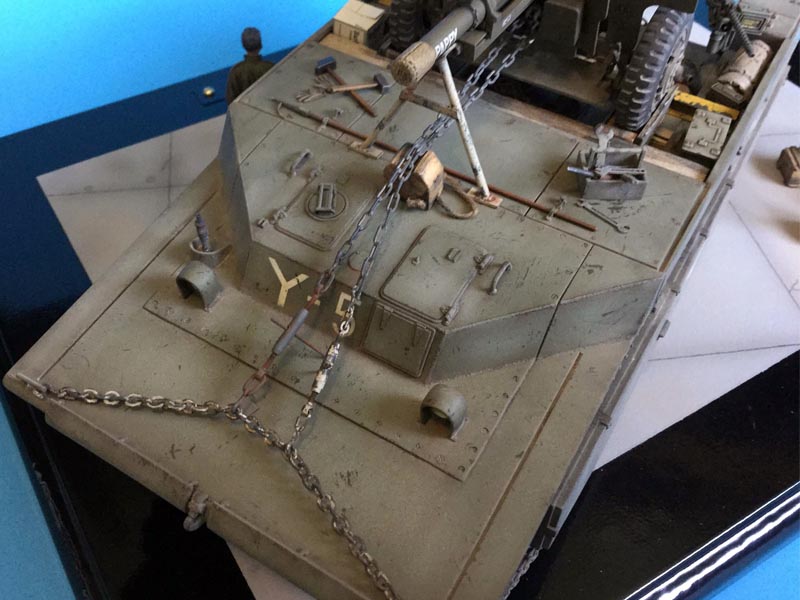
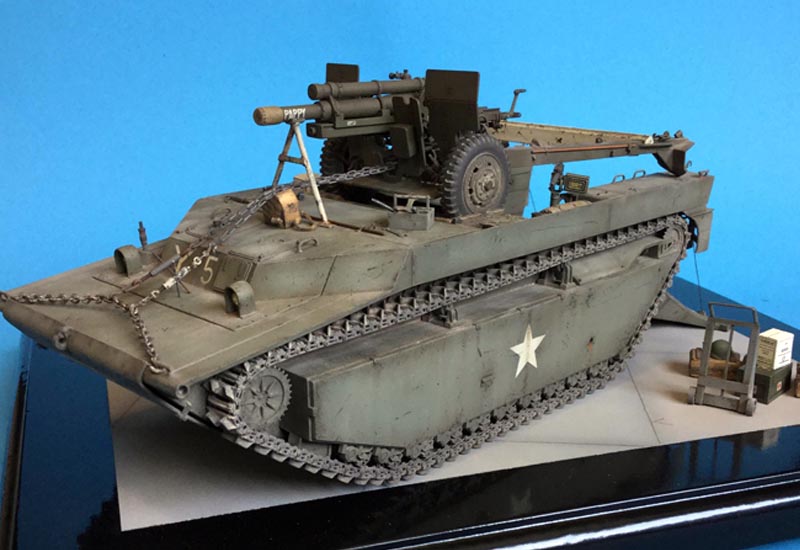
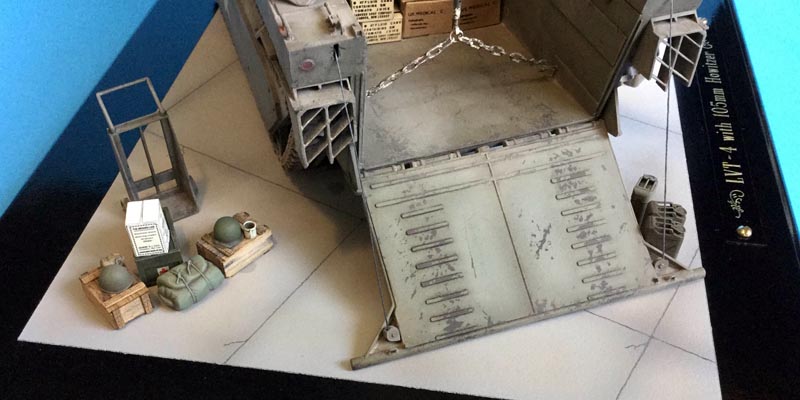
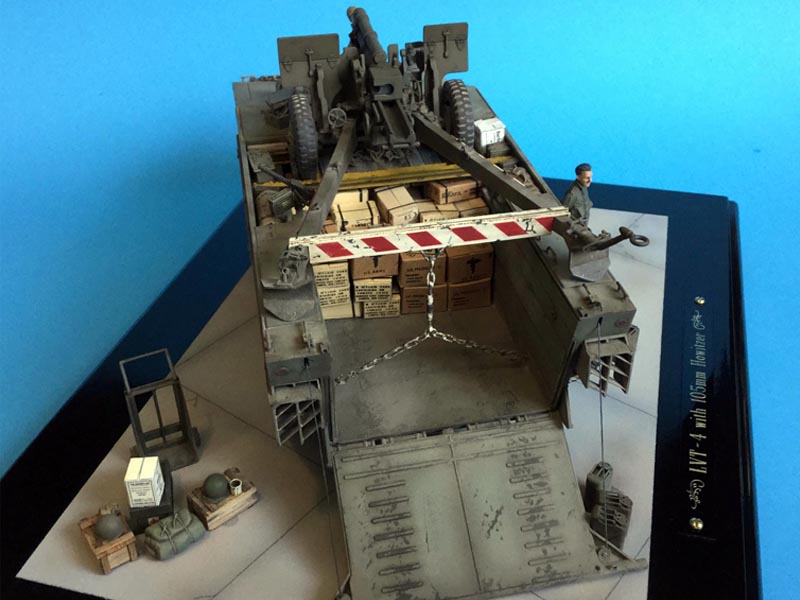
This is 'Mack the Knife'. This old warhorse has been called on, once again, to ferry an artillery piece (in this case, 'Pappy') across some watery region. The scene depicts an arsenal where the loading is occurring before the actual trip. The inspiration for this came from 'Amtracs in Action' no. 31' page 15.
Improvements include:
- ApoxieSculpt weld beads added to all handles.
- Added MV Lenses.
- Multiple weld seams were recreated using .010 styrene rod or thick, textured paint. Works like a charm!
- Photoetch screw heads added to driver's compartment. This entailed drilling (about 70) .0433 holes (not through-just enough for the screw head to sit in the recess). The screw heads I used are from the Aber set and they are .040. I 'glued' them in with Glosscote. It's much thinner than super glue and more forgiving.
- Filled in side visor areas and frontal (MG side) using styrene and Mr. Surfacer.
- Drilled out ends of the front bumper. They were part of the bilge system, so they need to be hollow.
- Made soldered brass cleats for the front and rear and added weld beads to them as well.
- Bridge for the howitzer made from Evergreen I-beam and flat stock. I guessed at how this was configured.
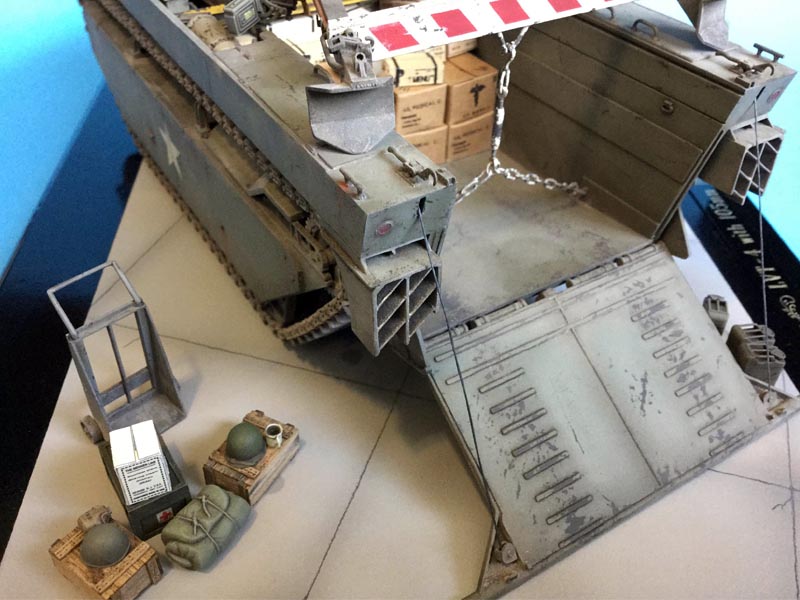
- All stowage bin hatches were carved off and replaced with styrene and Tichy rivets.
- Rear upper panels were made flush with .005 styrene and the outer edges were made flush with a square and Mr. Sufracer. Strangely, the edges are faired in at the rear, rather than being level and square.
- Brass turnbuckle from harbormodels.com actually works. I cut chain to length, added cast brass hooks and then soldered the links shut for strength. The hooks are a cast brass item, and come in various sizes from Precision Scale Co. out of Montana.
- Inner tie-down loops are made from .018 brass rod, bent into a circle, cut, and then soldered after being threaded through a cast brass eye. This was done for strength, as the turnbuckle used will be under real tension.
- Front chock (guiding the chain holding the howitzer) made from bass wood with hemp rope pull from the craft store.
- Replaced weld seams with Plastruct .010 rod.
- Added AFV Club (plastic 4-piece per link) tracks...amazing! A real lesson in patience, but worth it! About 600 pieces, for left and right, and 12,000 grey hairs.
- Lifting lugs made from rod and tube added to inner walls.
- Gate detailed with locating pins, hooks and scratch made pulleys, and a weld seam down the center. The hooks to hold the gate closed were kit bashed. The kit gives you the hammerhead style, but I chose to use the single hook-and-loop style. I made the hooks from the negatives of a circle punch-and-die sheet.
- The wash vanes were kit bashed. I gutted the innards and used .020 x .250 strip for the center and .010 x.125 for the angled pieces. I also added weld seams to the contact points with ApoxieSculpt. Again, a lot of effort, but worth it in the end since I'm only doing this once!
- I made better gaff hooks using the kit gaff hook head and Plastruct rod. Tie-downs were made from an old Airwaves etch sheet.
- T-bar cleats were fashioned from soldered brass rod and detailed with ApoxieSculpt weld seams. Once dry, I anchored them with super glue.
- All markings, with the exception of 'Mack the Knife', were airbrushed on using a combo of Eduard and homemade stencils.
- The paint chips are real. I clear coated over a chocolate brown paint that would simulate oxidized steel. I painted the vehicle as normal, then I used a mild paint thinner to soften the olive drab and I started removing paint in random patches and scrapes. What's underneath simulates aged steel. This is a variation on the 'hair spray' technique.
- The many ration boxes are from Verlinden, H & A, Js work and Tamiya. The strapping is electric tape, cut thin and super glued. Since it is plasticized, it responds well to CA adhesives.
- The figure is from Corpus.
- Painted with MM Faded OD.
- I plugged the bottom of the trailing arms with strip styrene and sanded them smooth. I also added weld seams on the side of each arm with .010 Plastruct rod...I love this stuff.
- Rivets were added for the shield reinforcements and all ejector pin marks were filled multiple times and sanded...there are many!
- The front shield braces had lightening holes in them. The kit has them as solid. I drilled them out in steps as close as I could to the real deal.
- I used Tankograd Manual (no. 6016) extensively to accurize this old kit. It was extremely helpful.
- I had some Trakz wheels from an old project I used. The kit wheels were a bit flat looking.
- I made a muzzle cover from ApoxieSculpt and I added a Hudson & Allen 'US' stencil to the front of it.
- Data plates were added to various areas according to the tech manual (from Fingerprint Designs.)
- The A-frame barrel support was made from Evergreen. Much like the bridge for the cannon, I figured this would be a last minute solution to putting too much stress on the gears and frail barrel lock.
- Painted with Testors old-school OD.


About the Author


FROM: WASHINGTON, UNITED STATES
Been sniffing glue since I was 6 or so. I am now 44. I became obsessed with armor when I saw Tony Greenland's work in FineScale Model Magazine. I try to get better with each model. I am thankful for having a wife who really allows me to get in to my hobby!
Comments
Great stuff George. Really love the finish, everything has a convincing amount of wear and tear. Coffee mug a v. nice touch as well!
MAR 09, 2015 - 01:04 AM


Thanks for all of the feedback you guys! I don't have any in-progress photos as I just got a decent iPad with a better camera. Models I start from this point will have some in-progress shots. Thanks again! George
MAR 09, 2015 - 04:13 AM

Very cool subject and excellent executed all over. It would be a rather large target on the battlefield though.
Jacob
MAR 09, 2015 - 05:10 PM
Hi Jacob, thanks for the feedback. I agree. Pretty much a moving house on tracks. I like your LVT and the engine compartment looks sweet.
MAR 09, 2015 - 07:20 PM

Where were you hiding this one? I don't think you ever brought it to the monthly...
MAR 18, 2015 - 02:33 AM

Hi George
Your build and finishes look great.
I'm going to do one as well one day to add to my LVT collection.
Check out my web page if you get a chance.
LINK
Did you see this new kit it is just like the black and white photo you posted.
LINK
Cheers,
Ralph
MAR 20, 2015 - 11:22 PM
Hi Mech! Thanks a bunch. You're page is awesome and I am really impressed with your scratch building abilities. Thanks for sharing that. Funny thing, I just saw the Ding Hao kit! I like the stone lion they give you. Thanks again for sharing your webpage.
MAR 21, 2015 - 08:55 AM

Really excellent painting and distressing! With the right backdrop it would look like the real thing!
MAR 22, 2015 - 07:55 PM

Copyright ©2021 by George Stray. Images and/or videos also by copyright holder unless otherwise noted. The views and opinions expressed herein are solely the views and opinions of the authors and/or contributors to this Web site and do not necessarily represent the views and/or opinions of Armorama, KitMaker Network, or Silver Star Enterrpises. All rights reserved. Originally published on: 2015-03-08 20:34:10. Unique Reads: 10274

WEB HOSTING BY


Copyright ©2021 Armorama and Kitmaker Network, a subsidiary of Silver Star Enterprises
All Rights Reserved. Please read our Conditions of Use and Privacy Policy.
All Rights Reserved. Please read our Conditions of Use and Privacy Policy.