

1⁄35Effective Pigments
18
Comments
Obtaining a Muddy Appearance to the Running Gear of an Amour Model
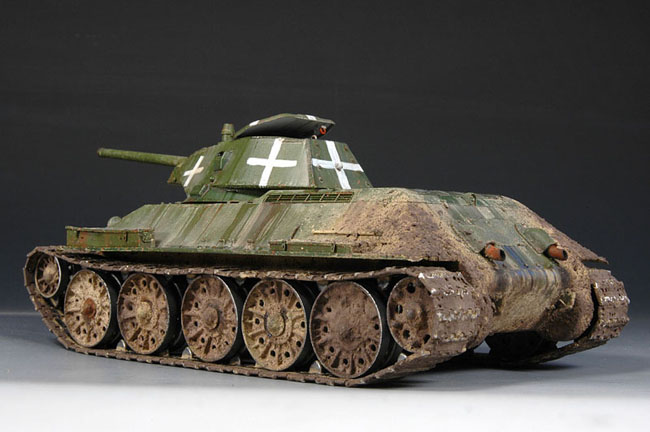
Applying large amounts of mud to a scale armor model can be a bit trickier requiring more attention. Large amounts of mud, if applied effectively, can add much life to a model. I have seen people refer to models with lots of mud as Extreme Weathering. I personally do not see anything extreme about a model containing large amounts of mud carefully applied and well researched using specific examples in actual photographs. The T-34/76 used for this second part of this article was referenced from photographs located on pages 24 and 48 of the book: Armor at War Series, Soviet Tanks in Combat 1941 1945 by Steven J. Zaloga, Jim Kinnear, Andrey Aksenov & Aleksandr Koshchavtsev - from Concord Publications. Specifically note the second T-34/76 directly behind the SU-85 in the photo at the top of page 48. All of the T-34s in these photos are missing the rear fenders resulting in large amounts of mud being thrown up onto the rear of the hull. Color photos of modern Russian armor in Chechnya were again used to help obtain the tones of the mud.Apply in layers
You want to weather models containing lots of mud in layers starting with your dry mud, then applying the damp mud, and finishing with a bit of wet mud (like on an actual vehicle). As mentioned above, models containing lots of mud include some of the first steps used to achieve the finish on models having only dust and dry earth. In photo one I am again mixing a dusty hue of Tamiya acrylics starting with a base of Buff then adding bits of German Grey. I did not add any Red Brown on this model simply for personal preferences. This time I am airbrushing a heavier coat onto the running gear. One can observe that it is a waste of our valuable time applying any chips to the running gear and lower hull as they will be covered by this step.Mixing dry mud
After airbrushing the base coat of dust I mixed the dry mud. I simply used a mixture of the same Tamiya colors then added pigments. Plaster was then added for texture. Add a little tap-water if your mixture is too thick. You will observe that the colors used for the Tamiya base and colors of the added pigments are identical to the colors used on the 38T. Remember, I used two vehicles toward Eastern Europe to eliminate confusion letting you focus more on the steps and mediums used. On subjects like a T-34, I like to apply the mud primarily to the inner corners of the wheels where it tends to collect as I have observed. Applying the mud in this manner also makes the heavy mud on your model appear a bit more controlled. After applying the mud keep tapping it gently with your brush. This will give it more texture as it begins to dry. After applying the bulk of the dry mud I apply a little more carefully using an old paint brush and quick bursts of air from my airbrush. This step will add more texture while covering up cracks caused when the thicker brush applied mud has dried. I strongly recommend you practicing this step on an old model prior to using it on your current project. Use a piece of paper to mask the rest of your model if the running gear is attached. Photo nine shows the wheel containing the Tamiya base and dry mud mixture. Important: After applying the dry mud is when you will want to apply the coat of dust colored pigments to the upper hull as displayed in the earlier pictures in the first part of this two-part article.creating 'damp' mud
I use Humbrol enamels as the primary ingredient for the damp mud with a bit of brown artist oils. Next, I add the pigments with a bit of sifted sand and plaster for texture. Some gloss for oil mediums purchased in an art supply store is also mixed into the concoction. The gloss should thin out your mixture allowing you to easily place it onto the model using an old paint brush. Add a bit of turpentine if your mixture is too thick. Once more I apply the damp mud mixture to the inner corners of the wheels using an old brush. You will also want to place the damp mud into all of the inner corners of the lower hull on your model where it might collect. After applying the wet mud slightly blend the mixture with the dry mud using turpentine. I would apply the damp mud to one side of the hull then blend it before moving to the other side. The wet mud mixture might dry making it more difficult to blend. After letting the damp mud set for a bit carefully apply more splattered mud again using an old paint brush and quick bursts of air from your airbrush. You might need to place some of this concoction into a tin and thin it with turpentine to get a better result. I once again recommend that you practice this step on an old model to assure that the mixture is thinned enough allowing you a desired appearance. This step will give your damp mud a realistic splashed appearance while again adding more texture covering any cracks that might appear in the damp mud as it dries on the model. This was the technique used to apply the mud to the rear of the T-34. Photo 16 displays the road wheel with both the dry and damp mud applied. Excess grease has again been added to give one more affect to the completed model.Finishing off the tracks
The track on a model containing lots of mud is weathered identically using the same colored dry and damp mud paint mixtures as applied to the road-wheels and hull. In this example I used some left over Friulmodel KV tracks. After applying a dust colored acrylic base-coat over the tracks the dry mud concoction is applied. Brush on an even coat of dry mud to the outer side of the track as displayed in the pictures shown below. On the inner side of the tracks, only place the dry mud onto the areas that will not be polished smooth from the running gear. You can also see pictures below showing a view of the track with the dry mud applied. The process of applying the damp mud onto the tracks is similar to adding the dry mud. Again, brush on a fairly even coat to the outer side while only focusing on the areas not polished by the road-wheels on the inner side. After applying the damp mud blend it using turpentine. Also apply the turpentine to the entire inner part of the track. For the next step I again placed some of the damp mud concoction into the tin and thinned small amounts at a time using turpentine prior to applying onto the track with bursts of air from my airbrush. The two centre pictures in the third row below show you the outer and inner parts of the track with both the dry and damp mud applied. The worn metallic areas on the track in this example were achieved using the same methods as on the dusty example. The outer side was simply polished using sandpaper. The inner parts of the track were rubbed using a large pencil. The graphite was then blended using an artist sharpener. A full step-by-step article of the T-34 used as the example in the second part of this article will appear in Osprey Publications Modelling 33, Modelling the T-34/76.


About the Author


Comments

Tony, Brian, Peter, Robert, Giacomo, Dave, Frank and Jon
Hello guys and thank you for responding to the article. I hope that you all enjoy it. It was a pleaser for me to write. Thanks again Vinnie for posting it.
Sincerely
ANPW
NOV 05, 2006 - 07:11 PM
Thank you very much for this very well written and so useful How-To
Cheers
Claude
NOV 05, 2006 - 07:38 PM
Thanks a lot Claude
I am glad that you enjoyed it. Again, it was a lot of fun to write.
Thanks for your posting
ANPW
NOV 07, 2006 - 11:17 PM


Wow..missed this one somehow. Excellent article Adam. Really explains with words and photos how to acieve such a realistic effect with this medium.
Thank you very much for taking the time to create this.
NOV 10, 2006 - 04:45 AM
Hello Stuke and Podporucznik
Thanks for the nice postings. Thanks for taking the time.
Talk to you soon and happy modeling
ANPW
NOV 14, 2006 - 12:42 AM

Thanks for this great article, full of loads of info. As a new member and someone who is returning to modelling after a 20 year break, I find these articles and forums a great boon. I myself have been using some pigments from CMK named 'star dust' you can see the interim effect on pics off my Tiger 1as yet unfinished in my album. Thanks again.
DEC 02, 2006 - 06:10 PM

Indeed very nice,i have the Osprey book on the T34/76,with your article and it's a great value for me.really like your work Adam.did you already have something like this done with a T34/85?/Would love to see one thanks for sharing....
greetings jeroen,.
DEC 02, 2006 - 06:24 PM

Great article! (I guess the others have already said that...) Would it be too much to ask to write more about the subject? It's one of the single most useful articles online. (Next to MIG's on missing-lynx.)
DEC 03, 2006 - 08:08 AM

Adam,
This is a terrific feature!
Might you be updating it with some of your new line of products?
Wilder products
DEC 27, 2014 - 08:11 PM
Copyright ©2021 by Adam Wilder. Images and/or videos also by copyright holder unless otherwise noted. The views and opinions expressed herein are solely the views and opinions of the authors and/or contributors to this Web site and do not necessarily represent the views and/or opinions of Armorama, KitMaker Network, or Silver Star Enterrpises. All rights reserved. Originally published on: 2006-11-04 00:00:00. Unique Reads: 109342

WEB HOSTING BY


Copyright ©2021 Armorama and Kitmaker Network, a subsidiary of Silver Star Enterprises
All Rights Reserved. Please read our Conditions of Use and Privacy Policy.
All Rights Reserved. Please read our Conditions of Use and Privacy Policy.