

1⁄35The Workhorse
11
Comments
INTRODUCTION
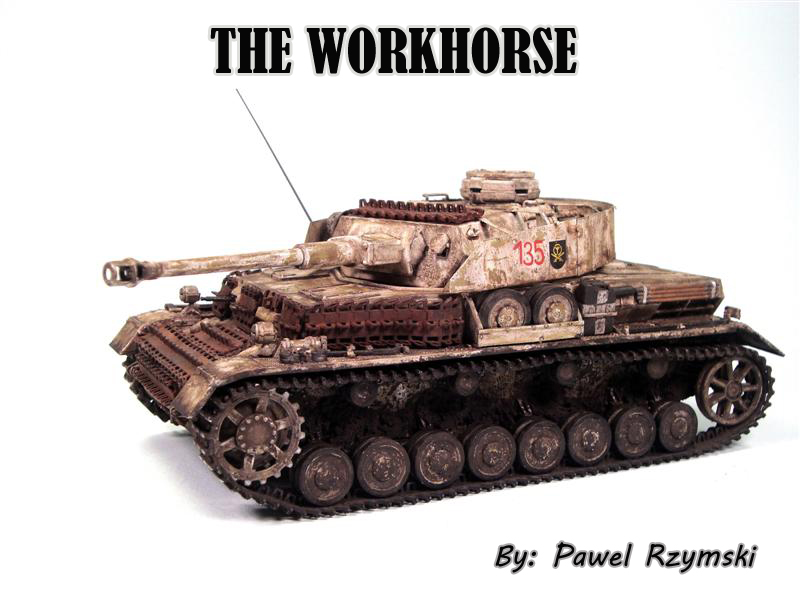
We have all been reading and hearing about the superiority of Panthers, Tiger Is and Tiger IIs over allied vehicles. There are many articles, books and documentaries about it. But take a step back and think for a while. Which panzer was in active service from the very beginning to the very end of the war? Which panzer was the most vastly produced? Which panzer became the backbone, the workhorse of the Panzerwaffe? The correct answer is of course the sdkfz 161 Panzerkampfwagen IV or just Panzer IV if you prefer. Its production begun in October 1937 and lasted till April 1945, with Over 7000 Panzer IVs of all types from A to J being built. I had the Dragon Panzer IV G kit 6363 lying quietly in my stash since.... I cant even remember for how long. Finally I decided to dig it out! What I have always liked the most about the panzer IV family are the vehicles that had schürzen fitted to them. Not willing to go too far with the budget I wanted to make a Panzer IV G with turret schürzen only, even without brackets for the big lateral screens. The kit doesn't include any schürzen so I was forced to use an after market set. I chose the Griffon turret schürzen set for the early Panzer IV G version (n°L35A011). Great value for money I must say. I wanted to base my project on a vehicle that actually existed and I could find a picture or two of. I'm not a Panzer IV expert so I asked for some help and advice here and there. All in all I finished up having few pictures of an early Panzer IV G vehicle with a lateral (right side) antenna, two part commanders hatch and no lateral brackets for the schürzen. After some reflections I had chosen to recreate the Panzer IV n°135 from the 4th Panzer Division in winter camouflage. The particularity of this Panzer IV and what I liked most was the considerable number of track links used as additional armour. The only drawback of this was the fact that the kit's tracks were not going to be enough and I had to pick some from another kit. The interesting thing is that on one of the pictures the tactical number seems to be missing. Where it is visible it is painted over the white camouflage and not on the dunkelgelb colour base. The decals for this vehicle are available from Echelon Decals, a big set for 4th Panzer Div.About the Author


Comments

Thank you Byron for your comment. I agree that in general your comment is right, but in this very case I was working with a historical picture. IMHO brand new vehicles during winter time got the white paint before they were fielded.
 spit
spit
spitJUL 10, 2010 - 09:45 AM

I liked how you've explained on doing winter camo. maybe i'll get encouraged by that and try it on my panzer for workhorse campaign
JUL 10, 2010 - 10:40 AM

Very nice model! I was going to gig you on not applying the markings to the base yellow coat but as noted, you have the picture to back up your work. Can't argue with that
Only thing that looks like was missed was the damaged left fender.
Great job on this one,
John
JUL 11, 2010 - 03:16 AM
Thanks, it was the first (and till now the only) time I used the Hair Spray method. The important thing is to... start. It's fairly easy just remember to apply the protective coats.
Thanks, for the fender I would have to use another PE set which wasn't planned.
spit
JUL 11, 2010 - 04:06 AM

Well if it isn't yet another build from the 'Media Mogul' that is Pawel!
I can't go online or open a magazine (or sometimes even my e-mail) without seeing your work!
This was a nice build and a change from the usual pussy cats for you my friend, but approached and executed with your excellent blend of historical accuracy and artistic licence.
I think you did this build justice and while at the time I thought you may have been a bit heavy with the dark washes on upper surfaces, my experience of machinery working in peat with frequent rain while I was in Ireland shows that similar grime effects do build up so another accuracy point for you to mark up!
Still no figure though!
Congrats on a job well done,
James
JUL 12, 2010 - 02:37 AM
Sorry for being a bit late with the answer.
Thanks for the kind words. I think the "media" time will be quickly finished as new builds... ehhh... what new builds? Life is too hard for now to model anything. All of my builds where born here on the big "A" and as I often told the blog and the build is getting better and better when people give you tips, good advices constructive critics etc.
"pussy cats"??!!! Well, I hope to see your medium "pussy cat" soon Mr LOL
Thanks about the input on the dirt. The next "white" Pz IV or III will be less dirty, at least a bit. Just to ttry something a bit different.
Spit
JUL 14, 2010 - 09:41 AM

Well Pawel, when you are rigth, you are very rigth. can't argue with that picture either. Very good work non the less.
Byron
JUL 17, 2010 - 02:55 PM

A real beauty Pawel. Nice article as well. Got to try this hairspray method for myself. The results look good, but I especially like the finish on the running gear and the spare tracks. I have this G kit as well, and all those extra tracks inspire me to make it and add some extra armor like this.
JUL 18, 2010 - 01:36 AM
Thanks Frank. I'm very glad you like it. Even if it's a bit of pain to assembly I would strongly advise to use some AM shurtzen (or even plastic). It changes completely the look of the tank and it's worth the extra time, swear and tears LOL.
spit
JUL 18, 2010 - 10:02 AM

Copyright ©2021 by Pawel Rzymski. Images and/or videos also by copyright holder unless otherwise noted. The views and opinions expressed herein are solely the views and opinions of the authors and/or contributors to this Web site and do not necessarily represent the views and/or opinions of Armorama, KitMaker Network, or Silver Star Enterrpises. All rights reserved. Originally published on: 2010-07-08 00:00:00. Unique Reads: 15870

WEB HOSTING BY


Copyright ©2021 Armorama and Kitmaker Network, a subsidiary of Silver Star Enterprises
All Rights Reserved. Please read our Conditions of Use and Privacy Policy.
All Rights Reserved. Please read our Conditions of Use and Privacy Policy.