_GOTOBOTTOM
Armor/AFV: Canadian Armor
Discuss all types of Canadian Armor of all eras.
Hosted by Darren Baker
My attempt to build the canadian Leo2A6M CAN
cdnkit
Visit this Community
Quebec, Canada
Joined: July 02, 2004
KitMaker: 170 posts
Armorama: 130 posts
Posted: Thursday, July 31, 2008 - 04:48 PM UTC
After pushing away that project again and again, I decided it was time to make the big jump. Rick Sauciers's Leo build also inspired me. Great job Rick !
Now what I will have for the project:
-TAMIYA LEOPARD 2A6
-EDUARD ENGINE SCREEN SET
-VOYAGER BASKET MESH SET
-EDUARD SLAT ARMOUR SET
-ECHELON LEO 2A6M CAN DECAL SET
-STYRENE SHEET
-BRASS SHEET
-Anthony Stewart excellent shots of the beast in Afghanistan and some canadian forces Combat Camera pictures as my refences

First of all, the kit:


Starting with the first step, the first modification I decided to do was on the rear mud flaps. I ound them a bit too thick and cut them off. I build new ones using styrene and brass pieces.


The next modification is the addition of the armor plate located under the lower hull. Again I used pieces of styrene. I concentrate the effort on the section that will be visible at the end, so the rest of it is a bit rough..


Then time to replicate the front glacis armor:
Not easy to figure out the right shape, but I have 3 sections done so far...


Well that's it for today, more to come in the following days.
f1matt
Visit this Community
Manitoba, Canada
Joined: August 13, 2006
KitMaker: 1,021 posts
Armorama: 805 posts
Posted: Thursday, July 31, 2008 - 07:41 PM UTC
Looks like you are off to a great start. I'll be watching this one.

-Matt
sauceman
Visit this Community
Ontario, Canada
Joined: September 28, 2006
KitMaker: 2,672 posts
Armorama: 2,475 posts
Posted: Friday, August 01, 2008 - 04:19 AM UTC
MUHAHAHAHAHAHAHAHA!

Good start on this beast! The worst part for me was the attaching brackets for the slat to the hull. NASTY!

I will definately follow this thread, good luck.

cheers from the sandbox
cdnkit
Visit this Community
Quebec, Canada
Joined: July 02, 2004
KitMaker: 170 posts
Armorama: 130 posts
Posted: Friday, August 01, 2008 - 05:24 PM UTC

Today all the work was done on the glacis armor. I finally finish to set up the armor plates on the hull, though I'm not 100% sure of the angle cut out in the plate near the driver's vision block...


Then I added a simple detail to the spare track link: I opened the link connectors at each end, the hole was not there...


Then I decided to get a try at the anti-slip surfaces. After a careful study of Anthony's pictures, I realized that some panels are not totally covered with anti-slip, and also found that they are not all in the same pattern: The last panel on the right seems to have the anti-slip surfaces in equal distance from each others, but for the other panels, the anti-slip sufaces are organized in rows that go a bit to the center of the panel and next rows going off center. I'm not sure if I explain it correctly here but look at my pictures and you will see what I'm saying.

I take note of the Rustoleum stuff but can not find any in my area so I used a product that gives a suede look to plain surface. It comes in different color but I don't know why, I choose olive green :


First I made a template using a piece of paper that I will simply place over the panel before I spay the textured paint on it. I made 2 different template, because the pattern is not the same as I said earlier


After the template is secured on the armor panel, I sprayed a thin layer and let it dry ( 5 minutes and it's ok)


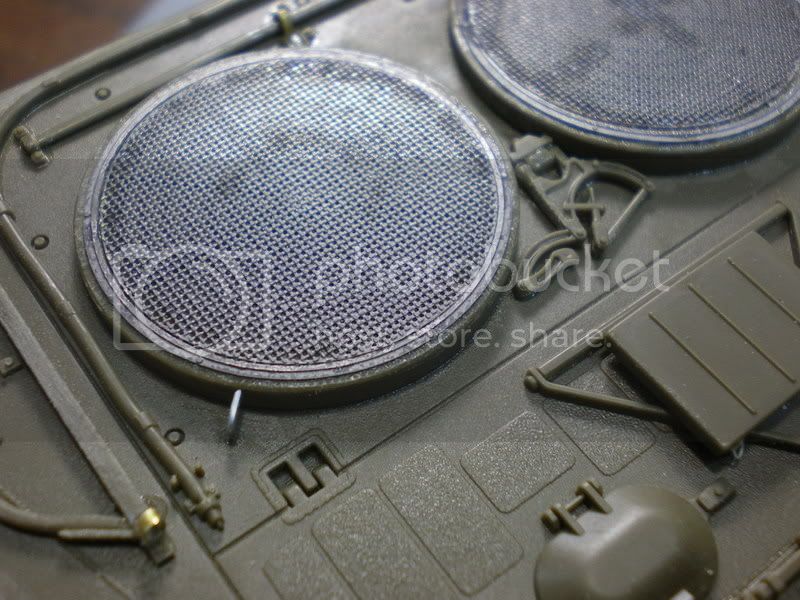
Here is the finish result:


Then, I begin to add the hold down bolt heads. There is 2 different sizes. And there is a lot !!! To reproduce the large ones, I used pieces of rivet shape styrene rod, cut into little heads and glued one by one...Again here I minutely study Anthony's Leopard pictures and find out that the bolts are not in the same place on all armor panels.
To reproduce the thiny ones, I used stretched sprue, that I cut into little pieces:


After marking each bolt heads location, I added each bolt heads one by one using Tamiya liquid glue. As of now I still have 2 paels to do, but that will be for tomorow, enough for tonight..I will sand just a bit the whole heads when they will be totally dry just to get them as equal as possible.


cdnkit
Visit this Community
Quebec, Canada
Joined: July 02, 2004
KitMaker: 170 posts
Armorama: 130 posts
Posted: Saturday, August 02, 2008 - 03:22 PM UTC
Now that all the glacis armor is finish, I worked on the driver's hatch. I glued all the parts in that area as indicated on the plan. But I decided to add some little detail that were missing according to the reference. Here's what it looks like now:


I also add some bolt head to the center spare link support:


At the moment, the upper hull as been glued on the lower hull and I'll wait it dries completely before I touch it. Surprisingly for a Tamiya, the fit is not good and it seems like the pieces are twisted, making the poor fit..
cdnkit
Visit this Community
Quebec, Canada
Joined: July 02, 2004
KitMaker: 170 posts
Armorama: 130 posts
Posted: Tuesday, August 05, 2008 - 05:19 AM UTC
Here are the latest work done to the Leo. I made some simple clamp for the tools using brass sheet. They could be better, but it works like that for me.


Then I modified a bit the back-up camera, that Tamiya offer in one solid piece:


I cut the part in 2 sections, add some bolt heads and the wire that is connected to the camera using a piece of stretched sprue:


That's it for now
Nito74
Visit this Community
Lisboa, Portugal
Joined: March 04, 2008
KitMaker: 5,386 posts
Armorama: 4,727 posts
Posted: Tuesday, August 05, 2008 - 05:32 AM UTC
Wow...
Terrific stuff...
Keep them coming... best tank around the Leo !

"Leo Getz... get it ??"
marsiascout
Visit this Community
Noord-Brabant, Netherlands
Joined: March 24, 2008
KitMaker: 1,247 posts
Armorama: 913 posts
Posted: Tuesday, August 05, 2008 - 07:57 AM UTC
Thatīs really nice scratchbuillding

Lars
RoelGeutjens
Visit this Community
Belgium
Joined: March 17, 2005
KitMaker: 410 posts
Armorama: 383 posts
Posted: Tuesday, August 05, 2008 - 11:10 PM UTC
Luc

Great work mate this is an awesome build. I always love to whatch buildlogs with extra extra detailing Could you please tell me how you made those pericsope glasses? Thanks a lot.

Keep it up

Roel
cdnkit
Visit this Community
Quebec, Canada
Joined: July 02, 2004
KitMaker: 170 posts
Armorama: 130 posts
Posted: Sunday, August 10, 2008 - 03:54 PM UTC
Thank you for the comment guys,
Roel, the periscope are made following the plan. The only change is made at the color. I used some Testor Jade green thinned with Humbrol thinner. I used different shade until I was satisfied.

Latest work on the cat were done on the engine deck, were I added different details to the tools location using strip of brass cut and put in shape.


I also used the Eduard engine screen set, but I my opinion, the rendering of Tamiya is far better and more realistic when I look at reference pics...


I have also started working on the turret:


I tried to reproduce the lenses on the optical instrument, but I'm not satisfied..It will have to stay like that though...


As I will set up the Leo in a diorame, I will modified existing figures to reproduce canadian crew membres. My base is the Tamiya modern japanese soldier.:


Lot of work needs to be made now.....
Blueheeler
Visit this Community
New South Wales, Australia
Joined: March 18, 2008
KitMaker: 347 posts
Armorama: 79 posts
Posted: Sunday, August 10, 2008 - 08:59 PM UTC
Brilliant mate, keep em coming! Always love watching these builds.
TBryant
Visit this Community
Ontario, Canada
Joined: June 10, 2015
KitMaker: 2 posts
Armorama: 1 posts
Posted: Tuesday, July 14, 2015 - 08:43 PM UTC
Did you ever finish this? I am very curious to see how those figures turned out as I have them sitting in a box trying to decide how to do the very thing you did for my HobbyBoss Leo 2. Thanks. (I'm just not seeing a next page)
 _GOTOTOP