_GOTOBOTTOM
Яusso-Soviэt Forum
Russian or Soviet vehicles/armor modeling forum.
Tamiya 1/35 JS-2 Model 1944 ChKZ
Spiff
Visit this Community
Nevada, United States
Joined: September 07, 2002
KitMaker: 807 posts
Armorama: 671 posts
Posted: Monday, September 22, 2008 - 06:28 AM UTC
I recently reviewed the Tamiya 1/35 JS-2 Model 1944 ChKZ and have decided to keep the momentum going by building it now while all the research is fresh in my mind and my references aren't buried under a stack of other references.

You can find the review here if you're interested: Tamiya 1/35 JS-2 Model 1944 ChKZ Review

I also recently reviewed two upgrade sets from Aber and will be using them in this build as well. You can find them here if you're interested.

Aber Russian 122mm D-25T tank Barrel for IS-2 Review

Aber Grilles for Soviet Heavy Tank JS-2 or Tank Destroyers JSU-122/152 Review

So far construction has been very easy. There is minimal cleanup that needs to be done on the sprue attachment points, just a few swipes with a fine then a very fine sanding stick did the job nicely. As you can see from the instructions, there are two parts to each of the wheel assemblies, then a poly cap gets trapped inside by the wheel caps which will allow them to turn on their axles.

Fun fact - It is interesting to note that a regular plain old road wheel is used for the idler on the JS-2


whittman181
Visit this Community
Massachusetts, United States
Joined: December 30, 2006
KitMaker: 646 posts
Armorama: 473 posts
Posted: Monday, September 22, 2008 - 01:44 PM UTC
Your builds are very informing and I'll enjoy watching this one and getting all the tips I can.I've actually got as far as you have so far so god luck Bob
Spiff
Visit this Community
Nevada, United States
Joined: September 07, 2002
KitMaker: 807 posts
Armorama: 671 posts
Posted: Tuesday, September 23, 2008 - 03:36 AM UTC
Thanks Bob.

I'll have some shots tonight of the lower hull with the suspension installed. So far it's been a very an issue free and enjoyable build.
Drader
Visit this Community
Wales, United Kingdom
Joined: July 20, 2004
KitMaker: 3,791 posts
Armorama: 2,798 posts
Posted: Tuesday, September 23, 2008 - 03:53 AM UTC
Scott - you may find that the heavy metal muzzle brake of the Aber barrel overwhelms the vinyl rings that allow the mantlet to move. Mine weren't able to support the Armorscale barrel which has a resin brake for more than a couple of days before losing out. Just something to watch out for.

David
Spiff
Visit this Community
Nevada, United States
Joined: September 07, 2002
KitMaker: 807 posts
Armorama: 671 posts
Posted: Tuesday, September 23, 2008 - 04:04 AM UTC

Quoted Text

Scott - you may find that the heavy metal muzzle brake of the Aber barrel overwhelms the vinyl rings that allow the mantlet to move. Mine weren't able to support the Armorscale barrel which has a resin brake for more than a couple of days before losing out. Just something to watch out for.

David


Thanks for the heads up David!
panamadan
Visit this Community
Minnesota, United States
Joined: July 20, 2004
KitMaker: 1,513 posts
Armorama: 1,449 posts
Posted: Tuesday, September 23, 2008 - 04:26 AM UTC
Scott, Good start-I'll be watching this build. Dan
Panzergrenadier44
Visit this Community
Iran / فارسى
Joined: January 30, 2008
KitMaker: 93 posts
Armorama: 84 posts
Posted: Tuesday, September 23, 2008 - 12:05 PM UTC

Quoted Text

Scott, Good start-I'll be watching this build. Dan


same
Spiff
Visit this Community
Nevada, United States
Joined: September 07, 2002
KitMaker: 807 posts
Armorama: 671 posts
Posted: Wednesday, September 24, 2008 - 04:56 AM UTC
Thanks for the interest guys, I appreciate it.

I've made some more progress on the JS-2 last night. The suspension arms have been attached. Be careful when sorting them out as the very front suspension arm (A5) is different from the rest of them (A6), it's beefier and has an angular shape to it instead of the rounded shape. It was pretty easy to install them all, they just snug right into the holes and have a small pin which goes into a locating hole to help with the alignment. As an added bonus Tamiya has included two nifty jigs that ensure that all the axles are in perfect alignment and that they're all level. That should prevent the dreaded "floating road wheel" which can really detract from an otherwise nice build as it sticks out like a sore thumb.


210cav
Visit this Community
Virginia, United States
Joined: February 05, 2002
KitMaker: 6,149 posts
Armorama: 4,573 posts
Posted: Thursday, September 25, 2008 - 07:53 AM UTC
Scott-- mating the hull can be tricky. I am anxious to see if your experience mirrors mine. It is a fine kit and I look forward to observing your techniques...
DJ
Spiff
Visit this Community
Nevada, United States
Joined: September 07, 2002
KitMaker: 807 posts
Armorama: 671 posts
Posted: Thursday, September 25, 2008 - 08:12 AM UTC

Quoted Text

Scott-- mating the hull can be tricky. I am anxious to see if your experience mirrors mine. It is a fine kit and I look forward to observing your techniques...
DJ


Work begins on the upper hull tonight so hopefully it will be relatively painless....
panamadan
Visit this Community
Minnesota, United States
Joined: July 20, 2004
KitMaker: 1,513 posts
Armorama: 1,449 posts
Posted: Sunday, September 28, 2008 - 06:33 AM UTC
Scott, You might find this link of interest: http://www.militaryphotos.net/forums/showthread.php?t=135408&highlight=%22is-2%22 Dan
martyncrowther
Visit this Community
England - West Midlands, United Kingdom
Joined: September 12, 2007
KitMaker: 1,548 posts
Armorama: 1,407 posts
Posted: Sunday, September 28, 2008 - 07:24 AM UTC
im watchin this with great inrest good luck mate!
tjkelly
Visit this Community
Maryland, United States
Joined: May 04, 2007
KitMaker: 1,132 posts
Armorama: 1,123 posts
Posted: Sunday, September 28, 2008 - 08:12 AM UTC
Nice progress so far Scott, enjoy the build. Will look forward to your continuations, you do nice work.

Cheers -
Tim
Spiff
Visit this Community
Nevada, United States
Joined: September 07, 2002
KitMaker: 807 posts
Armorama: 671 posts
Posted: Sunday, September 28, 2008 - 08:34 AM UTC
Thanks guys, I appreciate all the comments and the interest. Nice links too, there are some great pictures of JS-2s in action and there was another link in the post that led to more great pics. Thanks!

I spent most of the day on my workbench yesterday alternating work between the JS-2 and the Char B1 bis.

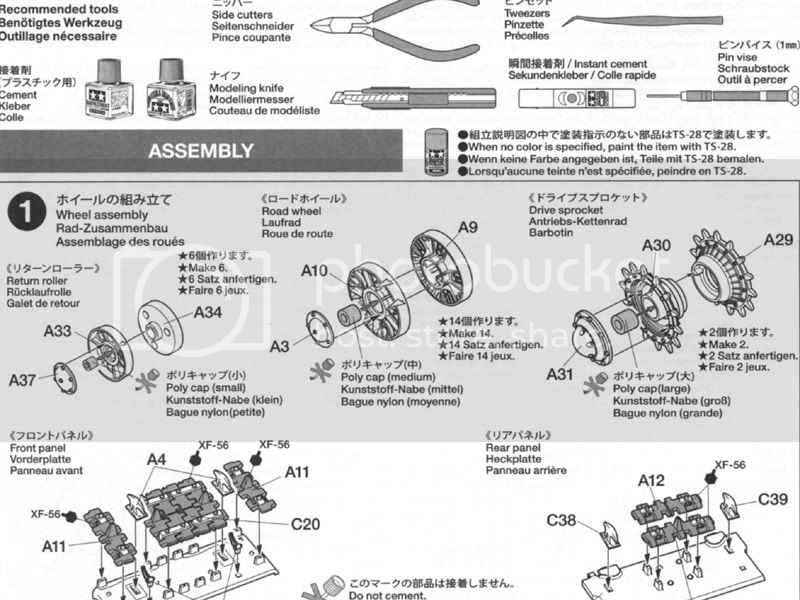
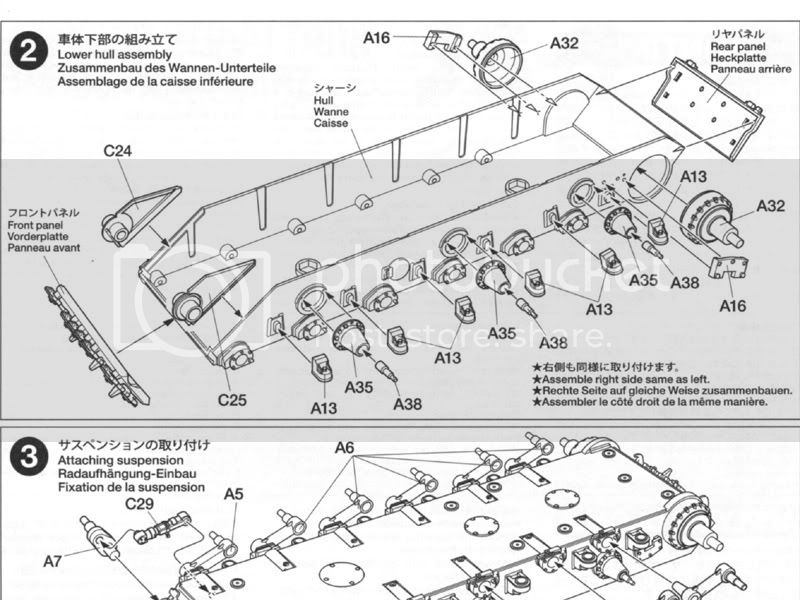
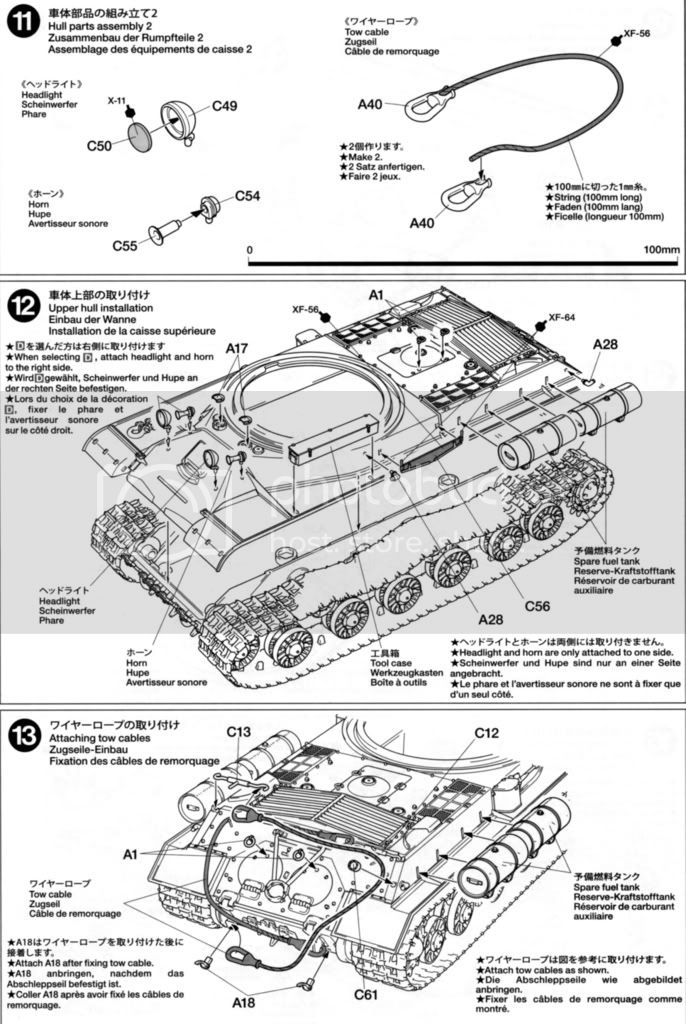
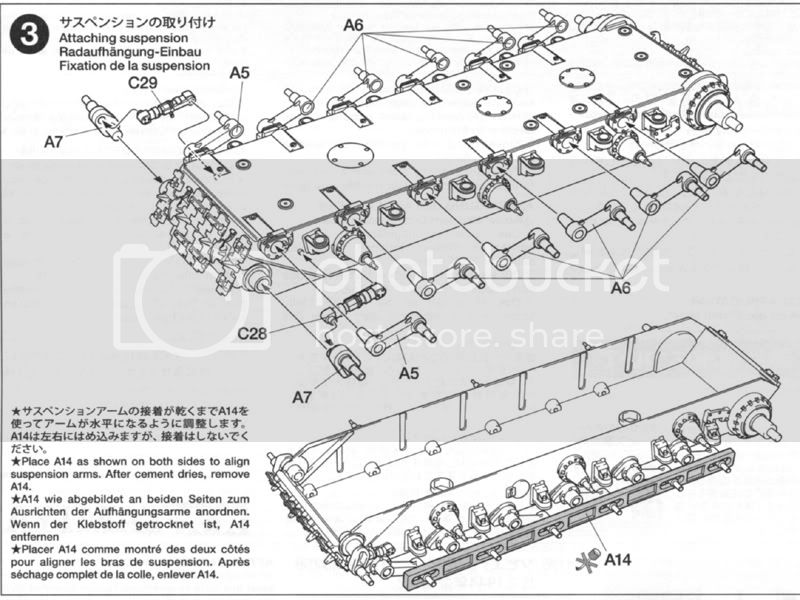
I've completed most of steps 3, 4, 5, 9, 10, 11, 12 and 13. There are a few more detail parts that need to be added, but they will go on after painting.


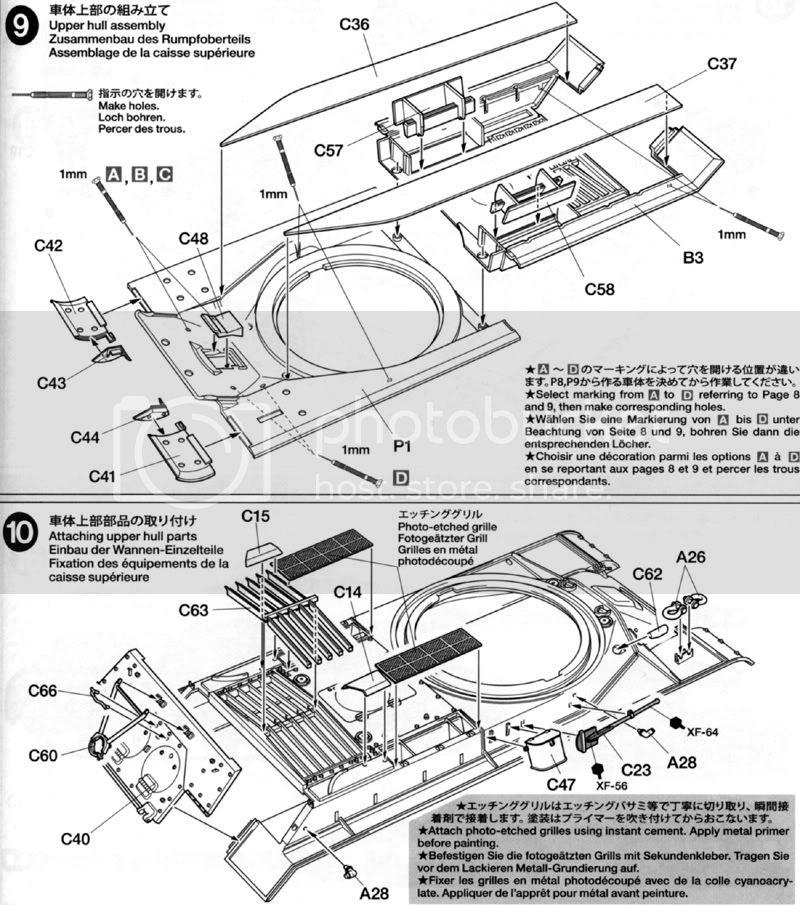
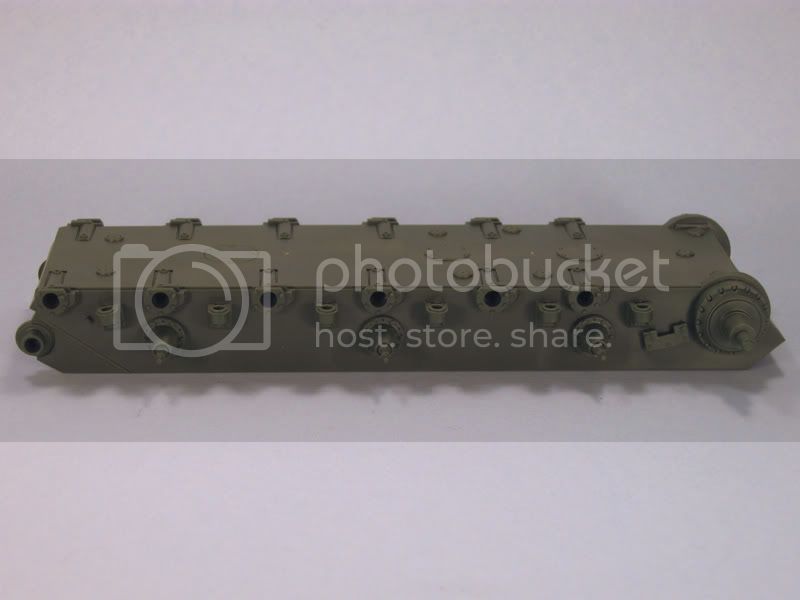
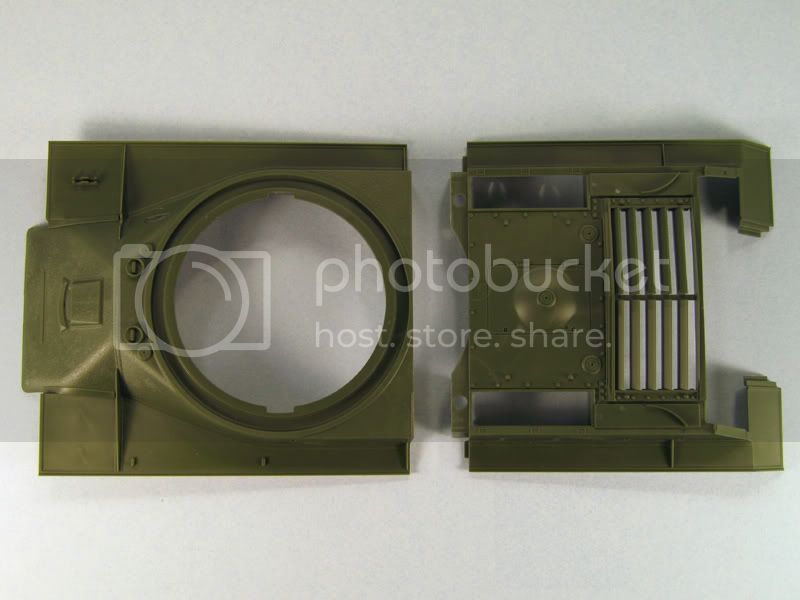
The hull was pretty easy to mate up once I dry fitted a couple of times and came up with the game plan for applying the glue and keeping the parts flush and aligned. I started by placing them together upside down, put a little liquid cement where the connecting tabs and locating circles were, gave that just a sec to solidify then ran cement all along the seam, flipped it all over then carefully held the front and back halves together to get a nice, solid joint. worked like a champ! Just be careful though as you want the upper hull surfaces to be level with each other. As long as you keep them butted up together firmly, this won't be a problem.


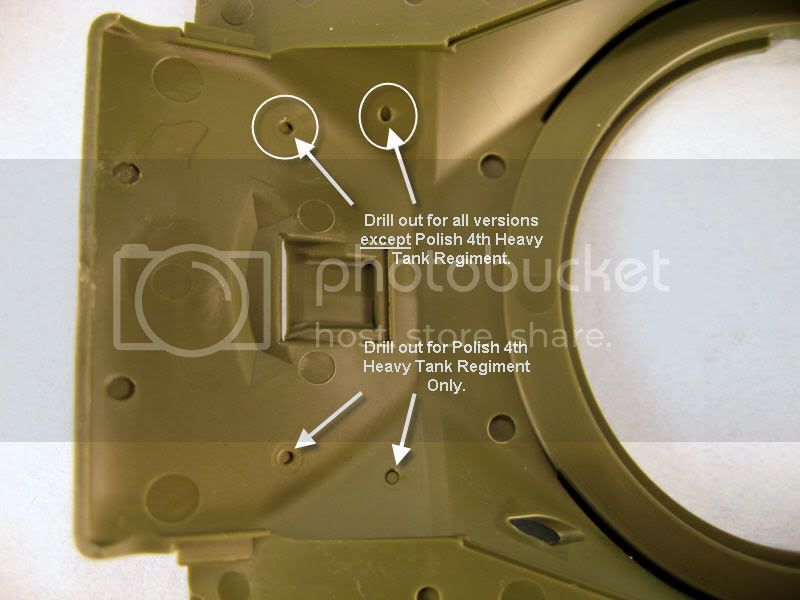
At this point you need to decide which scheme you're going with so you can drill the holes for the headlamp and the horn. If you're doing yours as one the one that served with the Polish 4th Heavy Tank Regiment then you'll need the holes right side (left if looking from underneath). All other variants have them mounted on the left (right if looking from underneath) so be careful! Also think through the angle you need to drill the holes at as the surfaces they're mounted on are at an angle. You'll want the hole for the headlamp to be completely vertical, the hole for horn should be perpendicular to the angled surface. Make sense?


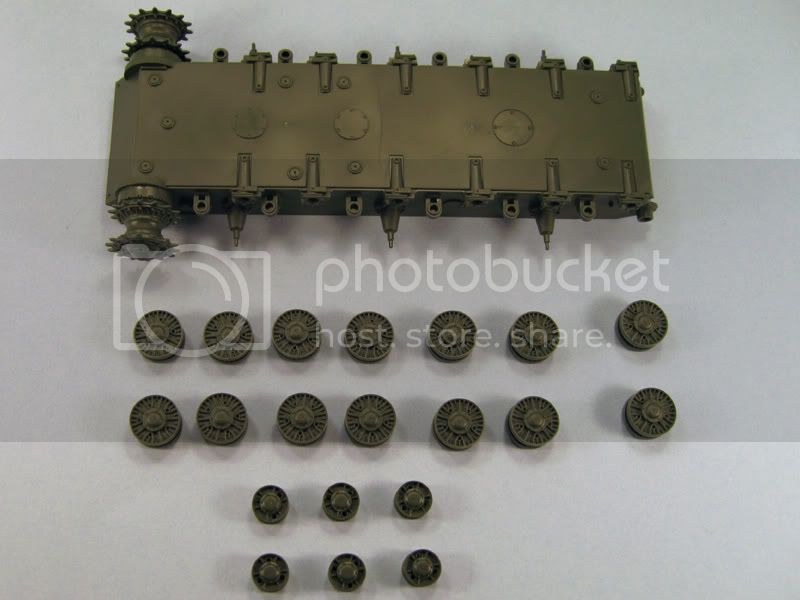
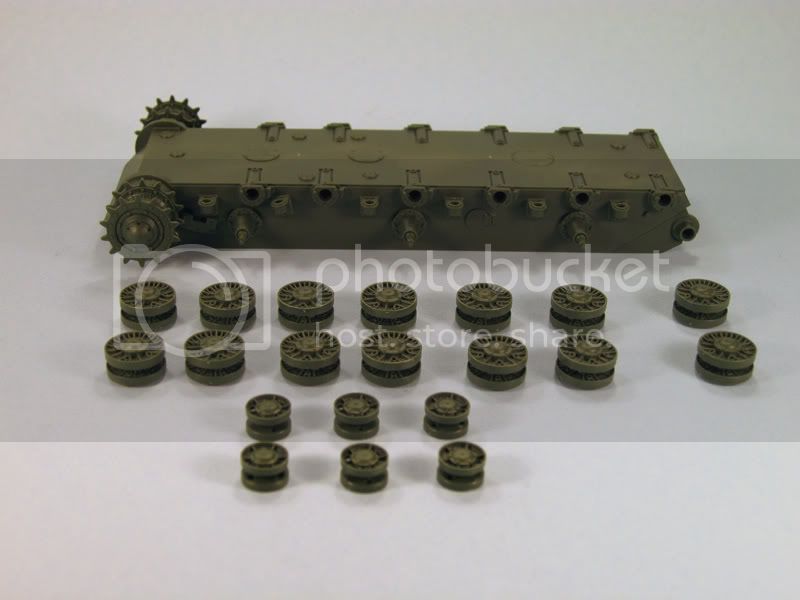
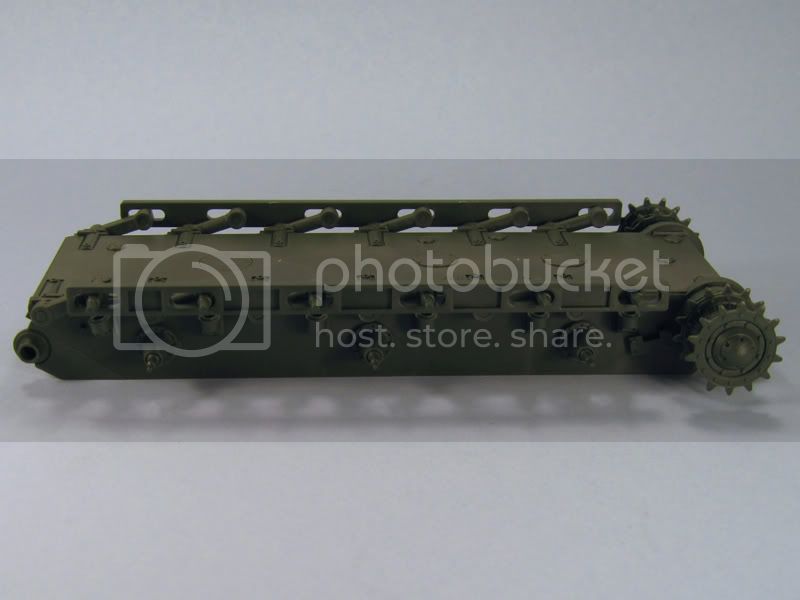
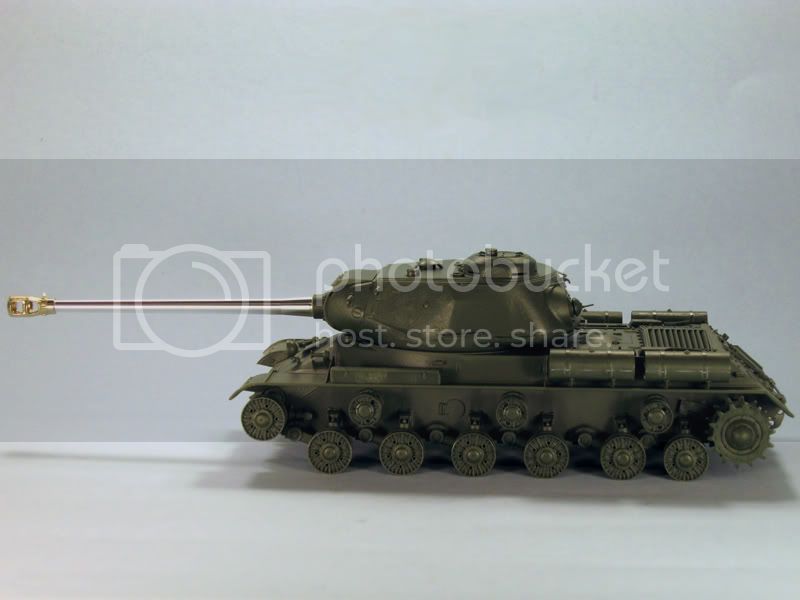
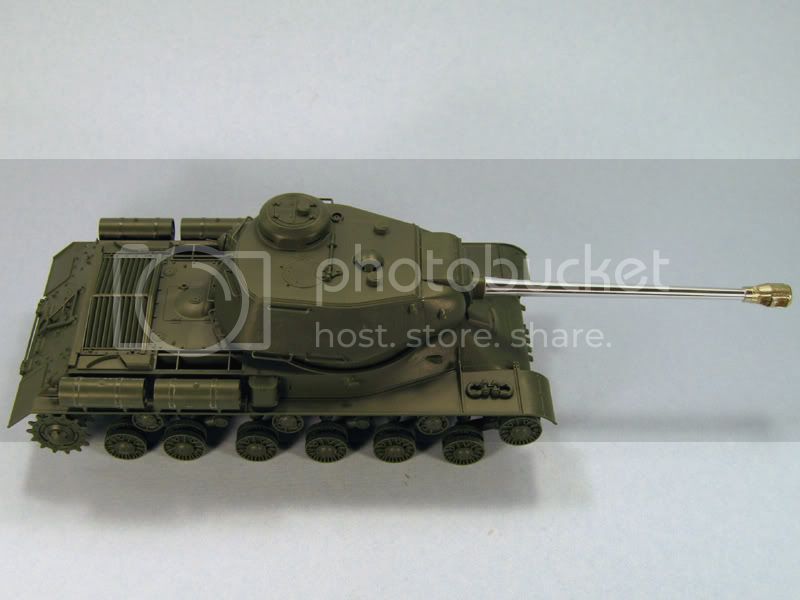
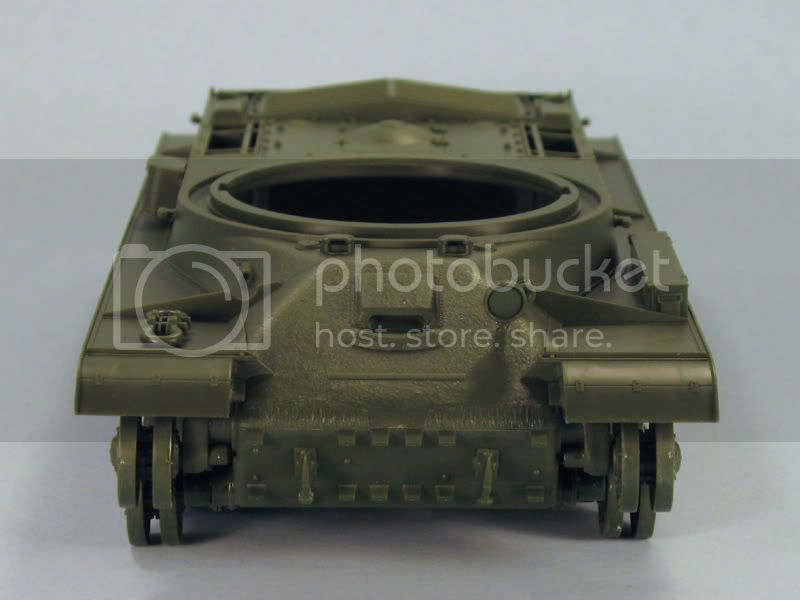
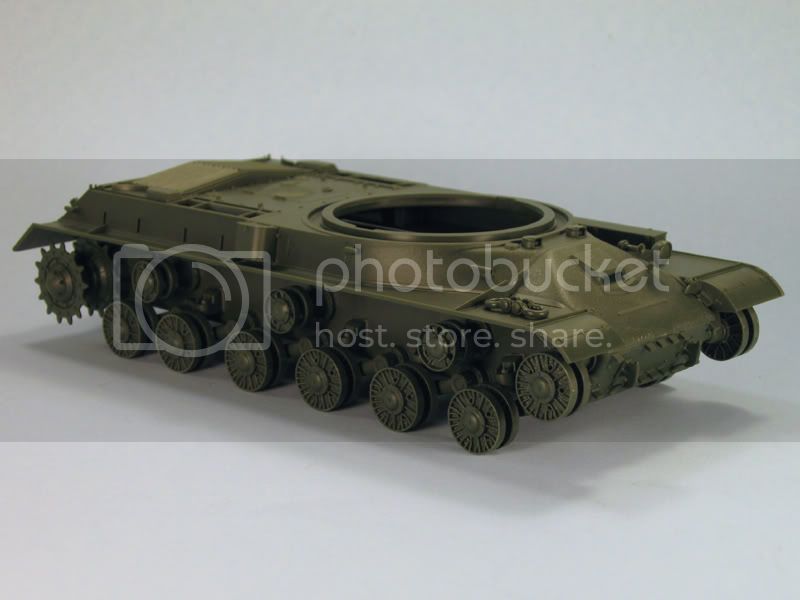
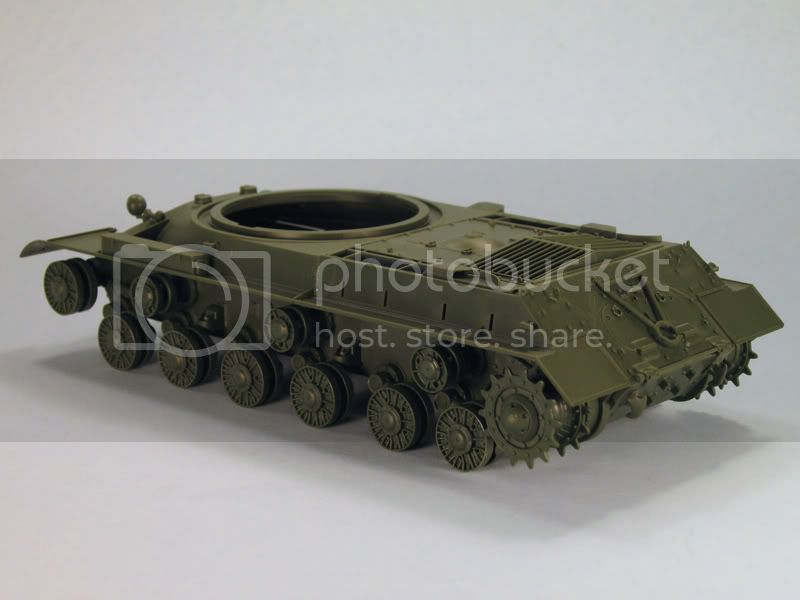
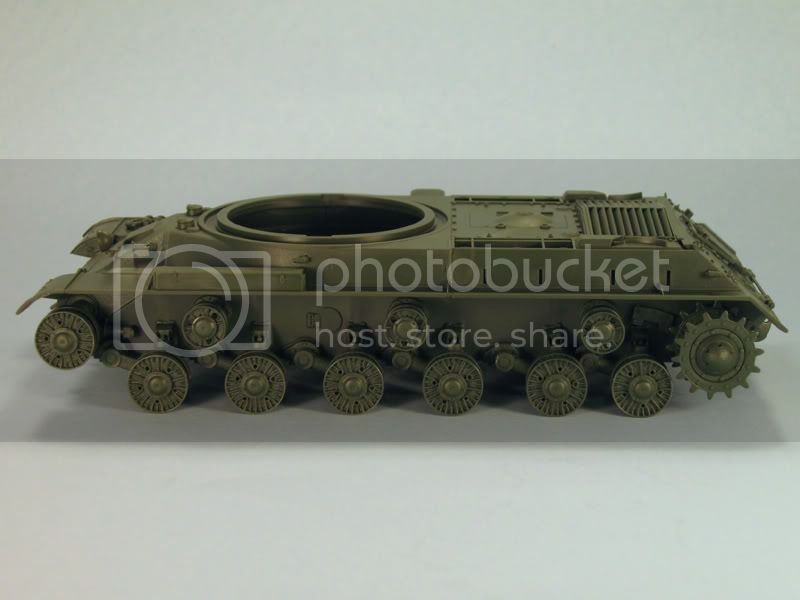
Here are a series of photos from this morning of the almost completed hull and running gear. I still need to install the mud scraper for the drive sprockets, and various tools. I'm going with the Aber engine grill set, so I have some modifications to do to remove the molded on hinges which don't look at all like the real thing. The Aber set will rectify that although I have to make my own hinge wires as they're not provided. More on that in a later build log installment.


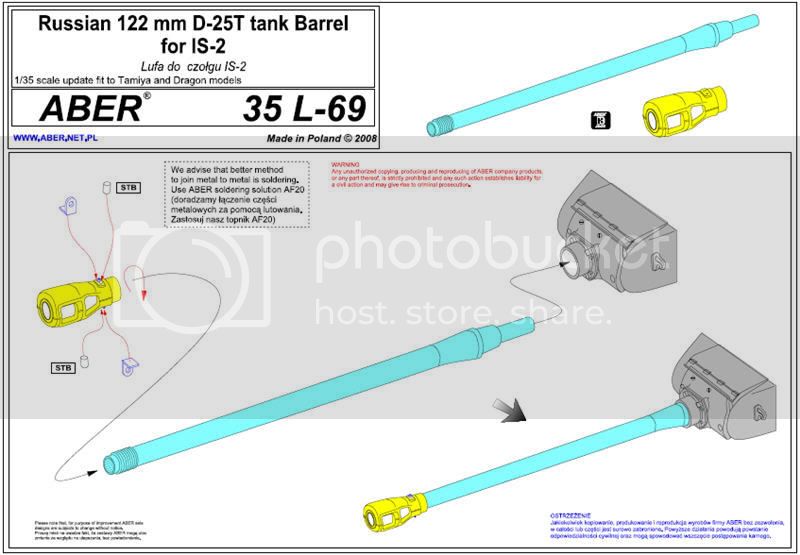
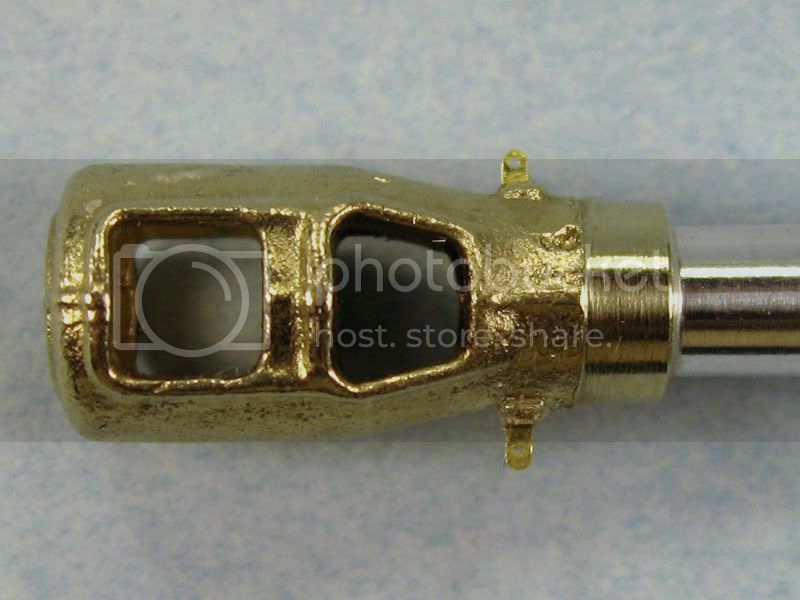
Today the game plan is to build the turret and install the Aber D-25T 122mm gun.
Plasticbattle
#003
Visit this Community
Donegal, Ireland
Joined: May 14, 2002
KitMaker: 9,763 posts
Armorama: 7,444 posts
Posted: Sunday, September 28, 2008 - 10:45 AM UTC
Hi Scott. Nice and tidy so far. Thanks for sharing your progress. Can´t wait for the real fun to begin.
Spiff
Visit this Community
Nevada, United States
Joined: September 07, 2002
KitMaker: 807 posts
Armorama: 671 posts
Posted: Monday, September 29, 2008 - 04:26 AM UTC
I'm just about finished with the Aber gun barrel, very nice set.

Yesterday I went about the process of attaching the two small photo etch parts to the base of the muzzle break which need to be bent into a 90 degree angle. The parts are very small so they can be a little tricky to handle. It took me a long time because they each wound up on the floor at some point or another. Good thing I was using my mobile work bench (12x12 inch ceramic tile) and was working in the kitchen. I still managed to lose one for good though, so I ended up making one of my own. I cut a small strip from the photo-etch fret, drilled a small hole using the tip of an old airbrush needle, then carefully held the part down with tweezers on the ceramic tile work bench while I filed it down to shape using a flat needle file. I know, crazy, but it actually looks pretty good! Whew!

I still need to fabricate the two little pegs that attach next to the brackets and so far haven't found anything suitable to use. I will probably end up using some stretched sprue chopped to the appropriate length and will deal with that when I get home this evening.


VonArnim
Visit this Community
North Carolina, United States
Joined: April 10, 2004
KitMaker: 48 posts
Armorama: 35 posts
Posted: Sunday, October 19, 2008 - 11:35 PM UTC
Hi Scott ,
Any update on your Stalin . looking forward to more progress.


regards
JOEY
Spiff
Visit this Community
Nevada, United States
Joined: September 07, 2002
KitMaker: 807 posts
Armorama: 671 posts
Posted: Monday, October 20, 2008 - 05:44 AM UTC

Quoted Text

Hi Scott ,
Any update on your Stalin . looking forward to more progress.


regards
JOEY


Thanks for the interest Joey.

Actually, yes. I've been so busy though dealing with a bad situation at our rental property. The previous tenants left us with a disaster at the house, so we've been repairing damage, cleaning things up, replacing things they damaged etc. We finally finished on Saturday evening so I can get on with my life now. LOL

I picked up some wire from my LHS with the proper thickness to make the pegs that go at the base of the muzzle brake next to the PE brackets. I've snipped off very short little lengths, then one at a time clamped them in a pin vise to hold them, then used my Dremel with a grinding attachment to flatten out the ends because cutting the wire crimped it at each end. I'll get some pics posted either tonight or tomorrow.

Oh, I also found some perfect pre-shaped thin wire from the model railroad section of my LHS and will use them as the pivot brackets to clamp the hinges around from the grill screens and frames.
Spiff
Visit this Community
Nevada, United States
Joined: September 07, 2002
KitMaker: 807 posts
Armorama: 671 posts
Posted: Monday, March 02, 2009 - 05:41 AM UTC
The JS-2 is finally back on my workbench! Here are two quick update photos which I took this morning. Up next is the installation of the Aber Grill Screens. I am going with the individual track links provided in the kit and will keep the rubber band tracks in the spares box in case someone might need them some day.


muchachos
Visit this Community
Ontario, Canada
Joined: May 21, 2008
KitMaker: 537 posts
Armorama: 439 posts
Posted: Monday, March 02, 2009 - 09:12 AM UTC
Good to see this blog revived. It should look really nice with some paint on it!

Scott
tskross
Visit this Community
New York, United States
Joined: August 29, 2008
KitMaker: 160 posts
Armorama: 152 posts
Posted: Monday, March 02, 2009 - 09:30 AM UTC
I agree! What a beast she is!
TankSGT
Visit this Community
New Jersey, United States
Joined: July 25, 2006
KitMaker: 1,139 posts
Armorama: 946 posts
Posted: Friday, March 06, 2009 - 11:05 AM UTC
Looking good so far, can't wait to see it finished.

Tom
clay_cliff
Visit this Community
Lima, Peru
Joined: April 07, 2008
KitMaker: 375 posts
Armorama: 371 posts
Posted: Friday, March 06, 2009 - 02:21 PM UTC
Very good explained, and very good looking so far. I'll keep on watching this project. BTW, that two-piece upper hull... I hope that Tamiya will release an ISU-122 or 152, only time will tell. Good luck. Best regards.

José.
jimz66
Visit this Community
Connecticut, United States
Joined: December 15, 2006
KitMaker: 1,165 posts
Armorama: 1,105 posts
Posted: Friday, March 06, 2009 - 02:37 PM UTC
Looking good so far Scott, what are you using for tracks. Are you using the kit ones or am?

Jim
Spiff
Visit this Community
Nevada, United States
Joined: September 07, 2002
KitMaker: 807 posts
Armorama: 671 posts
Posted: Saturday, March 07, 2009 - 06:47 AM UTC
Thanks guys. I sure hope that the two piece upper hull is an indicator of a future new release from Tamiya!

I'm planning on using the individual link tracks that came with the kit because there is no way the rubber band tracks are going to give the upper run the characteristic sagginess over the return rollers. Tamiya provides a nice jig for getting the curves of the upper run just right.
 _GOTOTOP