_GOTOBOTTOM
Armor/AFV: What If?
For those who like to build hypothetical or alternate history versions of armor/AFVs.
Hosted by Darren Baker
E-5 Frettchen - 1/35 scratchbuild
Neo
Visit this Community
North Carolina, United States
Joined: January 20, 2005
KitMaker: 916 posts
Armorama: 758 posts
Posted: Wednesday, October 14, 2009 - 01:57 PM UTC
The History:
The Entwicklung Series or E – Series was a late war attempt by Germany to produce a standardized series of tank designs that would incorporate interchangeable parts. This was necessitated by the extremely complex tank designs that had resulted in poor production rates and mechanical unreliability.

There were to be standard designs in six different weight classes designated:

1 E-5 5-10 tons
2 E-10 10-25 tons
3 E-25 25-50 tons
4 E-50 Standardpanzer 50-75 tons
5 E-75 Standardpanzer 75-100 tons
6 E-100 100+ tons

From these base vehicles, several specialized variants were to be developed.

The E10, E-25 & E-100 have all been produced by one (or more) of the major modeling companies and a few different scales and it appears that the E-50 & E-75 will also soon be available. The only one remaining one is the E-5 – the subject of this build.

The Plan:
The E-5 Frettchen (Ferret) at 5-10 tons was most likely intended to be a small & fast light tank utilized as a reconnaissance vehicle or tank destroyer. For my submission for the “What If?” Campaign I have chosen to model a lightly armed / lots o radios recon AFV in an Africa Korps / desert environment. The “Frettchen” thing is my idea but I think it works.

Step 1 – Model the Model
Using Google Sketch-Up (a FREE 3D modeling program – and a heck of a lot of fun) I created a digital model of what I wanted to build. This “style or look” of the vehicle is based somewhat on the Trumpeter E-10 and E-25 (of which I am currently building both and stealing the extra parts for this build). After creating the 3D model and painting it with the approx. camo I envisioned, I made a small walk around animation. Click on the LOWER play button and it and it goes round and round.

Sorry - Had to remove video - was taking too much bandwidth from my photobucket account and they were going to turn me off.

Step 2 - Block it Out
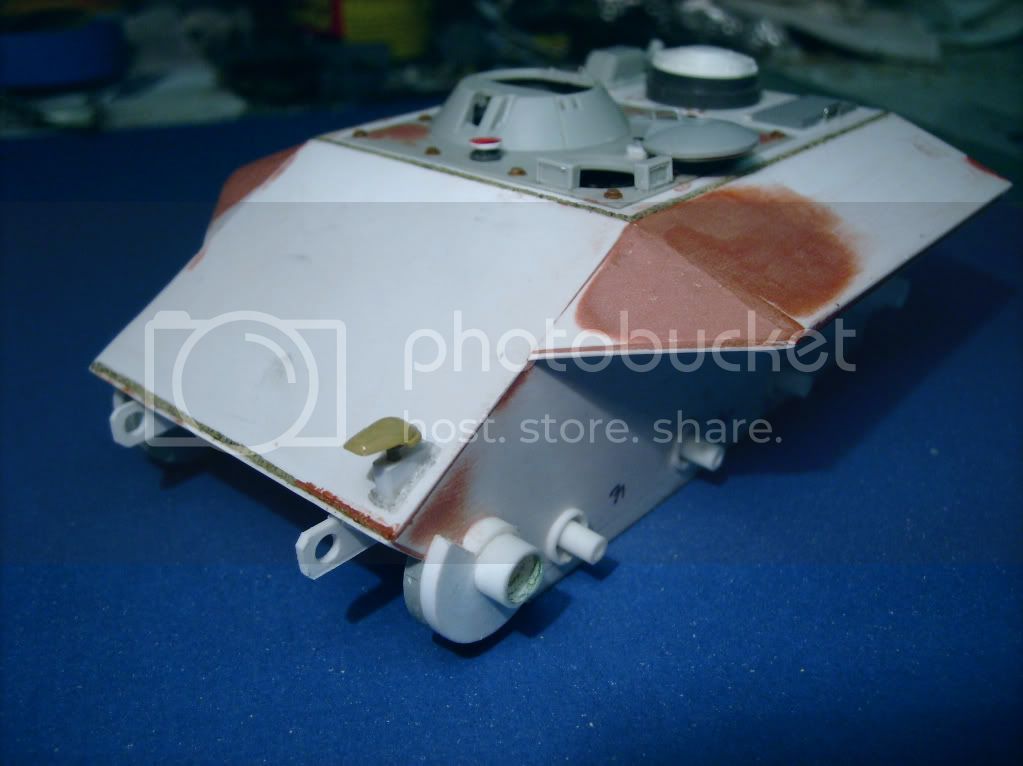
Using my E-5 for comparison, I started cutting and gluing sheet styrene. And after more cutting and gluing I’m currently at this point.


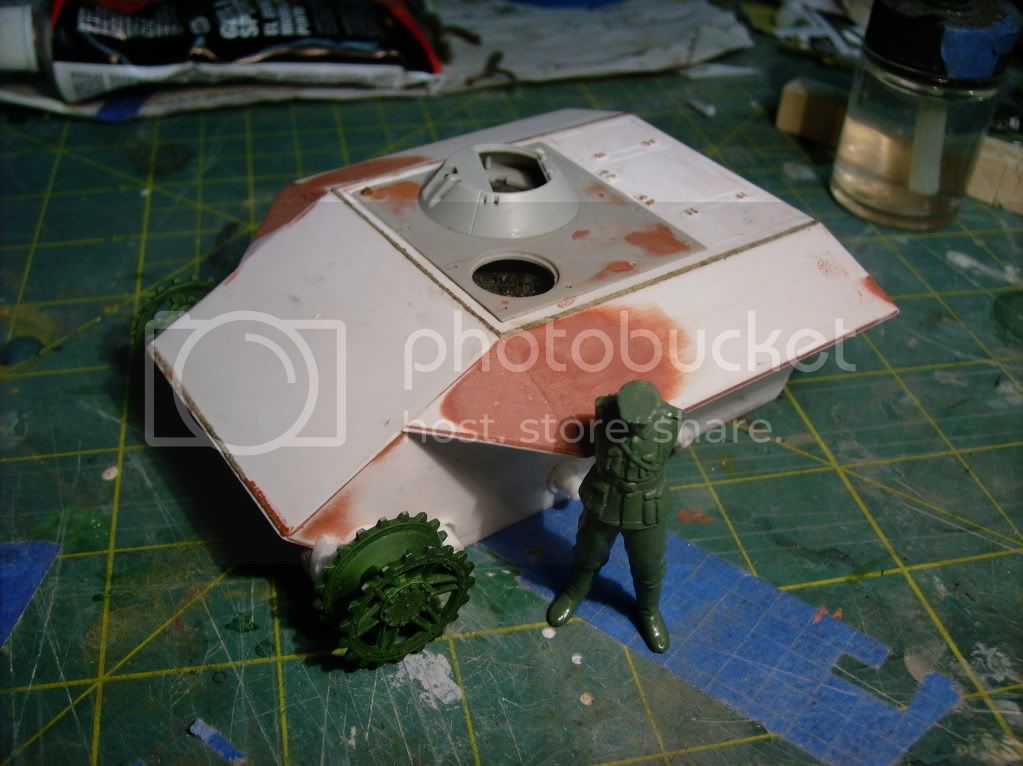
I had an old dio base laying around that I never used - until now.


The top deck and turret is from the E-25 and the front sprockets are from the E-5. The rest is sheet (sale signs from local dept. store) and tube styrene. Just to add to the fun I’m trying to build this for zero dollars – just leftovers and stuff out of the parts box.

That’s all for now – more to come.

SSGToms
Visit this Community
Connecticut, United States
Joined: April 02, 2005
KitMaker: 3,608 posts
Armorama: 3,092 posts
Posted: Wednesday, October 14, 2009 - 04:03 PM UTC
Neo, I like your design a lot. I'll be following your build.
Your build looks great. Nice to see some good old fashioned modeling being done. Good for you using scrap and spares. I bet you're really having a ball with this!
Cuhail
Visit this Community
Illinois, United States
Joined: February 10, 2004
KitMaker: 2,058 posts
Armorama: 791 posts
Posted: Wednesday, October 14, 2009 - 04:33 PM UTC

Fancy a Campaign ribbon for this build? Enter it into the ACUTR Campaign!
Totally qualifies!
Cuhail
Neo
Visit this Community
North Carolina, United States
Joined: January 20, 2005
KitMaker: 916 posts
Armorama: 758 posts
Posted: Thursday, October 15, 2009 - 11:34 AM UTC
Thanks Matt - I am having a good time w/ this one.

Thanks for the invite Cuhail but I've already joined the "What If" Campaign for this build.
Don't want to double dip and win all the campaign prize money.


Step #3 - The Road wheels, Suspension and Idler.

I picked up these old wheels (maybe for an Esci Tiger or Panther) in the closeout bin at the LHS for one US dollar. A piece of styrene tube and spacer - road wheels. The idlers are the mounting bases for the DAK figures that came w/ the old Tamiya PzK II - rounded on my trusty Dremel lathe. The suspension arms are more styrene tube. These need alittle more detailing, nuts & bolts, etc...


Here's a few photos w/ the wheels stuck on. I think it might be to high and I'll have to cut the suspension arms down.


Stay tuned - more exciting model engineering / scratch building to come...
tnichols
Visit this Community
California, United States
Joined: May 14, 2007
KitMaker: 66 posts
Armorama: 50 posts
Posted: Thursday, October 15, 2009 - 11:53 AM UTC
Really like what you are doing here. Just a suggestion. Go to the Track Link German What If gallery and look at the E-5 built by James Noorian. He might have solved some of the issues you might face in your build. Again,really like what you are doing. Ted Nichols
Neo
Visit this Community
North Carolina, United States
Joined: January 20, 2005
KitMaker: 916 posts
Armorama: 758 posts
Posted: Sunday, October 18, 2009 - 09:55 AM UTC
Thanks Ted.

I checked out James build, he went a different route (smarter) and used the Hetzer wheel / tracks.

Step #3 - Adding some details.
I added the drivers hatch (came w/ the dragon achung jabo crew) some more nuts & bolts and the motor fan / vents. BTW - I did cut 1/8" or about 3.5mm off the control arms - I like the lower look. Starting to look like it should.


More to come...


maultier
Visit this Community
Buenos Aires, Argentina
Joined: December 02, 2004
KitMaker: 55 posts
Armorama: 60 posts
Posted: Monday, October 19, 2009 - 06:08 PM UTC
interesting thing
I waiting more advance for you.
I imagine the beast more for this Style:

But... your model is better.

cheers. maultier (Zeke)
Damraska
Visit this Community
California, United States
Joined: October 06, 2006
KitMaker: 580 posts
Armorama: 499 posts
Posted: Tuesday, October 20, 2009 - 01:36 AM UTC
Now that is one cool and unusual beastie. I love it.

-Doug
kaiserine
Visit this Community
Rhone, France
Joined: April 14, 2008
KitMaker: 383 posts
Armorama: 320 posts
Posted: Tuesday, October 20, 2009 - 02:13 AM UTC
Well just discovering this topic! I like what you've done so far. I like your approach in modelbuilding!
I'll keep a close eye on your progress!

Alex.
SSGToms
Visit this Community
Connecticut, United States
Joined: April 02, 2005
KitMaker: 3,608 posts
Armorama: 3,092 posts
Posted: Tuesday, October 20, 2009 - 07:43 AM UTC
Great progress Neo, everything fits together very cleanly and logically. If Accurate Armor or Cromwell put this out, I'd buy one!
Have you considered a drivers view port on the glacis?
It's strange how you can have modeling flashbacks - I recognize the standing figure as one from the old Tamiya 88 kit - and I haven't seen that figure in 35 years!
Keep up the fantastic work and post more photos, it's looking excellent!
Neo
Visit this Community
North Carolina, United States
Joined: January 20, 2005
KitMaker: 916 posts
Armorama: 758 posts
Posted: Wednesday, October 21, 2009 - 03:41 PM UTC
Doug & Alex - Thanks for the feedback.

Matt - You'll have to wait for Trump's to add this to their E-Series. I'm going for scopes w/ this - no openings in the front armor. That figure is actually about 30 years old - I got the orig. 88 in my teens and never used it - 30 years in the parts box - LOL.


But... back to the build.

Added the armor skirts (Schürzen). Left overs from E-10. Made copies to make a mirror image look.


Needed a break so I started on the crew. Fig. on left is driver, on right is commander.


Also worked on some tools. Some are from the E-10 and some are old Tamiya so I added clamps.


All for now, more exciting modeling to come...


maultier
Visit this Community
Buenos Aires, Argentina
Joined: December 02, 2004
KitMaker: 55 posts
Armorama: 60 posts
Posted: Thursday, October 22, 2009 - 03:55 AM UTC
guau... I don`t wait for the paint. Superb.

cheers.
DougBramah
Visit this Community
Canada
Joined: May 30, 2009
KitMaker: 18 posts
Armorama: 17 posts
Posted: Saturday, October 24, 2009 - 05:13 AM UTC
Keep the progress reports coming. I for one am very excited about your build here. it will also be interesting to see if you nouveau up the afrika corps cammo to a 1946 version. Cheers Doug.
maultier
Visit this Community
Buenos Aires, Argentina
Joined: December 02, 2004
KitMaker: 55 posts
Armorama: 60 posts
Posted: Saturday, October 24, 2009 - 10:04 AM UTC
This is an Nazi World Union (NWU -ONU-) Panzer in DAK 1946

and this is a Panzer in future The Four Reich War DAK 2008


The imagination for What if don`t have any limits.

cheers.
Neo
Visit this Community
North Carolina, United States
Joined: January 20, 2005
KitMaker: 916 posts
Armorama: 758 posts
Posted: Saturday, October 24, 2009 - 02:18 PM UTC
Thanks Maultier and Doug.

Doug - you must have psychic powers because I have been recently working on the camo scheme.
Small sample:


Cont. on w/ the build...
I made alittle change to follow w/ the non-symmetrical layout of the top armor panel. Added the exhaust to the roof in place of the vent that was there. Added some tools and tool boxes to rear.


Also added some detail to the front (notex light & mount, tow cable points)


Did some more work on the tools and add-on equipment.


Here’s the return rollers, did these the other day but forgot to add to photos.


(Spoken like the narrator from the 1960’s Batman TV show)

Will he keep working? Will he ever finish this thing?
Or will another build disappear into the Armorama Hall of Shame…
Same bat time… same bat IP address…
Neo
Visit this Community
North Carolina, United States
Joined: January 20, 2005
KitMaker: 916 posts
Armorama: 758 posts
Posted: Friday, October 30, 2009 - 07:59 AM UTC
Getting close now...

Just need to add a few more grab handles, nuts & bolts and the radio antennas and it's ready for primer and paint.


Few detail shots.


Some camo ideas I have been working on.


I'm having a hard time deciding on a paint job so if you read this I could really use some feed back on what looks good or bad.

Thanks

EDIT: That's alot of fun - repathing all your photos after you use up all your bandwidth on P-Bucket...

jimz66
Visit this Community
Connecticut, United States
Joined: December 15, 2006
KitMaker: 1,165 posts
Armorama: 1,105 posts
Posted: Friday, October 30, 2009 - 01:15 PM UTC
Top one is my favorite. I really think its COOOOOOOL!!!!!!!!!!. Different too. Nicely done. Very nicely done.
SSGToms
Visit this Community
Connecticut, United States
Joined: April 02, 2005
KitMaker: 3,608 posts
Armorama: 3,092 posts
Posted: Friday, October 30, 2009 - 02:40 PM UTC
Again Neo, excellent scratch work! I'm really impressed and I like the layout.
I have to pick the first camo scheme. It's like a splinter/digital pattern. Perfect skin for this innovative baby.
poky
Visit this Community
Overijssel, Netherlands
Joined: October 02, 2005
KitMaker: 14 posts
Armorama: 12 posts
Posted: Friday, October 30, 2009 - 03:43 PM UTC
looks great I'm also working on the E-5 but a bit smaller 1/72 with interior working on the engine and PAW now.
as for the paint scheme the top one or maybe with last with different lines
Gorizont
Visit this Community
Sachsen, Germany
Joined: November 28, 2007
KitMaker: 1,462 posts
Armorama: 1,289 posts
Posted: Friday, October 30, 2009 - 07:36 PM UTC
Wow, that´s a great build!
Until I read your list of the E-series, I didn´t know what they are.
Also I like scratchbuilt things and details!

Great work!

greetings...
Soeren
Neo
Visit this Community
North Carolina, United States
Joined: January 20, 2005
KitMaker: 916 posts
Armorama: 758 posts
Posted: Wednesday, November 04, 2009 - 04:25 PM UTC
Thanks James & Matt (of course you guys would pick the hardest one to paint - LOL)

Thanks Poky - you should post some pic's of your E-5, I would like to see it.

Thanks Soeren - Scratchbuilding can be a pain in the butt... but alot of fun too.

Sooo... finally finished building, started painting (I always rattle-can prime), next up is shading.


Base is coming along also.


All for now, good stuff starts soon.

poky
Visit this Community
Overijssel, Netherlands
Joined: October 02, 2005
KitMaker: 14 posts
Armorama: 12 posts
Posted: Thursday, November 05, 2009 - 05:13 AM UTC
I'm still working on the interior, just finished the transmission working on the engine and seats now so not that must to see. I will post pictures of it end of next week on my site
http://poky609.fotopic.net/
greetings
DazzaD
Visit this Community
South Australia, Australia
Joined: June 17, 2007
KitMaker: 235 posts
Armorama: 232 posts
Posted: Thursday, November 05, 2009 - 08:54 PM UTC
Fantastic build so far mate, cant wait to see the end product!
Neo
Visit this Community
North Carolina, United States
Joined: January 20, 2005
KitMaker: 916 posts
Armorama: 758 posts
Posted: Friday, November 20, 2009 - 05:10 AM UTC
Poky - saw your build - looks good so far, very detailed.
Thanks Dazzy.


News Update - Minor disaster has struck...

I dropped the E-5 while painting the driver's body...

Snapped off the notek light, tow cable mount, broke off two of the aerials to the star antenna and worst of all - cracked the body of the E-5 on one of the glued seams (items marked in red below).
The crack was the hardest to repair w/ all the finished work around it. I'm still fixing the rest.


While I pondered how the fix the damage I worked on the last figure - he will be running up the hill next to the E-5.


Also did some work on the base. Going for a two tone look so this will stand on on the shelf.
Started to make the footprints in the sand for the figure (in red).


More to follow (hopefully - unless I manage to drop it again).
poky
Visit this Community
Overijssel, Netherlands
Joined: October 02, 2005
KitMaker: 14 posts
Armorama: 12 posts
Posted: Friday, November 27, 2009 - 09:02 AM UTC
like the start on the dio, how are the repairs going?
 _GOTOTOP