_GOTOBOTTOM
Constructive Feedback
For in-progress or completed build photos. Give and get contructive feedback!
IDF M163 Machbet
Maki
Staff MemberSenior Editor
ARMORAMA
Visit this Community
Croatia Hrvatska
Joined: February 13, 2002
KitMaker: 5,579 posts
Armorama: 2,988 posts
Posted: Friday, April 16, 2010 - 02:40 AM UTC
Hi all,

First of all let me start by saying that I have actually been building 1/35 scale AFVs before turning to the dark side of the figure painting... I think the last vehicle I've built was about 15 years ago and this is going to be my first "serious" AFV project log since those times.

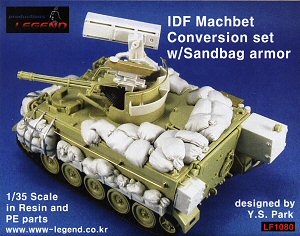
It all started when I decided to get Legend's IDF Machbet conversion for M163 on sale from Lucky Models. I've always had a soft spot for IDF armor and I just loved how mean the M163 looks with 20mm Vulcan rotary cannon and 4-tube Stinger rocket launcher.
Some details on IDF Machbet can be found here and here is the PMMS review of Legend's converision set.


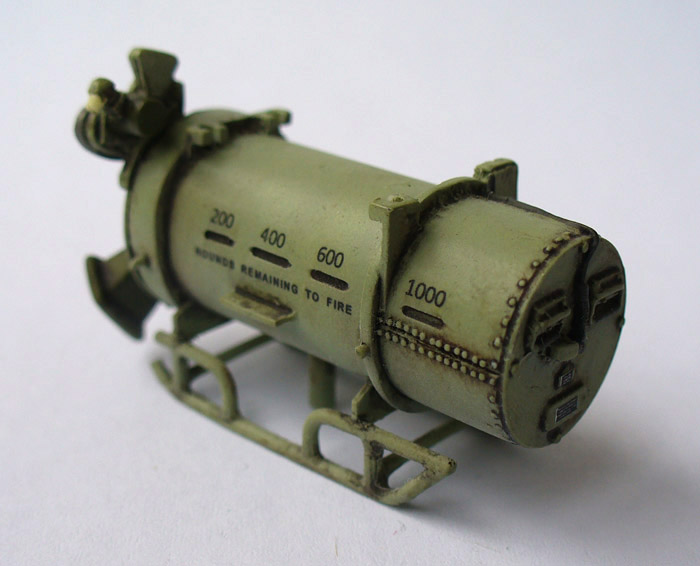
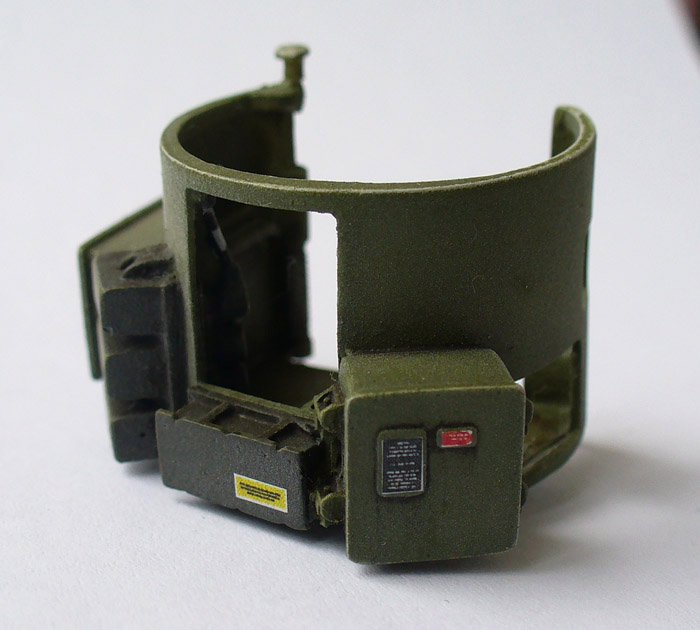
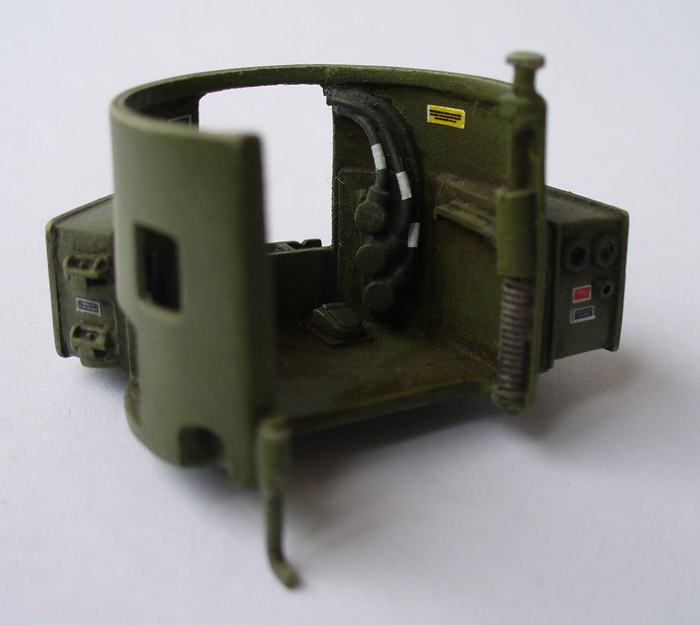
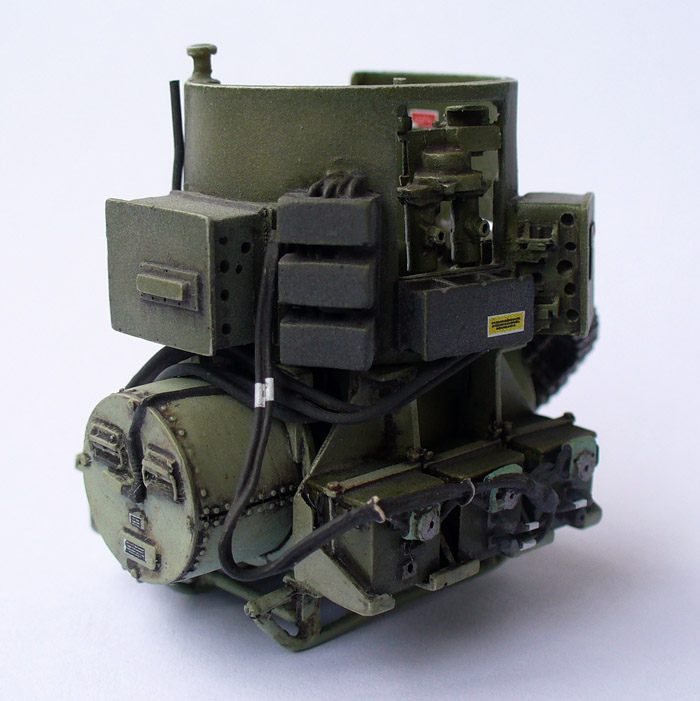
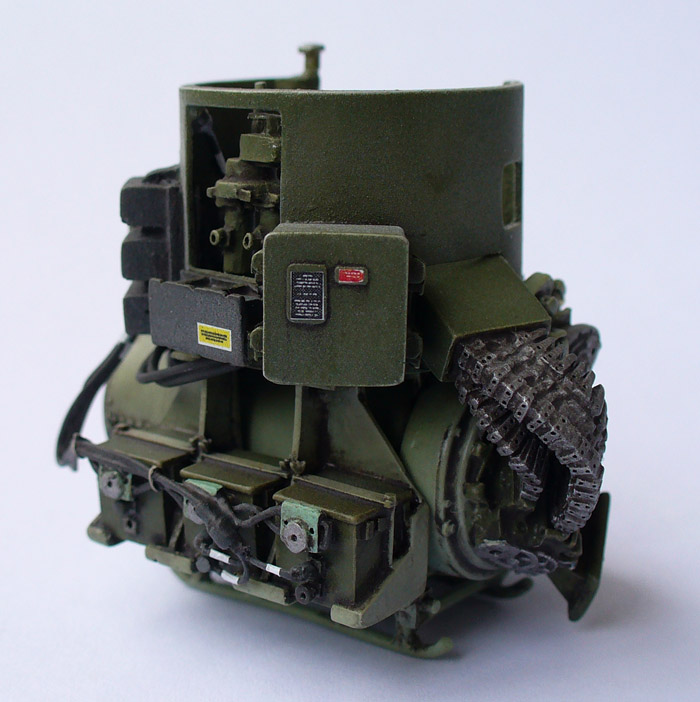
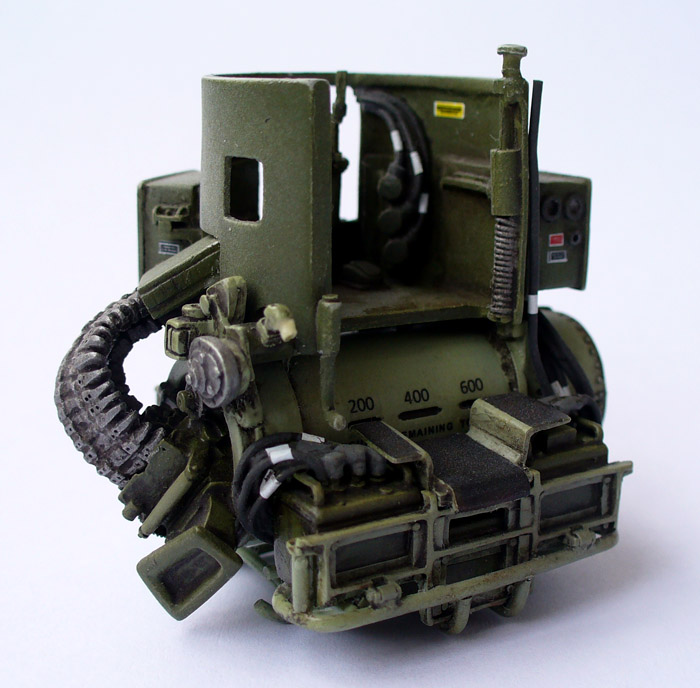
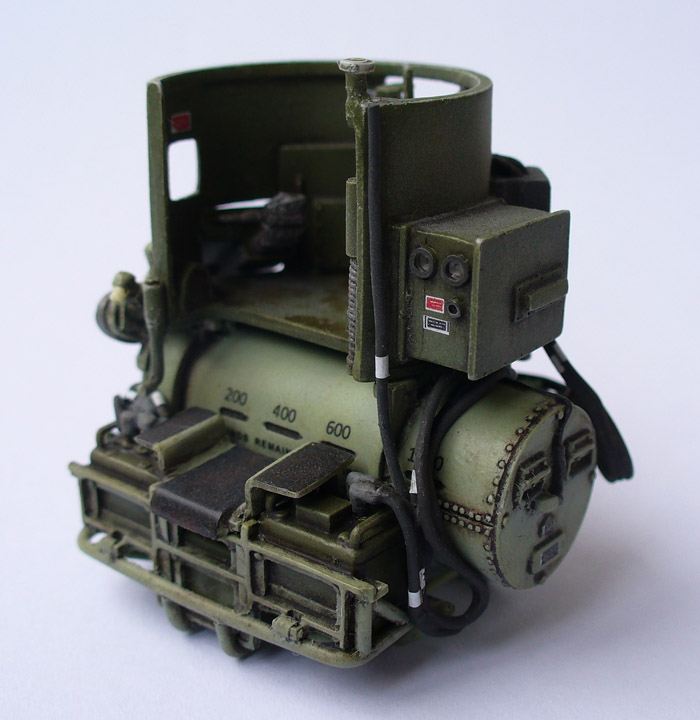
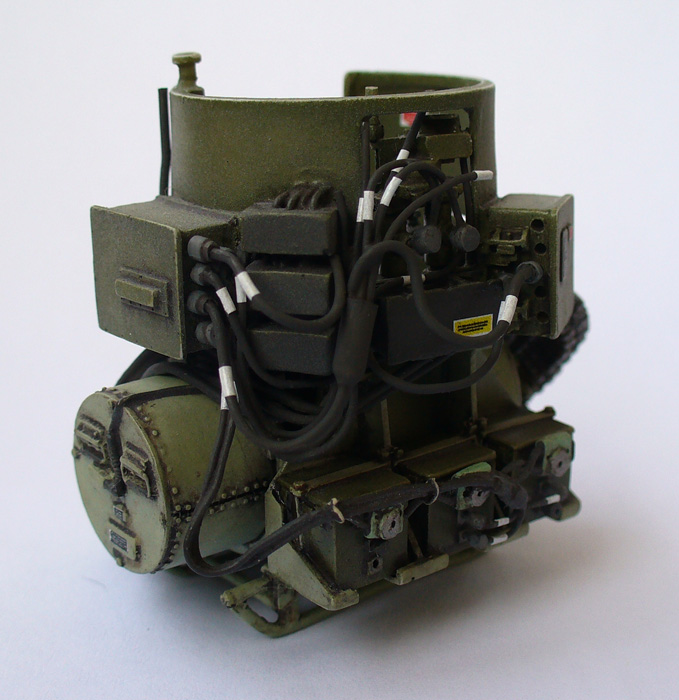
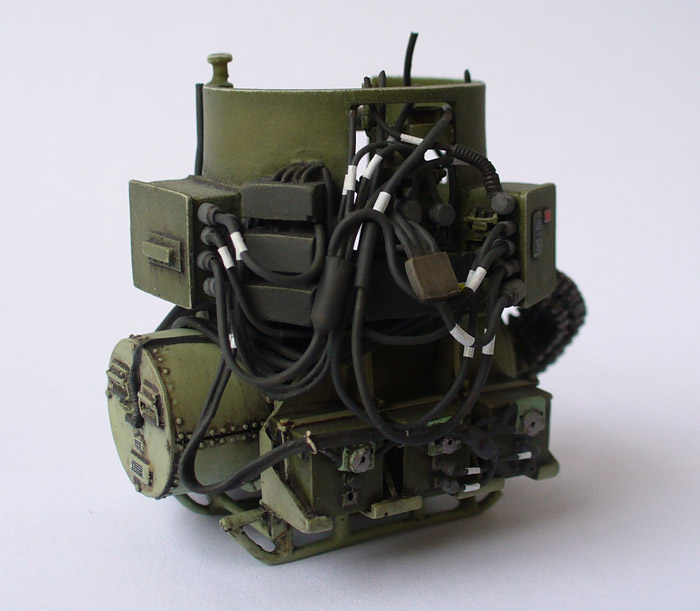
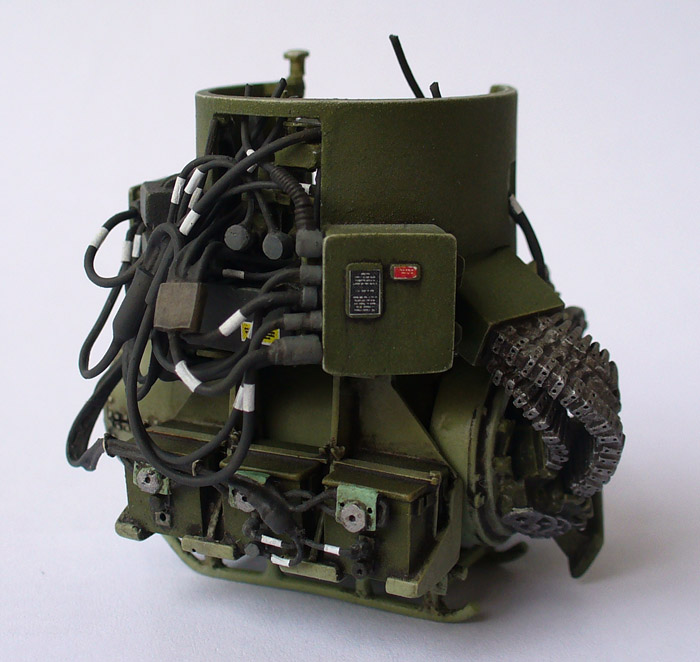
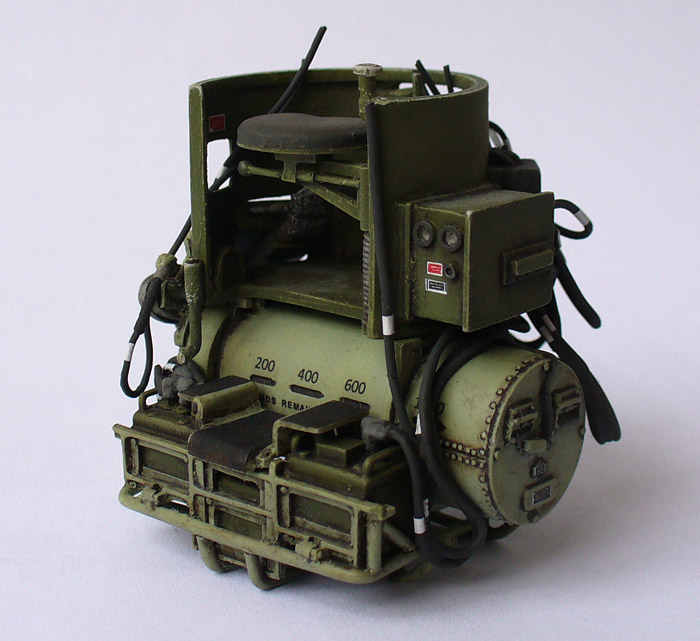
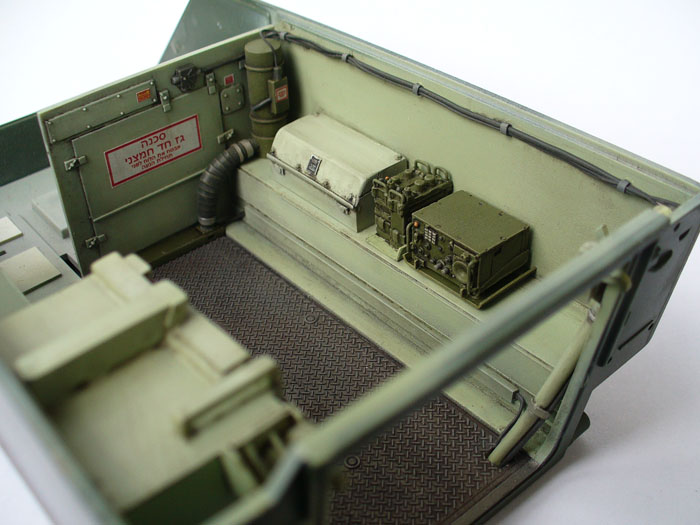
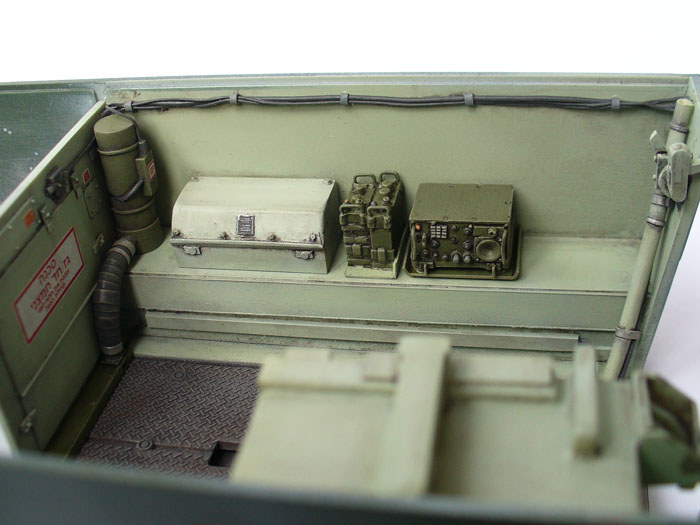
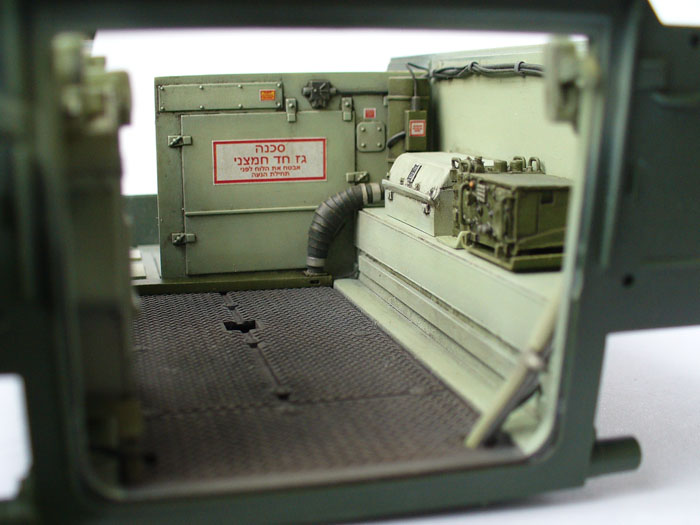
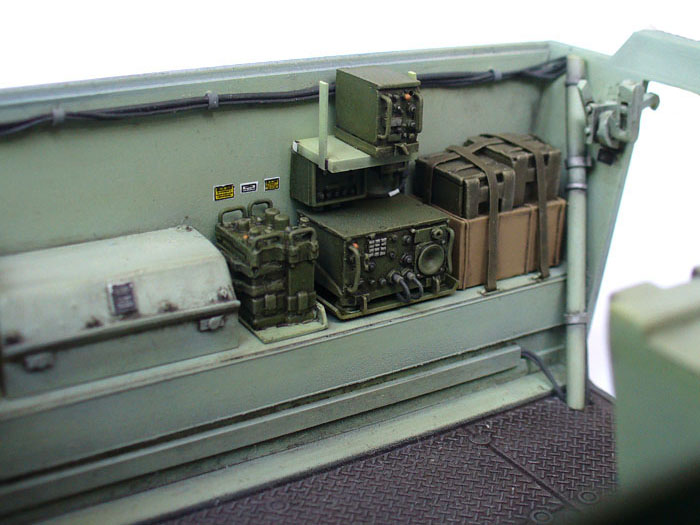
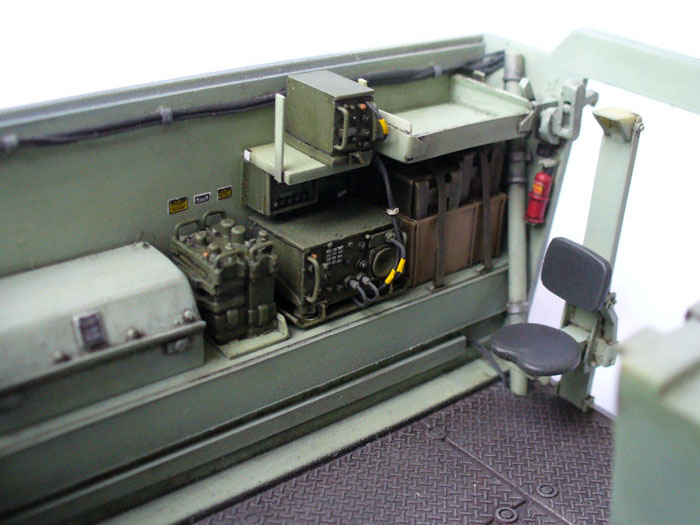
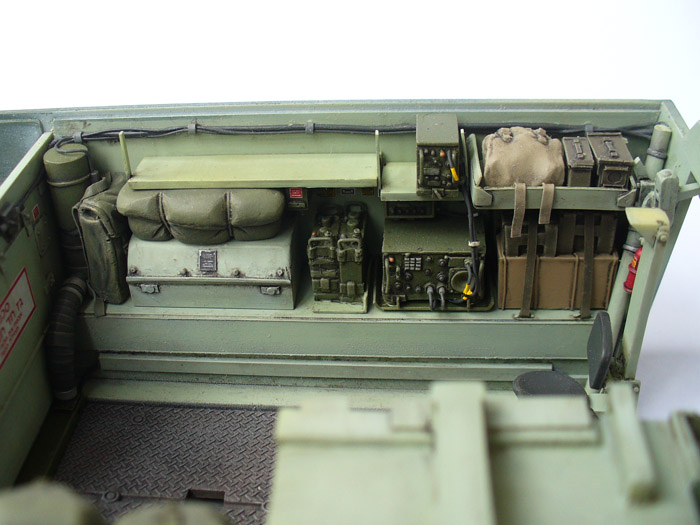
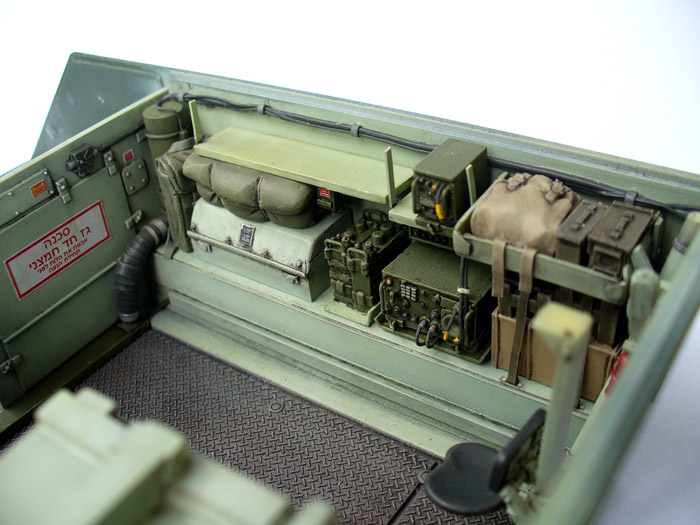
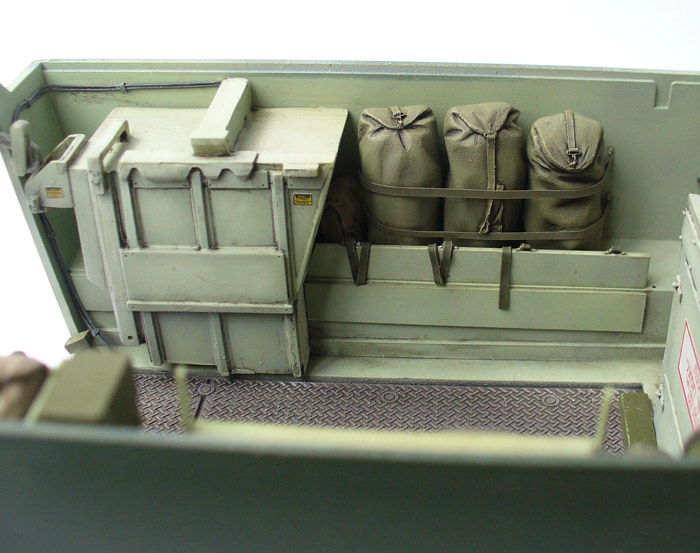
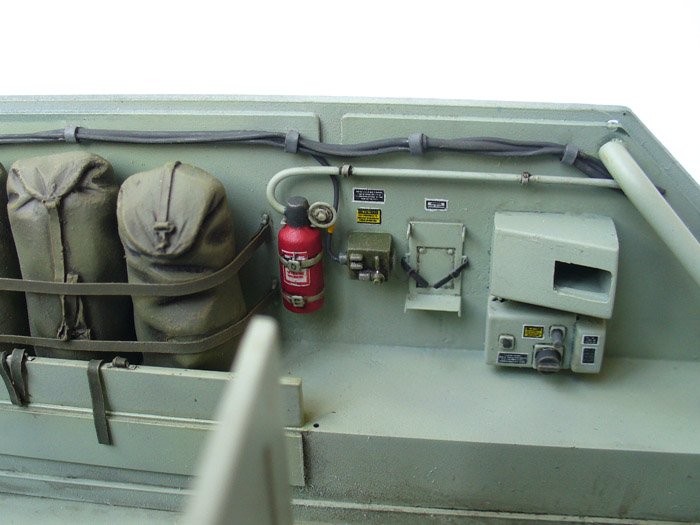
Then I decided it would be cool to open up the belly of the beast and got me a HobbyFan's Vulcan conversion. The conversion looks amazing with complete interior, turret and metal barrels... about 120 parts all together. Here's how the set should look once finished:


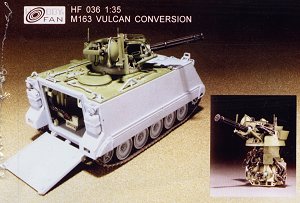
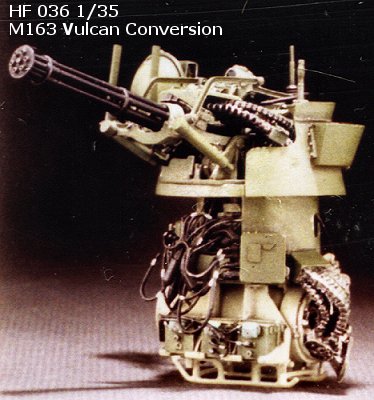
And here is the PMMS review.

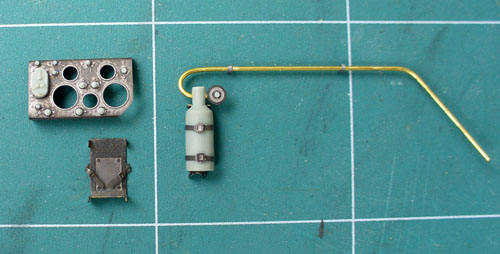
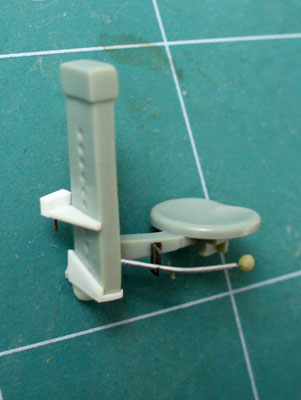
As if this wasn't enough, I got Verlinden's IDF Vulcan conversion, Eduard's PE, Friul tracks and some other small bits and pieces... quite a handful for a first project after 15 years.

I just need to sort out the pictures I took and I'll be ready to show you the progress I made so far.

Mario
Maki
Staff MemberSenior Editor
ARMORAMA
Visit this Community
Croatia Hrvatska
Joined: February 13, 2002
KitMaker: 5,579 posts
Armorama: 2,988 posts
Posted: Friday, April 16, 2010 - 03:42 AM UTC
I forgot to mention this is the first time I'm using the airbrush... I have two local modeling friends helping me out and it seems I've been pretty much in the dark regarding most of the techniques on painting AFVs today. The last stuff I remember from all those years ago were washes and drybrushing... and now the whole new world of modeling is opening up in front of me. Thanks guys!

Anyway, here are the first pictures.

Couple of interior pieces (ammo drum and turret interior) with custom made decals:


Then most of the turet assembly put together:


I did the wiring as well, so those pics are to follow soon.

Mario
afv_rob
Visit this Community
England - East Anglia, United Kingdom
Joined: October 09, 2005
KitMaker: 2,556 posts
Armorama: 2,199 posts
Posted: Friday, April 16, 2010 - 03:54 AM UTC
Upon reading the first post, I thought if your figure painting is anything to go by this will be awesome, as I scrolled down my thoughts were confirmed! The work so far is incredible, absolutely superb looking. I really cant wait to see more, and welcome back to the world of armor modelling!
jackhammer
Visit this Community
North Carolina, United States
Joined: November 12, 2002
KitMaker: 357 posts
Armorama: 310 posts
Posted: Friday, April 16, 2010 - 03:54 AM UTC
Really beautiful work. Gonna be watching this one very close. Love the IDF hardware too and all those bits and bobs (did my best Hagrid impersonation there) will make it scream! Kudos!!!!! And PUSSAW!!!!
rfbaer
Visit this Community
Texas, United States
Joined: June 12, 2007
KitMaker: 1,866 posts
Armorama: 1,696 posts
Posted: Friday, April 16, 2010 - 05:14 AM UTC
Holy rapid fire, Batman!
I'll be watching, too.
Maki
Staff MemberSenior Editor
ARMORAMA
Visit this Community
Croatia Hrvatska
Joined: February 13, 2002
KitMaker: 5,579 posts
Armorama: 2,988 posts
Posted: Friday, April 16, 2010 - 05:30 AM UTC
Thanks guys, glad you like it so far.

Here are some more... wiring in progress:


And I just managed to finish the turret interior:


This is it for now. I got the M113 donor kit yesterday so I can start with the rest of the interior.

Mario
Mario_HR
Visit this Community
Croatia Hrvatska
Joined: June 28, 2006
KitMaker: 376 posts
Armorama: 303 posts
Posted: Friday, April 16, 2010 - 06:44 AM UTC
We prefer the term indigenous personnel Great start and I would expect nothing less from you
Bumblebee
Visit this Community
Croatia Hrvatska
Joined: April 15, 2010
KitMaker: 18 posts
Armorama: 16 posts
Posted: Friday, April 16, 2010 - 07:34 PM UTC
Great start Maki, looks very impressive
WayneB
Visit this Community
Victoria, Australia
Joined: July 22, 2008
KitMaker: 141 posts
Armorama: 130 posts
Posted: Saturday, April 17, 2010 - 03:30 AM UTC
Wow great start! ill be watching this
Maki
Staff MemberSenior Editor
ARMORAMA
Visit this Community
Croatia Hrvatska
Joined: February 13, 2002
KitMaker: 5,579 posts
Armorama: 2,988 posts
Posted: Saturday, April 17, 2010 - 04:56 AM UTC
Thanks guys. Hope to have some more updates to show soon...

Mario
seb43
Visit this Community
Paris, France
Joined: August 30, 2005
KitMaker: 2,315 posts
Armorama: 2,158 posts
Posted: Saturday, April 17, 2010 - 11:52 AM UTC
Great Start Mario
Congrats
Cheers
Seb
Maki
Staff MemberSenior Editor
ARMORAMA
Visit this Community
Croatia Hrvatska
Joined: February 13, 2002
KitMaker: 5,579 posts
Armorama: 2,988 posts
Posted: Saturday, August 28, 2010 - 12:20 AM UTC
Here's some progress on Machbet interior after quite a long time. I managed to get hold of M163 Operator Manual and some more documents (thanks guys!) just to find out there are several things in HobbyFan conversion which could use a make-over and a lot of things which are not even included.

On the right hand side, along HobbyFan parts, I added the bilge pump, wiring and some small details as well. The air heater from Academy kit received a bit touched of a touch up and hebrew decals added:


The remainder of radio set and some stowage was added. Wirings to the radio set, fire extinguisher and commander's seat...


Some more stowage and stuff on the right-hand side:


There's a lot more work needed on this, but I lost interest and started working on left-hand side. That area is not covered by Hobby Fan set:


Finally, I started playing around with the driver's compartment. The interior in Academy set is pretty much simplified, so with Eduard PE and some scrathbuilding... here's the progress so far:


Mario
WayneB
Visit this Community
Victoria, Australia
Joined: July 22, 2008
KitMaker: 141 posts
Armorama: 130 posts
Posted: Saturday, August 28, 2010 - 03:07 AM UTC
Mario,

This is an excellent build. Your attention to detail and subtle painting skills are something to be admired. The details on that 524 radio just pop right out! The stowage looks natural and detailed. Very, very good.

If you wanted to, you could paint the hand loops on the 524 and 77 radios steel or metal colour. I can’t speak for what they look like in Israeli service but in Australia that would be right.

Keep up the good work. I’m very interested in this one.

One request. Post some unpainted pics. I’d love to see what you have scratch built and how it went together.

Cheers

W
Maki
Staff MemberSenior Editor
ARMORAMA
Visit this Community
Croatia Hrvatska
Joined: February 13, 2002
KitMaker: 5,579 posts
Armorama: 2,988 posts
Posted: Saturday, August 28, 2010 - 03:23 AM UTC
Thanks for the comments Wayne!

Will do on the radio hand loops. There's still some wiring to the radios to finish up... can't seem to find interest at this moment, but I'll definitely do that eventually. As for the stowage; I'm not completely satisfied in that department and hope to improve it over the next couple of weeks.

I'm sorry about the lack of unpainted pics. The interior is pretty complex to build and I'm painting most of the stuff I'm scratchbuilding without them being attached to the model... The two pics I posted are the first unpainted pics I took of the entire model so far.

Cheers,
Mario
vonHengest
Visit this Community
Texas, United States
Joined: June 29, 2010
KitMaker: 5,854 posts
Armorama: 4,817 posts
Posted: Sunday, August 29, 2010 - 05:43 PM UTC
Lookin good Mario
Kiwi_Modeller
Visit this Community
Queensland, Australia
Joined: August 13, 2010
KitMaker: 188 posts
Armorama: 121 posts
Posted: Sunday, August 29, 2010 - 07:15 PM UTC
holy cow thats very nice think i'll keep an eye this too.
cheers,
Graham
skarik
Visit this Community
Praha, Czech Republic
Joined: February 08, 2005
KitMaker: 324 posts
Armorama: 295 posts
Posted: Sunday, August 29, 2010 - 07:26 PM UTC
Hello Mario,
let me also say it looks GREAT so far. I am looking forward to the kit done.

Regards

Jiri
Maki
Staff MemberSenior Editor
ARMORAMA
Visit this Community
Croatia Hrvatska
Joined: February 13, 2002
KitMaker: 5,579 posts
Armorama: 2,988 posts
Posted: Monday, August 30, 2010 - 04:52 AM UTC
Thanks guys, I'm glad you like it. Will keep you posted on the updates.

Mario
SEDimmick
Visit this Community
New Jersey, United States
Joined: March 15, 2002
KitMaker: 1,745 posts
Armorama: 1,483 posts
Posted: Tuesday, August 31, 2010 - 04:02 AM UTC
I've been wanting to do this very same conversion for years now...I have all the stuff in my closet, but never broke it out to start on it! LOL
Maki
Staff MemberSenior Editor
ARMORAMA
Visit this Community
Croatia Hrvatska
Joined: February 13, 2002
KitMaker: 5,579 posts
Armorama: 2,988 posts
Posted: Saturday, September 04, 2010 - 06:12 AM UTC
Some more work around the drivers compartment:


Mario
bison126
Visit this Community
Correze, France
Joined: June 10, 2004
KitMaker: 5,329 posts
Armorama: 5,204 posts
Posted: Saturday, September 04, 2010 - 06:21 AM UTC
Really impressive Mario. Your attention to details is excellent as are your skills !

It's a real pleasure to llok at this thread.
chefchris
Visit this Community
North Carolina, United States
Joined: February 06, 2006
KitMaker: 1,544 posts
Armorama: 1,464 posts
Posted: Saturday, September 04, 2010 - 08:20 AM UTC
Stunning work - my hat is off to you sir. The HobbyFan kit is a real gem. I also like your custom decal work - impressive! Model on Dude.....

Chris
TankSGT
Visit this Community
New Jersey, United States
Joined: July 25, 2006
KitMaker: 1,139 posts
Armorama: 946 posts
Posted: Saturday, September 04, 2010 - 09:49 AM UTC
It's coming along great. Wonderful attention to detail.

TC
ptruhe
Visit this Community
Texas, United States
Joined: March 05, 2003
KitMaker: 2,092 posts
Armorama: 1,607 posts
Posted: Saturday, September 04, 2010 - 02:06 PM UTC
All the fittings look great and especially the corrections to the driver's seat.

Paul
 _GOTOTOP