Armor/AFV: Canadian Armor
Discuss all types of Canadian Armor of all eras.
Hosted by Darren Baker
Canadian Firefly VC and NNSH Figgies WIP
SdAufKla
Visit this Community
South Carolina, United States
Joined: May 07, 2010
KitMaker: 2,238 posts
Armorama: 2,158 posts
Posted: Friday, May 28, 2010 - 01:53 PM UTC
Alright, moving on.

My next step after getting the tools, brackets, and footman loops was the front fenders and the sand shield mounting brackets.

I thinned the front fenders down from the inside / bottom. The kit parts were typically very nice. After thinning, I only added the small vertical reinforcements just up and in from the inside front corners of each.

The sand shield brackets on the sides and rear corners are the Tasca kit PE parts. I used epoxy glue to mount these and give me a bit of working time. I strated at the front hull corners and worked my way back down each side. This is because the rear corner brackets should make a tight angle with the side brackets. By starting at the front, I was able to adjust the final pieces at the rear corners to fit the last side piece with no extra or gaps.

Here's a pic of the rear corner joint to show what I'm trying to describe.


In this pic, you can also see the small welds along the sides and rear sand shield brackets. These are done with epoxy putty (Miliput Yellow-Gray). As with all the epoxy putty weld beads, I rolled out fine strings of putty, cut small lengths, applied these to the model, and textured with a damp (dampened with water) toothpic (cocktail stick) which was trimmed to an angled chisle end.

Next up was some spare track armor for the hull front. I used DML link-to-link from a doner kit that supplied the lower hull to a kit-bashed US M4A1 (early) in Operation Torch markings.


The track is held on with masking tape strips in the photo. I'll remove it for painting and "weld" it on later using epoxy putty on the top two end connectors. These end connectors have the track pin detailed drilled out on the very ends. I also added longer track pins to the final, botton links on each run.

The DML tracks are not precisely the same as the Panda / RHPS track that I will use, but it's very close. I also detailed a DML road wheel for some extra storage. I added the inner rim rivets and the grease nipples. DML provides the small "divots" where the grease nipples should be, but no nipples.


Here's a shot showing one of the bogy assemblies. I added the rim rivets to the outside and inside of each road wheel. I added grease nipples to the insides of each wheel. There are four holes drilled in each forward face and a corresponding four bolts added to each rear (under the return rollers). Finally, I added the missing bolts on the return skids after thinning them. Voyager provides PE skids, but the kit parts will thin easily and there's no issue with trying to match the bends in six identical parts.


Next up is are the figures for the turret, then finishing detail on the turret. Also, some crew storage for the rear hull.

Mike
SdAufKla
Visit this Community
South Carolina, United States
Joined: May 07, 2010
KitMaker: 2,238 posts
Armorama: 2,158 posts
Posted: Friday, May 28, 2010 - 02:12 PM UTC
Hmmmm...? Some glitchy thing going on here with a couple of the photos.

Maybe a re-do is in order.

Here's the missing bogy picture.


And the missing overall pic.

SdAufKla
Visit this Community
South Carolina, United States
Joined: May 07, 2010
KitMaker: 2,238 posts
Armorama: 2,158 posts
Posted: Friday, May 28, 2010 - 04:29 PM UTC
Well, if you guys can stand it, I was going through my photos and found some from my early start on the Firefly last year (before I was so rudely interrupted by so mundane a thing as work).

One of the fist things I wanted to do, if I could, was to replace the air inlet grating behind the turret on the engine deck. This is the original kit part. I really wanted that see-through look.


After going through all my photos of the relavant areas on Sherman M4A4's, V's, and VC's, I was able to do up some working sketches.


One thing that I learned was that the grating was a single-piece casting. I had thought that it was constructed from various bar and rod stock, but it isn't. Also, I had thought that the grating was more open than it actually is. In reality, it composed os a series of slats with round top edges and not round bars at all.

Once I had some working plans, I decided to make my grating from Evergreen strip and rod.

I made the lateral slates and gang-cut the slots in them for the longitudinal slats. I did this by grouping together a bunch of strips and gluing the ends together so that they would remain in the same positions realative to each other as I cut the slots.

Here's a picture of the ganged-together strip in my mitre box where I cut the slots.


A a picture of the slats with all the slots cut into them but before separating.


Next to go on were the longitudinal slats into the slots cut into the lateral slats. Here's a picture of those in place.


After the slats were in place, I added styrene rods along the top of each lateral slat and coated the entire grating with thinned Squadron Green Stuff putty.

Here are a couple of different views of the grating assembled and finished in the single-use jig and before cutting it out.


And finally, here are a couple of pictures of the first grating dry-fit into the kit part.


I wasn't happy with the first grating, though, as I thought the spacing between the lateral slats was too large. I re-did the whole exercise and respaced the slates based on using .020 dia. rod vice .025 dia rod. This is the grating that I'm actually using.


If I were to do this one again, I think that I'd re-calculate the spacing again for .015 dia Plastruc Styrene rod instead of the .020 dia. Evergreen Rod.

But as it is, I'm satisfied with the results and learned a bit with the doing.

I hope that the explanation will help someone else confronted with a similar problem.

Mike
SdAufKla
Visit this Community
South Carolina, United States
Joined: May 07, 2010
KitMaker: 2,238 posts
Armorama: 2,158 posts
Posted: Friday, May 28, 2010 - 04:40 PM UTC
OK, here's the missing picture.

The lateral slats after cutting the slots for the longitudinal slats. The lateral slats are still gang-glued together on one end.


I think my problem with the missing pictures is from trying to go back and insert a picture later into the posting. Using the "[img]" button on the Reply tool bar always puts the new image at the bottom of the posting no matter where the cursor is and manually typing in the "[img]" tags doesn't make the machine happy either... Oh well.

No worries.
SdAufKla
Visit this Community
South Carolina, United States
Joined: May 07, 2010
KitMaker: 2,238 posts
Armorama: 2,158 posts
Posted: Saturday, June 12, 2010 - 11:47 AM UTC
Well, it's been a couple of weeks since I posted my last up-dates. Full disclosure: I think I'm the slowest model builder going. My progress is often measured in a single part or two over the course of a day, so I appologize to anyone actually trying to follow this.

At any rate, since my last posts, I've been working on the crew figures (two torso figgies) and another infantry guy.

The crew will consist os two figures, the commander and loader. I couldn't find any suitable figures, so I've modified a pair out of the Minicraft British Armoured Car Figure set. The loader started out as one of the drivers and the commander, well, a commander-looking dude.

Both figures needed new arms (twisted wire armatures and Miliput) and I replaced the heads and hands as well. For heads and hands, I used Hornet parts. The commander started out as a bare head to which I added an Ultracast British Mk I tank helmet and scratch-built headset. The loader will represent a figure tossing out spent 17 lb. shell casings.

The infantry figure (which will be a NNSH cpl.) has a Hornet replacement head and right hand. I've also added a ton of straps, a Tamiya small haversack, and Tamiya ammo pouches.

They all have a bit more work to go before I primer them (hopefully in the next few days). After I hit them with primer, I'll plan on posting some WIP photos of the painting.


I'll freely admit that I'm no figure sculptor, but both crew figures are mostly hidden down in the hatches, so hopefully they won't look too horrible when finished.

More to follow.

Happy modeling,
Mike
LSniper
Visit this Community
Ontario, Canada
Joined: June 27, 2007
KitMaker: 223 posts
Armorama: 162 posts
Posted: Saturday, June 12, 2010 - 03:10 PM UTC
Nice looks like a good build


Matt
exer
Visit this Community
Dublin, Ireland
Joined: November 27, 2004
KitMaker: 6,048 posts
Armorama: 4,619 posts
Posted: Saturday, June 12, 2010 - 11:45 PM UTC

Quoted Text

I think I'm the slowest model builder going.


Not by a long way

Very nice work on the crew figures
metooshelah
#011
Visit this Community
Jerusalem, Israel
Joined: February 06, 2009
KitMaker: 1,507 posts
Armorama: 1,304 posts
Posted: Sunday, June 13, 2010 - 01:56 AM UTC
impressive build!
keep it up
AlanL
Visit this Community
England - East Anglia, United Kingdom
Joined: August 12, 2005
KitMaker: 14,499 posts
Armorama: 11,675 posts
Posted: Sunday, June 13, 2010 - 03:43 AM UTC
Hi Mike,

thanks for the past pictures, really great work. Build is coming along a treat.

Al
panamadan
Visit this Community
Minnesota, United States
Joined: July 20, 2004
KitMaker: 1,513 posts
Armorama: 1,449 posts
Posted: Sunday, June 13, 2010 - 05:26 AM UTC
Glad that I fould your build! You have a great eye for detail!
Dan
SdAufKla
Visit this Community
South Carolina, United States
Joined: May 07, 2010
KitMaker: 2,238 posts
Armorama: 2,158 posts
Posted: Monday, June 14, 2010 - 10:32 AM UTC
Thanks for the kind words, guys!

Here're the three new figures after priming. I simply use Tamiya flat white airbrushed with their X-20A thinner.


I didn't notice that I broke the left thumb off of the loader figure, so that's a repair that I'll have to make.

Here're the figures after airbrushing on the basic uniform and flesh undercoat colors. I try to always airbrush on these large undercoat blocking colors since the paint always goes on much smoother and thinner than brush painting. Airbrushing these is probably no faster since you have to mix the paints, clean the brush between colors, and mask a little bit. But the overall finish is, IMO, worth the extra effort.


The rest of the undercoat / blocking colors will be brush painted after these guys dry at least overnight.

Here are the paint colors used:


The crew figures are in the dark green which I pre-shaded by mixing black and spraying from the bottom and then adding dark yellow and spraying down from the top.

The infantry figure is in khaki with a drop or two of the dark green added (probably about 4:1-khaki:dark green). The Canadian battle dress (if manufactured in Canada) was a bronzy-green instead of the normally expected earth-brown / mustard khaki of the British battle dress (although the Brits supplied the Canadians with many uniforms). Of course, there are exceptions to this in that some indigenous manufactured Canadian battle dress was also in the more brown / nustard color. But since the infantry figures on this project are all Canadian, I'm going with the bronze green.

The flesh undercoat is Citadel Bronze Flesh airbrushed after thinning with Tamiya X-20A thinner. The Citadel paints are excellent for brushing and will also airbrush very nicely. They have several flesh tones that vary from pretty light to fairly dark. The Bronze Flesh is in the middle.

As I've mentioed in some earlier posts, once undercoated with acrylics, I'll paint the figures using artist oils, wet-on-wet. But first is the undercoating.

Happy modeling,
Mike
SdAufKla
Visit this Community
South Carolina, United States
Joined: May 07, 2010
KitMaker: 2,238 posts
Armorama: 2,158 posts
Posted: Thursday, June 17, 2010 - 05:49 AM UTC
A bit of WIP on the figures:

These first three show the loader, commander, and squad leader fully undercoated with acrylics.


Loader. Note that I fixed his missing / broken left thumb with a bit of Milliput. Still needs sanding in this photo.


Commander. The "Y" shaped cord thingy is the caord set for his headset and microphone. Made of .010 lead wire and fuze wire. I'll paint it separately and add it on final assembly.


Squad (Section) Leader. The sling for the Sten Gun is heavy aluminum foil from a seal on a bottle and fuze wire for the swivels. Note that the rear swivel is a simple ring that fits around the skeleton stock. His Ammunition Boots will be black when finished, but here they're undercoated with Citadel Beastial Brown with works very well with black oil paint over it for worn leather.

All of the undercoating was done with acrylic paints, either Tamiya or Citadel. The Tamiya paints are horrible to brush paint, but if you use the X-20A thinner and an artists acrylic paint drying retarder, it can be done.

Next up are the finished faces:


Again, these are Hornet heads.

The loader has a FGH beret badge added from .005 plastic card in the shape (sort of) a Maple Leaf. It'll be painted bronze with a bright silver center later.

The commnader was a bare head with the crown of his head cut off (to fit into an UltraCast Mk. I steel helmet). I added the headphones with epoxy putty (Miliput), plastic sheet and rod, and bits of foil and fuze wire.

The squad leader's head is unchanged.

All three were painted using artist oils, wet-on-wet.

More to follow later.

Happy modeling,
Mike
Totalize
Visit this Community
Ontario, Canada
Joined: February 04, 2009
KitMaker: 743 posts
Armorama: 549 posts
Posted: Thursday, June 17, 2010 - 08:44 AM UTC
Mike, fantastic work. Great detailing of this Firefly and the faces on the figures are pure artisty a la Mark Bannerman.

Regarding the faces "wet on "Wet" did you put a basecoat of oils on the faces over the acrylics then wait for it dry before doing the shadows and highlights and blending? or did you just paint the entires faces doing all the blending and shadows wet on wet over the acrylic base?


Keep up the masterful work.

SdAufKla
Visit this Community
South Carolina, United States
Joined: May 07, 2010
KitMaker: 2,238 posts
Armorama: 2,158 posts
Posted: Thursday, June 17, 2010 - 04:57 PM UTC
Dave, thanks for the kind words.

Regards the "wet-on-wet" oil painting technique: I really use Mark Bannerman's methods. He gives a great explantion in his Osprey Modelling book, "Modelling Panzer Crewmen of the Heer."

http://www.ospreypublishing.com/store/Modelling-Panzer-Crewmen-of-the-Heer_9781846031328

This is a fantastic little book, and one that I've recommended before. Next to Shep Pain's classic works on figure painting, it's probably the best basic explantion going for "classic" figure painting using oils. Don't be turned off by the title if you're not into Panzer troops: the book is really a great how-to work on oil painting figures, and not just Bannerman's methods. He has several very talented painters demonstrate their styles in well documented step-by-step's.

You mentioned his name, so you might be familer with his methods. If not, here's a short description of what I do based on his technique:

I paint the undercoat acrylic color (here Citadel Bronzed Flesh) and allow that to completely dry. Sometimes I use a lighter acrylic flesh color, like Citadel Elf Flesh or mix the two for some variation.

I then put a wash of burnt umber oil paint over that, and allow it to dry. After drying, this wash might need to be played around with a bit, maybe wiped away here and intensified there. I use ordinary mineral sprits for a thinner in this wash.

Once the wash has dried, I apply the flesh oil color mixed from yellow ochre, burnt sienna, and titanium white in about a 2:1:4 ratio. Add white to get the desired over all tone. Apply this as thin as you can, using very small amounts of paint and brushing it out to avoid brush marks as much as possible. It's almost impossible to use too little.

Here is why the technique is called wet-on-wet: after applying the flesh color, the shadows and highlights are painted on the still still wet basic oil flesh color.

I use a burnt umber for shadows, painting them first, either directly on the flesh coat or by mixing with the flesh on the palet. I then paint the highlights by adding white, again either direct onto / into the flesh color or by mixing on the palet.

Burnt sienna is used for the warm, rosy tones on the cheeks and ears tips. A bit of alizarian crimson goes on the lower lip. Payne's gray is used for the 5 o'clock shadows when desired. These tonal variations are usually painted onto still wet undercoats, but some can done after the basic painting. It just really depends on how each figure is progressing.

Somewhere near the end, I paint the eyes. I add the whites first and then the pupils. I usually have to go back and trim the edges back with some burnt umber. After I get the eyes where I want, I'll add the highlights to the eyelids.

Hair and eyebrows are usually last. I try to blend the edges of the hairlines into the flesh and not leave sharp edges (unless there's a particular reason to do so).

Interestingly enough, Bannerman uses the same basic oil color mixes for his flesh tones as Pain. I don't know if Bannerman perfected the method, but his major departure form the classic figure painting technique is the burnt umber wash to start. By varying the drying time on this wash, you can actually blend it into your initial flesh colors to start the first shadows.

Any hoo... That's what I do and freely give credit and thanks to those who took the time and effort to share their methods and styles. I've learned a bit and borrowed more than a little from them all.

Happy modeling,
Mike
AlanL
Visit this Community
England - East Anglia, United Kingdom
Joined: August 12, 2005
KitMaker: 14,499 posts
Armorama: 11,675 posts
Posted: Friday, June 18, 2010 - 06:58 AM UTC
Hi Mike,

Stunning piece of work on the faces, excellent stuff indeed.

Al
SdAufKla
Visit this Community
South Carolina, United States
Joined: May 07, 2010
KitMaker: 2,238 posts
Armorama: 2,158 posts
Posted: Tuesday, August 03, 2010 - 05:05 AM UTC
Well, it's about time that I up-dated this. I've been diverted over the last month by the usual and not so usual things that come up in everyone's life: holidays, house guests, my camera took a tip without me, I've been trying to get our local AMPS chapter up and running, etc, etc, etc...

Anyways, I have actually managed to fit a bit of model building in the cracks, so here's the latest:

I finally finaished the figures. Not much to say about them that I haven't already posted, so here's an overview of the guys-


I appologize for the depth-of-field issue. The guys in the background are a bit fuzzy, but I didn't catch that when I took the overall picture.

Mike
SdAufKla
Visit this Community
South Carolina, United States
Joined: May 07, 2010
KitMaker: 2,238 posts
Armorama: 2,158 posts
Posted: Tuesday, August 03, 2010 - 05:11 AM UTC
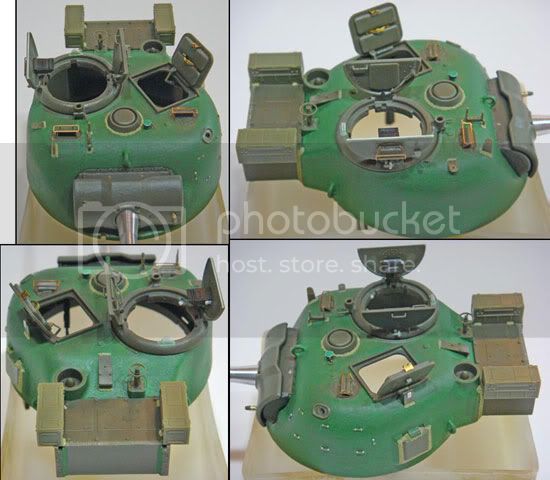
Next up are some views of the finished turret. Again, not much to say that hasn't already been said. The crew stowage boxes on the radio bustle are, of course, the excellent Bronco 25 pdr. ammo boxes. On my model they're attached with Milliput putty "spot-welds."


I intend to add cammo net with Hessian stripping to the turret sides and gun barrel as I move along with the finishing. This will be over some yellow A squadron triangles, which I hope, will still show through the netting slightly. We'll see how it comes together.
SdAufKla
Visit this Community
South Carolina, United States
Joined: May 07, 2010
KitMaker: 2,238 posts
Armorama: 2,158 posts
Posted: Tuesday, August 03, 2010 - 05:19 AM UTC
Here are all of the sub-assemblies after washing in preparation for painting. I simply use luke-warm tap water and few drops of dish washing detergent, scrubbing everything down with a soft water color brush.

I do all of that in a large plastic salad bowl to catch the odd part or two that might break off. I rinse under running water with the sink plugged (again to catch any parts that want to go AWOL).

The whole lot are allowed to air dry. Doing this removes all the sanding dust, steel wool (which I use to clean / buff away scratches, etc), finger prints, oil from tools, etc. I've found over the years that if the model is simply clean, that no special primers are needed for either acrylics or enamels. Plus, all of that dirt will show up in the finish if not removed any ways.

Simple, effective, less detail-hiding paint needed: all good things.


It does take a couple of days for everything to dry out, though. A twist or two of paper towel down in the hatches, turret opening, etc, will wick the water out as it drys.
SdAufKla
Visit this Community
South Carolina, United States
Joined: May 07, 2010
KitMaker: 2,238 posts
Armorama: 2,158 posts
Posted: Tuesday, August 03, 2010 - 05:35 AM UTC
I have actually gotten around to a bit of painting on the tank, proper, too.

Here're the tracks. They the link-to-link, Panda (formerly RHPS) T-62 steel chevron tracks. The Panda tracks are semi-workable, in that they will assemble as a "press-fit" unit and hold tgether to paint and add to the model. But that's about it. They will not take any kind of rough handling.

The detail is great. This is the second se that I've used. The first, a set of T-51 rubber block track, fit together tighter. On this set, the T-62, the end connectors fit a bit looser, so they've been agravating to paint, but not impossible. Also, this set had about 30 of the end connectors mis-molded and un-usable. If I hadn't had the spares from the earlier set, I would have been in trouble.

Also, each track shoe has a small sink hole in its inner face. I filled all of these while the track shoes were still on the sprues using Squadron Green Putty thinned with acetone. The inside faces were sanded when I cleaned the mold lines off the shoes. This only adds a bit of work to the clean-up, but makes a big difference in having those inside faces absolutely flat.

The prototype calls for 83 links per side, but a dry-fit showed that that will be 2-3 links too long, even with the adjustable idler wheel.


I've finished these up to the point where they're ready to install on the model before final weathering. To get to where they are right now, I've:

Painted them overall with Floquel Rail Brown. Given that a wash of Citdel Brown Ink Wash. Over that, they got a selective airbrush of Citadel Bolt Gun Metal, followed by a lighter application of Citadel Chainmail. When adding these bare metal colors, I avoided the outsides of the end connectors and concentrated on the wear surfaces of the track shoe faces, both the inside and outside. I also hit the inside wear faces of the end connectors.

After that had dried, I used a product called Rub-n-Buff, Silver Leaf Color, applied with a bit of a latex sponge make-up applicator. This was done jst down the center of the insides and out sides.

After the Silver Rub-n-Buff, I've added several washes made of artist piments and water using several different colors over each other to vary the appearence and avoid a mono-chrome look. The pigments were fixed, after drying, with Woodland Scenics Scenic Cement. This has a flow-aide incorporated into to it, and it will draw into the dry pigments quite nicely without destroying the look of loose dirt. I just used a small brush to place drops of the cement on the edges of the dried pigments allowing it to flow naturally into them.

About halfway through the pigments, I used a fine brush and added some Boltgun wear on the edges between the end connectors where the drive sproket teeth will contact the track. The last pigment layers were added afterwards to allow a bit of dirt on these wear points, too.

Once the tracks are installed on the tank, I'll carry the last of the tank weathering on to the outsides of the tracks. Before I put them on the tank, I'll also use some dry pigments to dust up the insides of the track. Again, the same colors as I'll be using on the tank will be used for that, too.
Navy95
Visit this Community
Val-drOise, France
Joined: October 03, 2008
KitMaker: 174 posts
Armorama: 173 posts
Posted: Tuesday, August 03, 2010 - 05:55 AM UTC
Mike,

Those faces are just

Really wait to see that one completed with the Firefly
SdAufKla
Visit this Community
South Carolina, United States
Joined: May 07, 2010
KitMaker: 2,238 posts
Armorama: 2,158 posts
Posted: Tuesday, August 10, 2010 - 06:38 AM UTC
In preparation for the basic finish painting and markings, I decided to use reverse masking for the A Squadron turret and rear hull signs and also for the unit codes (FGH = 52 in red square over white stripe). So, here're a couple of pictures of the initial colors and masks:


The white is Tamiya XF-2 and the yellow is Citadel "Golden Yellow" with a touch of "Snakebite Leather" to darken it up a bit. The masks are cut from ordinary blue painter's masking tape.

I will be adding two unit codes on the hull front to replicate the maint / crew adding a second marking because the regulation position will be covered by spare track armor.

After adding these masks, I painted red over the white unit code bars and mask the red squares with more blue painter's tape. (Unfortunately, no photos of this.)

The red was painted on using Polly Scale Model Railroad Color "DTI Cherry Red."
SdAufKla
Visit this Community
South Carolina, United States
Joined: May 07, 2010
KitMaker: 2,238 posts
Armorama: 2,158 posts
Posted: Tuesday, August 10, 2010 - 06:48 AM UTC
I started the basic finish painting with Tamiya XF-52, Flat Earth, airbrushed on the hull bottom, hull sides, and suspension bogies. I also painted the Flat Earth on the insides and rear of the drive sprockets and idler wheels.

This was followed by a scale OD / SCC-15 mixed with 3 parts XF-62 and 1 part XF-60. I sprayed a bit this on the hull sides between the bogies and on the outside faces of the bogies, drive sprockets, and idler wheels.

I followed the basic color with a lighter mix of 1:1 / XF-62 and XF-60. This was sprayed to achieve a "post-shading" effect and to start to break up the monotone large flat areas.


After the basic finish was applied, I removed the masks.

More info on the markings in the next post.
SdAufKla
Visit this Community
South Carolina, United States
Joined: May 07, 2010
KitMaker: 2,238 posts
Armorama: 2,158 posts
Posted: Tuesday, August 10, 2010 - 07:13 AM UTC
To ready for the markings, those places to receive water-slide decals received a spray coat of Floquil Crystal Coat. While this was drying hard (it dries very quickly), I added the unit code numbers using Woodland Scenics and Verlinden dry transfer numbers.

I used a "stencil" style number for the second, field applied unit code on the transmission / final drive bulge to replicate a "hasty job." (These additional unit codes are not universally observed in photos, but I have seen several, most of which appear to be a bit "cruder" - sometimes obviously hand painted. They were used for traffic control, so they were useful to have visible on both ends of a vehicle. I thought it was an interesting addition, anyways....)

The 2CAB signs are from the Ultra Cast Strathconia's sheet (OOP, I believe) as are the tank census numbers (undoubtably accurate for a Strathconia tank). The bridge classification marking is from the Tamiya Cromwell sheet and the radiator coolant notices are from the Tasca Firefly sheet. The 25 pdr. ammo box markings are from the Bronco decals provided with the boxes.

After allowing the decals to dry a bit, I added some additional "pre-weathering" using Liquitex acrylic "stucco texture" mixed with Liquitex "blended fibers" and a bit of static grass.

This was followed with some more earth colors on the lower hull and suspension. This was mixed from 1:1, Tamiya XF-49, Khaki and XF-52, Flat Earth. I followed that with some 1:1:1 Tamiya XF-57, XF-49, and XF-52. These last colors were sprayed onto the high points of the lower hull details ans suspension to achieve a "post shading" effect much as with the basic finish colors.

Once all of the above dried over night, I followed up over the water-slide decals with two more coats of Floquil Crystal Coat. Once this was dry, the entire model was given 3-4 very light coats of Testor's Dull Coat.

The Dull Coat was mixed about 3:2 Dull Coat and Acetone to get a highly reduced mix that was applied using low pressure and high volumn. Dull Coat must be applied "wet" and with as little over spray as possible to prevent the dreaded "clear finish orange peel" which looks like white frosting.


The white air-recognition star was applied using a mask cut using a Stencilit PE template. The mask itself was cut from ordinary blue painter's masking tape. I lifted the edges a bit to get some intentional over-spray and also didn't makk the coverage 100% all in an attempt to get that look of "imperfect" application. The star was painted on before the last earth colors, too.

The markings were added before these last colors to allow some earth tone overspray on the markings as more of the "pre-weathering."
SdAufKla
Visit this Community
South Carolina, United States
Joined: May 07, 2010
KitMaker: 2,238 posts
Armorama: 2,158 posts
Posted: Tuesday, August 10, 2010 - 07:22 AM UTC
In between the color coats and while waiting for things to dry with the markings, etc. I've done some of the detail painting.


The spare track armor for the front hull was painted and finished the same way as the tracks (see the earlier post) but without the silver colors.


I use tooth picks (cocktail sticks) with a bit of masking tape reverse-rolled on the tips to hold small parts while painting them.


The tools were finished by first spraying them with Tamiya XF-59, Desert Yellow for the wood parts. I brush painted the metal parts using Polly Scale Model Railroad Color "Engine Black."

For the wear on the metal parts, I used Citadel Colors "Tin Bits" followed by "Bolt Gun Metal" with a wash of "Brown Ink."

The wood parts were given a wash of artist oil burnt sienna. I allowed the wash to dry, and then added wood grain using more burnt sienna and yellow ochre oil paints.

Once the tools dried throughly, I shot them with Testor's Dull Coat as described above.

Next up, more detail painting, chipping, pin washes, oil paint dot color modulation, and pigments.