_GOTOBOTTOM
Armor/AFV: Canadian Armor
Discuss all types of Canadian Armor of all eras.
Hosted by Darren Baker
Hobby Boss Canadian Leopard 2A6M
kruppw
Visit this Community
Texas, United States
Joined: March 17, 2006
KitMaker: 1,117 posts
Armorama: 1,115 posts
Posted: Thursday, September 16, 2010 - 06:28 PM UTC
Well everyone, I just received this in the mail today.


I have been patiently waiting for this kit to arrive at my doorstep ever since I first heard it was going to be released by Hobby boss. I have to say it was worth the wait, it may not be up to standards with Tamiya or some of the after markets kit available. Still it is a nice kit and can hold its own ground. Upon opening the package, I notice the Leopard box is rather large, more in lines with some of the newer kits being released by Dragon. Once opening up the lid, the box is jam pack full of parts neatly individual wrapped in plastic bags. The box does not state how many parts are in the box, but this is what you get

15 plastic sprues
1 upper hull
1 lower hull
1 upper turret halve
2 sets of polly caps
2 set of vinyl tracks
3 set of photo etch parts
1 length of string
Decals
Pre-punched clear accent
1 set of soda boxes
1 set of MRE boxes
Directions
Color guide


All the parts were nicely packed into the box with only one part broken off the sprues. Not bad considering the shear amount of plastic sprues in the kit. The upper hull even comes in its own cardboard box for whatever reason I cannot figure out. At least Hobby boss was thinking about shipping and handling as most parts get broken off from crappy packaging. Over all the molding seems to be nice with just a bit of flash on some parts. Nothing too serious that a knife cannot handle. Some of the parts are not quite crisp as Dragon or Tamiya. Still it is a nicely done kit to add to the collection. It would appear this is a re-boxing of some of their earlier Leopard kit with some additional parts to model the Canadian version. The bar armor is just a bit thick, but one cannot really complain as this is done in plastic instead of photo etch. I just wish that Trumpeter or AFV club would follow suite and make a plastic set of birdcage armor for their Strykers. I know this would be a great set to have as many people are like me and not very fond of photo etch parts.

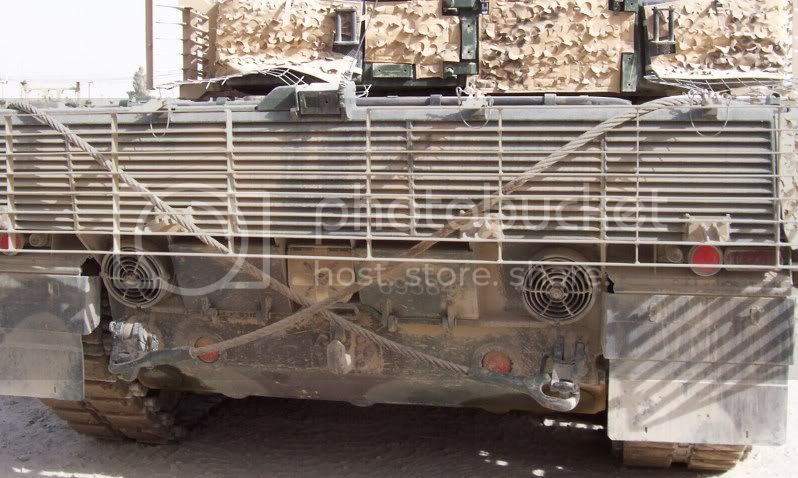
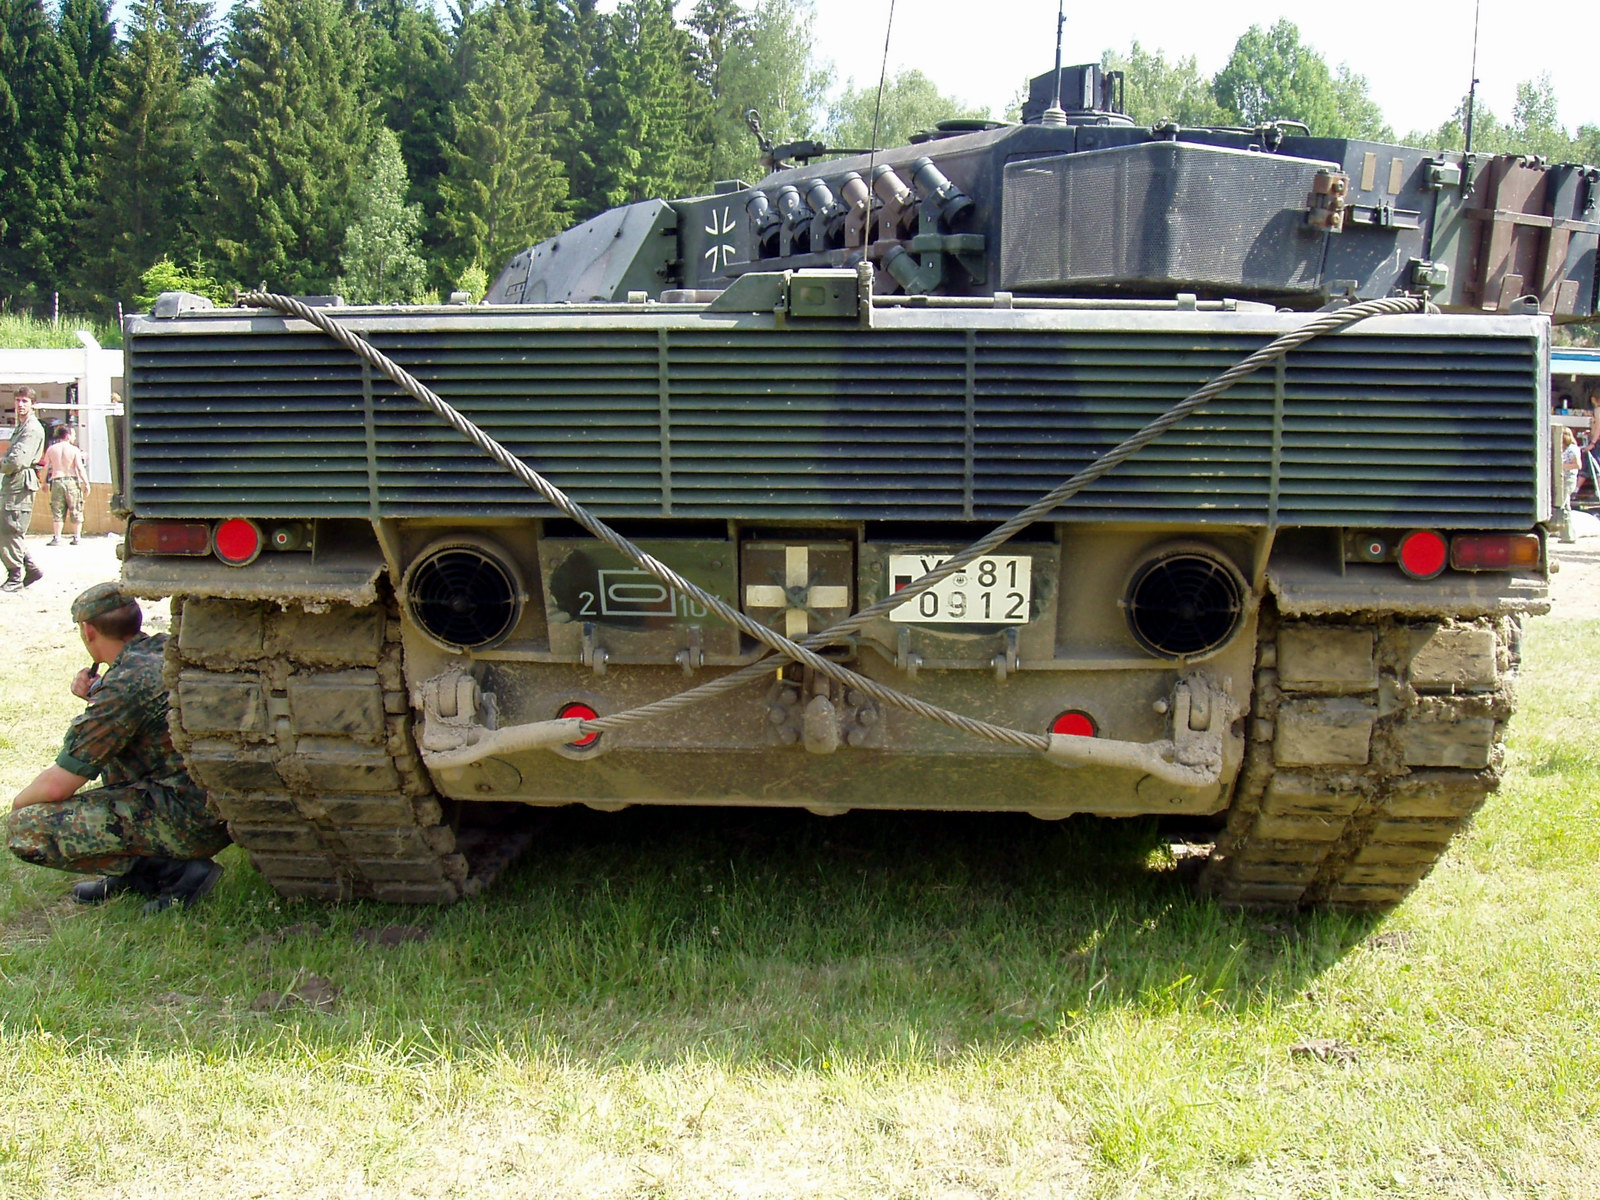
So far, I have notice one thing wrong with the directions and a weird oddity on the painting guide. First there is a shield like thing on the lower rear hull with a white cross made from photo etch parts. It would appear the directions do not even call out the construction of this part, but every photo of the real tanks shows it. Maybe it is just something the company over looked on the directions. Anything quirk with painting guide was there seemed to be some sort of remote AAMG mount on the turret. Hoping to find something in the kit to make this weapon, but nothing turned up at all. Maybe it is a later release or something. I am not an expert on Canadian armor or the Leopard series tank so I cannot vouch that this weapon system even exists. Another thing is I cannot even comment on the accuracy of the kit as I have nothing to scale it against or any documentation on the real tank. So far, I have not been able to find any other problems with the directions yet as I still have to start construction. I plan to build this straight out of the box to comment on the build and compare to other built models on the web. This should be a fun and interesting build to add to my collection, more to follow very soon.
Chris


Hisham
Visit this Community
Al Qahirah, Egypt / لعربية
Joined: July 23, 2004
KitMaker: 6,856 posts
Armorama: 6,363 posts
Posted: Thursday, September 16, 2010 - 11:17 PM UTC
I'm very interested in this kit.. especially the slat.

I hope you will be showing pics of the build

Hisham
dvarettoni
Visit this Community
South Carolina, United States
Joined: September 28, 2005
KitMaker: 778 posts
Armorama: 763 posts
Posted: Thursday, September 16, 2010 - 11:29 PM UTC
chris this look like it will be fun i have had fun with HB and i'm going to watch this build dave
sauceman
Visit this Community
Ontario, Canada
Joined: September 28, 2006
KitMaker: 2,672 posts
Armorama: 2,475 posts
Posted: Friday, September 17, 2010 - 02:15 PM UTC
Can't wait for this one for sure!

Just checked my LHS and they are not in yet although I got my name on the reserve list


cheers
OatmealSavage
Visit this Community
Ontario, Canada
Joined: March 06, 2010
KitMaker: 14 posts
Armorama: 12 posts
Posted: Friday, September 17, 2010 - 02:59 PM UTC
Just picked up one myself and will be following your build. I can certainly agree with your description of the kit. I plan on an OOB build as I too, have a love/hate relationship with PE. Looking forward to the build Jim
kruppw
Visit this Community
Texas, United States
Joined: March 17, 2006
KitMaker: 1,117 posts
Armorama: 1,115 posts
Posted: Friday, September 17, 2010 - 03:39 PM UTC
Thanks for following everyone, I plan to post some photos tomorrow. I already have the lower hull built up and did not run into any problems in that area. I also started to built the upper hull and there were some fit issues I will go into detail with. One thing about the kit is, there is alot of injector pin marks all over the kit, but at least there on the back side of parts and won't be seen. Again I plan to post some progress tomorrow as I need some comments on some parts since I'm not too sure with what hobby boss has done.
Chris
ahueger
Visit this Community
Nordrhein-Westfalen, Germany
Joined: December 01, 2001
KitMaker: 217 posts
Armorama: 214 posts
Posted: Friday, September 17, 2010 - 11:21 PM UTC
Hi Chris,

it's the Tarnkreuz, used to make column travelling (at night) easier ...
All Leo's have that, right.
and That Leo will be my next Leo purchase, so I'll follow up on your build closely ;-)
Andreas
kruppw
Visit this Community
Texas, United States
Joined: March 17, 2006
KitMaker: 1,117 posts
Armorama: 1,115 posts
Posted: Saturday, September 18, 2010 - 05:18 AM UTC
Okay as promised, here are some in progress shots of the model so far. The directions have you start with the lower hull typical of most manufactures; this area was relatively free of any problems. First, I mounted the return roller supports; there are some injector pin marks that need to be sanded down just a bit before gluing to the side of the hull. Next up were the shock absorber mounts, just a simple scrape of a knife to get rid of the mold lines and they were popped in place. Next step was the drive sprocket mount, nothing serious here, just cut and glue in place. After that, the two idler arms were next to install. The detail on these parts are not too bad, just a simple mold line to sand down, the mounting location was positive thanks to small tabs in the side of the hull. I then tackled the road wheels arms, there is seven altogether. There is however an injector pin mark on the back of the part that needs to be sanded down some, but at least it will not be seen from the outside. I do not have them glued in place yet as I plan to do a simple base and want the tank to sit on uneven ground. The arms how ever do have a good location and just a hair of movement so the model should sit level on the ground. Here were I begin to wonder about Hobby Boss if they had plan to make this model when they first released the leopard tanks. The lower hull had four locations holes that need to be drilled out for the belly armor. Either that had planned to release this version later or they just made a new hull, but some how I do not see them doing that, as it would be easier to re-package an already existing kit. From here the direction, have you working on the lower rear hull plate. This part is not bad, but a little simple in detail, the exhaust seems to be a little think for the grill cover, maybe a photo etch part will do better justice for this. The next parts to install are the towing hooks and pintle; I have to say these parts suck. First the pintle does not even look like the pictures I have seen, just a chunk of plastic in a C-shape form with no details and a injector pin mark on the side. The towing hooks look like they belong on the short bus, there molded as a solid piece and stick straight out. It would have been better if the company produced them as two separate piece so the modeler could position them any way they want. After the panel in glued on, a seem needs to be filled on the side of the hull, nothing to serious a little putty could not handle. Once all side and down the belly armor was next, this just went in place with no problems.


sauceman
Visit this Community
Ontario, Canada
Joined: September 28, 2006
KitMaker: 2,672 posts
Armorama: 2,475 posts
Posted: Saturday, September 18, 2010 - 06:42 AM UTC
Definately soft on details.


cheers
kruppw
Visit this Community
Texas, United States
Joined: March 17, 2006
KitMaker: 1,117 posts
Armorama: 1,115 posts
Posted: Saturday, September 18, 2010 - 06:56 AM UTC
Hey thanks for the picture rick. I've just notice a few flaws with the HB kit.
First the two doors next to the exhaust are not the correct shape or size. The other thing is, were the formation shield is to mount, HB has a weird angular box like thing for the shield to mount onto. But thing again I can not really complain as I only paid 23 USD through Lucky Model.
kruppw
Visit this Community
Texas, United States
Joined: March 17, 2006
KitMaker: 1,117 posts
Armorama: 1,115 posts
Posted: Saturday, September 18, 2010 - 07:10 AM UTC
Everyone, I just did some research and the rear lower hull plate matches up with a STRV-122. It would seem they did not even bother to put the correct part for the German Leopard or even the Canadian verison. I guess if you are going to build an accurate model, you will need to do some scratch building to correct this problem.

STRV-122


German Leopard / Canadian

[imh]
http://i744.photobucket.com/albums/xx88/kruppw/DSC01719.jpg?t=1284826659[img]
kruppw
Visit this Community
Texas, United States
Joined: March 17, 2006
KitMaker: 1,117 posts
Armorama: 1,115 posts
Posted: Saturday, September 18, 2010 - 10:01 AM UTC
Okay, I have now moved onto construction of the upper hull and here were problems begin to pop their heads up. The first step in the assembly has you drill out three location holes for the bar armor support brackets. Instead of the holes drilling through the upper deck of the hull, the drill bit open up on the edge of the plate for the fuel tanks.


Next was to sand off some of the non-slip tread areas on the front hull. Really no issue here other than the fact I think the treads are rather thick. From here, the driver’s hatch and front mud flap are glue in place. I had to do some cleaning around the edges of the flaps since there is a nasty mold line on them. In addition, I am not happy with the two position lights on the flap as they are chunky and hard to tell their lights under the protective cage.


The rear panel for the engine deck also has some hole to be drilled out before attachment. I would recommend that you hold off attaching this piece until the side panels J2, J5, and H3 are in place so the rear panel can align up with the sides, as this is no positive location for this part. Now here is my biggest problems has come so far, the three panels just mentioned for the side have a nasty seem the runs the whole length of the especially around J5. One thing I have notice about this kit is the lack of weld seems, I would assume there be some on this tank, but being no expert on the subject, I can not say for sure. If someone could chime in and as I plan to hide the seems with welds, it would seem logical in this area for them.


Part D15 is glued in place just behind the driver’s hatch and this has a nasty seem all around the part. Not sure if this should be filled in and flush with the rest of the hull.


Last thing I have done so far is to install a rather large panel to the front of the hull, which I can guess as being some sort of armor package. This just needed some slight sanding from the underside since there is a lot of injector pin marks all over it. So far, this is a solid kit with areas to be addressed, but should build up into a model that looks like the real thing. There an area up on the engine I am not too happy with so far and would probably fix and the next go around. The two dome like intake the sit towards the front of the deck that looks like bottle caps. This should have a mesh screen around it, which HB did not even try to make.


sauceman
Visit this Community
Ontario, Canada
Joined: September 28, 2006
KitMaker: 2,672 posts
Armorama: 2,475 posts
Posted: Sunday, September 19, 2010 - 12:40 AM UTC
Maybe someone should send a letter to Hobby Boss. All they have to do is include the proper rear hull from their 2A6 kit.


cheers
sapper25
Visit this Community
Colorado, United States
Joined: October 17, 2009
KitMaker: 12 posts
Armorama: 11 posts
Posted: Sunday, September 19, 2010 - 03:53 AM UTC
Greetings fellow treadheads!!! Thanks so much for posting up the recon on this kit. As you point out some flaws, I wonder how much and hard would it be, to throw the needed parts on the Tamiya's A6???? The Echelons tan camo nets would be the bees knees on this kit would it not???
ESSAYONS
Wes
gcdavidson
Visit this Community
Ontario, Canada
Joined: August 05, 2003
KitMaker: 1,698 posts
Armorama: 1,563 posts
Posted: Sunday, September 19, 2010 - 04:23 AM UTC

Quoted Text

, I wonder how much and hard would it be, to throw the needed parts on the Tamiya's A6Wes


What he said.

Thanks for the build log. The HB kit is definitely living up to my expectations.
kruppw
Visit this Community
Texas, United States
Joined: March 17, 2006
KitMaker: 1,117 posts
Armorama: 1,115 posts
Posted: Sunday, September 19, 2010 - 04:57 AM UTC
Thanks everyone for following this build. The kit is not bad, but does have it's issues that need to be fix. This tank kind of reminds me of some of trumpeter's earlier, like their Japanese IFV . Overall look of the real thing, but lots of flash, crapy mold line, and fit problems. Do I feel this kit is worth 35+ USD in the states....................NO. I would of be mad if I paid full price for this, but I got it through Lucky Models with a bunch of other kits, so that at least makes up for it. As far as using this kit with Tamila's Leopard, I don't see why you couldn't, just as long as you can get it for a good price. I don't know if the bar armor will fit the kit, but this part of the kit is very nicely done. So far I'm disapointed with this kit as I just built and posted their ZLC-2000 on this sight a while back and was very pleased with the kit's out come.
sauceman
Visit this Community
Ontario, Canada
Joined: September 28, 2006
KitMaker: 2,672 posts
Armorama: 2,475 posts
Posted: Sunday, September 19, 2010 - 10:22 AM UTC
This kit is best used to install the the Barracuda cam LOL.


cheers
haribeau44
Visit this Community
Nordrhein-Westfalen, Germany
Joined: August 01, 2006
KitMaker: 129 posts
Armorama: 113 posts
Posted: Sunday, September 19, 2010 - 10:41 AM UTC
Hallo, Christopher,

I follow your build with great interest and sympathy!

Here is a fine tip for making weldseems:

https://armorama.kitmaker.net/forums/161991&page=1

Harald
kruppw
Visit this Community
Texas, United States
Joined: March 17, 2006
KitMaker: 1,117 posts
Armorama: 1,115 posts
Posted: Sunday, September 19, 2010 - 11:13 AM UTC
Thanks Harald for that idea. I started to fill in the gaps with super glue to sand down, but with the seem running the whole length of the hull, it's going to take too long to do.

Great idea Rick, just use some camo nets to solve all the problems with the seems. After all the pictures I have seen of this tank in afganastan show nothing but nets all over. Hell while I'm at why don't I just cover the thing in mud and make it look like it just went through a mud pit LOL

It's not that I'm complaining about the kit, it's nice to see someone release this model for once, it's just not worth the price for it. I haven't built tamiya's leopard, but still has to be light years ahead of this offering. Someone can pick up tamiya's for about 40, plus slats for 25, and then what ever aftermarket kit for the a/c units and now it's 60-80 for the whole deal. Or you could pay the 40 through one of the dealers I use all the time and pull you hair out. But at the same time the plastic slats are a real nice plus, so I guess it's a reall toss up.
recceboy
Visit this Community
Alberta, Canada
Joined: July 20, 2006
KitMaker: 706 posts
Armorama: 665 posts
Posted: Sunday, September 19, 2010 - 03:47 PM UTC
Looking forward to the build, I have 2 in the mail. If you have any questions on the" Canuck kitty" feel free to PM.

Anthony
kruppw
Visit this Community
Texas, United States
Joined: March 17, 2006
KitMaker: 1,117 posts
Armorama: 1,115 posts
Posted: Sunday, September 19, 2010 - 04:11 PM UTC
Thanks Anthony, I'm defiantly going to have to hit you up on that offer as I have some question on the reat tank. I'll be posting some more progress tomorrow as I just started to work on the turret tonight. This area has some headaches to address for everyone, some things to watch out for.
Chris
kruppw
Visit this Community
Texas, United States
Joined: March 17, 2006
KitMaker: 1,117 posts
Armorama: 1,115 posts
Posted: Monday, September 20, 2010 - 11:37 AM UTC
Here are some more updates on the Leopard. So far, I have completed the hull minus slat armor and the side skirts as those will be built up further when I get ready to start painting things, as I want to paint everything separate. Once the gaps on the side of the hull have been filled, the rest of the construction went fast with just a few areas to watch out that I will show you. I filled the gaps in with evergreen plastic rod and made the welds with a soldering iron, the welds may not be correct, but it was the fastest and easiest way to correct this problem. On the lower rear hull, I shaved off a part and made a small support for the formation shield that is not called out in the directions. It would have been nice if HB provided the correct hull part, instead everyone is going to have to correct this problem with either some scratch building or find a replacement part. Also in this area, one thing I am not too impressed with is the rear-facing camera for the driver, there is no detail that even looks like a camera and will need some extra parts to fix this.


Up on the front of the hull where the ice cleats are mount next to the towing hooks has two raised tabs that need to be removed in order for the parts to sit flat against the hull. The cleats themselves also suffer from some inject pin on the face and will be difficult to fill in. The headlights lack detail and seem to be soft, if I were to redo this kit; I would drill them out and fill it with epoxy glue. The spare tracks were another area to watch out for. First, the tracks themselves suffer from injector pin and suck on detail. I replaced them with tracks from an Italian MBT which not the correct type of tracks but I like the detail on them better. One part that is not called out in the direction, but is included in the kit is the mounting bracket that holds the tracks to the hull. The box art shows this piece, but nowhere in the directions is it shown.


Once all this was completed, the rest of the tools and equipment are glued in place then the two halves can be glued, which fits like a glove almost.


From here, I moved onto the turret, mostly fit issues with this step. There is two inject pin marks that need to be fill on the side panel with the coax gun before the turret is glued together. The bustle rack had some design flaws in it and I had to trim parts off to fix this. Part E15 needs just one of the side tabs removed in order for it sit flush with the sides of the rack. Part E14 has a small location tab the needs to be removed from the part. In addition, part E10 needs one of the sides sanded down a bit, once E10 and E14 are joined together that parts can be shifted to sit even with the side of the turret. If not, one side of the rack with over hangs the turret side.


Overall, one thing I have notice is the lack of non-slip coating on top of the turret, defiantly something people are going to have to replicate on a accurate model. I also glued down part D22 for the commanders hatch and this part is going to need some real work. The part has support that sits in between the periscopes that do not reach all the way down to the top of the turret. In addition, the base for the CITV does not sit flush and has an angular gap that needs to be shimmed with plastic to sit level. Beyond that, so far everything seems to be going good so far. Just minor issue to correct, but I think with a lot of TLC and some aftermarket parts, this kit could be a nice model.


sauceman
Visit this Community
Ontario, Canada
Joined: September 28, 2006
KitMaker: 2,672 posts
Armorama: 2,475 posts
Posted: Tuesday, September 21, 2010 - 07:34 AM UTC
Are you planning to use the Barracuda cam?


cheers
kruppw
Visit this Community
Texas, United States
Joined: March 17, 2006
KitMaker: 1,117 posts
Armorama: 1,115 posts
Posted: Tuesday, September 21, 2010 - 08:54 AM UTC
Hey Rick, I'm leaning towards probably not on the camo net. I've been talking to Anthony about possible painting idea and descide to do this straight from the box. I feel the nets would hide all the details on the kit even though I hate painting the nato tri-color. I do plan to do another leopard build later down the road with all the cool aftermarket parts to been it up to 2010 standards with the C6 gun instead of the MG3 and lots of camo nets. First I just want to build this kit up to show everyone and have you Canadian guys nit pick it more or less.
7Samurai
Visit this Community
Ontario, Canada
Joined: June 26, 2010
KitMaker: 3 posts
Armorama: 2 posts
Posted: Tuesday, September 21, 2010 - 03:21 PM UTC
There are some pretty awesome videos of this tank in motion on U Tube. When (not if) I build it, the Barracuda net is going to be on the want list. Need to keep an eye out for aftermarket items.

One video that shows off some close up details is:
Afghanistan Canadian Forces in action Leopard 2A6M ! - Badger Kodiak PionierPanzer

There is in particlar a nice fade out at about the 4m 30 sec mark.
 _GOTOTOP