_GOTOBOTTOM
Armor/AFV: Axis - WWII
Armor and ground forces of the Axis forces during World War II.
Hosted by Darren Baker
DML #6520 StuG IV Early to Late Version
SdAufKla
Visit this Community
South Carolina, United States
Joined: May 07, 2010
KitMaker: 2,238 posts
Armorama: 2,158 posts
Posted: Sunday, January 30, 2011 - 02:43 AM UTC
Hi all,

Our AMPS club, AMPS Central SC, has been working on a group-build for the past few months, and I thought that I'd post some WIP photos and descriptions of my project.

The idea of the group-buld is for everyone interested to build the exact same kit and use that as a way to discuss tips and different building approaches. I have to give credit for the idea to the AMPS Atlanta chapter. They've been doing such builds for quite some time, and they were happy to share with us how they organize things - So, a big shout out to our friends there:

AMPS Atlanta Homepage

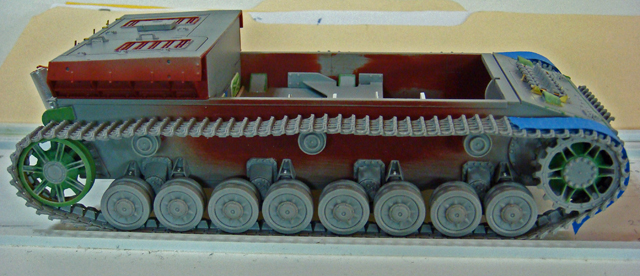
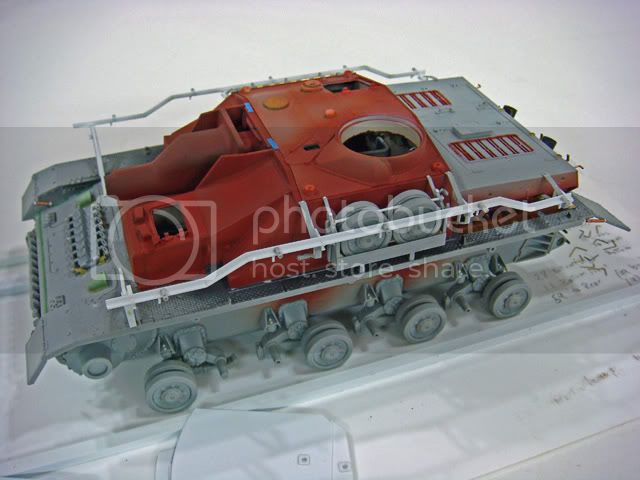
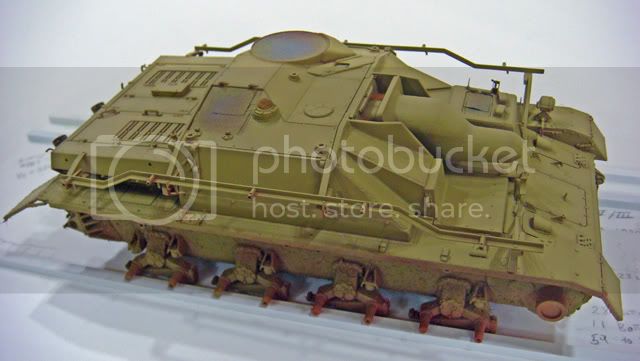
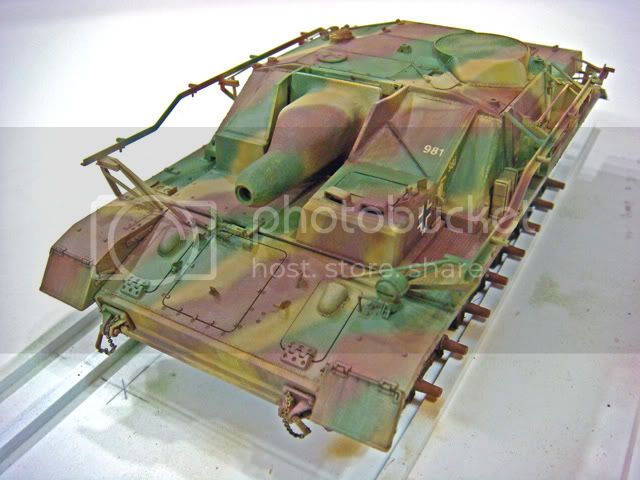
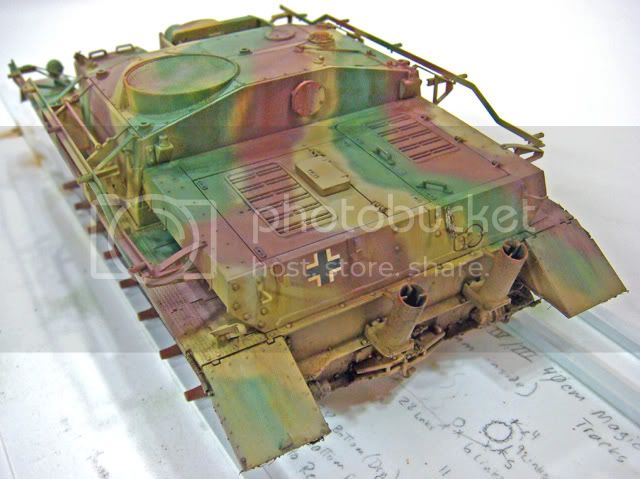
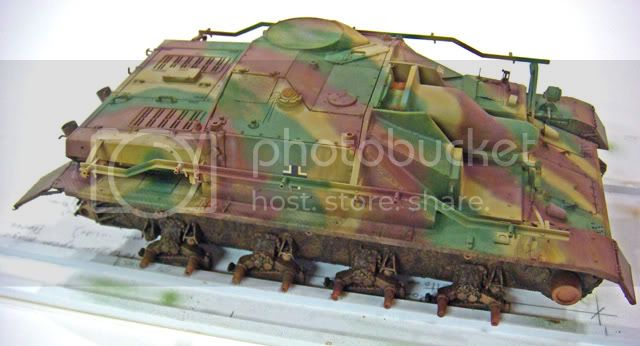
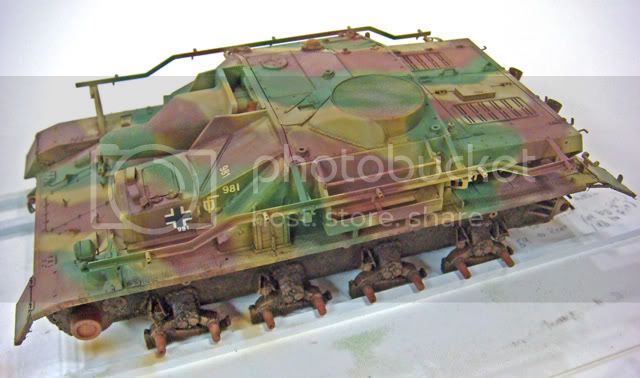
So, our project kit is the DML #6520, StuG IV sd.kfz. 167 Early. This is the kit that was recently re-released with molded on Zimmeritt. Out of the box (if you add the Zimmeritt) the kit represents one of the first 100 or so production vehicles, say up to about Feb '44. There is actually a front fender option that narrows this production window down to one of the very first 30 vehicles produced in Dec '43-Jan '44. The kit is very typical of newer DML offers - That is, it's very nice, has 40cm Late Magic Tracks and some PE and other metal enhancements (ex: die cut metal Schurtzen), and fewer than the usual number of mistakes or confusing instructions. Actually, the instruction problems are mostly with ommisions of information or explanations of options rather than actual mistakes.

The kit has been reviewed here on Armorama and other places, and as has been pointed out, the only real ommision to an accurate kit is the lack of Zimm which was put on all of the StuG IV's that could be built from this kit OOTB. The newer kit with the Zimm has also been reviewed, but about half of all StuG IV's were produced without Zimm. This change in production occured in Sep '44, and starting as early as Feb or Mar '44, there were other changes to the StuG IV that are not possible with the kit as boxed by DML. So, both kits, while very accurate, really are rather limited in their historical context.

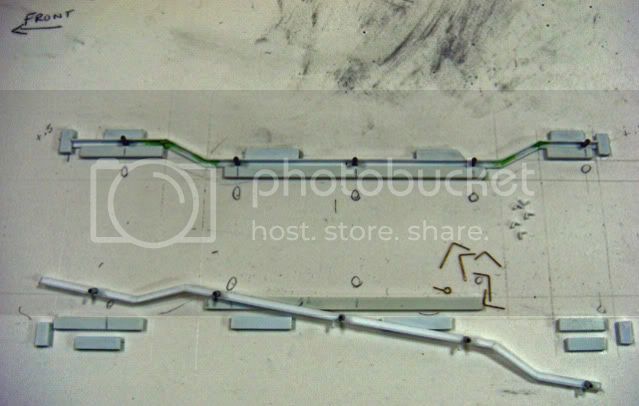
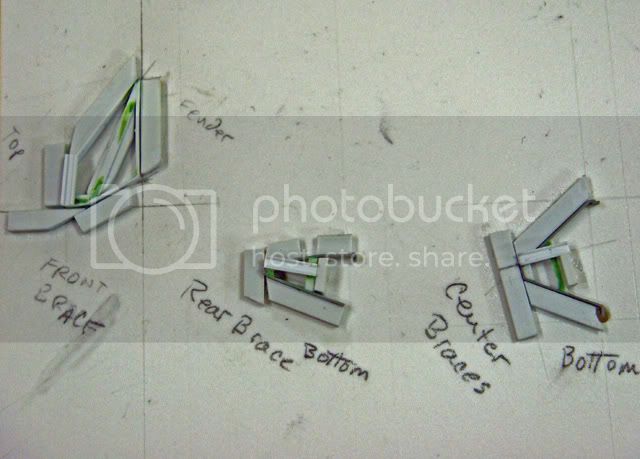
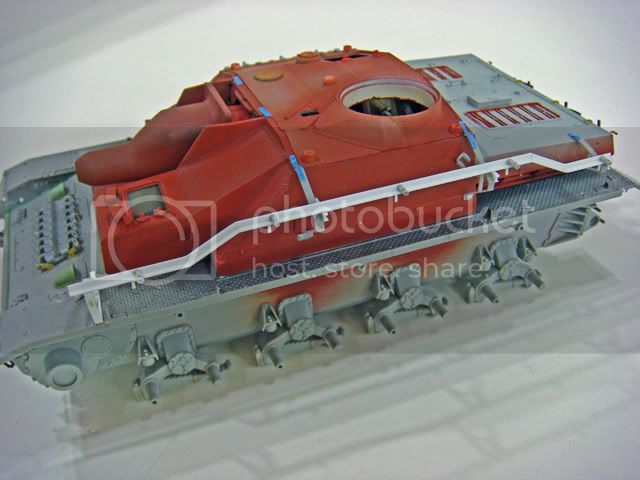
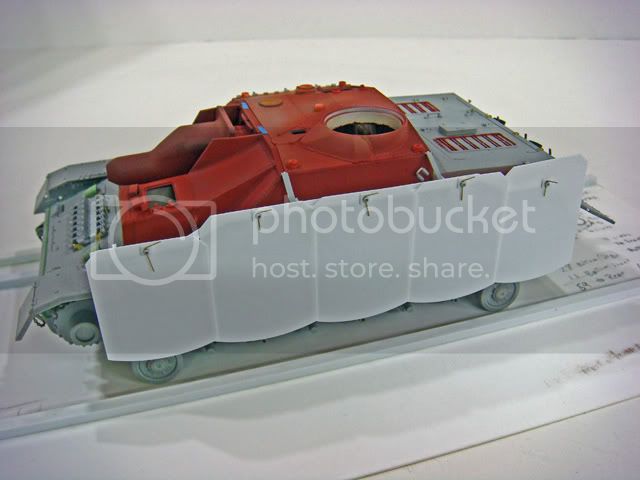
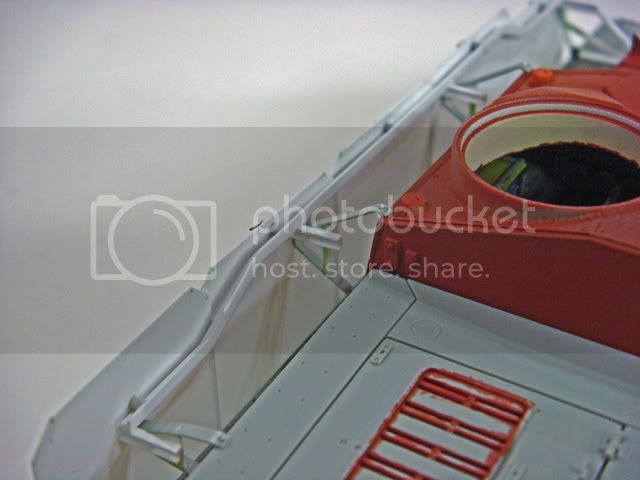
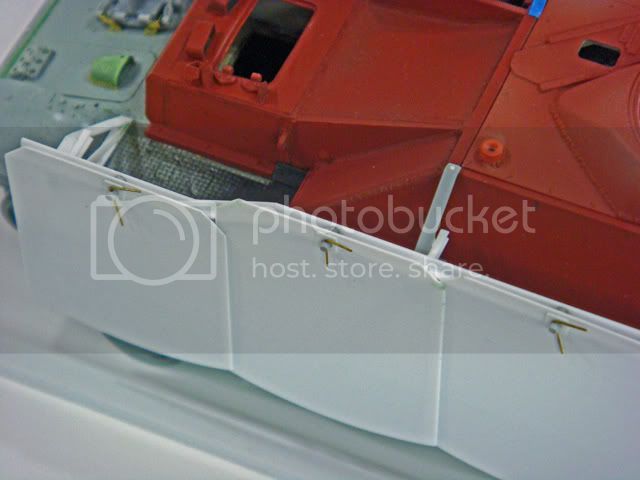
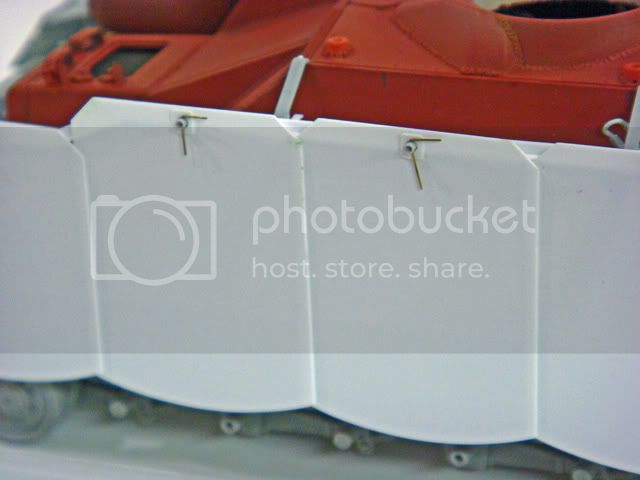
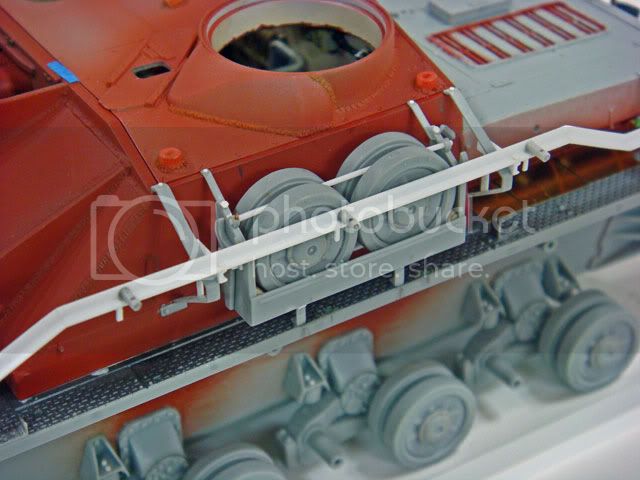
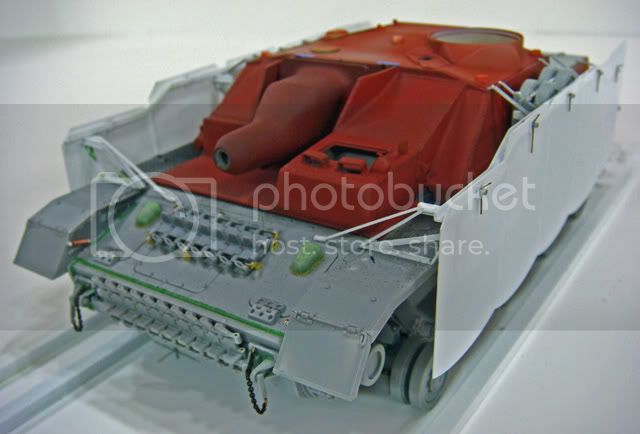
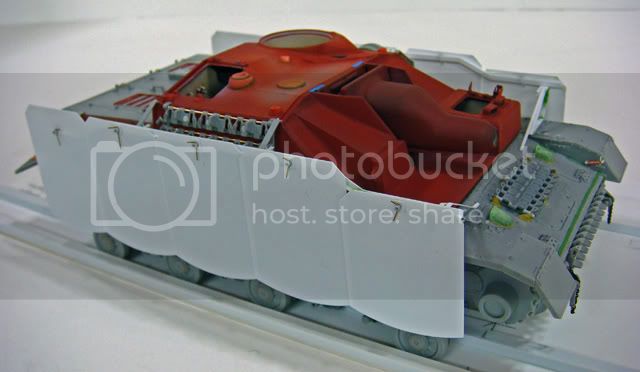
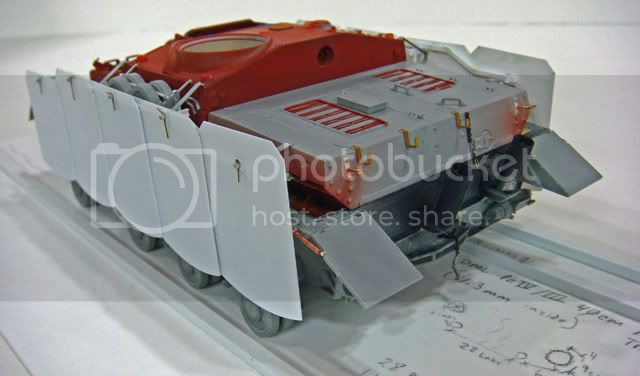
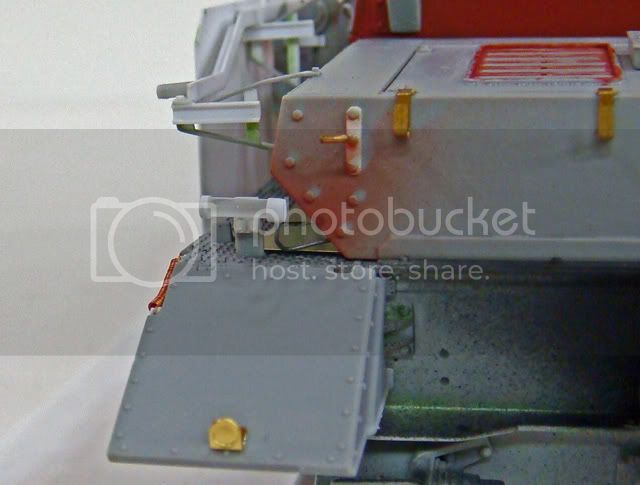
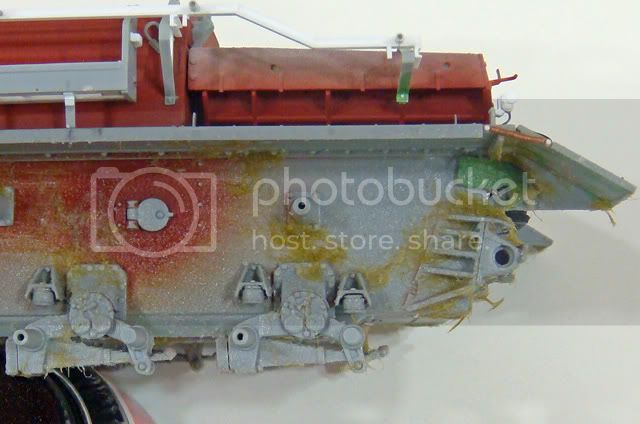
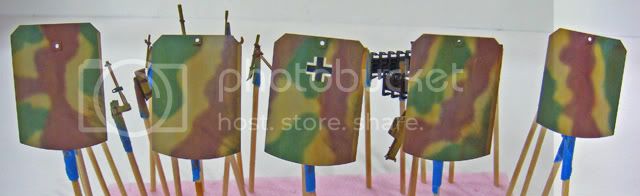
I originally wanted to build a StuG IV perhaps in a Normandy setting, but wasn't really satisfied with the amount of information that I could find and verify on the units issued with them at that time and place. As my research continued, my choices of vehicle subjects kept getting later and later until I finally found some photos of StuG IV's with very interesting "swinging" Schurtzen that was hung from single-point pivots. If I wanted to build one of these, though, I'd have to modify the DML kit to include all of the up-dates and changes introduced into the production run.

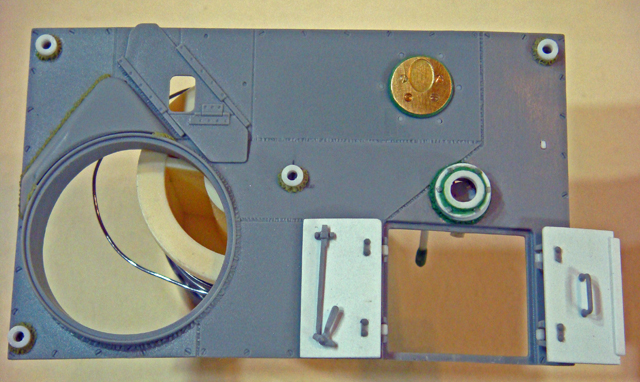
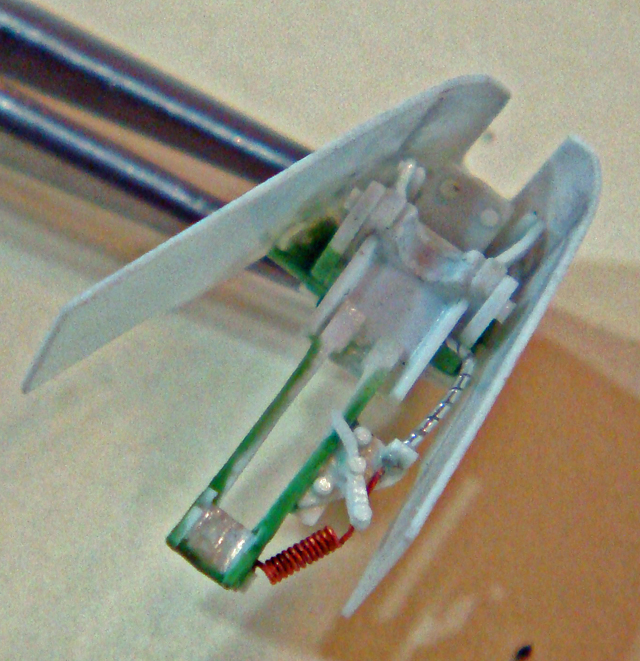
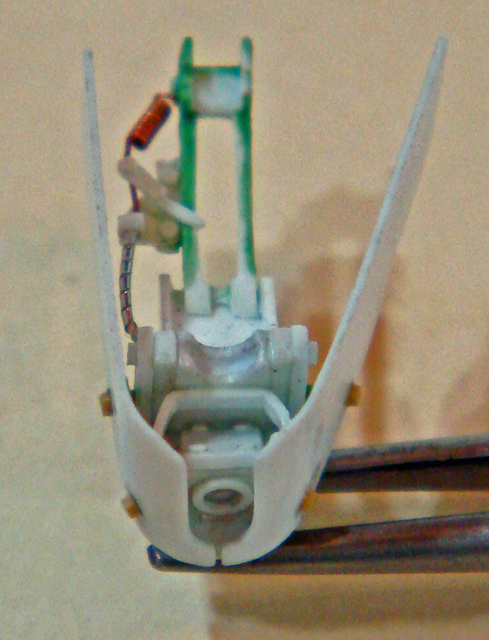
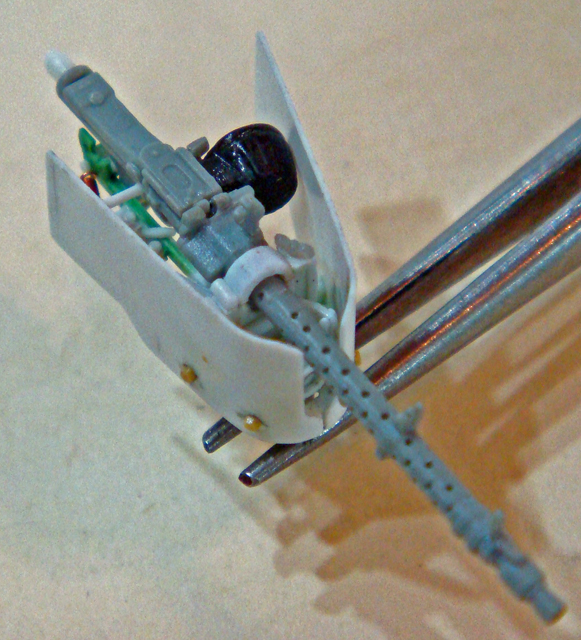
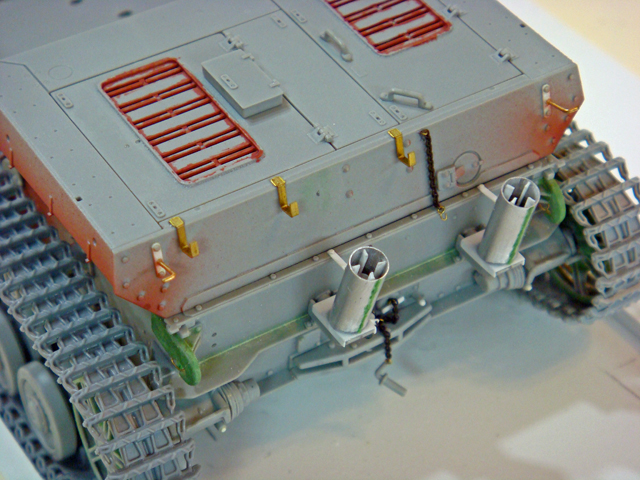
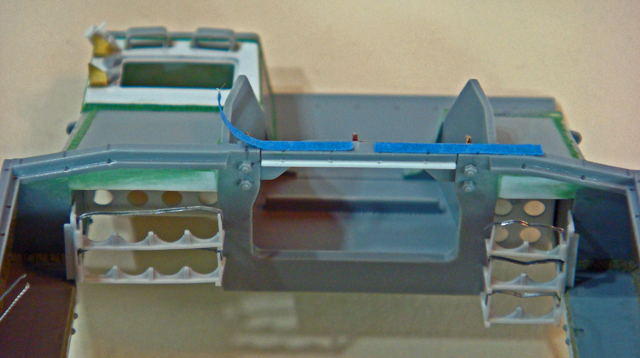
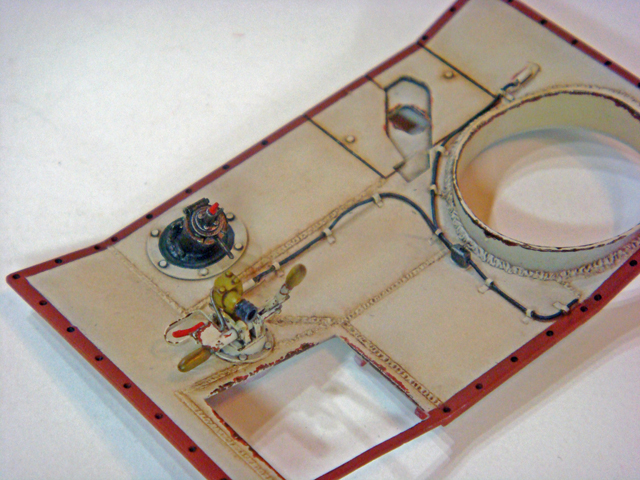
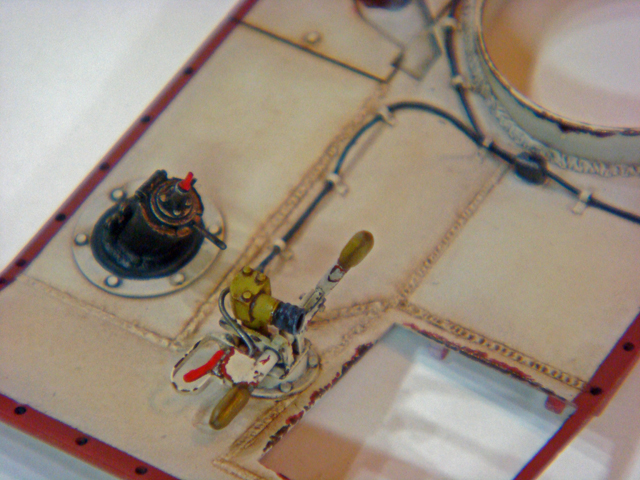
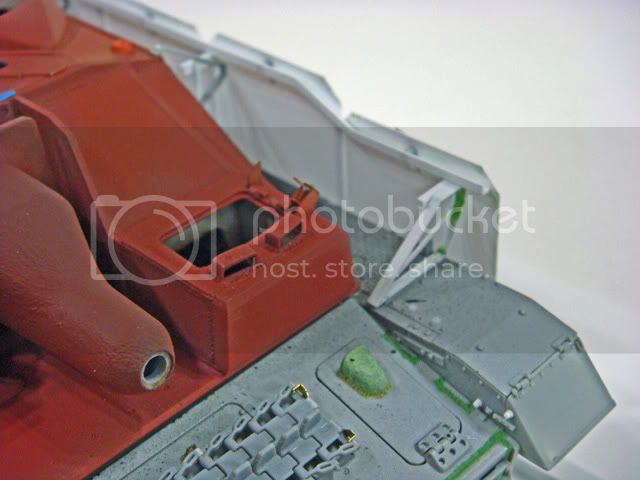
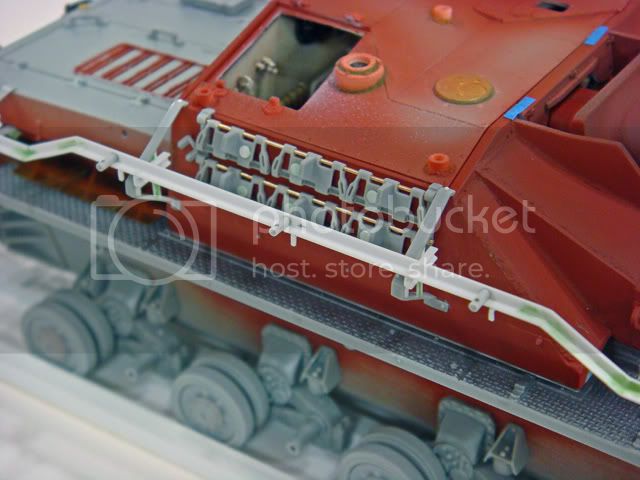
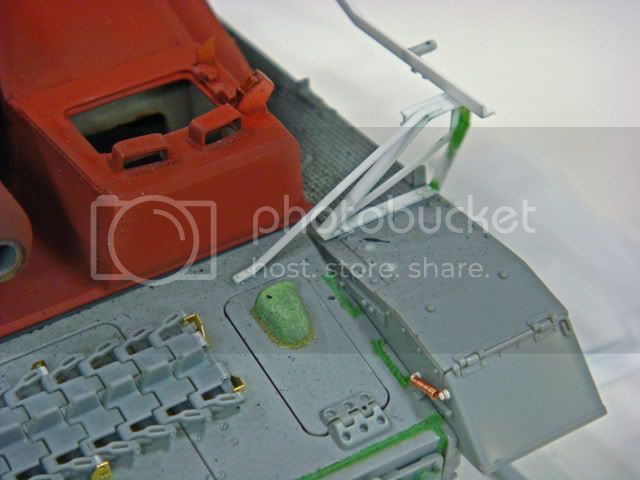
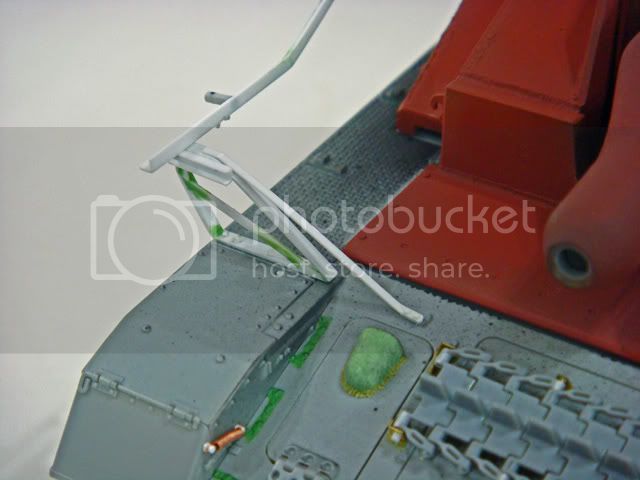
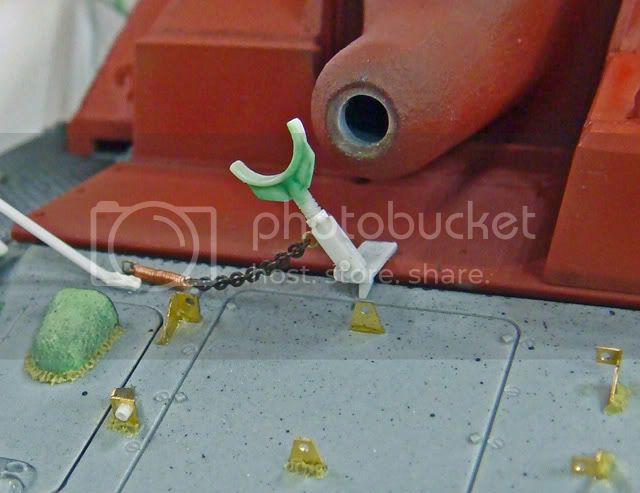
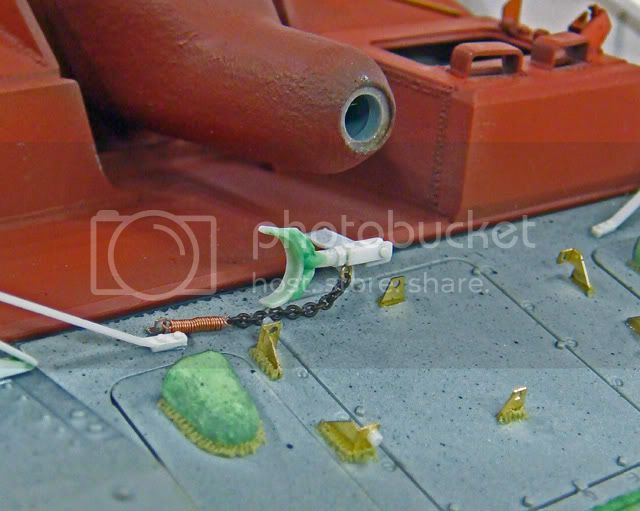
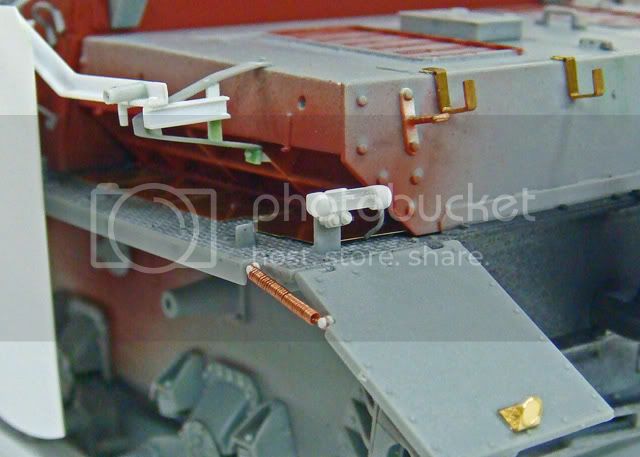
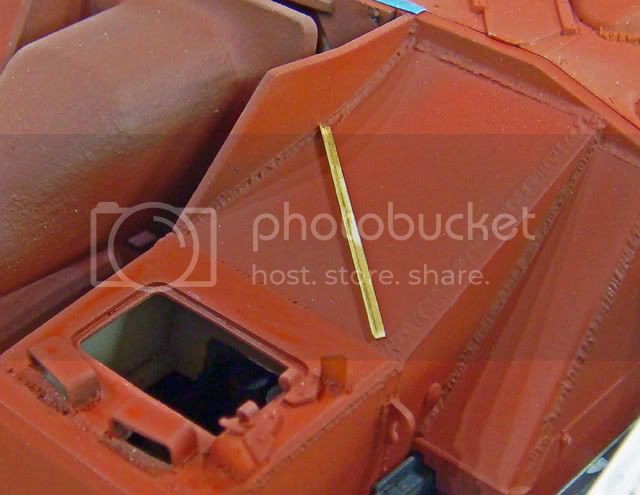
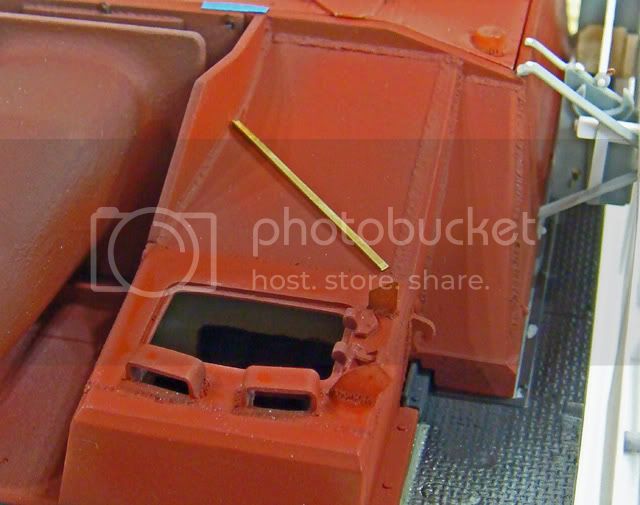
The first change in design was a modified driver's hatch and periscope arrangement. This change was made pretty early in the production run, maybe as early as late Feb '44, so this was one of the the first changes I made on my kit:


The new layout used a rectangular hatch and changed the angles on the periscopes. I sanded the kit hatch down to nothingness leaving the molded on hinges. I cut out the hatch opening and did the same with its details. The hinges were then transferred onto new parts cut from styrene sheet with the welds restored using Squadron Green Stuff and Milliput epoxy putty.

More to follow.
SdAufKla
Visit this Community
South Carolina, United States
Joined: May 07, 2010
KitMaker: 2,238 posts
Armorama: 2,158 posts
Posted: Sunday, January 30, 2011 - 03:37 AM UTC
The next changes were to the fighting compartment roof. The StuG IV was modified in parallel to the StuG III ausf. G, so any changes in the StuG III were applied to the StuG IV. This makes finding information about the changes a bit easier. StuG IV specific references are a bit thin, but the StuG III is well documented.

(The StuG IV chasis and automotive systems were, on the other hand, modified along with the changes in the Pz IV ausf. H-J.)

In the Summer of '44, the Nahverteidigungs Waffe (close-defense weapon) and Rundumfeur MG (remote-control MG, but literally - "all around firing MG") were added to the StuG fighting compartment along with the Pilsen (mushroom) mounts for the self-repair crane. The remote-control MG demanded the layout of the loader's hatches be changed from front-to-rear to side-to-side opening. The Pilsen layout originally called for 3 mounts which was later changed to 5. (I modeled the later 5-mount layout.)


As with the driver's hatch, the kit hatch details were added to new sheet plastic hatches. On the roof, though, I had to make new hinges since the kit hinges were molded on the roof and fighting compartment rear wall.

The close-defense weapon is a left over PE part from "On the Mark Models" with "Voyager" brass slotted screw heads.

I also scratched up a remote control MG. I had originally thought to use one from an old "Italeri" Hetzer kit in my stash, but the Hetzer kit part was very inaccurate and it was simpler to scratch-build the MG than correct the kit part.


The MG is the DML kit part with the butt stock removed and the buffer and a 50-round magazine added.

I also scratched up the interior parts of the two weapons. These details are largely visible through the loader's hatches, and I felt they were worth the effort to add.


More to follow...
SdAufKla
Visit this Community
South Carolina, United States
Joined: May 07, 2010
KitMaker: 2,238 posts
Armorama: 2,158 posts
Posted: Sunday, January 30, 2011 - 03:54 AM UTC
Next up, in the sequence of modifications to the StuG IV, were the final, Flammvernichter (flame extinguishing) exhausts.


Note that since this photo, I've removed the 4th internal vane per some corrected information that was share with me on Missing-Lynx. (Thanks again Mirko!)

I also modified the kit's 4-return roller configuration to the later 3-roller configuration. This was a simple change. The two right (starboard) side center roller mounts were cut out of the kit hull by drilling a series of holes around them. The two left (port) side mounts were carefully shaved off to preserve the fuel-filler armored cover locations. The right side hole were filled with styrene and cyanoacrylate (supper glue). The mounts removed were then added to the kit at the same level - bottom to top - as the level of the original front three rollers and at the center point - fore and aft - between the front and rear rollers.


I enhanced the weld details on the hull using Squadron Green Stuff and Milliput epoxy putty. I only found out recently that the late-Pz IV ausf. J extended hull side towing eyes were in fact used on the StuG IV, so if you want to add those, the DML kit makes it pretty easy. The front hull sides are separate kit parts which could easily be replaced with the later tow eyes.

The basic references that I'm using, though, are the Poznan Poland StuG IV's which had the "swinging" Schurtzen, but the standard front, bolted on tow eyes. Oh well....


More to follow...
SdAufKla
Visit this Community
South Carolina, United States
Joined: May 07, 2010
KitMaker: 2,238 posts
Armorama: 2,158 posts
Posted: Sunday, January 30, 2011 - 04:11 AM UTC
Well, like the story of "Topsy," my project seem to take on a life of its own and grow and grow...

I really liked the kit radios - some of the nicest plastic ones offered and with the loader's and commander's hatches right over them, they seemed like they were deserving of some extra work and effort...


These are the kit radios dolled-up with some wiring, front handles, and a scratched up transformer (basic block of strip styrene shaped by carving and sanding).

The rear of the fighting compartment wall is deviod of any details, by the addtions needed are fairly simple and mostly deal with a pair of MP-40 submachine guns and canvas magazine pouches. The clamps for the SMG's are left-over PE parts modified to serve here. The missing SMG will be carried by the loader on the planned dio base.


There are certainly more details that could be added, but these were sufficient for me.

The kit main gun is also pretty nice and only needs a few details to spruce it up:


The major deficiencies are the lack of traversing and elevating gears, the spent casing bag and the loader's firing system safety cut-out switch. I made the bag with styrene rod and strip and rolled out Milliput epoxy putty.

Finally, I added the racks for the main gun ammo storage in the front fighting compartment sponsons:


More to follow...
SdAufKla
Visit this Community
South Carolina, United States
Joined: May 07, 2010
KitMaker: 2,238 posts
Armorama: 2,158 posts
Posted: Sunday, January 30, 2011 - 04:28 AM UTC
So, my project grows and grows...

If the fighting compartment is going to be detailed out, then the driver's compartment needs some detail that's at least equivalent. I knew the area that would be visible through the driver's hatch would be very limited, so really, only a seat, the side of the tranny and the left (port) side final drive could be seen.

I had intended to scratch up all this detail, but while shopping around a local hobby shop, I found a dusty, musty old "Verlinden" Pz IV resin interior set. It included details for the dirver's / radio operator's areas, the turret / fighting compartment, and engine compartment. The resin parts were a bit "rough" and dated, but the hobby shop owner was willing to give me a great deal and I figured that I could use the set in at least two, maybe three different projects. So, the diver's compartment in my StuG IV is based on this old "Verlinden" set:


I spent some extra time building a new driver's seat using photos of the Poznan Poland museum StuG IV. Those photos also provided the details of the ammo storage behind the driver. This is similar to the Pz IV, but the number of rounds is reduced because the StuG IV superstructure blocks access somewhat. The dashboard / guage location also has to be moved down on the tranny from where it's at on the Pz IV.

A convienent result from using the "Verlinden" resin parts was that they form a "module" that can be painted outside of the model and installed later:


More to follow...
panamadan
Visit this Community
Minnesota, United States
Joined: July 20, 2004
KitMaker: 1,513 posts
Armorama: 1,449 posts
Posted: Sunday, January 30, 2011 - 04:40 AM UTC
Impressive work Mike! I think that you nailed the primer red color.
Dan
SdAufKla
Visit this Community
South Carolina, United States
Joined: May 07, 2010
KitMaker: 2,238 posts
Armorama: 2,158 posts
Posted: Sunday, January 30, 2011 - 04:51 AM UTC
I added a few details to the fighting compartment interior, but the kit provides a pertty good start. I did add some "panel" line on the floor and the loader's ready-round ammunition stowage racks.

By the way, the actual vehicle floor was smooth with no anti-slip tread. This was confirmed in photos of the Poznan StuG IV, and the kit is correct in this aspect. Also, the ready racks fold against the hull wall when they're empty.


In this photo, the floor, firewall, and engine compartment are all dry-fitted for disassembly during the painting process.

I also made a RTV mold using the "Tamiya" turned brass KwK / StK 40, 7.5 cm ammunition set. I wanted to fill all my main gun ammo racks, and so I needed about 40 rounds of 7.5 cm ammo (or rather, the shell casings), and buying multiples of the "Tamiya" set was cost prohibitive. So, the effort and cost of the RTV and resin hand-casting was acceptable.

The next step in finshing the interior to get ready to close it up and work on the exterior was the lower hull area of the fighting compartment. I painted the floor and firewall and lower hull interior with the basic primer red. Then I installed the driver's compartment, the firewall, and finally the floor. There were some bolts and wiring conduit details that had to be added to the hull walls after the floor was installed. The I could do the detail painting:


The shell casings are the hand-cast resin ones, painted to represent steel casings. The red dots represent the water-proofing daubbed on the primers. The steel casings were also lacquered to prevent rust and corosion, and I gave these a thinned brown ink wash ("Citadel-Games Workshop" Brown Ink wash).

The primer red is either Polly Scale Boxcar Red or Vallejo Red Leather. The interior buff is Vallejo Buff with a bit of brown (I forget which specific color) added to darken it up a bit.

More to follow...
SdAufKla
Visit this Community
South Carolina, United States
Joined: May 07, 2010
KitMaker: 2,238 posts
Armorama: 2,158 posts
Posted: Sunday, January 30, 2011 - 05:00 AM UTC
The main gun is painted separately. It has to be installed in the fighting compartment at the same time that the superstructure is glued down to the lower hull.

This is one of the most "fiddly" bit in the assembly of the kit. I don't know that DML could have designed / engineered the kit differently, so you just have to live ith it.


In these photos, the gun is simply dry-fitted so that I could photograph it.

Before adding the superstructure, its interior needs to be finished too:


More to follow....
SdAufKla
Visit this Community
South Carolina, United States
Joined: May 07, 2010
KitMaker: 2,238 posts
Armorama: 2,158 posts
Posted: Sunday, January 30, 2011 - 05:17 AM UTC
With all the fighting compartment interior parts finished, I was able to dry-fit the superstructure to the lower hull and get a view of what the final reults might look like:


The canvas wether cover between the gun mantlet and the "bridge" across the front superstructure opening is made with rolled-out Milliput epoxy putty shaped on a scratch-built jig.

I finished and painted the superstructure roof at the same time. By this stage in my project, I've decided to leave the roof un-glued so that I can remove it and view the interior. To this end, I added some bolt hole details around its edge. I also got some constructive comments on Missing-Lynx about the interior of the commander's cuplola, so I added the part where the cupola intrudes into the fighting compartment.


While I was doing interior painting, I painted the main gun sight:


Although not visible in this photo, I've masked the objective and occular lenses, painted the sight silver and then black before the detail painting. When the masks are removed, the clear lenses will catch light and cause prototypical reflections.

And last, for this first progress dump, I've been working on the late StuG comander's cupola hatch configuration:


This flat-folding configuration with the circular closing handle was common to both the late StuG III and IV.

So, that's all for now. I'll up-date this as Imake some more progress.

Happy modeling!
maartenboersma
Visit this Community
Noord-Holland, Netherlands
Joined: October 10, 2010
KitMaker: 764 posts
Armorama: 742 posts
Posted: Sunday, January 30, 2011 - 07:04 AM UTC
like it alot ,love the detail/paint.
dvarettoni
Visit this Community
South Carolina, United States
Joined: September 28, 2005
KitMaker: 778 posts
Armorama: 763 posts
Posted: Thursday, February 10, 2011 - 03:55 AM UTC
mike this is nuts you neads to show everone all the jig that you made for this as well
dave
chefchris
Visit this Community
North Carolina, United States
Joined: February 06, 2006
KitMaker: 1,544 posts
Armorama: 1,464 posts
Posted: Thursday, February 10, 2011 - 05:56 AM UTC
MIke,
Man thats great work! Your attention to detail is quite impressive. Wouldn't this vehicle have the Coax MG installed though?

Chris
SdAufKla
Visit this Community
South Carolina, United States
Joined: May 07, 2010
KitMaker: 2,238 posts
Armorama: 2,158 posts
Posted: Monday, April 18, 2011 - 01:47 PM UTC
Well, finally, I'm back to the work bench and have gotten some work done on this. I've been working on the late, swinging Schurtzen and the the pioneer tools.

For reference, I was fortunate that Craig Ellis (author "8-wheels Good") shared some of his original research with me, and recently, I got a copy of the Feb. 2011 Ground Power, issue no. 201 that has some side view plans of the Schurtzen and the its mounting rails and brackets.

The Ground Power plans were very useful and saved me a ton of work measuring and sketching. I also used those basic dimensions to build some assembly jigs for the rails and brackets to ensure both sides were the same and all parts were square.

Here're a couple photos of these jigs:


Even with these and the Ground Power plans, there was a lot of dry fitting to be done:


But I've finally gotten the left side glued up"


There's still a lot of work to be done, but if all goes well, I should be squirting paint on this by next week.

I'll post some more construction WIP before I put the paint on.

@ Chris Smith: Unlike the late StuG III, none of my references show the coax MG used in the StuG IV. However, I've only recently found out that at least some of the very last StuG IV's had the "vent-less" glacis brake doors and hullside towing eye extensions. Up until then, all of the photos that I had only showed these details as I've modeled them (even on the 3-return roller vehicles). So, I guess the rule should be "to never say never" where the StuG IV is concerned. It's at least possible that the final StuG IV's could have had the coax MG.
bizzychicken
Visit this Community
Wales, United Kingdom
Joined: September 06, 2008
KitMaker: 967 posts
Armorama: 842 posts
Posted: Tuesday, April 19, 2011 - 07:18 AM UTC
Awesome craftmanship, thanks for sharing. Lots of great tips to be had. love the late stugs with so many field mods done to they're hull schurzen. The famous colour news reel of the two stug III's on the Order front springs to mind. Another stug IV I know of that had very similiar schurzen to yours was a stug that was being loaded on to a ferry at the Baltic coast that belonged to Pnzjager-Abt 1 21 Feld Div(Luftwaffe) Hard edge late war camo.
SdAufKla
Visit this Community
South Carolina, United States
Joined: May 07, 2010
KitMaker: 2,238 posts
Armorama: 2,158 posts
Posted: Tuesday, April 19, 2011 - 12:40 PM UTC
Hi Geraint,

Thanks for the kind words.

The "swinging" Schurtzen on the late StuG IV was actually a factory change to the series production. That photo you reference had researchers confused for years because it suggests that the Schurtzen plates are graduated in size from largest in the rear to the smallest in the front. When in reality, four of the plates are the same size and only the front plate is shorter. I think it was the only photo in circulation for a very long time.

However, there have now been several other photos that have surfaced from both the eastern and western fronts that show StuG IV's with these swinging "Schurtzen." I've really enjoyed the research I've done on this project and have learned a ton.
SdAufKla
Visit this Community
South Carolina, United States
Joined: May 07, 2010
KitMaker: 2,238 posts
Armorama: 2,158 posts
Posted: Wednesday, April 20, 2011 - 10:05 AM UTC
Another little up-date on this project.

I've added the right side Schurtzen rail and brackets, finished the front brackets (added the last brace down to the glacis), and added a few details like the spare track hangers, spare road wheel box and the fender flap springs.


The Schurtzen plates are removable for painting and the brass pins are just for dry-fitting. I'll make some proper cotter pins for the final assembly.
SdAufKla
Visit this Community
South Carolina, United States
Joined: May 07, 2010
KitMaker: 2,238 posts
Armorama: 2,158 posts
Posted: Saturday, April 23, 2011 - 08:32 AM UTC
Well, I've finally finished up with the basic construction on this one and I believe that I'm ready to move on to some finishing.

Here're the last few details that I've added.

First up is the main gun travel lock. I've kept it semi-movable for paining:


Next is the late model tubular tail light. I used the kit clear bulb which is a press fit in my assembly so that I can remove it for painting:


And lastly, here's the rain gutter over the driver's station. The kit part is a simply square stock-like piece which I replaced with a bit of left-over PE fret bent into an "L" shape:


Hopefully I'll get some paint on this beast in the next week or so, and I'll post some more "happy snaps" once I do.

Happy modeling,
SdAufKla
Visit this Community
South Carolina, United States
Joined: May 07, 2010
KitMaker: 2,238 posts
Armorama: 2,158 posts
Posted: Saturday, June 25, 2011 - 07:03 AM UTC
Well... so much for thinking I was going to start painting back in April!

At any rate, after a rather long-ish break, I have actually started back working on this project.

I did get the figures ready for painting in the mean time. These are a variety of Alpine, Wolf, New World Minatures and The Bodi, most with new Hornet heads and a couple of replaced Hornet hands. Here's a pic of the figures primed and ready for painting:


The sitting Bodi figure will be on the main gun mantlet, with the New World figure walking toward the Alpine and Wolf figures posed off the StuG's front.

I started getting the vehicle ready for paint by first adding some "preliminary" mud and turf textures to the lower hull and suspension parts. Imade this from a mixture of static grass and various artist acrylic gel mediums:


This "muck" was applied to the lower hull and I've found that it helps me define the weathering as well as it gives the later 3-D pigment applications something to anchor to. This preliminary texturing also helps by reducing the amount of later pigments that are needed to achieve the desired textures. Not always needed, and sometimes, they're all that's needed. In this case, however, the StuG will be on a muddy dirt road on a semi-melty-snow vignette, so I think the heavier than usual amount of texture will be needed:


I've also kept as many of the tools and other "removable" details separate for painting as possible. This is really a matter of finishing style and technique preference and is just the way I build.


More to follow...
SdAufKla
Visit this Community
South Carolina, United States
Joined: May 07, 2010
KitMaker: 2,238 posts
Armorama: 2,158 posts
Posted: Saturday, June 25, 2011 - 07:10 AM UTC
After masking, I started with an overall primer red, followed by a mix of Tamiya Buff and Earth on the lower hull and suspension.

This was followed by a pre-shaded Panzer yellow mixed up with various ratios of Tamya Dark Yellow and Buff, adding lighter shades on top of the darker coats:


In order to get the Schurtzen plates to show over lapped areas in the later cammo coats and weathing, they were taped together for some of the intial painting:


More to follow...
SdAufKla
Visit this Community
South Carolina, United States
Joined: May 07, 2010
KitMaker: 2,238 posts
Armorama: 2,158 posts
Posted: Saturday, June 25, 2011 - 07:36 AM UTC
So, next up were the color cammo coats. These were mixed up from Tamiya paints and also post-shaded by adding a bit of Buff to the brown and Dark Yellow to the green. You'll note that I also kept the Schurtzen plates taped together during this step. I plan to display the StuG with the plates on the left side (where the vehicle is fuled up) mixed up a bit, and hope that the lines where the cammo is mis-matched will be noticable:


The markings are water-slide Balken crosses from old Tamiya decal sheets and decals that I made up myself from Woodland Scenics dry-transfers applied to Microscale clear decal paper. All of these markings were applied over spots of Tamiya gloss clear. After the decals dried, I sealed them with another coat of the gloss clear, and after that had dried, I over-sprayed them with Testors Dull Coat to restore the flat finish in preparation for weathering.


The markings represent a vehicle from PGD Brandenburg as seen in western Poland in 1945.

While I waited for decals to dry, I did some of the detail painting on the tools, etc. These were mostly painted with Vallejo and Citadel acrylics. The wood handles were painted with artist oils over Vallejo Iraqi Sand under coats:


I still have a considerable amount of work to do on the tools, but this is where I'm at right now.

More to follow...
SdAufKla
Visit this Community
South Carolina, United States
Joined: May 07, 2010
KitMaker: 2,238 posts
Armorama: 2,158 posts
Posted: Saturday, June 25, 2011 - 07:57 AM UTC
The last up-date in this batch is for the initial weathering.

I've added several washes made form artist raw umber paint to the lower hull and suspension parts that got the earlier "pre-texturing." For the road wheels, I first added the inner metalic wear using a silver colored pencil and followed that with painting the rubber tires before applying the umber wash.


Although these pics only show a sample of the road wheels and one idler and drive sprocket, the lower hull sides and bottom received the same treatment, I just didn't take a pics of those areas.

The next step was to do a bit of color modulation using artist oil paints. I use a variation of the "oil-dot" method, where I apply the colors individually. So, for this model, I started with titanium white. Small dots were applied over the model surface that was pre-wetted with plain thinners (common odorless mineral spirits). I worked in small areas, doing one before moving to the next.

I used three colors, titanium white, raw sienna, and yellow ochre. By only applying one color at a time, you can avoid simply mixing all the colors into a "mushy brown" wash. Also, I deliberately try to apply each color to areas where I havn't applied the other colors. So, although they will over lap, I try to keep the "modulated" or changed color tones somewhat distinct.

Note that this is also just one step. I'll follow this with some pin washes to acentuate some details along with some chipping and scratches. I probably add some more pin washes and dirt and dust streaking over those perhaps followed by some "scuffs" through the dirt layers exposing fresher-looking colors, somewhere along the way, I'll start adding pigments, and there will be a dust glaze or two sprayed over things...


At any rate, still lots and lots to do, but I wanted to post a few pics before I made too much more progress and started abreviating later posts because there was so much done...

Happy modeling,
SdAufKla
Visit this Community
South Carolina, United States
Joined: May 07, 2010
KitMaker: 2,238 posts
Armorama: 2,158 posts
Posted: Saturday, June 25, 2011 - 08:04 AM UTC
Oops...

Forgot to add the pics of the side skirts:


"That's all folks!" Hopefully it won't be two months before my next up-date...
thomokiwi
Visit this Community
Christchurch, New Zealand
Joined: January 11, 2006
KitMaker: 438 posts
Armorama: 359 posts
Posted: Saturday, June 25, 2011 - 12:00 PM UTC
Inspiring, painting and detail is awesome
SdAufKla
Visit this Community
South Carolina, United States
Joined: May 07, 2010
KitMaker: 2,238 posts
Armorama: 2,158 posts
Posted: Sunday, June 26, 2011 - 06:26 AM UTC

Quoted Text

Inspiring, painting and detail is awesome


Thanks for the kind words, Thomo. This has been an interesting project, especially from the research point of view, and I've enjoyed the challenges of finding some of the information.

Hopefully i'll have some more on the finishing before too long.

Happy modeling,
jrutman
Visit this Community
Pennsylvania, United States
Joined: April 10, 2011
KitMaker: 7,941 posts
Armorama: 7,934 posts
Posted: Sunday, June 26, 2011 - 01:11 PM UTC
Mikey,
My hat is off to you sir. This is some fine model building and painting for sure. And the late war in East Prussia is one of my favorite topics so it's all good man!
J
 _GOTOTOP