_GOTOBOTTOM
Dioramas: Making Bases
Discuss all aspects of making bases.
Hosted by Darren Baker
Tough Old Gut
War_Machine
Visit this Community
Washington, United States
Joined: February 11, 2003
KitMaker: 702 posts
Armorama: 385 posts
Posted: Wednesday, January 23, 2013 - 09:39 AM UTC
It's been a while since I dove into a full diorama, so no time like the present to take the plunge. This project will depict elements of the 1st Armored Division advancing on Rome after breaking out of the Anzio bridgehead in Operation Buffalo in late May, 1944. The title comes from a quote by General Mark Clark in which he said he imagined Churchill talking about Italy being the soft underbelly of Europe and what a tough old gut it turned out to be.
The build itself will involve three AFVs, two Tasca shermans

and an older DML Panzer IVG.

The scene will show the latest attempt to advance up a narrow road in the hills outside Rome where much fighting has already taken place.
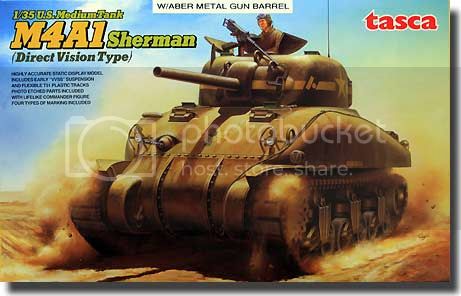
I started with the M4A1 Direct Vision (DV) kit because it will be the more involved of the two sherman builds. I plan on eventually modelling it as being abandoned and partially burned out, which means adding a partial interior. I sourced the interior parts from my ever growing supply of Sherman spare parts.


Since so little will be visible through the open hatches, I don't need to go all out with the interior. A little weathering and I'll be ready to close up the hull. In addition to doing that, next in the build will be modifying a couple of the bogies to show the rubber burned off the wheels. I hope to have another update ready in the very near future.
panzerconor
Visit this Community
Massachusetts, United States
Joined: February 08, 2012
KitMaker: 1,271 posts
Armorama: 1,253 posts
Posted: Wednesday, January 23, 2013 - 11:45 AM UTC
I'll be keeping up with this for sure, the last diorama was great and this looks even better

-Conor
War_Machine
Visit this Community
Washington, United States
Joined: February 11, 2003
KitMaker: 702 posts
Armorama: 385 posts
Posted: Friday, January 25, 2013 - 11:28 AM UTC
Time for an update. I finished assembling the bogies for the M4A1 DV. As this kit is going to be shown partially burned out, I needed to modify the wheels on the two bogies so damaged. I started by chucking the wheels in my motor tool and sanding off most of the 'rubber' portion of the wheels, depending on how burned each was supposed to look. Once done I assembled the bogies.

Next I added an uneven coat of white glue to the wheels and sprinkled on Woodland Scenics snow, which is made up of microballoons. This gave the damaged wheels a nice rough finish.


I don't know if it's completely realistic, but it does add some nice visual interest and provides a good base for detailing and weathering to come.
I've also made very good progress getting the hulls and turretts for both shermans assembled, and should have them finished fairly soon. I'll post a new update as soon as I can.
DOntos
Visit this Community
England - South East, United Kingdom
Joined: July 26, 2012
KitMaker: 89 posts
Armorama: 72 posts
Posted: Friday, January 25, 2013 - 12:28 PM UTC
Hi Ed,
This sounds like its going to be an exciting diorama, cant wait to see more!

I like the use of the snow, looking forward to seeing how well that takes paint and the compressed air!

Dan
War_Machine
Visit this Community
Washington, United States
Joined: February 11, 2003
KitMaker: 702 posts
Armorama: 385 posts
Posted: Friday, February 01, 2013 - 10:56 AM UTC
Time for another update. I've finished construction of the two M4A1s. First up is the direct vision hull version.


I added casting numbers and foundry markings from Archer and an early version barrel from Formations. I also bored a couple of holes in the hull to simulate armor penetrations.
Next up is the mid production M4A1.


Since I used a resin barrel with the dv kit instead of the metal one it came with, I decided that the metal barrel should go to good use and installed it on this build. I also added Archer casting numbers and foundry marks to this kit as well. Both kits received a little additional armor texturing with homemade thinned putty, straps and buckles for the tools, and photoetched chains for the headlight plugs and fuel filler cap retainer pins. One change coming up for both kits is replacing the kit tracks with ones from Panda. Part of this is to show burned tracks, but it's also because I just don't really like the Tasca ones. But that's for another day.
Up next is getting both tanks painted, as well as getting started on the Mk. IVG, and laying out the base if the opportunity presents itself. I'll have another update as soon as I can.
War_Machine
Visit this Community
Washington, United States
Joined: February 11, 2003
KitMaker: 702 posts
Armorama: 385 posts
Posted: Wednesday, February 13, 2013 - 10:08 AM UTC
Time for an update. I have both kits painted, decaled, and ready for weathering. First up is the M4A1 DV. I began with a reddish brown metallic color to simulate burned metal, which I then masked off with silly putty before applying the camoflage.


The camoflage consisted of Pollyscale OD mixed with some yellow, bands of Tamiya Hull Red mixed with a little Flat Earth, and white countershading under the barrel and transmission cover.


Next is the M4A1 mid, which is more straightforward. Just a different shade of Pollyscale OD lightened with a little yellow and bands of Tamiya Nato Black.


Next up is weathering, which for the DV will include adding a base of color for the burned areas as well as lots of dirtying up for both. I also plan on starting on the Mk. IVG, and this time I mean it. I hope to have another update soon.
Lonewolf7usa
Visit this Community
Michigan, United States
Joined: March 24, 2009
KitMaker: 312 posts
Armorama: 296 posts
Posted: Wednesday, February 13, 2013 - 10:13 AM UTC
Not much of a sherman fan but nice build. how do plan to weather it??

'All the way and then some'
War_Machine
Visit this Community
Washington, United States
Joined: February 11, 2003
KitMaker: 702 posts
Armorama: 385 posts
Posted: Saturday, February 23, 2013 - 10:55 AM UTC
Back with another update. I've given both M4's a thorough going over with dot filtering, overall filters, and pin washes. First up is the DV. I added the base for the areas of burned paint using black and white oil paints. These areas will get further dressed up with pigments to show rust and ash.


Next up is the mid version. It received essentially the same treatment as the DV, just without the burned areas. Both tanks also received a base layer of muck on the lower hull made up of plaster, static grass, and a bit of paint.


Next up for both kits is a heavy dose of pigments, especially on the suspension as well as the tracks, which are assembled but unphotographed. As far as the Mk IV is concerned, I've got the that build well under way and hopefully I'll remember to take some pics of it one of these days. Whenever all of that happens, I'll be sure to post it in one of these updates, which shouldn't be too far off in the future.
retiredyank
Visit this Community
Arkansas, United States
Joined: June 29, 2009
KitMaker: 11,610 posts
Armorama: 7,843 posts
Posted: Saturday, February 23, 2013 - 11:04 AM UTC
Good to see you back at it. This is one inspirational build. The Shermans are masterful. I am really enjoying this, already.
Tiger_213
Visit this Community
California, United States
Joined: August 10, 2012
KitMaker: 1,510 posts
Armorama: 1,443 posts
Posted: Saturday, February 23, 2013 - 11:51 AM UTC
I think I'll be following this, sounds interesting. Nice work on the destroyed Sherman.
War_Machine
Visit this Community
Washington, United States
Joined: February 11, 2003
KitMaker: 702 posts
Armorama: 385 posts
Posted: Thursday, March 14, 2013 - 10:36 AM UTC
My apologies for the extended absence from this thread. Lots of relatively minor yet time-consuming real life matters kept me distracted from updating the blog. Still, I did manage to get some things accomplished and now have a chance to share.
First, I got both shermans weathered. First up is the DV, to which I added some smoke effects while saving others for once the kit is in place on the base.


I also added most of the rust, although there's still some tweaking to do. Next is the M4A1 mid. In addition to the weathering, I added stowage.


Besides adding a tank commander and an antenna, this one only needs to be fixed in place on the base and given a touch more dusting before it's done. After this, at long last, come pics of the MK IVG.


One sort of interesting aspect to this diorama is the fact that the panzer will be monotone while the shermans are camouflaged. Not too often you see that. Finally, the base started to take shape.


The idea here is to employ several vehicles and figures on multiple levels so things don't look overly congested even on a relatively small (at least by my sometimes overly ambitious standards) base for display. I suppose this blog will show whether I pull that off or not. Regardless, thanks for looking in and commenting. More updates coming soon.
War_Machine
Visit this Community
Washington, United States
Joined: February 11, 2003
KitMaker: 702 posts
Armorama: 385 posts
Posted: Monday, March 25, 2013 - 06:54 AM UTC
Time once again for an update. First of all, I finished painting and weathering the Mk IV. First is the base coat.


Next is filters and pin washes.


Last but not least, final construction and pigment application.


There's still a bit of weathering to go, but that will wait for once the kit is in place on the base.
In between each step of finishing the vehicles, I've been busily at work on the figures. First up is the tank commander for the M4A1 mid.

Next is a machine gun team.

Here's an NCO and one of his men.

Following them is a BAR man and a rifleman.

Finally, here are four more riflemen.


Bringing up the rear is this view of my infantry collection in my ultra high-tech storage case.

Now that most of the on-base components are done, it's time to focus on finishing the base. I hope to have pics of that process ready in the near future. Till then, thanks for looking in and your comments.
panzerconor
Visit this Community
Massachusetts, United States
Joined: February 08, 2012
KitMaker: 1,271 posts
Armorama: 1,253 posts
Posted: Monday, March 25, 2013 - 07:19 AM UTC
I like it, I like it a lot. The last diorama was great and I can't wait to see how this turns out

-Conor
Rampenfest
Visit this Community
California, United States
Joined: April 28, 2011
KitMaker: 193 posts
Armorama: 188 posts
Posted: Monday, March 25, 2013 - 10:46 AM UTC
Looks very nice! I like the weathering on the panzer.

-Joe
War_Machine
Visit this Community
Washington, United States
Joined: February 11, 2003
KitMaker: 702 posts
Armorama: 385 posts
Posted: Thursday, April 11, 2013 - 08:50 AM UTC
After lots of real world distractions, I've finally got enough accomplished and enough free time to post an update. I've finished the basic painting of the base. The following photos are in chronological order showing the progress of the paintwork, starting with the dirt sections, then going on to the grass, then finishing up by touching up the dirt areas after realizing that I should have painted the grass first. Get settled in and comfy, because there are quite a few pics to come. First, two views of the unpainted base.


Next painting the soil from dark to light.


Now the grassy areas get the same treatment.


Now the touch ups.


Last but not least, a road sign to let the viewer know where the scene is set.

The soil was painted various shades to Tamiya flat earth, while the grass was painted various shades of Tamiya Green. Next up is incorporating the two knocked out tanks, a little more weathering of vehicles, base, and figures, and final positioning of all the remaining elements. I'll have pics of all that as soon as possible.
retiredyank
Visit this Community
Arkansas, United States
Joined: June 29, 2009
KitMaker: 11,610 posts
Armorama: 7,843 posts
Posted: Thursday, April 11, 2013 - 07:29 PM UTC
The base looks great! Leaving road signs intact was not popular. Of course, there's the one in a million chance it survived.
War_Machine
Visit this Community
Washington, United States
Joined: February 11, 2003
KitMaker: 702 posts
Armorama: 385 posts
Posted: Friday, May 03, 2013 - 10:10 AM UTC
Finally enough of a break from my other responsibilities to post an update on this build. I've placed all of the various elements on the base and am only a few touch ups here and there from being completely done with things.
First up are a few overall views of the scene.


Next up are some pics showing close ups of the details. They also show some of the things I missed, like the barrel on the 50 cal. on the surviving Sherman. With the help of these pictures most of the things I missed the first time have been dealt with.


I tried to be artistic with these last three pics and give the viewer a "you are there" sort of feel for the scene. Don't know if it worked, but they're not completely horrible either.


The only real work left is adding a small nameplate and then I can call this one done. Thanks to everyone who gave this a look and left comments. After a few years in a row of putting together large dioramas like this, I'm ready to shift gears and focus more on smaller scenes so I can cover a wider variety of subjects. Whatever I end up building, I'll be sure to inflict my work upon you great folks here.
retiredyank
Visit this Community
Arkansas, United States
Joined: June 29, 2009
KitMaker: 11,610 posts
Armorama: 7,843 posts
Posted: Friday, May 03, 2013 - 10:49 AM UTC
Just a little update? Nicely done! I'm not going to ask any of the obvious questions.
 _GOTOTOP