

 Al
AlArmor/AFV
For discussions on tanks, artillery, jeeps, etc.
For discussions on tanks, artillery, jeeps, etc.
Hosted by Darren Baker, Mario Matijasic
M-107 175mm SPG Help Needed

TAFFY3

Joined: January 21, 2008
KitMaker: 2,531 posts
Armorama: 859 posts
Posted: Monday, April 22, 2013 - 01:17 PM UTC
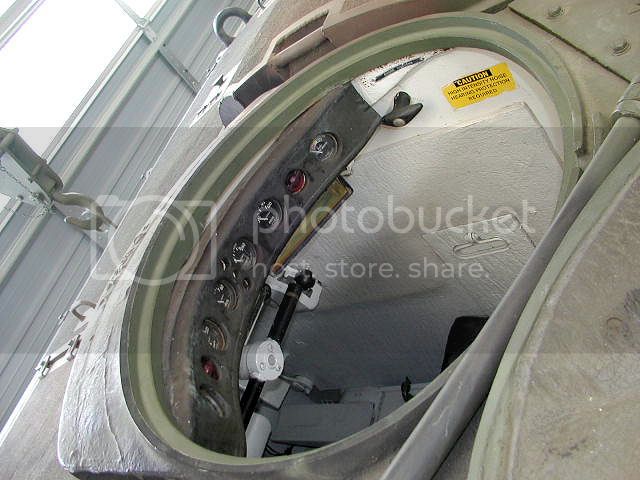
Does anyone have, or know of, any pictures of the driver's compartment of the M-107? I dug the Testor's re-box of the old Italeri kit out of the stash and would like add some detail to this area. Any help would be appreciated. Al
Al
18Bravo
Joined: January 20, 2005
KitMaker: 7,219 posts
Armorama: 6,097 posts
Posted: Monday, April 22, 2013 - 01:25 PM UTC
Try primeportal.net.
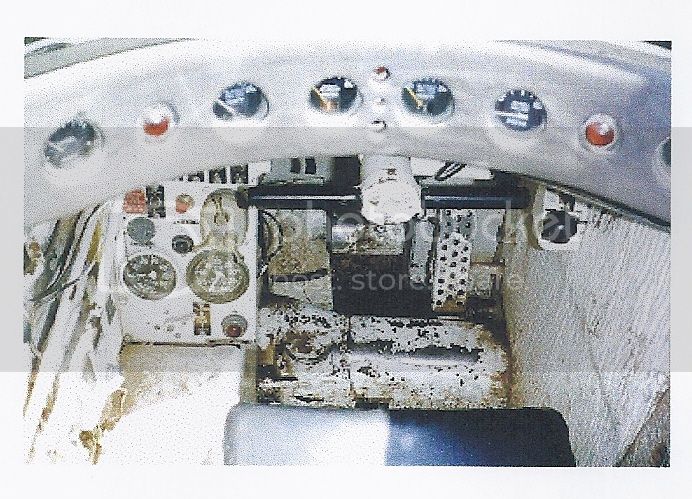
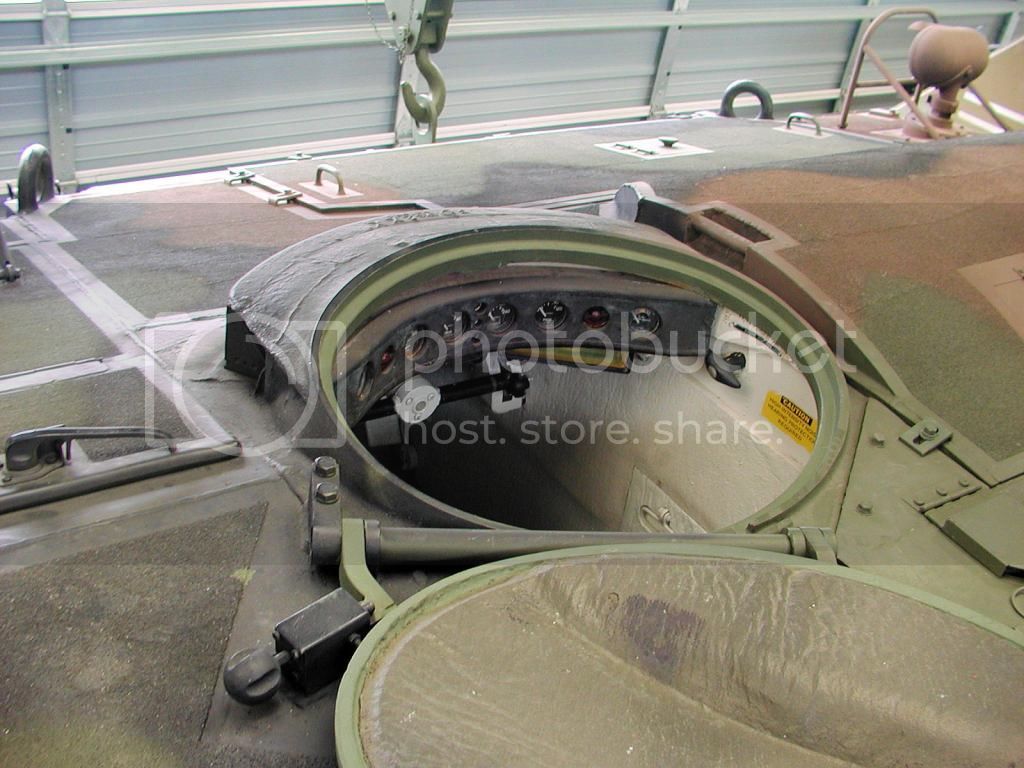
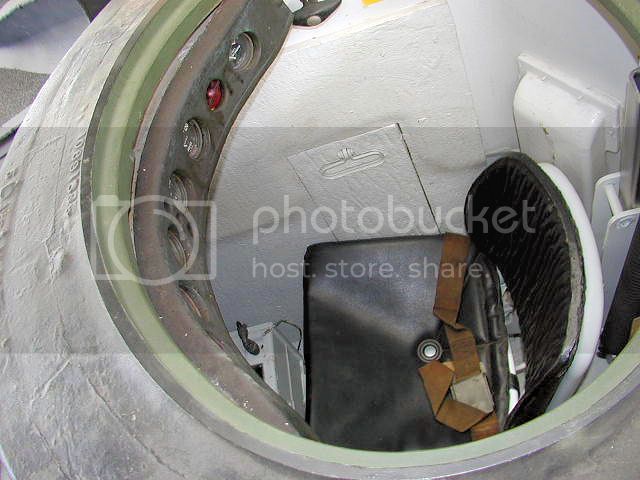
I have a walkaround which includes the driver's compartment I can send you if no one else can help you out. The problem is that I won't have access to it for a week. All of my walkarounds are on an external hard drive that I don't take with me when I travel.
Edit:
Disregard that. I just did some looking on Prime Portal for you, under both M107 and M110. There's nothing there that can help you. As I said, if no one helps you in the next week, I'll help you out.
TAFFY3
Joined: January 21, 2008
KitMaker: 2,531 posts
Armorama: 859 posts
Posted: Monday, April 22, 2013 - 03:05 PM UTC
Thanks for the comeback Robert. Any and all help is welcome. Al
Al
Frenchy

Joined: December 02, 2002
KitMaker: 12,719 posts
Armorama: 12,507 posts
Posted: Monday, April 22, 2013 - 05:34 PM UTC
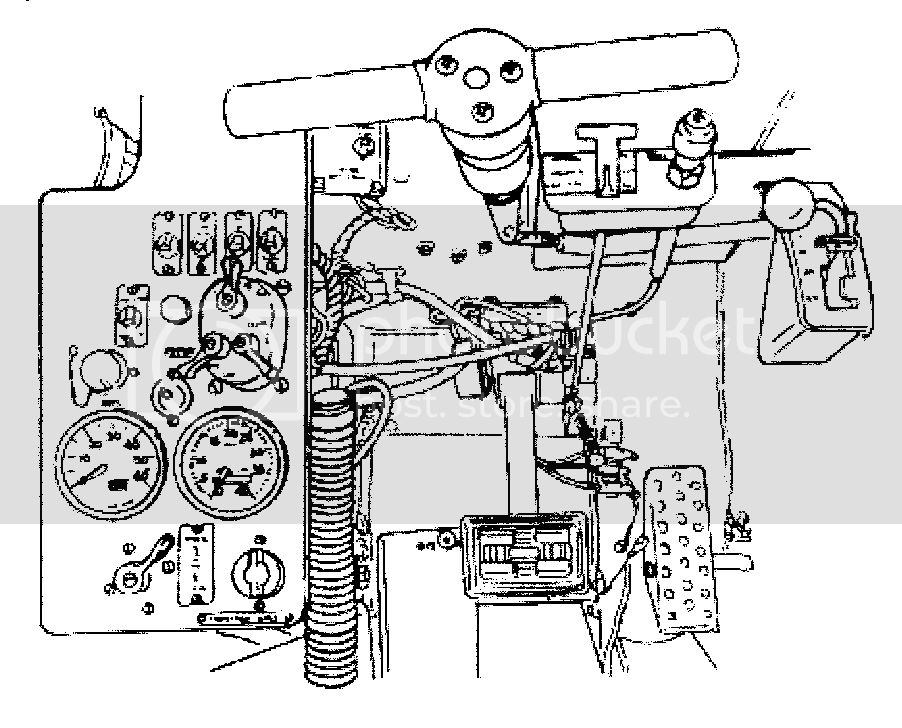
As it's based on the same chassis, I guess some M578 pics would be worth a look...
There are a few here :
http://www.primeportal.net/recovery/dave_connolly/m-578/index.php?Page=1
Some TM drawings here :
http://recoveryvehicles.tpub.com/TM-9-2350-238-10/index.htm
and two more pics in this document :
http://ftp.rta.nato.int/public//PubFullText/RTO/TR/RTO-TR-061///TR-061-APP-III.pdf
HTH
H.P.

Delta42
Joined: August 27, 2002
KitMaker: 616 posts
Armorama: 511 posts
Posted: Tuesday, April 23, 2013 - 05:56 AM UTC
Al,
These may help.
Dave
These may help.
Dave

AKirchhoff

Joined: September 12, 2008
KitMaker: 307 posts
Armorama: 304 posts
Posted: Tuesday, April 23, 2013 - 06:42 AM UTC
Hi,
no pictures of the drivers compartment at my side, but I think I remember a resin kit of this drivers compartment from the period when the Verlinen M578 came out first. To be honest, I dont know if my memory fools me now, but maybe someone other remembers it?
Andreas
no pictures of the drivers compartment at my side, but I think I remember a resin kit of this drivers compartment from the period when the Verlinen M578 came out first. To be honest, I dont know if my memory fools me now, but maybe someone other remembers it?
Andreas
TAFFY3
Joined: January 21, 2008
KitMaker: 2,531 posts
Armorama: 859 posts
Posted: Tuesday, April 23, 2013 - 06:57 AM UTC
Thanks Guys, that's a really big help. I wanted to leave the driver's hatch open and didn't want an empty hole. This will help fill it quite nicely. Andreas, your memory is good, a company called Peddinghaus made one. I saw it listed online. Thank you all for your assistance. Al
AlTAFFY3
Joined: January 21, 2008
KitMaker: 2,531 posts
Armorama: 859 posts
Posted: Thursday, April 25, 2013 - 03:11 PM UTC
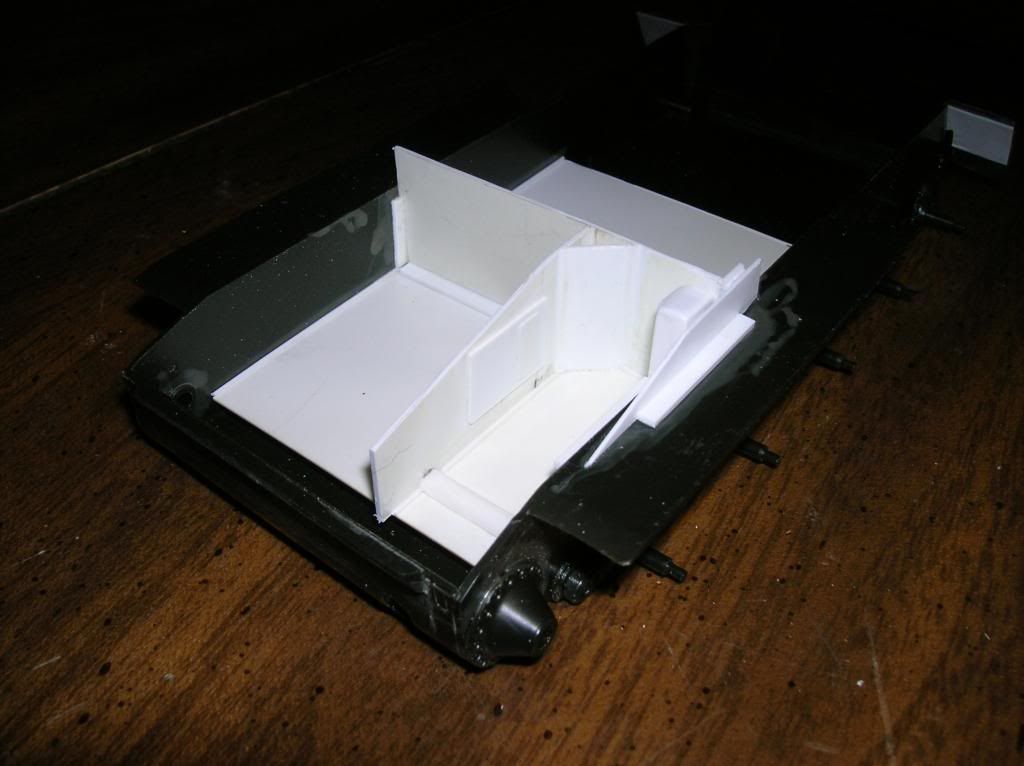
I started the work on scratch-buiding the driver's compartment of my M-107.
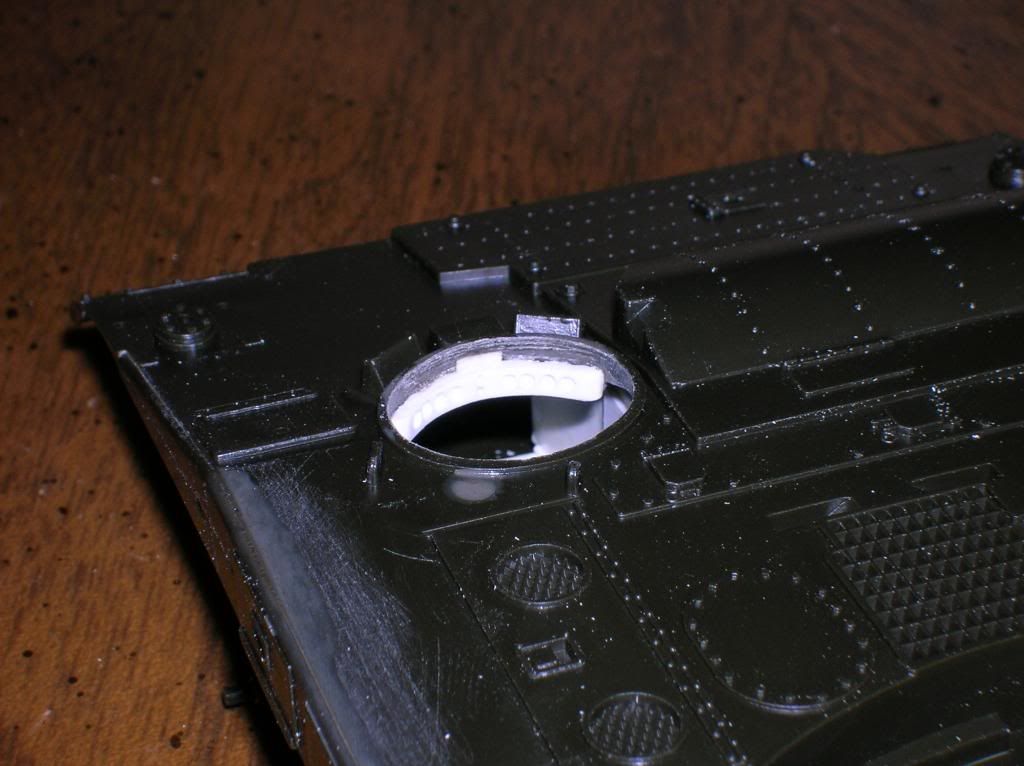
I want to once again say thanks to those who kindly answered my call for help. That kind of consideration and co-operation is what makes this such a great site. I'll post a few more pictures when I finish. Al
I want to once again say thanks to those who kindly answered my call for help. That kind of consideration and co-operation is what makes this such a great site. I'll post a few more pictures when I finish.
AlDelta42
Joined: August 27, 2002
KitMaker: 616 posts
Armorama: 511 posts
Posted: Friday, April 26, 2013 - 01:33 AM UTC
I'll be following your post closely Al. The pictures I sent were some that I had collected in anticipation of building a driver's compartment for my M578 conversion. I will be interested to see how your scratch build turns out.
Dave
Dave

Tankrider
Joined: October 07, 2002
KitMaker: 1,280 posts
Armorama: 1,208 posts
Posted: Friday, April 26, 2013 - 01:42 AM UTC
Quoted Text
The pictures I sent were some that I had collected in anticipation of building a driver's compartment for my M578 conversion.
So Dave,
Are you going to enter that model into a contest?? Inquiring minds want to know...
John C
Delta42
Joined: August 27, 2002
KitMaker: 616 posts
Armorama: 511 posts
Posted: Friday, April 26, 2013 - 01:49 AM UTC
John,
You are relentless
But the answer is a big Maybe!
Great to hear from you, and was even nicer to get to meet you and interact at AMPS International.
Dave
You are relentless
But the answer is a big Maybe!
Great to hear from you, and was even nicer to get to meet you and interact at AMPS International.
Dave
TAFFY3
Joined: January 21, 2008
KitMaker: 2,531 posts
Armorama: 859 posts
Posted: Friday, April 26, 2013 - 01:54 AM UTC
Hello Dave, Your photos were a big help and I'll be sure to post some more as I progress as well as some of the finished project. Al
AlTAFFY3
Joined: January 21, 2008
KitMaker: 2,531 posts
Armorama: 859 posts
Posted: Tuesday, May 14, 2013 - 03:25 AM UTC
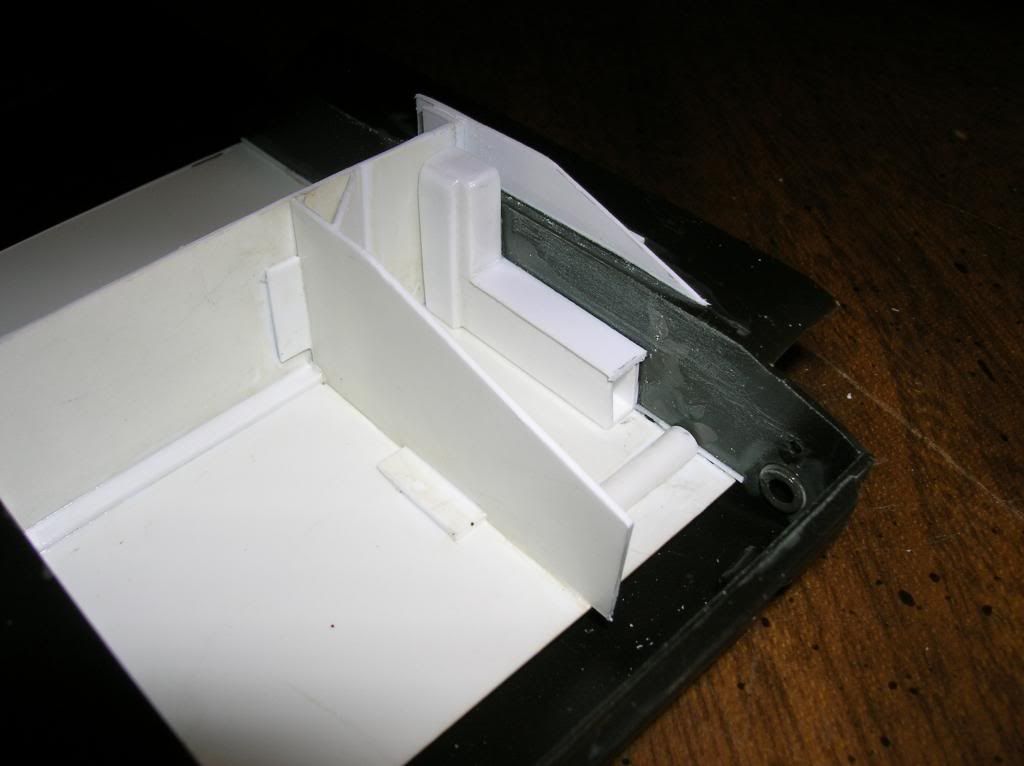
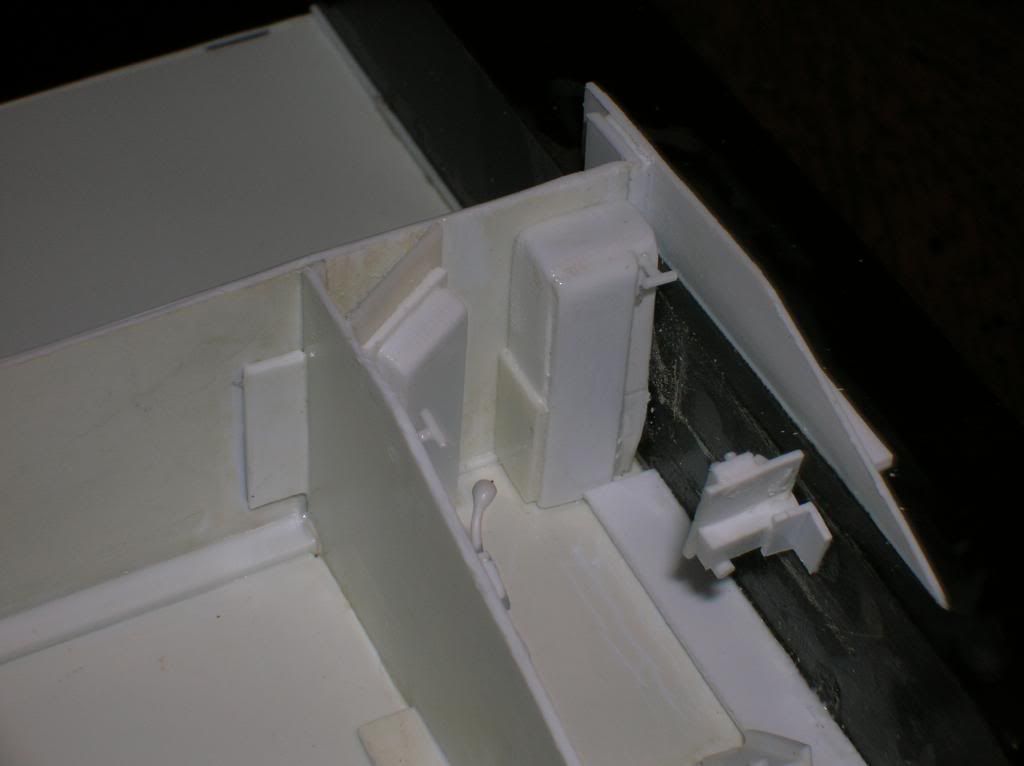
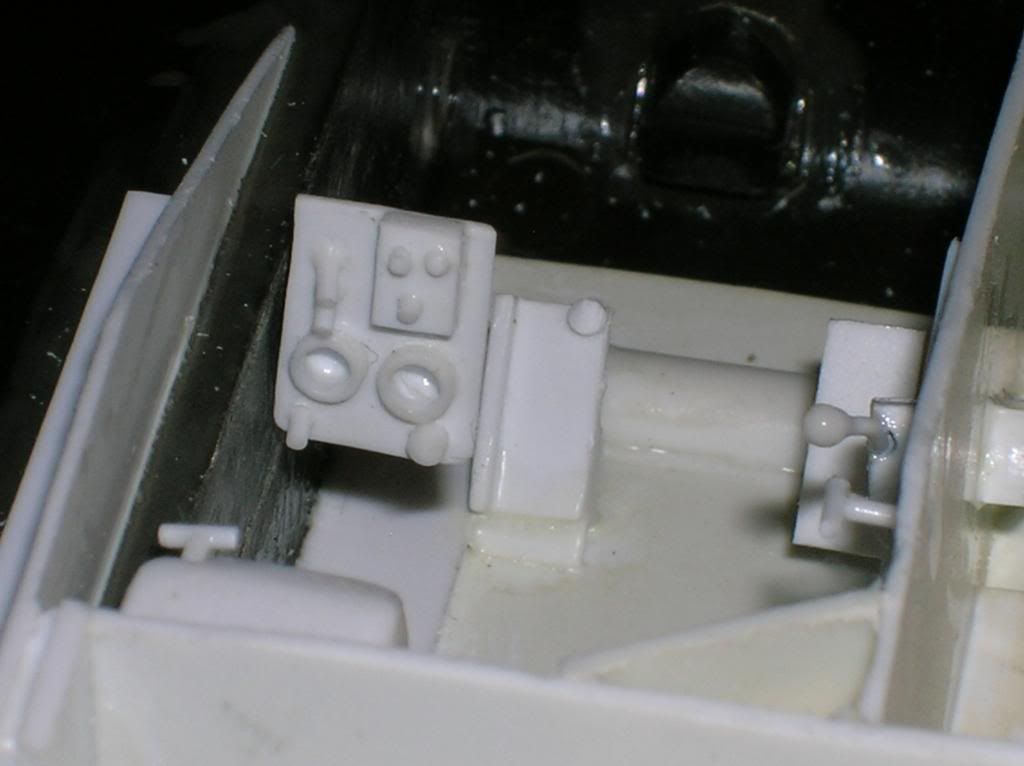
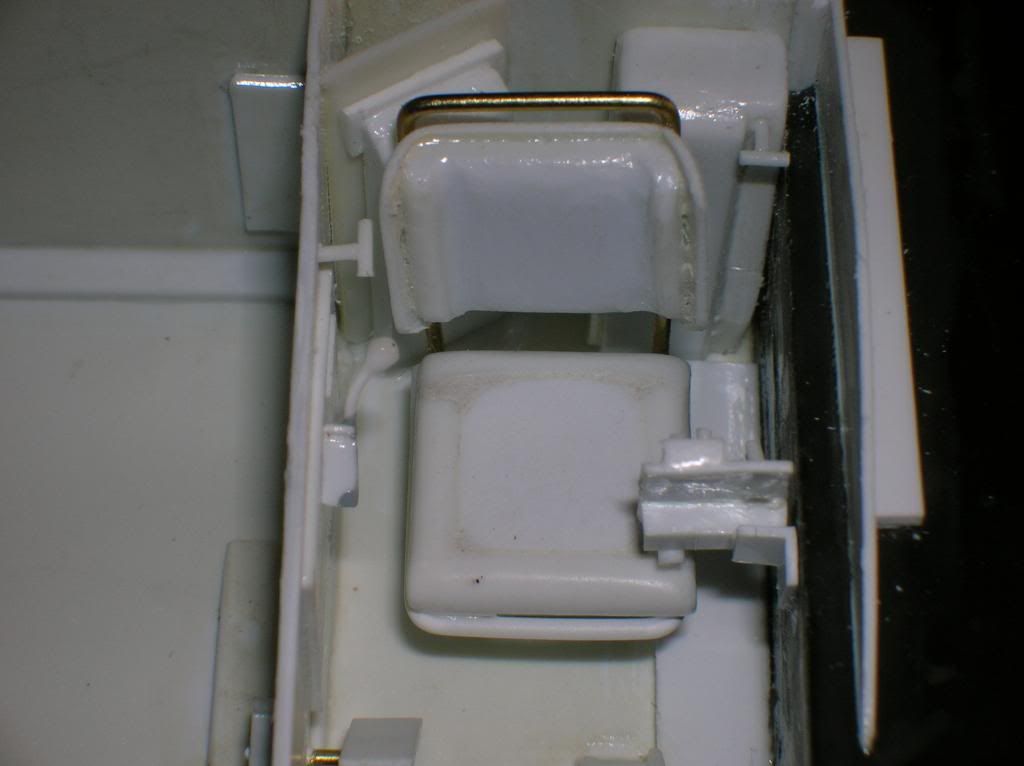
Small update, got some more work accomplished on the driver's compartment.
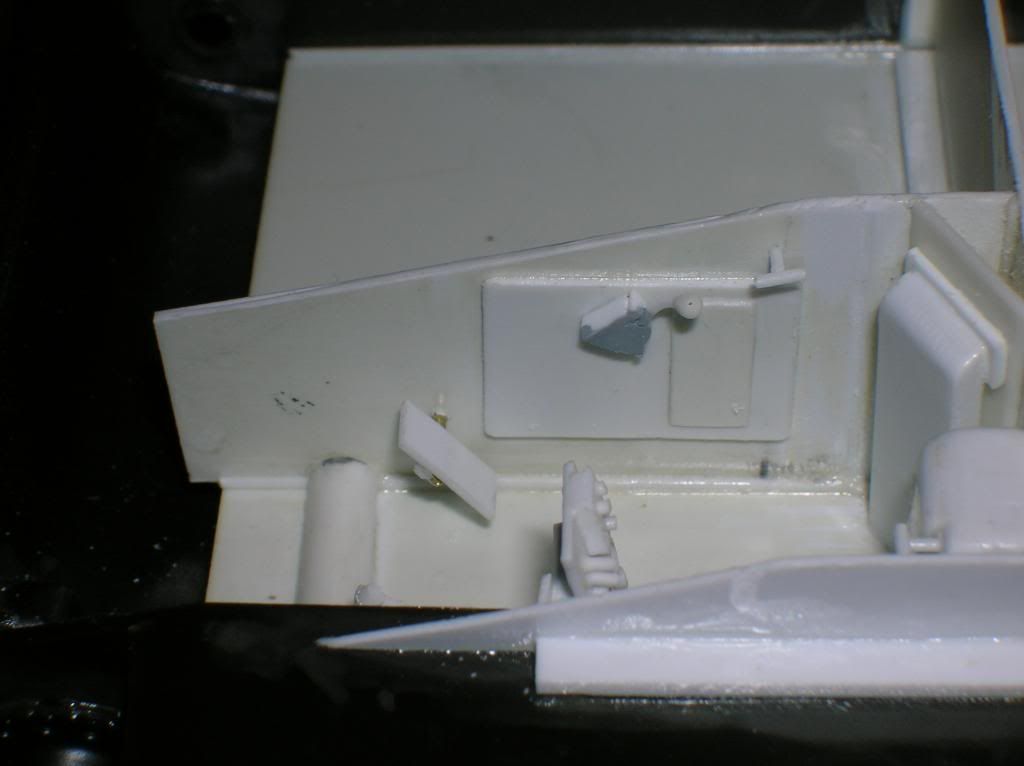
You can see the shift lever and gas pedal mounted on the side wall. The next picture shows it from a different angle.
This is the partial instrument panel. I didn't do the whole panel because it wouldn't be visible.
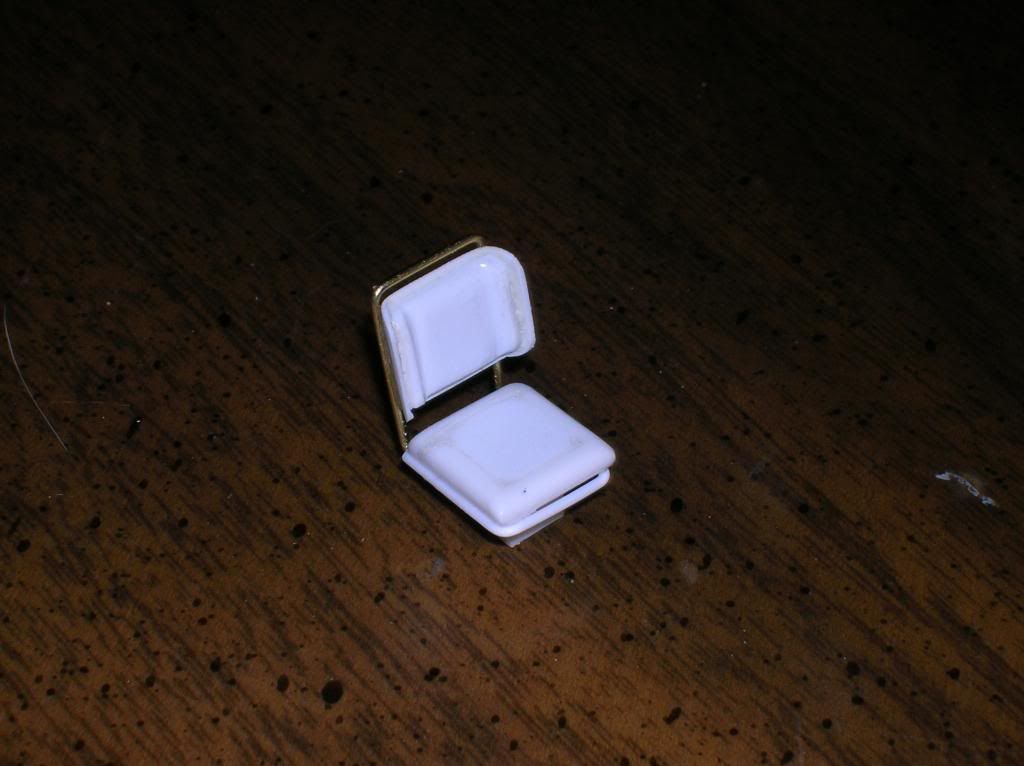
The driver's seat.
Temporarily in position.
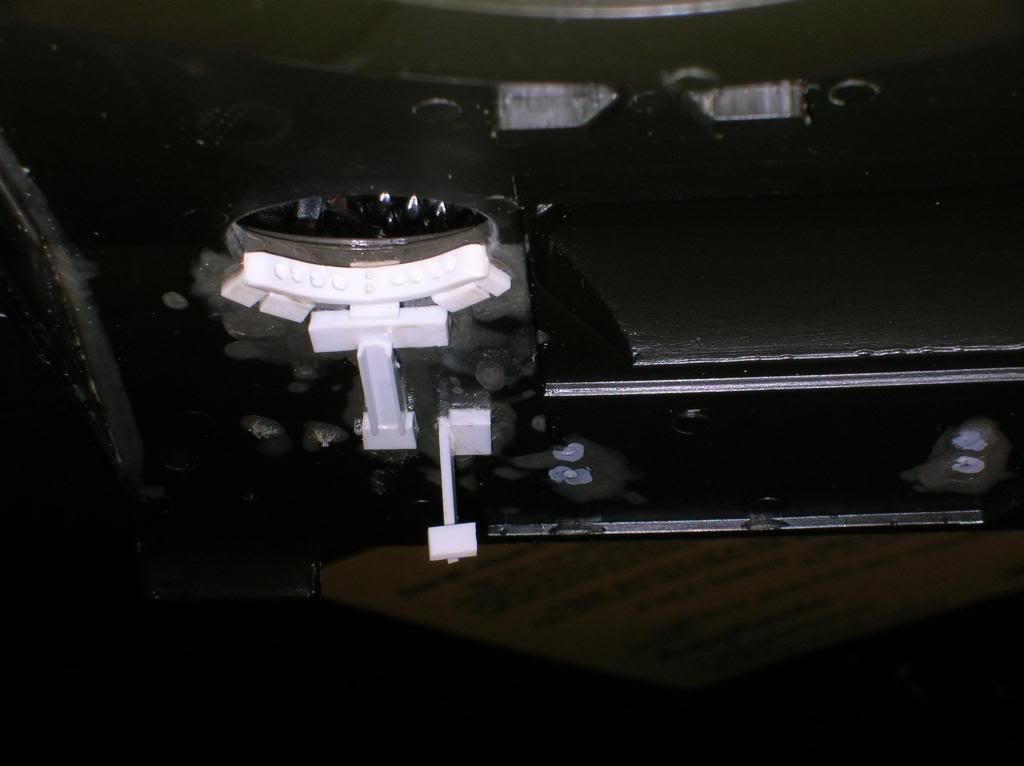
Finally, the underside of the upper hull showing the brake pedal, gauge panel, and the channel for mounting the T-shaped steering tiller.
Next, some paint. Al
You can see the shift lever and gas pedal mounted on the side wall. The next picture shows it from a different angle.
This is the partial instrument panel. I didn't do the whole panel because it wouldn't be visible.
The driver's seat.
Temporarily in position.
Finally, the underside of the upper hull showing the brake pedal, gauge panel, and the channel for mounting the T-shaped steering tiller.
Next, some paint.
Al
Reforger-Victim
Joined: March 26, 2017
KitMaker: 95 posts
Armorama: 79 posts
Posted: Thursday, April 30, 2020 - 12:28 AM UTC
http://i860.photobucket.com/albums/ab161/Delta42_2010/M578/M578LRV33_zps503597f8.jpg
Does anybody know the time frame when anti slippery pads were added to M110/M578 in US Army units?
Does anybody know the time frame when anti slippery pads were added to M110/M578 in US Army units?

jvazquez
Joined: September 26, 2006
KitMaker: 857 posts
Armorama: 811 posts
Posted: Thursday, April 30, 2020 - 03:22 AM UTC
/.
|
|
|
|
Holy thread resurrection!
|
|
|
|
Holy thread resurrection!
trickymissfit
Joined: October 03, 2007
KitMaker: 1,388 posts
Armorama: 1,357 posts
KitMaker: 1,388 posts
Armorama: 1,357 posts
Posted: Thursday, April 30, 2020 - 11:11 AM UTC
I trained heavily on the 175 gun in 67. I don't remember much about the insides, and seems like there wasn't much in there. Funny thing is that it seems like we used a dual butterfly handle for steering, and a lever for the drive ranges on the right side. There was a brake deal used only when shooting, but honestly can't remember if it was outside or inside the compartment. Been 50+ years! The seat was canvas covered, and green in color.
Note: if being displayed shooting, the driver's hatch will be sealed! The concussion alone will blow the glass out of the gauges.
Only serious driving I did was off the road, as I didn't have anykind of a license. There are some serious errors in that kit that few will catch. Be sure to add the travel lock, and omit the cradle rest underneath the trunnion. Breech is pure fantasy, Very similar to the breech on an M114, but of course much larger in diameter. The track pads really take a beating, and should really be roughed up (changing individual pads weekly). Do not pose the crane behind the breech unless loading a round! And lower the barrel to where it's parallel with the ram on the crane. No rammer staff was used. A big bucket of water is needed on the AG side to swab out the breech after firing. The 175 was very prone to leaving red hot piece of rag inside. The hydraulic lines for elevation are on the AG side. They are SS steel, and paint just flakes off them all the time (19,000lb. of pressure on them).
Never pose anybody behind the breech when in the firing position. Can be fatal! You pretty much only shoot PD fuse HE in that SPG. I've never seen one shoot a times fuse. So the rounds will be off to the left of the gunner's station, and back about twelve to fifteen feet. The crane picks up the round right behind the gunner, and all you do is roll it over into the tray. The crane does the rest. The powder bags are huge (shoot zone three most of the time in combat). About 5'7" long and maybe 12" in diameter. There will be a red pad on one end, and that pad goes against the breech face. Powder is loaded by hand; not the crane. it comes in three bags tied together with a ribbon like deal made from the same material as the bags. A light ivory color with a hint of green.
The spade must be dug in very deep with the last road wheels almost off the ground. recoil is serious!
gary

marcb

Joined: March 25, 2006
KitMaker: 1,244 posts
Armorama: 1,226 posts

Posted: Thursday, April 30, 2020 - 11:39 AM UTC
Nice work,
Barrel depot made an aluminium barrel for this one. Don't know about the quality though.
Barrel depot made an aluminium barrel for this one. Don't know about the quality though.
 |

WEB HOSTING BY


Copyright ©2021 Armorama and Kitmaker Network, a subsidiary of Silver Star Enterprises
All Rights Reserved. Please read our Conditions of Use and Privacy Policy.
All Rights Reserved. Please read our Conditions of Use and Privacy Policy.