_GOTOBOTTOM
Armor/AFV: Allied - WWII
Armor and ground forces of the Allied forces during World War II.
Hosted by Darren Baker
GMC Bofors 40mm - C&C Appreciated
johnnyodotorg
Visit this Community
Pennsylvania, United States
Joined: November 26, 2013
KitMaker: 21 posts
Armorama: 15 posts
Posted: Saturday, February 21, 2015 - 04:45 AM UTC
Hello all, and welcome to my first full build log on Armorama. I got back into the hobby about 18 months ago, and I'm working on improving my skills and techniques, so I'm always looking for comments and criticism. Don't worry, I have a thick skin.

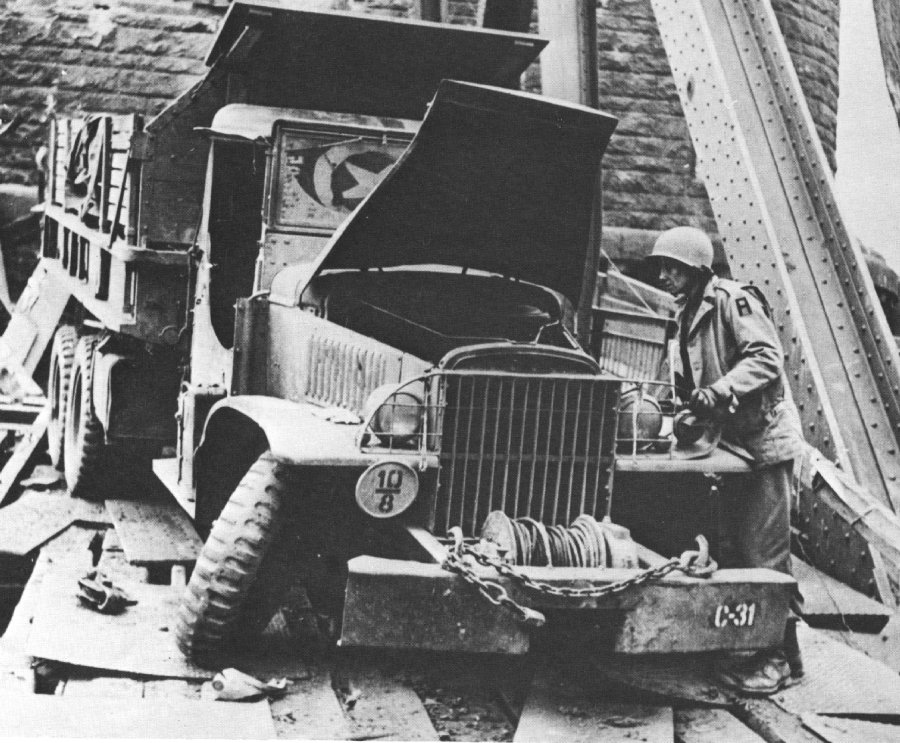
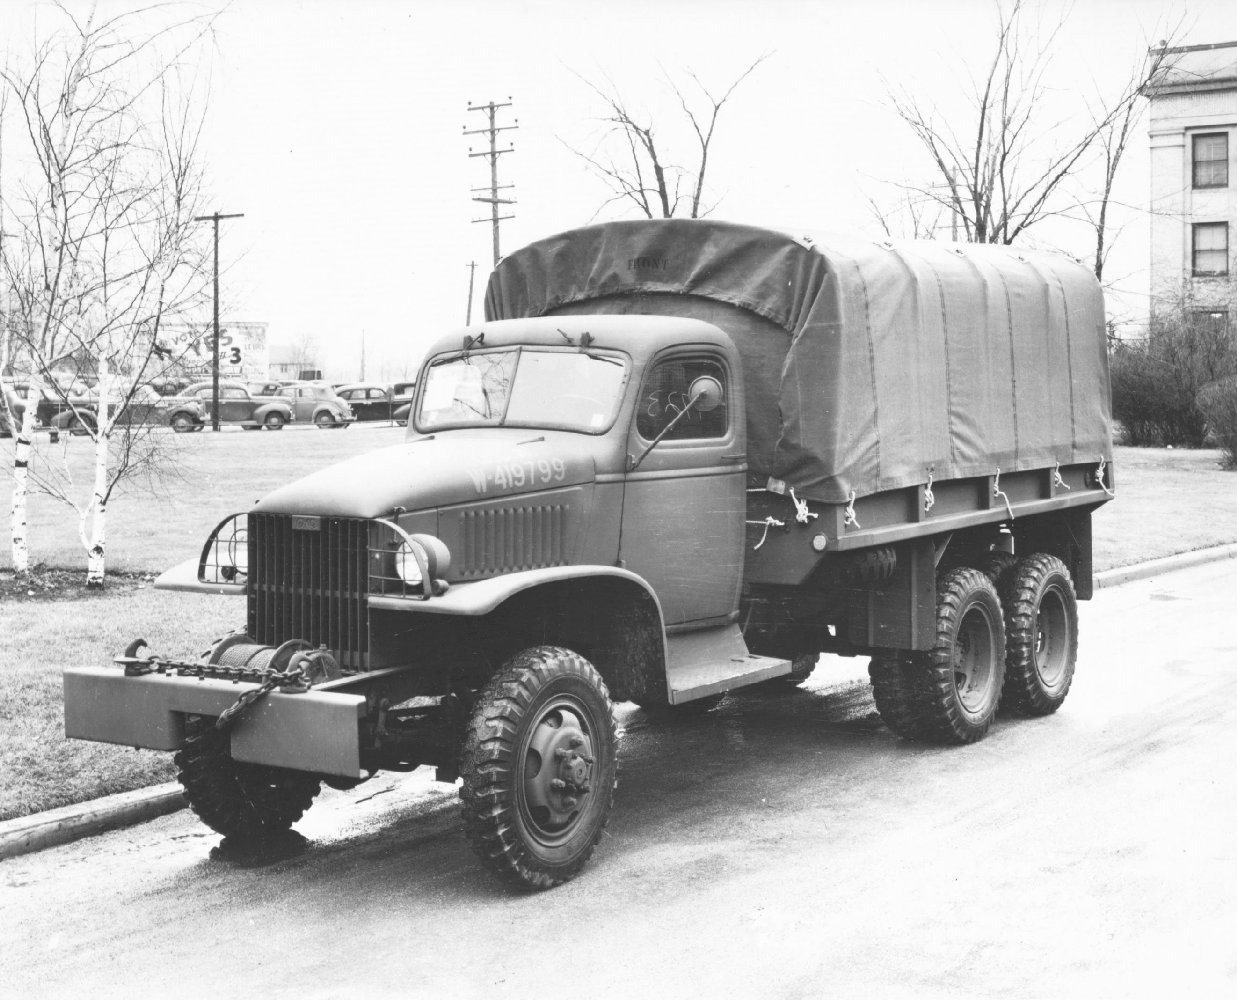
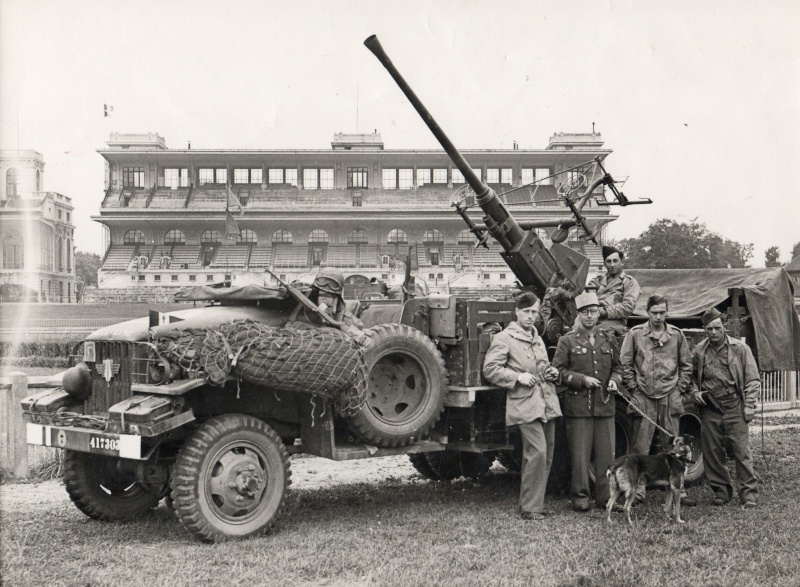
For this project, I'll be tackling the GMC Bofors 40mm, a field modification by the French forces during WWII. Effectively, it is a standard GMC CCKW with the back modified to hold a 40mm Bofors anti-aircraft gun. Why tow your AA gun when you can have it always ready on the back of the truck? This is the Hobby Boss 1/35 kit, and so far, the detail and fit so far are very good.

Shot of the box, and a instruction sheet detailing the parts layout:


First step was to build the engine


Next step is to start on the undercarriage. This is where I currently am. Note the white string to represent the tow rope. I'm unsure on how to make this look more like real rope at scale. Does anyone have any suggestions here? Should I paint it, dye it, replace it with something else? I'm been experimenting with a couple of options, but if anyone has any ideas, I'd love some advice.


CMOT
Staff MemberEditor-in-Chief
ARMORAMA
Visit this Community
England - South West, United Kingdom
Joined: May 14, 2006
KitMaker: 10,954 posts
Armorama: 8,571 posts
Posted: Saturday, February 21, 2015 - 05:49 AM UTC
I look forward to your progress with this kit. I know there are concerns about accuracy with the cab doors on the HobbyBoss kit, but it will not matter to most I believe.
Frenchy
Visit this Community
Rhone, France
Joined: December 02, 2002
KitMaker: 12,719 posts
Armorama: 12,507 posts
Posted: Saturday, February 21, 2015 - 01:32 PM UTC

Quoted Text

I know there are concerns about accuracy with the cab doors on the HobbyBoss kit, but it will not matter to most I believe.


Hi Darren

AFAIK, the concerns are about the doors of the closed cab variant, not the soft top cab seen here

H.P.
barkingdigger
Staff MemberAssociate Editor
ARMORAMA
#013
Visit this Community
England - East Anglia, United Kingdom
Joined: June 20, 2008
KitMaker: 3,981 posts
Armorama: 3,403 posts
Posted: Saturday, February 21, 2015 - 08:37 PM UTC
Looks good so far! I had a look in the box when these first came out, but haven't built one - was the frame easy to get squared up? For the winch cable you need something that has no fuzz on it. If the white stuff is ok I'd just soak it in black paint (to kill the white) before priming and painting - the real thing should be a greasy metallic black colour. Best to build the colour up in stages, with a base coat and several different washes before a subtle dry-brush to bring out the twists as highlights. This is ok if you leave it coiled, but probably won't work if you want it extended...
ericadeane
Visit this Community
Michigan, United States
Joined: October 28, 2002
KitMaker: 4,021 posts
Armorama: 3,947 posts
Posted: Saturday, February 21, 2015 - 10:04 PM UTC
you have a good eye for noticing that something seems amiss with your winch cable spool. In reality, the tow rope is 1/2" diameter. For all my winches, I use metallic infused embroidery thread (avaiable at any fabric section or craft store). It has no "fuzzies", has a more in-scale diameter, and has texture to simulate the wire rope. Even if you decide not to go this route, I'd recommend you remove some of your wound thread -- the winch spool would not have had as much cable as you have depicted.

http://i45.photobucket.com/albums/f74/ericadeane/M17%20MGMC/100_0503.jpg

Hope this helps!
Keep up the good work!
Armored76
Visit this Community
Bayern, Germany
Joined: September 30, 2013
KitMaker: 1,615 posts
Armorama: 1,500 posts
Posted: Saturday, February 21, 2015 - 11:58 PM UTC
Great to see this here! Good luck with your first building blog!

I finished mine about a moth ago for the What the Flak campaign and I must say it a breeze to build.

For the cable I went with the 10cm specified in the instructions but I think you could add about 3-5cm more. For the color I have been using a 50-50 mix of Revell 91 Steel and Revell 09 Anthracite.

Keep us posted!

Cristian
CMOT
Staff MemberEditor-in-Chief
ARMORAMA
Visit this Community
England - South West, United Kingdom
Joined: May 14, 2006
KitMaker: 10,954 posts
Armorama: 8,571 posts
Posted: Sunday, February 22, 2015 - 12:25 AM UTC

Quoted Text


Quoted Text

I know there are concerns about accuracy with the cab doors on the HobbyBoss kit, but it will not matter to most I believe.


Hi Darren

AFAIK, the concerns are about the doors of the closed cab variant, not the soft top cab seen here

H.P.


You may be right Frenchy, but I believe the door opening as such would still be amiss. As I said no big issue for me, but some are more pickyy as regards accuracy.
johnnyodotorg
Visit this Community
Pennsylvania, United States
Joined: November 26, 2013
KitMaker: 21 posts
Armorama: 15 posts
Posted: Sunday, February 22, 2015 - 07:26 AM UTC
Hello All -

Thanks for the comments, I'll address them here, then onto the next update.

Darren/Henri - Thanks for the heads up about the doors. These look pretty good, but I'll do some research before installing them to make sure everything looks proper.

Tom - Squaring up the frame wasn't too bad, I found it was easiest to leave the final connection between the axles and the frame until the very end, then I made sure everything was lined up before adding the final cement, that seemed to do the trick. We'll see for sure when I put the wheels on.

Christian - I saw your build while I was doing my research, excellent job. I hope mine turns out half as good.

Tom/Roy - Thanks for the tip on the rope. I've seen a bunch of pictures, and it seems to be the rope was pretty random from picture to picture. In some, I agree with Roy, it should be thinner, closer to thread, but in other pictures, it definitely looks like it is a lot thicker, almost the same thickness as the grill behind it.

For example, here's a CCKW one where the rope looks fairly thick, closer to the kit provided


And yet here, it's appears to be a much thinner rope


Even more confusing, the only source photo of an actual GMC Bofors 40mm Gun I've found looks like it didn't have a tow rope at all on the front. So either option might be wrong.


For now, I'm going to cut the kit-provided rope shorter, and try to paint it, see how it looks. If I don't like it, maybe I'll swap it out for the metallic thread later in the build.
johnnyodotorg
Visit this Community
Pennsylvania, United States
Joined: November 26, 2013
KitMaker: 21 posts
Armorama: 15 posts
Posted: Sunday, February 22, 2015 - 07:40 AM UTC
OK, got a little more done today in between shoveling and othe responsibilities.

The undercarriage is now complete, as you can see below. Very complex and nicely detailed under there. It's a pity 90% of it will never be seen. Next, onto the tires, and figuring out what to do about the winch cable.

highway70
Visit this Community
California, United States
Joined: November 27, 2004
KitMaker: 322 posts
Armorama: 267 posts
Posted: Sunday, February 22, 2015 - 10:49 AM UTC
There are several photos of the vehicle in The GMC A Universal Truck by Jean-Michael Boniface and Jean-Gabriel Jeudy

One clearly shows the winch with the thinner cable.

A variation apparently not offered in the kit would be to build it without winch. Leave (cut) the winch extension parts off the frame and attach a standard thinner bumper from a kit (for instance Italeri) that offers the winchlees option.

In another photo of at least 20 trucks the front six can be seen. Four of the six are winchless.
johnnyodotorg
Visit this Community
Pennsylvania, United States
Joined: November 26, 2013
KitMaker: 21 posts
Armorama: 15 posts
Posted: Sunday, February 22, 2015 - 10:38 PM UTC

Quoted Text

There are several photos of the vehicle in The GMC A Universal Truck by Jean-Michael Boniface and Jean-Gabriel Jeudy

One clearly shows the winch with the thinner cable.

A variation apparently not offered in the kit would be to build it without winch. Leave (cut) the winch extension parts off the frame and attach a standard thinner bumper from a kit (for instance Italeri) that offers the winchlees option.

In another photo of at least 20 trucks the front six can be seen. Four of the six are winchless.


Thanks for the book recommendation, just put in a request for it through my local library, should get a copy in the next week or so.

johnnyodotorg
Visit this Community
Pennsylvania, United States
Joined: November 26, 2013
KitMaker: 21 posts
Armorama: 15 posts
Posted: Saturday, February 28, 2015 - 10:11 AM UTC
Only a few hours this week to focus on this project, but progress is being made.

First off, thanks for Highway70 for the book recommendation. I grabbed a copy at my local library, and its been a great source of pictures.

As he mentioned, there is a picture of about 20 of these posed for a photo near the end of the war. Some have winches, some don't so I think its perfectly reasonable to leave it on.

I did replace the stock winch thread with some metallic embroidery thread based on Roy's feedback. I think it was the right choice. You can see the new thread in the picture below.


With the undercarriage largely complete, I moved on to building up the wheels. The wheels come in two parts, so there is a rather annoying seam that runs right down the center of all of them. To clean this up, I'm using my drill and some sanding sticks. Results are good, but its rather tedious work to get the seam completely gone.


More updates in the coming weeks.
johnnyodotorg
Visit this Community
Pennsylvania, United States
Joined: November 26, 2013
KitMaker: 21 posts
Armorama: 15 posts
Posted: Tuesday, March 10, 2015 - 08:51 AM UTC
Work is moving along nicely, if a bit slowly, mainly due to limited amount of time to work on the project. So far, I've completed all the wheels, and done significant work on the cabin.

To smooth out all the wheels, I spun them on my drill as shown in the previous post. They are currently dryfitted onto the frame. The hubs snap in and out, so I'll take it all apart before painting to make it easier to get a clear color line between the wheel and the hubcap.


Building the cab went fairly easily, but I'm a little worried about the eventual painting, especially the small details on the dash. I've left the steering wheel off for now to make them a little easier to access when the time comes.


As always, comments and criticism is appreciated.
johnnyodotorg
Visit this Community
Pennsylvania, United States
Joined: November 26, 2013
KitMaker: 21 posts
Armorama: 15 posts
Posted: Saturday, April 18, 2015 - 08:13 PM UTC
OK, work continues on this project, slightly delayed due to real world concerns.

Here is final construction:

And here it is broken down for priming.


With any luck, I should be able to get the first couple of coats of paint on it this week, and get moving on the final paint job, now that the weather is nicer.
johnnyodotorg
Visit this Community
Pennsylvania, United States
Joined: November 26, 2013
KitMaker: 21 posts
Armorama: 15 posts
Posted: Tuesday, June 16, 2015 - 09:07 AM UTC
OK, I know I've been gone for a while, but I wanted to update everyone now that this build is complete. It took a while longer than I would have liked, mostly due to limited time to actually work on this.

But, she is done now, and I'd greatly appreciated any feedback you might have.


And if you are interested in relative size, here it next between an M4 Sherman and a Willy Jeep.

fificat
Visit this Community
California, United States
Joined: January 10, 2011
KitMaker: 135 posts
Armorama: 109 posts
Posted: Friday, June 26, 2015 - 09:58 AM UTC
Johnny, I served on a M42 in the Cal National Guard in the 1950's as a loader. This gun shoots 240 rounds a minute, and needs a LOT of ammo in clips in various places around the gun. If you show this truck/gun in action, you will have a real mess of spent shells under the truck. Even if in transit, a lot of ammo should be shown.
fificat
Visit this Community
California, United States
Joined: January 10, 2011
KitMaker: 135 posts
Armorama: 109 posts
Posted: Friday, June 26, 2015 - 08:50 PM UTC
OOOPS, Johnny, I just woke up and noticed you have only one gun, not two like on the M42, so 120 rounds per minute. Still, there should be a lot of ammo in evidence.

Your build looks real good too.
johnnyodotorg
Visit this Community
Pennsylvania, United States
Joined: November 26, 2013
KitMaker: 21 posts
Armorama: 15 posts
Posted: Sunday, June 28, 2015 - 07:46 AM UTC
Hey thanks for the tip. The kit did come with some extra ammo clips, I just tossed them in my spares box. I'll see about littering them around the base or on the decking.
 _GOTOTOP