_GOTOBOTTOM
Armor/AFV: Allied - WWII
Armor and ground forces of the Allied forces during World War II.
Hosted by Darren Baker
Mirror Models ZiS-30 Build Blog
ColinEdm
Staff MemberAssociate Editor
ARMORAMA
Visit this Community
Alberta, Canada
Joined: October 15, 2013
KitMaker: 1,355 posts
Armorama: 1,229 posts
Posted: Tuesday, June 30, 2015 - 08:49 AM UTC
Hi all!

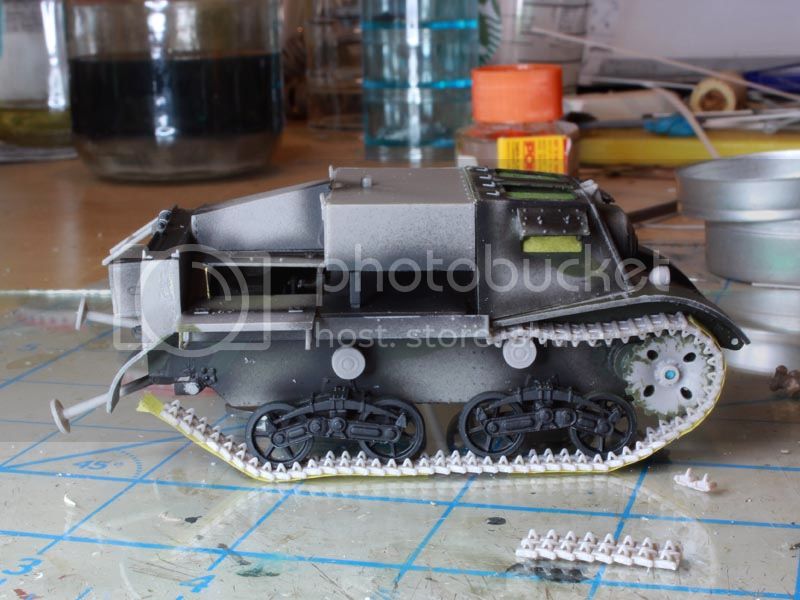
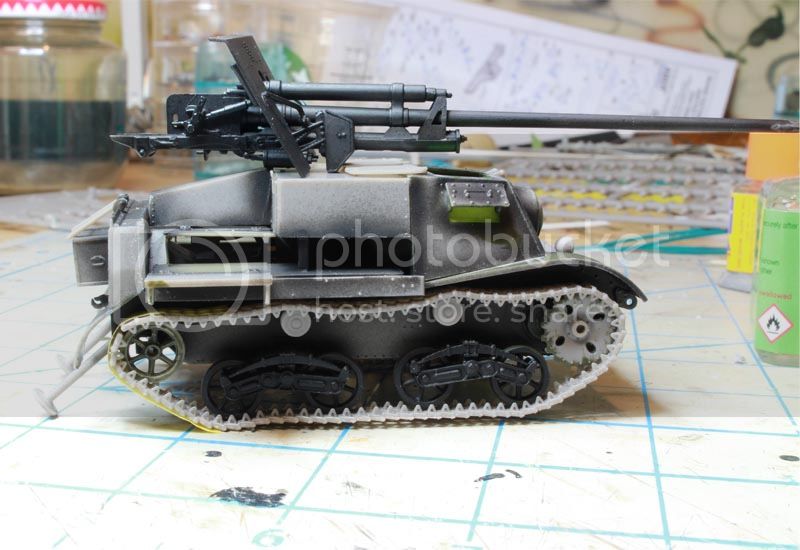
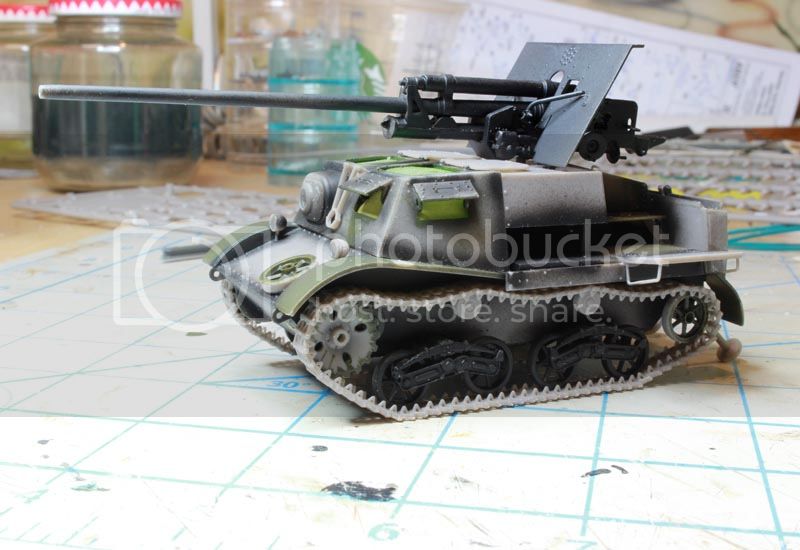
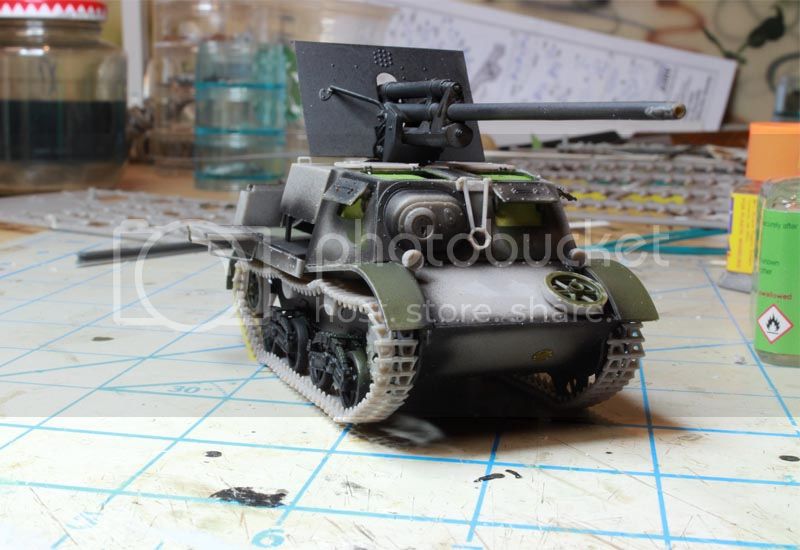
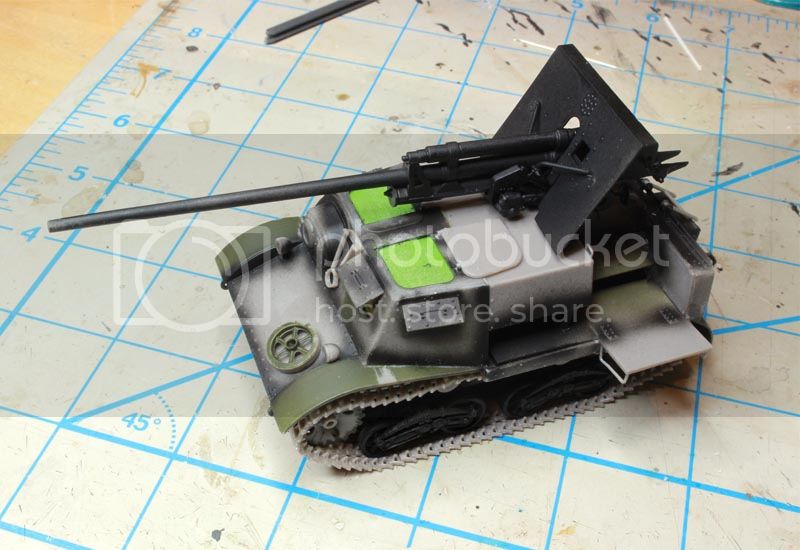
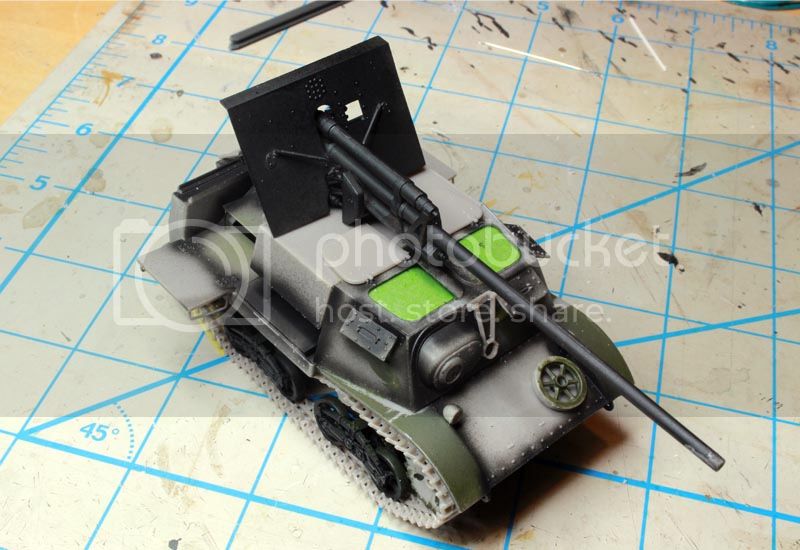
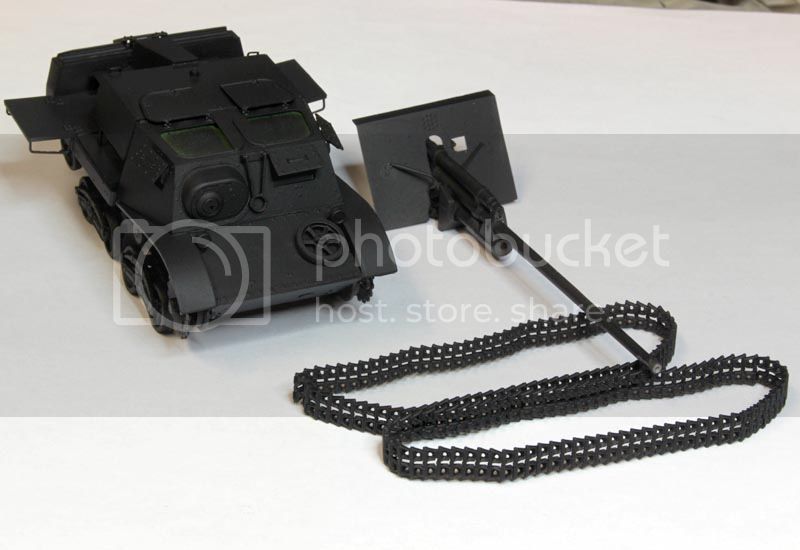
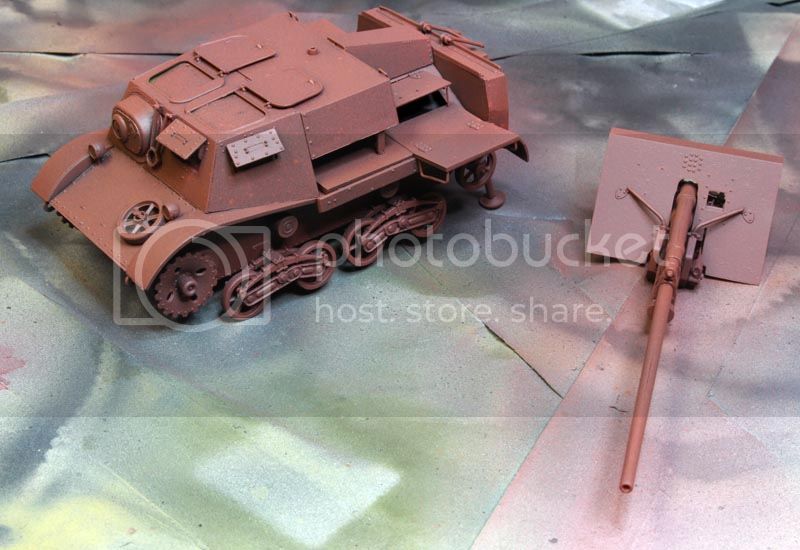
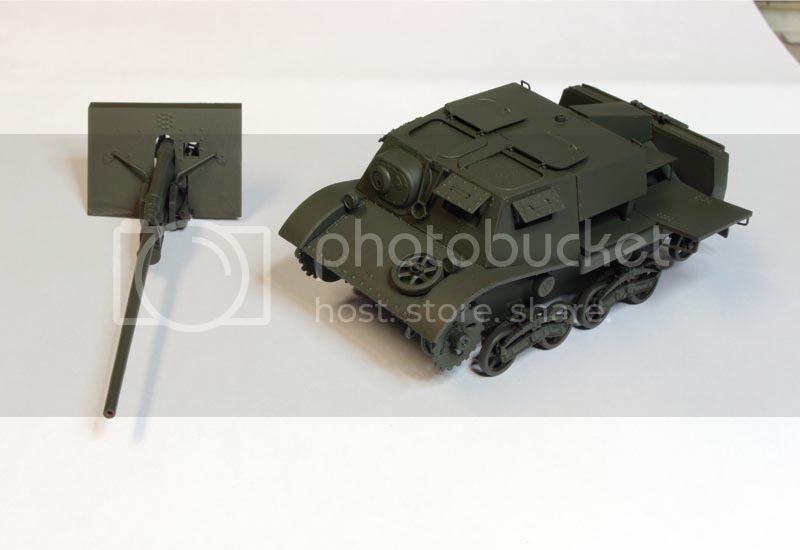
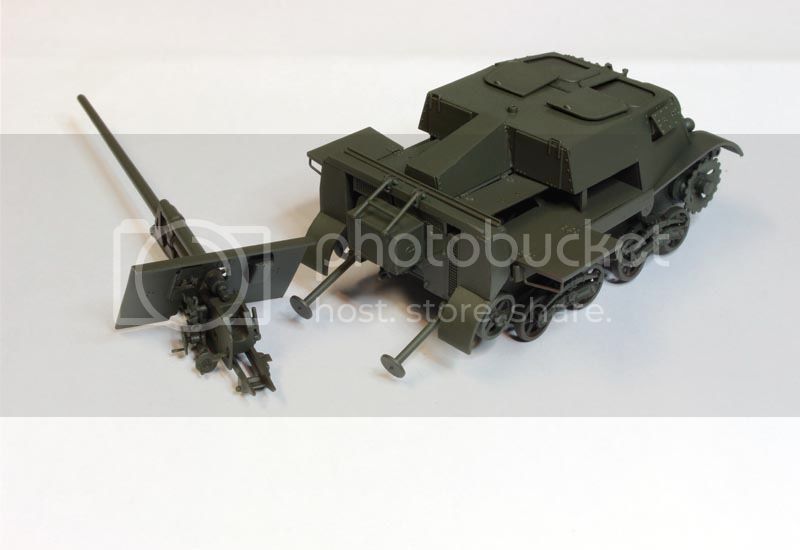
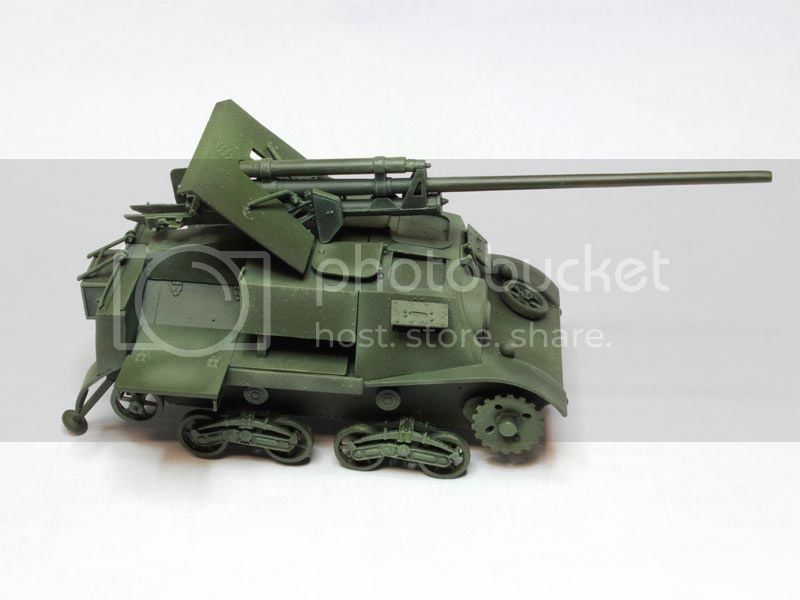
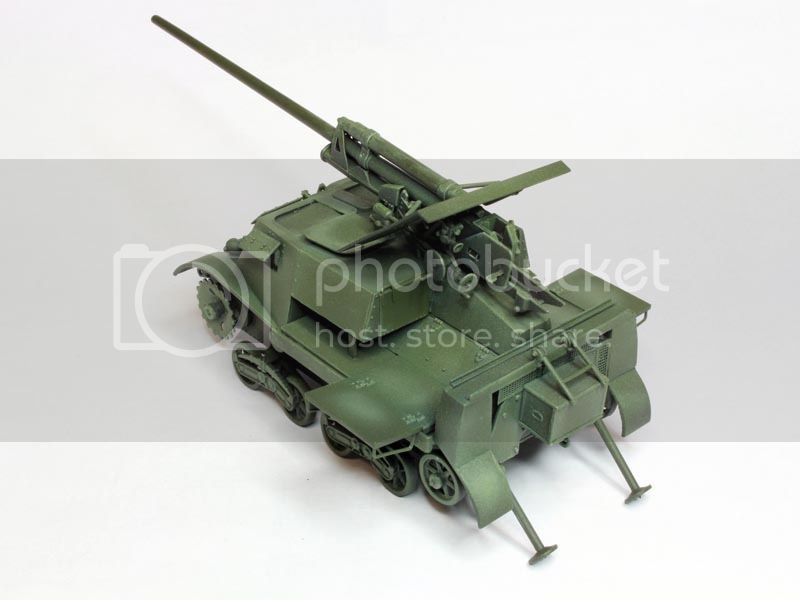
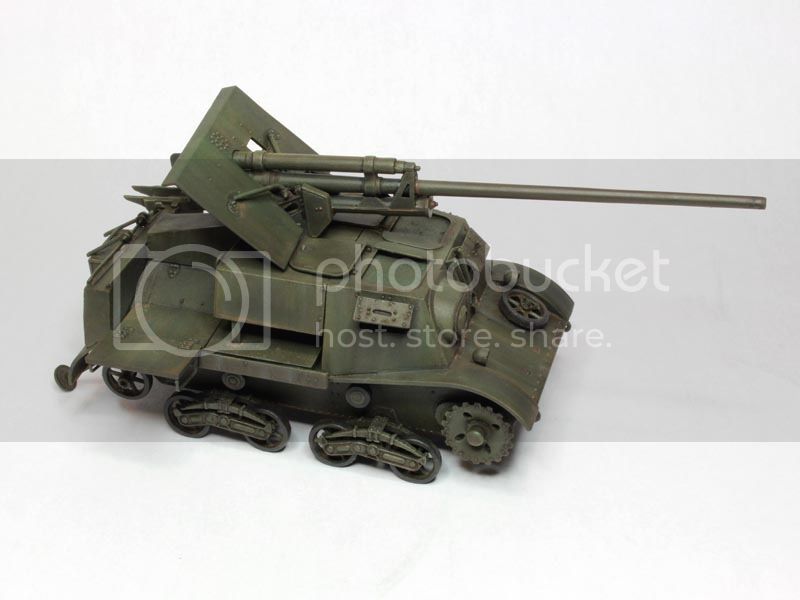
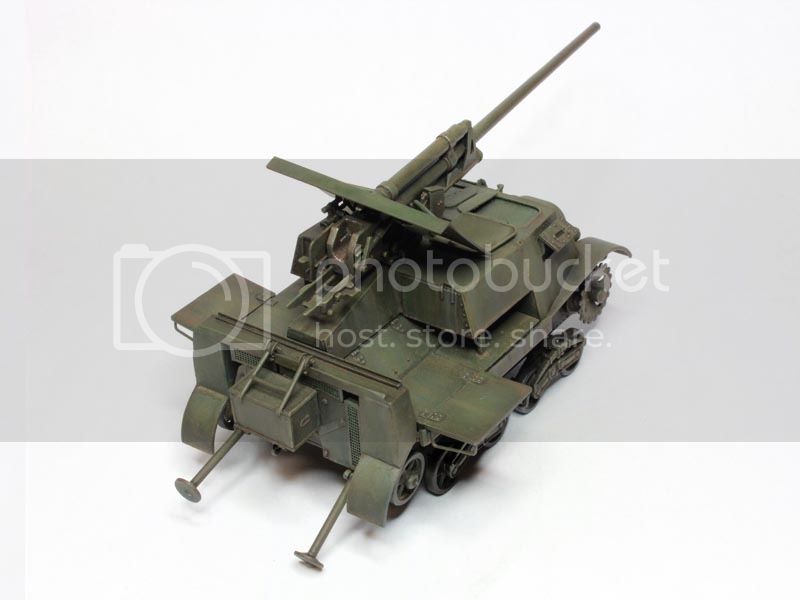
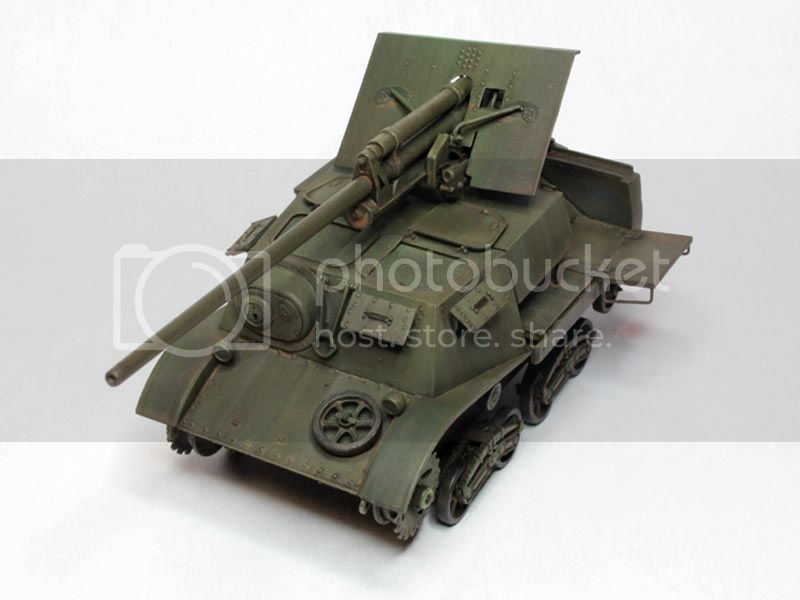
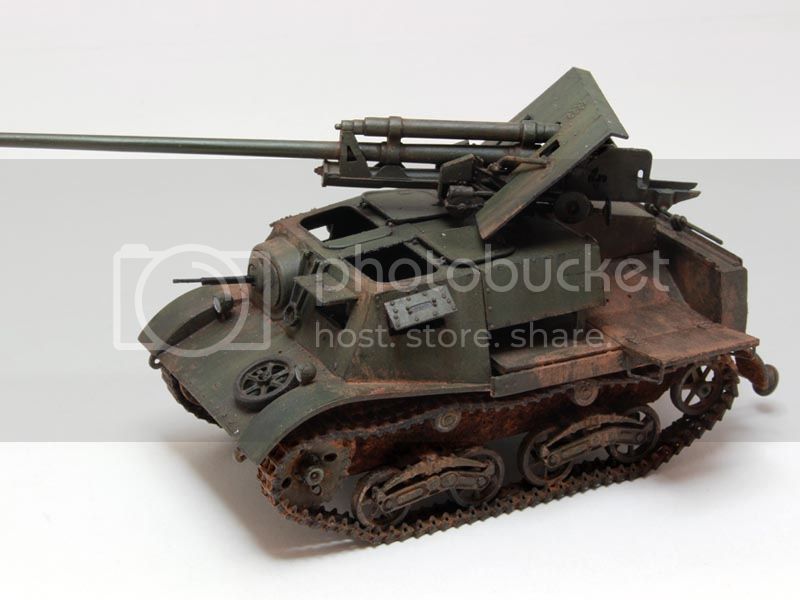
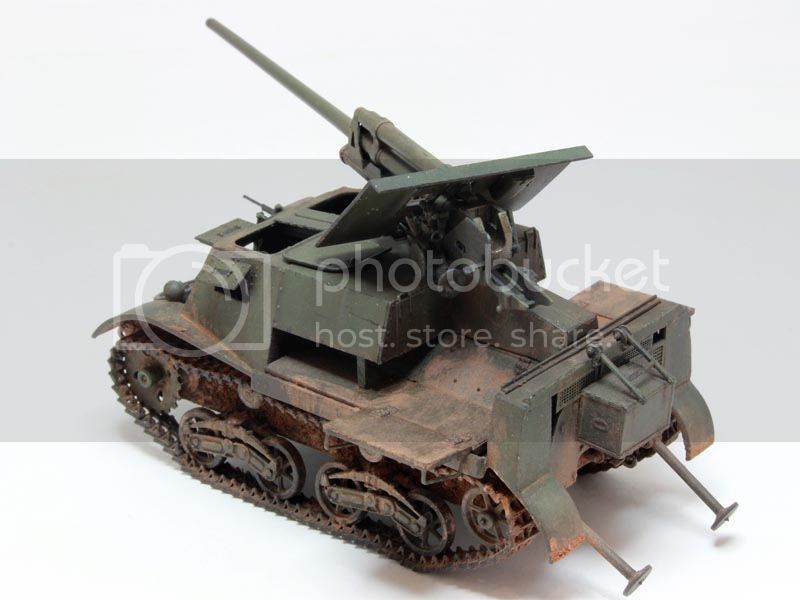
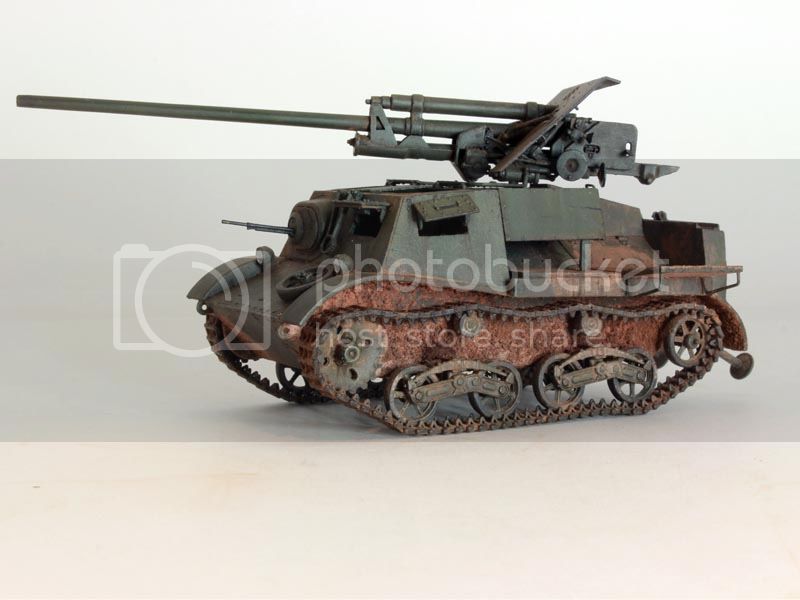
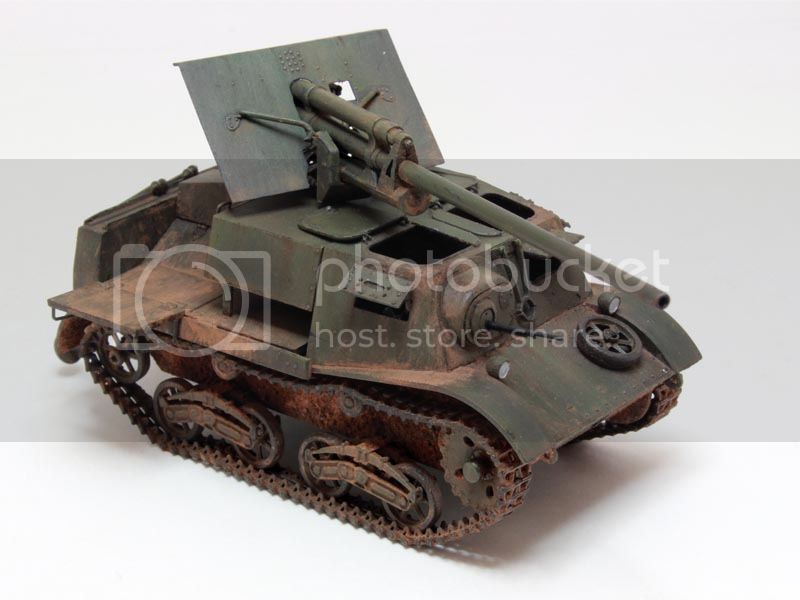
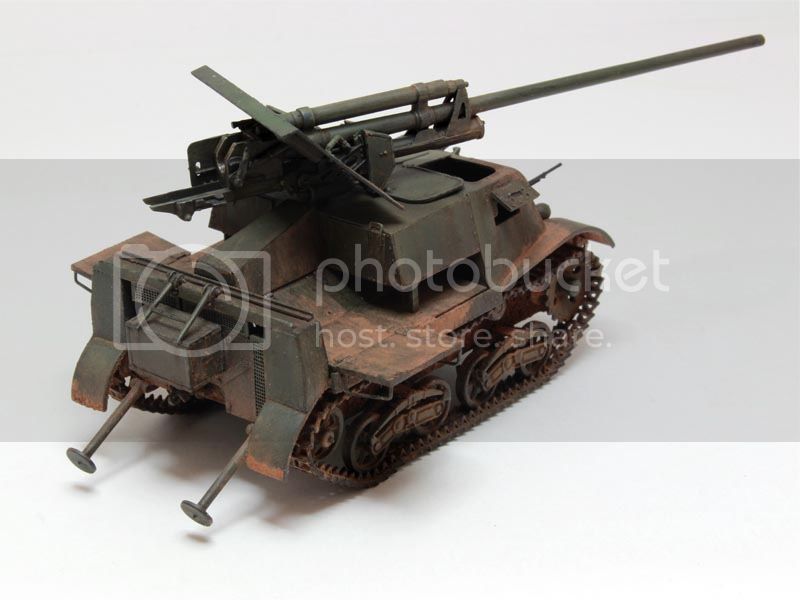
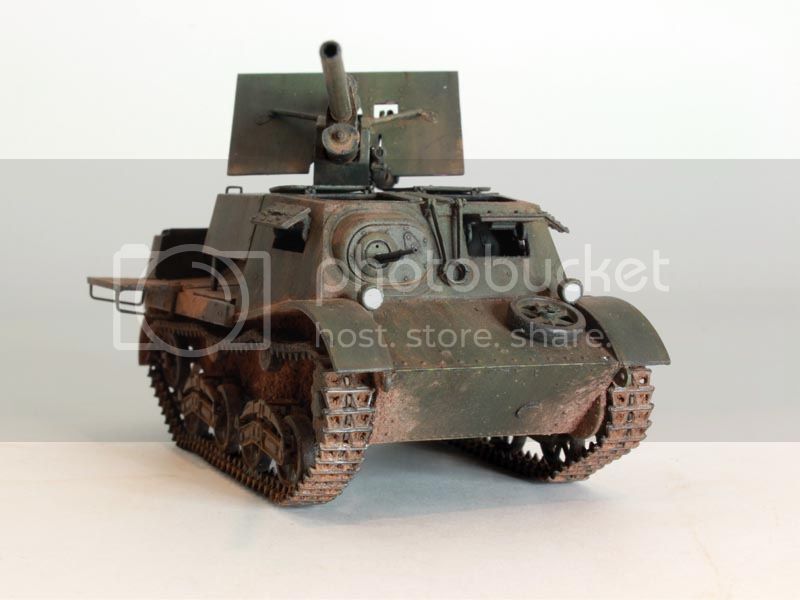
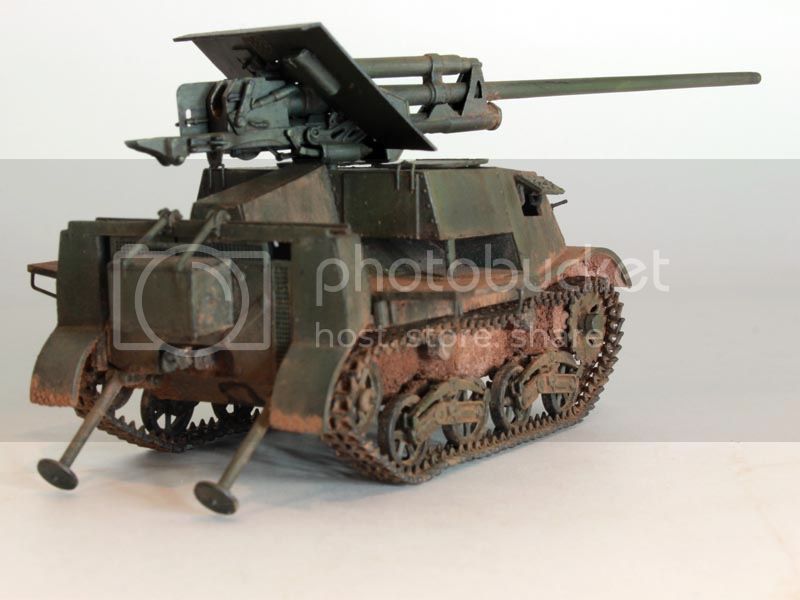
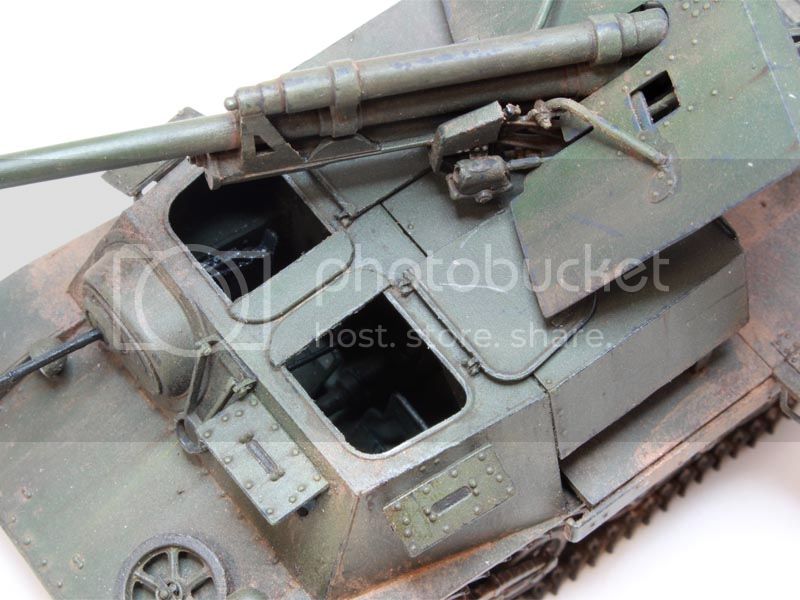
With my in-box review of Mirror Models ZiS-30 self propelled anti-tank gun complete Mirror Models ZiS-30 in-Box Review , I am now moving on to a build blog of this little critter. I will try to update regularly, but as it is summer I may not get as much bench time as usual.

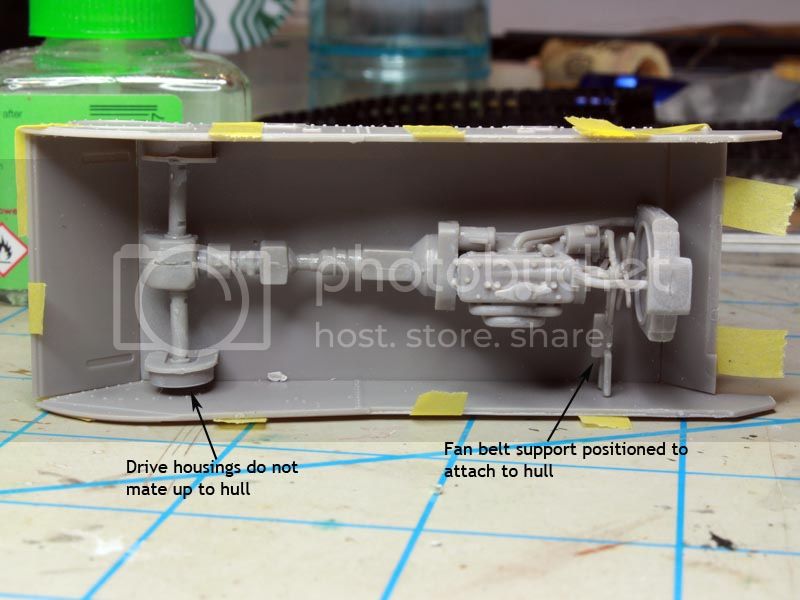
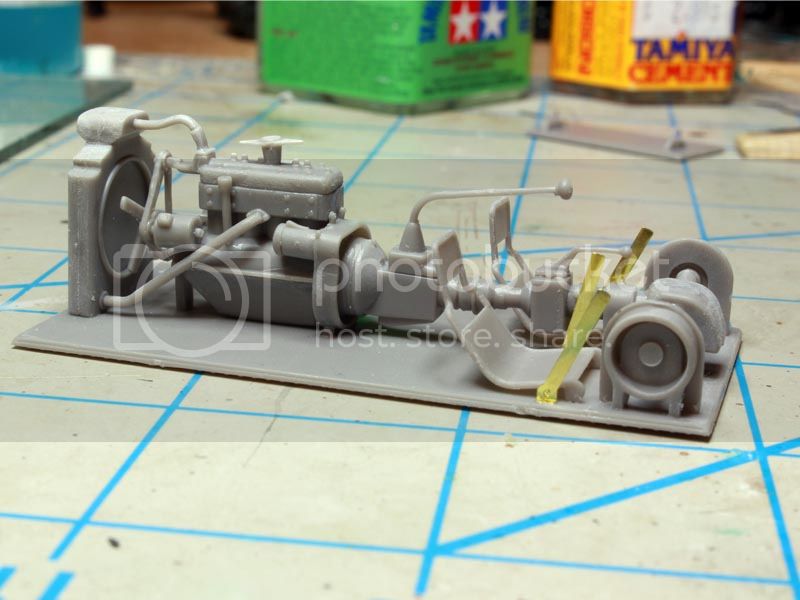
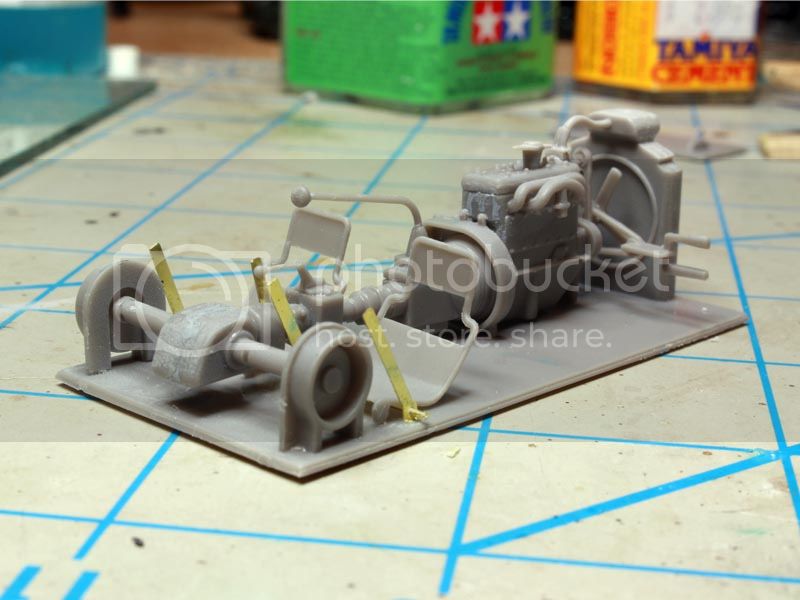
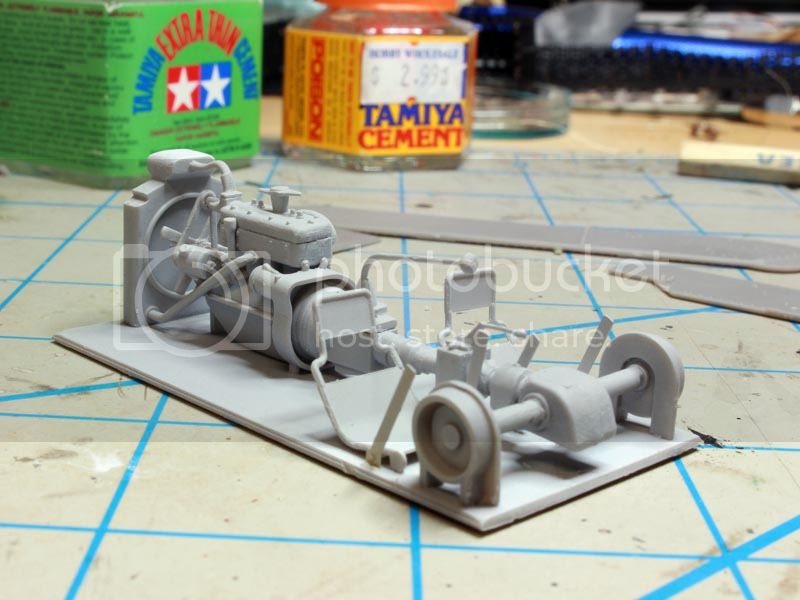
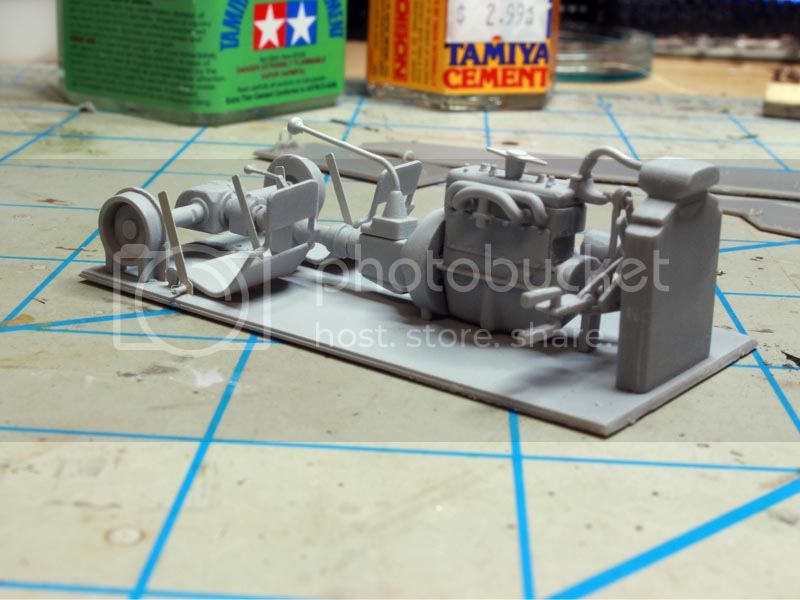
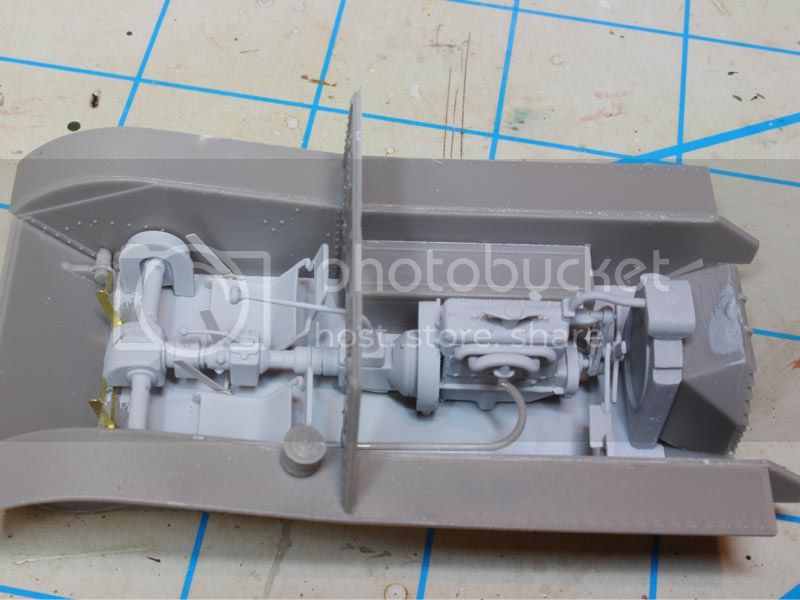
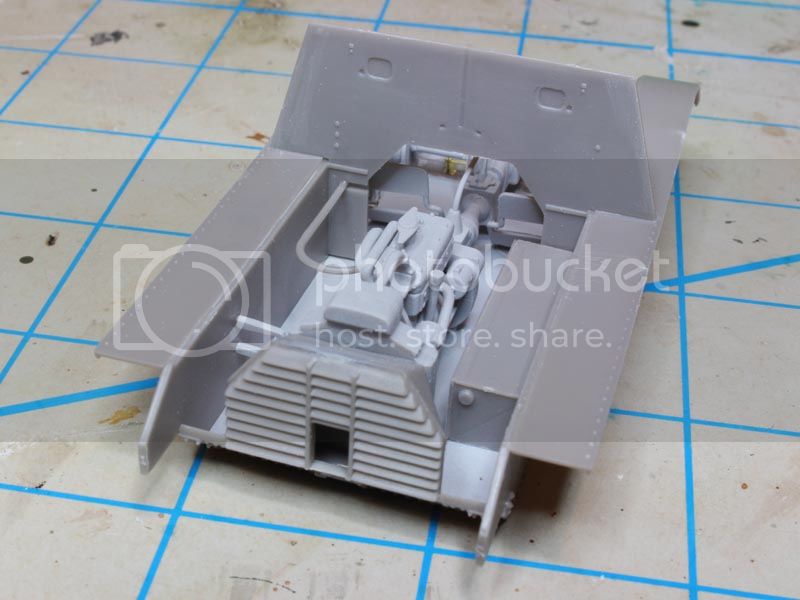
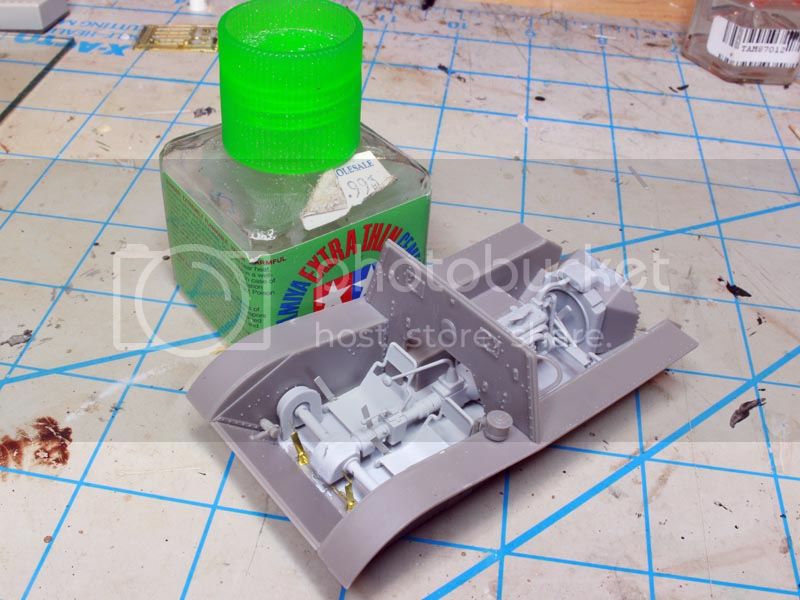
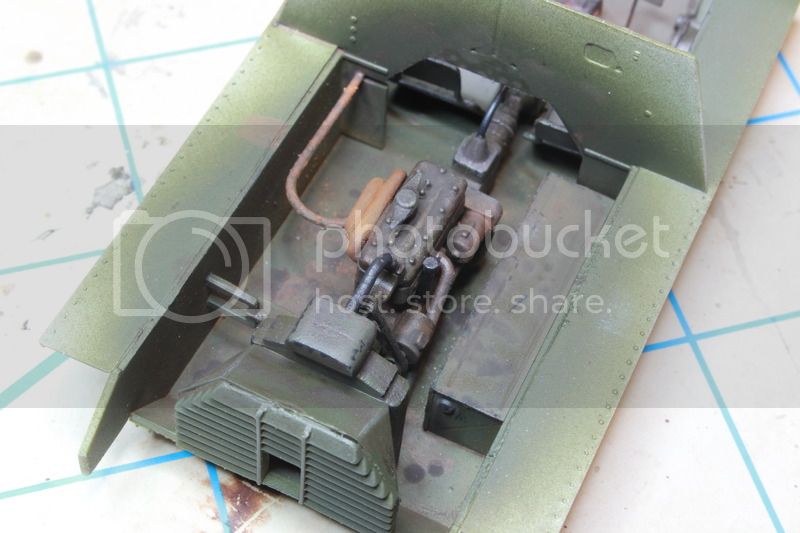
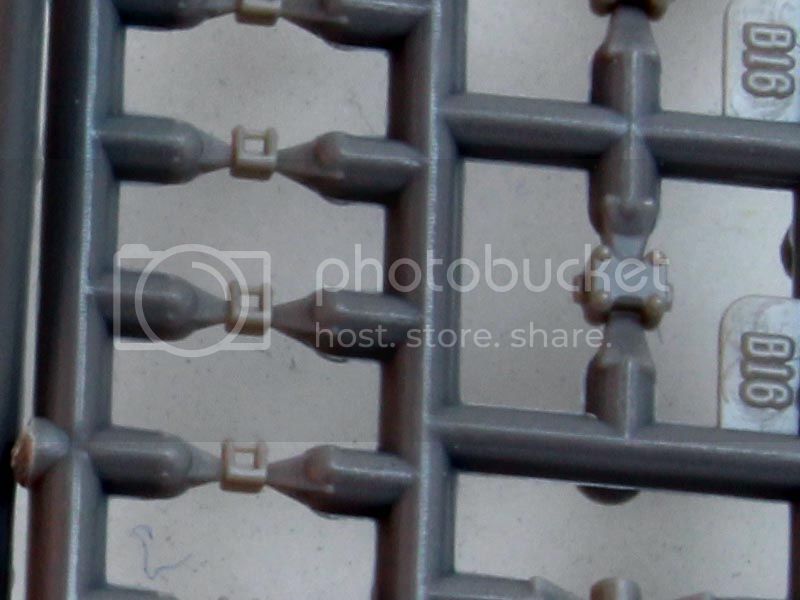
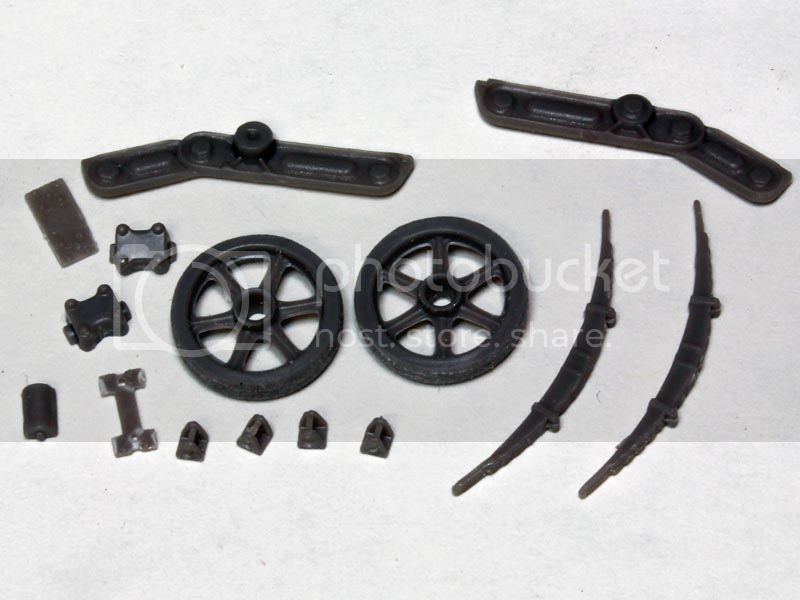
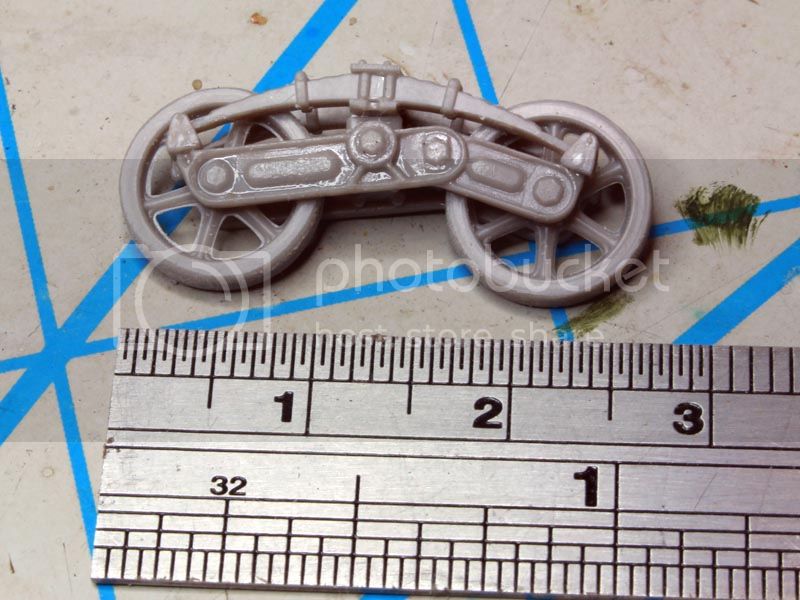
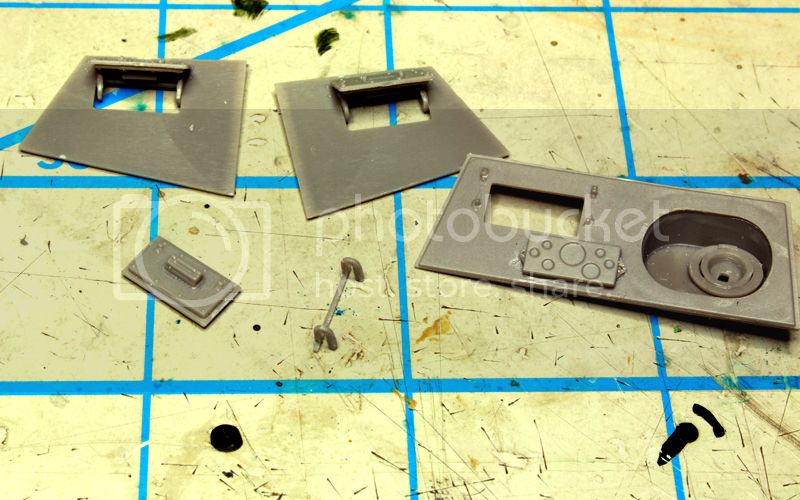
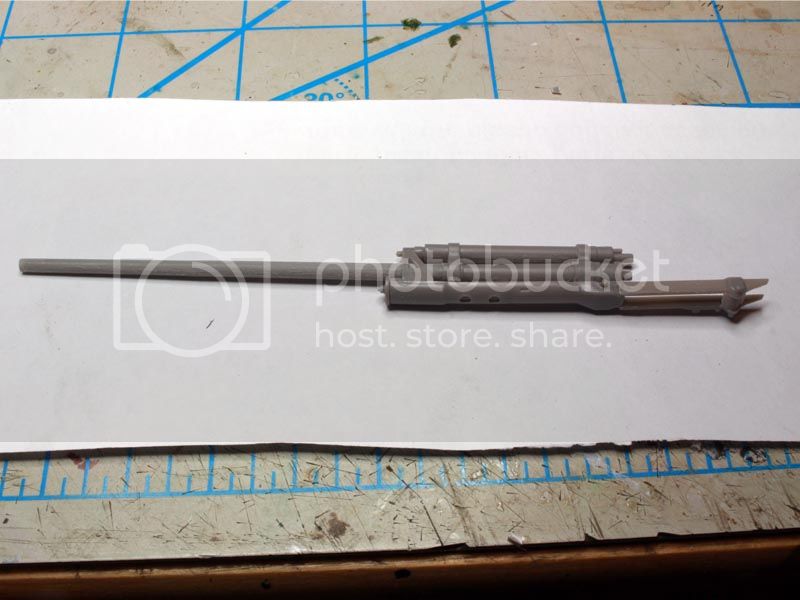
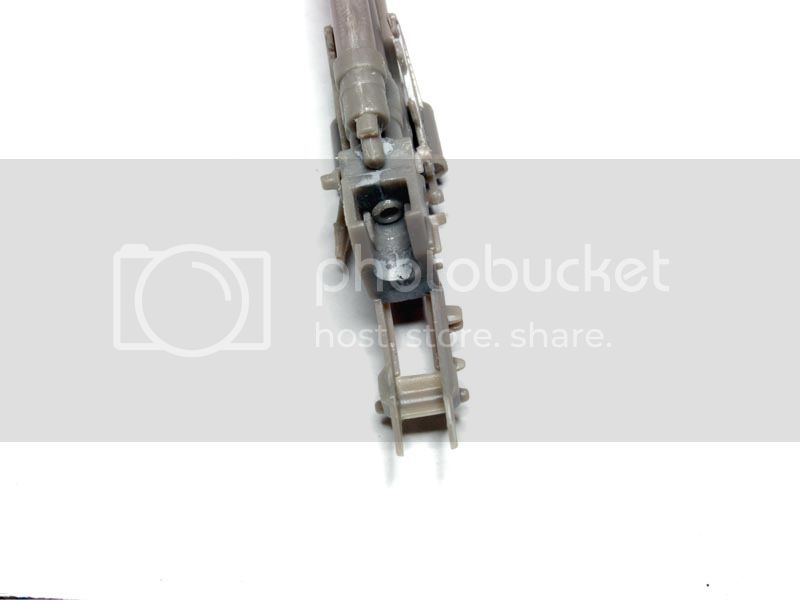
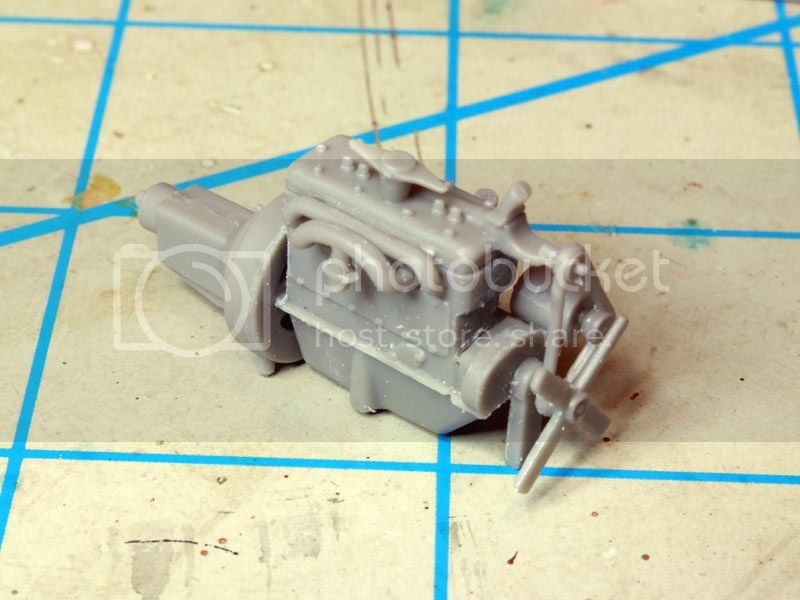
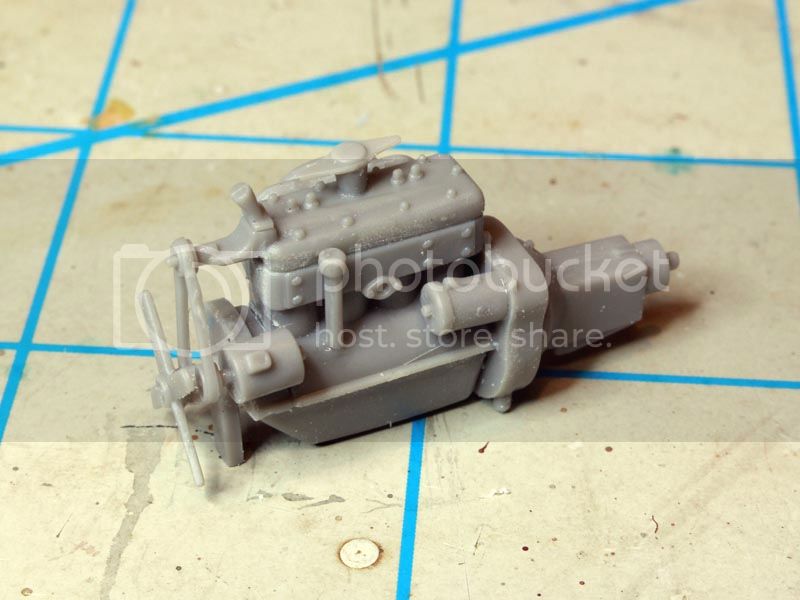
Assembly starts with the engine, radiator and drivetrain mounted on the hull bottom. The radiator and engine consist of about 20 parts on their own and build up into a nicely detailed little motor. You have to be very careful aligning parts as there are not many locating pins, and those that are there need some extra work. Also, the plastic is quite soft, and combined with large sprue gates means that you have to be very careful removing parts from the sprue to avoid damage. At this stage, the motor is still not complete, more pieces will be added after it is mounted to the hull bottom. Ignore the fan, it came back off - I thought I was smarter than the instructions, I was wrong .


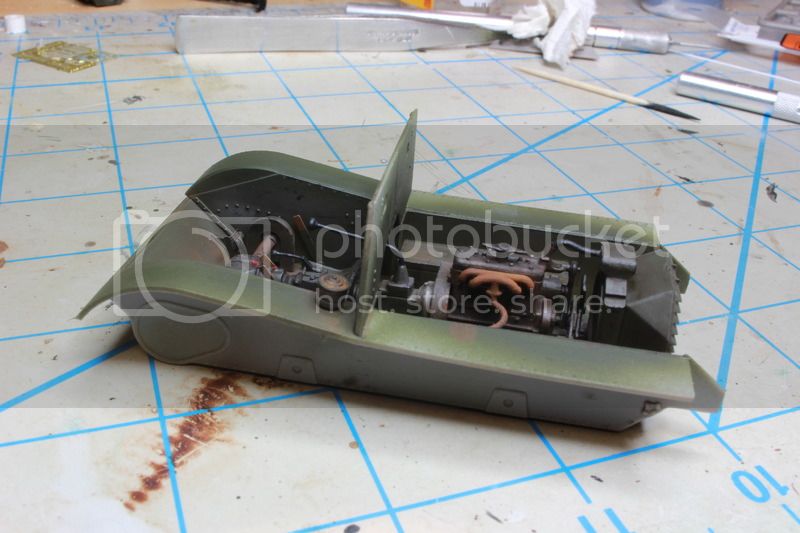
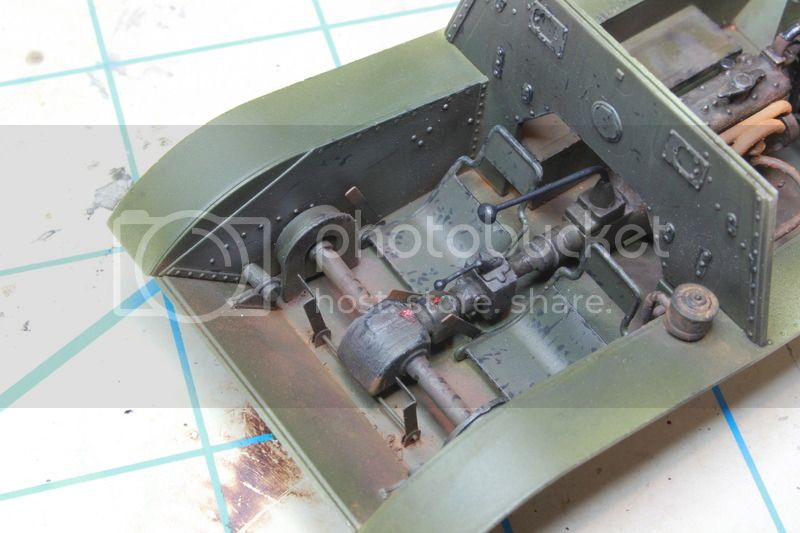
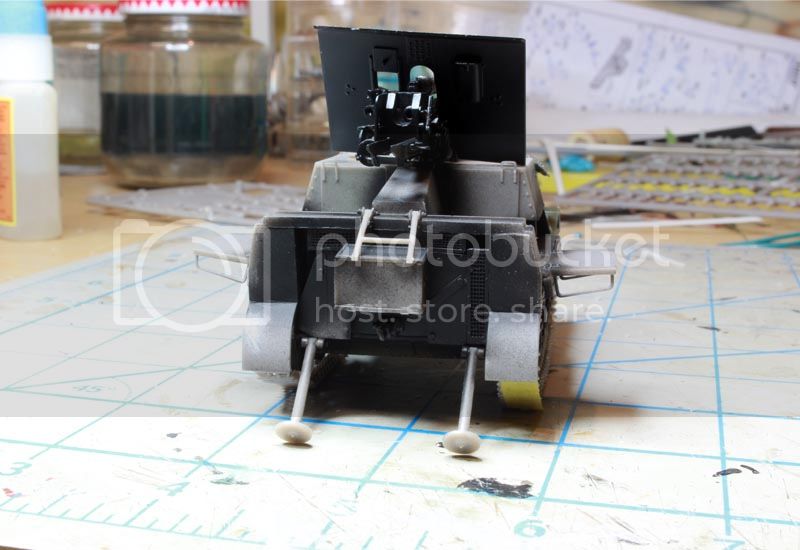
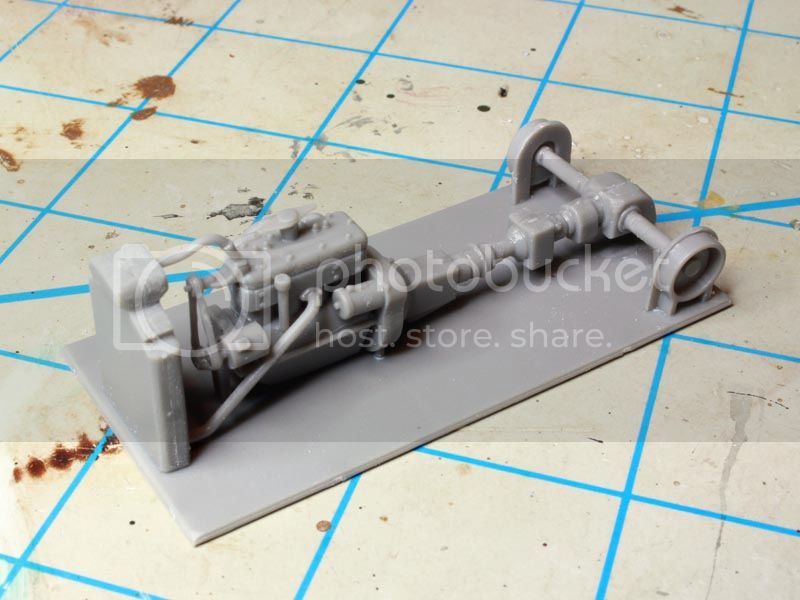
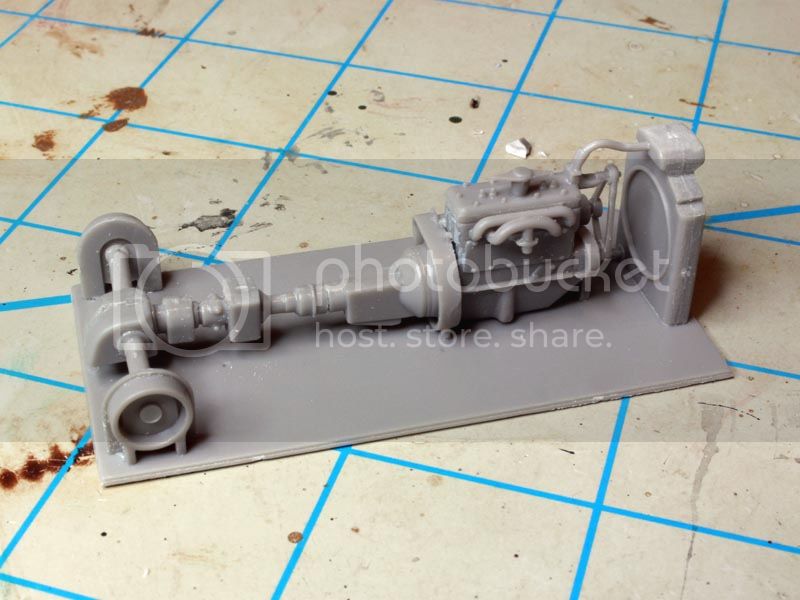
Once the engine and radiator are completed, they are mounted on the bottom hull plate and coolant hoses added. Then the driveshaft, differential and axles are added.


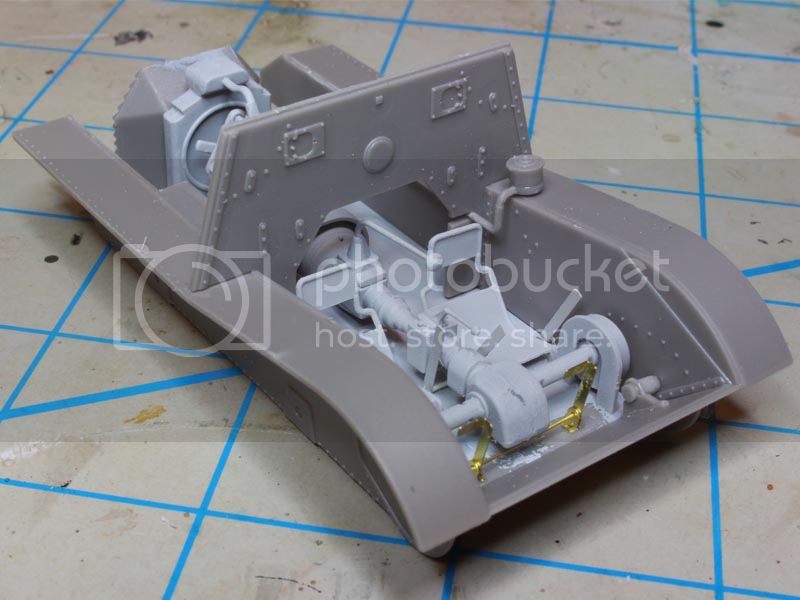
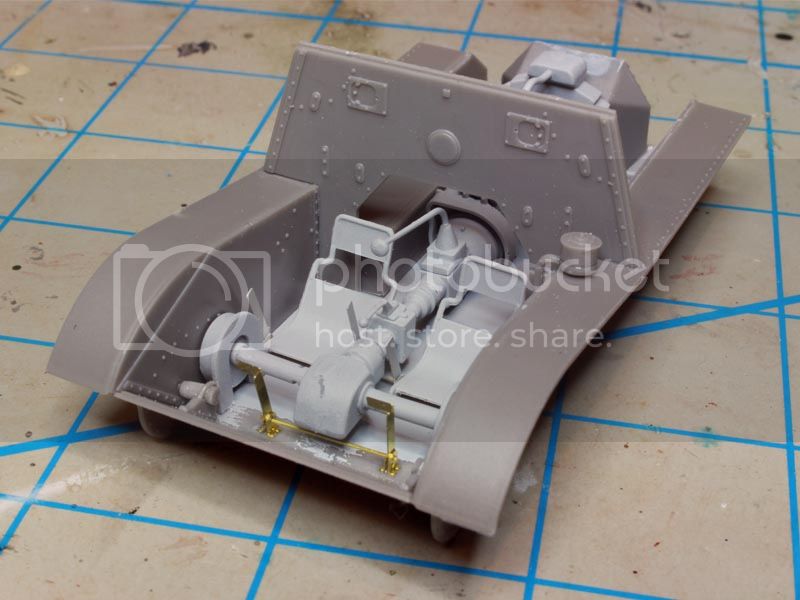
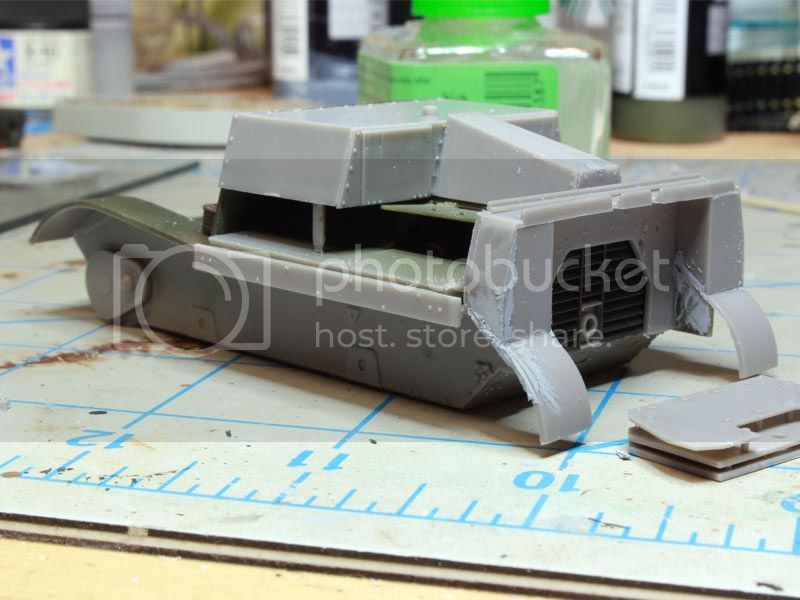
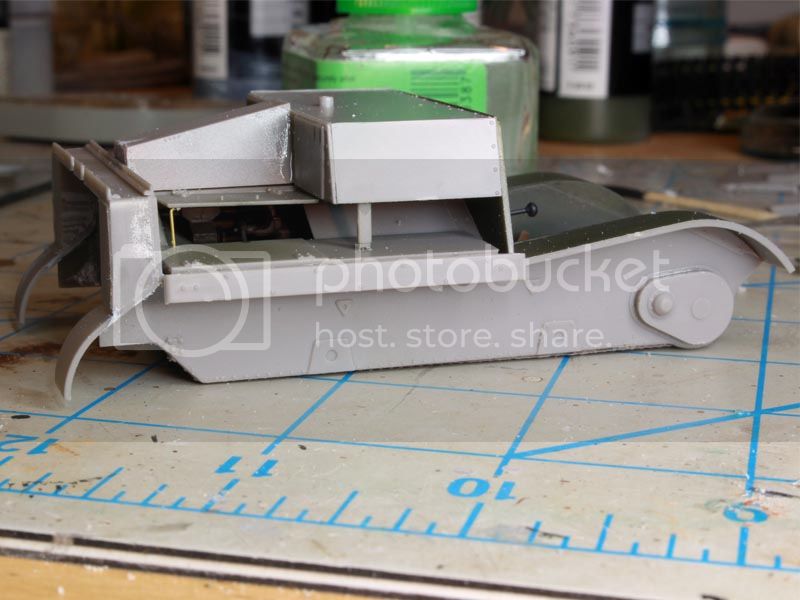
Next step will be the assembly of the lower hull.
Thudius
Visit this Community
Uusimaa, Finland
Joined: October 22, 2012
KitMaker: 1,194 posts
Armorama: 1,077 posts
Posted: Tuesday, June 30, 2015 - 03:17 PM UTC
I'll be watching this, managed to grab one for the stash a while ago.

Kimmo
ColinEdm
Staff MemberAssociate Editor
ARMORAMA
Visit this Community
Alberta, Canada
Joined: October 15, 2013
KitMaker: 1,355 posts
Armorama: 1,229 posts
Posted: Saturday, July 18, 2015 - 09:31 AM UTC
Time for a little update on this critter, I haven't had much bench time as it is summer and the weather has been nice, but did progress a bit.

The assembly steps are rather unique in the way things come together, with much of the interior detail added after the hull is built up. Given the diminutive size of this model, I decided to do as much of the interior as I could before assembling the hull, both for ease of assembly as well as for painting as I plan to have as many hatches open as possible.

That fan that I had attached earlier came off as there is another set of pulleys and belt that has to be installed once the hull sides are fitted and it attaches to one of the hull sides. I taped the hull sides on to allow me to position this piece as shown below. This also highlighted the fact that the drive housings do not mate up to the hull sides, there is quite a gap. I will do some research to see if I can find some pictures showing if there really is this gap, although it may turn out to be a moot point as this will likely not be visible from the hatches.

Here are a couple of pics with the seats and controls added:


The PE levers are a nice touch, but again positioning of these and the seats is by guess or by golly as there are no locating pins or marks whatsoever, although there is a photograph in the instructions that shows them installed that can be used as reference.
Primed and ready for paint.


..and having just posted this I notice that I haven't installed the foot pedals...stay tuned!
Cheers!
ColinEdm
Staff MemberAssociate Editor
ARMORAMA
Visit this Community
Alberta, Canada
Joined: October 15, 2013
KitMaker: 1,355 posts
Armorama: 1,229 posts
Posted: Wednesday, July 22, 2015 - 10:00 AM UTC
Some more progress, added the foot pedals and then built up the hull sides. There are no locating pins of any sort for this so you have to take your time and be very careful to make sure things line up properly. I think I did it right, the firewall slotted in very nice and snug, hopefully the upper hull will mate up with it.


Just to give a sense of scale and how diminutive this beastie is...

Next step will be painting the interior.
ColinEdm
Staff MemberAssociate Editor
ARMORAMA
Visit this Community
Alberta, Canada
Joined: October 15, 2013
KitMaker: 1,355 posts
Armorama: 1,229 posts
Posted: Saturday, August 15, 2015 - 09:26 AM UTC
Have been away so not a lot of progress, just painting and weathering the interior. The only colour picture I could find showed the interior in what looks like 4B0 green, so that is how I proceeded:

Chipping on the metal seats looks a bit excessive, but I'm not sure how much will really be visible...


ColinEdm
Staff MemberAssociate Editor
ARMORAMA
Visit this Community
Alberta, Canada
Joined: October 15, 2013
KitMaker: 1,355 posts
Armorama: 1,229 posts
Posted: Monday, September 07, 2015 - 01:08 AM UTC
And I'm back on this after a brief hiatus to finish up my KV-85. Started on the upper hull assembly. Given all the nice engine detail I wasn't about to close it all up so I fashioned some prop rods and brackets and kept a couple of the engine access panels open. i'm thinking of doing a dio of an abandoned vehicle being examined by curious German soldiers, even though it is questionable how much will actually be visible...

Some putty work was required, the lack of locating pins/strips does make it difficult to get a good fit - lots of test fitting is required and even then it doesn't always line up right!

Started on the running gear, there are four sets of suspension bogies, each with 15 pieces. A number of these are quite small and the large sprue gates and soft plastic means it is very easy to damage some of these parts so take extreme care! I resorted to cutting up the sprue into smaller sections for easier access, but still damaged a couple of pieces.


Again a lot of care is required to make sure thinks go together correctly. The final diminutive assembly....3 more to go.
ColinEdm
Staff MemberAssociate Editor
ARMORAMA
Visit this Community
Alberta, Canada
Joined: October 15, 2013
KitMaker: 1,355 posts
Armorama: 1,229 posts
Posted: Monday, September 14, 2015 - 09:00 AM UTC
Slowly making progress, finished off the four bogie assemblies, now back to the hull. The crew compartment is made up of front, side and top pieces, with a rudimentary instrument panel and the machine gun assembly.

I elected to position the vision ports open, be very careful removing the hinge assemblies from the sprue as they are very easy to damage due to the soft plastic and large attachment points. The instructions say to put one side on first, then assemble the other side and front before attaching, and then finally the roof. Because I want to paint the inside, I put all the pieces together without attaching to the hull and held in place until the glue dried to get a good fit.


The barrel of the machine gun was badly damaged when I removed it from the sprue, so I have a new brass one on order from The Barrel Store.

Handles for the fold out firing platform extensions are also added, again, very delicate and easy to damage, a good candidate for brass rod?

The rear hitch is made up of four delicate parts and suffered from complete molding on a couple of parts so I had to add some new bolt heads and a bracket.

The PE screens on the rear panel also don't match up correctly, and the instructions show a different shaped PE piece than was included in the kit, so I modified it and got it to fit as best I could.
ColinEdm
Staff MemberAssociate Editor
ARMORAMA
Visit this Community
Alberta, Canada
Joined: October 15, 2013
KitMaker: 1,355 posts
Armorama: 1,229 posts
Posted: Monday, September 21, 2015 - 08:25 AM UTC
Because I hate doing tracks, I decided to move on to the boom stick. Lots of small, fiddly parts, some good detail and some soft detail, plus a frustrating lack of clarity in the instructions in a number of locations. Oh well, onward!

Starts with the barrel, recoil cylinder and slide:


This thing cries out for an a/m turned barrel, there is one for the T-34/57 but I'm not sure how well it would work. The barrel is two piece and turned out to be warped, needing some straightening and filling. The top of the recuperator is not quite accurate as there should be a gap along its length so I scribed that in afterward.

The breech block is a nice little piece, I did have to go back and readjust one piece as it is hard to put together without the "donut" popping out - ream it out a bit. again, some filling is needed here.


Onto the elevation gears - the carpet monster demands sacrifice! I did lose the smallest bracket piece (middle bottom) but after a half hour of searching culminating with essentially straining the carpet dust I found it!

A number of bolt details were awfully soft so I replaced a number of them. The gun assembly looks pretty good.


Final assembly is the shield with some fiddly brackets.


Had to ream out the eyepiece to make it look more realistic. Now that this is done, I can't put off the tracks and final suspension assembly...ugh.
ColinEdm
Staff MemberAssociate Editor
ARMORAMA
Visit this Community
Alberta, Canada
Joined: October 15, 2013
KitMaker: 1,355 posts
Armorama: 1,229 posts
Posted: Tuesday, September 29, 2015 - 08:31 AM UTC
Finally onto the tracks. I attached the main suspension bogies to the hull, the locating pins are barely nubs and not very useful, you have to hold each piece in position until the glue sets because the joint is not strong enough to hold the bogie in position. Very easy to get a collapsed or cockeyed suspension. The individual track links are nicely cast and fit together quite well albeit a bit loose. I have to glue them in sections and form them around the suspension with tape until the glue sets.


The idlers didn't line up with the rest of the suspension so I had to add some spacers.

Slow going but almost ready for primer!


ColinEdm
Staff MemberAssociate Editor
ARMORAMA
Visit this Community
Alberta, Canada
Joined: October 15, 2013
KitMaker: 1,355 posts
Armorama: 1,229 posts
Posted: Friday, October 02, 2015 - 08:55 AM UTC
Pretty much ready for the paint booth!

Whoops! Except for caps on drive sprockets and idlers!


ColinEdm
Staff MemberAssociate Editor
ARMORAMA
Visit this Community
Alberta, Canada
Joined: October 15, 2013
KitMaker: 1,355 posts
Armorama: 1,229 posts
Posted: Saturday, October 03, 2015 - 11:54 PM UTC
On to painting! First a coat of Vallejo black primer:
Then a coat of red oxide primer with some cavalry red in to lighten it up. I am doing this as I have chosen this beastie upon which to make my first attempt at hairspray chipping, eek! Doing some research there is no clear consensus on the use of primer by the Russians, some say yes, some no, especially with vehicles built after the German invasion where the idea was to get them out as quick as possible. I decided to go with the primer on this as the vehicle could have been built before the invasion and then modified, and I like the extra contrast. There are some red splotches in the primer coat as the cavalry red did not mix up well, but since it will be covered by the 4BO, I’m not worrying about it.

I followed this up with 2 coats of hairspray, let that dry overnight and then the 4BO layer:


Now to chip...started with the gun, like I said this is my first ever attempt at this, so I’m learning as I go (I really should have started with something simpler but I guess I’m a sucker for punishment), any helpful tips are appreciated! Trying to keep the chipping in scale and concentrated on areas that would receive wear. The breech block itself will be bare steel, and some more areas need some chipping on the slides but pretty happy so far but much to learn!


Will post more as I go if anyone is still interested.
Thudius
Visit this Community
Uusimaa, Finland
Joined: October 22, 2012
KitMaker: 1,194 posts
Armorama: 1,077 posts
Posted: Sunday, October 04, 2015 - 01:55 AM UTC
Let er rip, its always good to see how people approach techniques and what they get up to with them. Although if you don't mind my saying I think that the hairspray technique might be a little heavy handed for something like this unless you were planning on a relic?

Kimmo
ColinEdm
Staff MemberAssociate Editor
ARMORAMA
Visit this Community
Alberta, Canada
Joined: October 15, 2013
KitMaker: 1,355 posts
Armorama: 1,229 posts
Posted: Sunday, October 04, 2015 - 03:01 AM UTC
I don't mind at all Kimmo! I chose this one for hairspray because of its small size - I need to be very controlled to keep the chipping in scale, I figured the breech area of the gun is subject to a fair amount of wear and further weathering will tone down the effect(I hope!!!). May have to do some 4BO touchup as well. The rest of the vehicle will not get so much, and I will be doing a 3 colour camo as well to tone it down. It's all about control - I get to discover if I have any!
Thudius
Visit this Community
Uusimaa, Finland
Joined: October 22, 2012
KitMaker: 1,194 posts
Armorama: 1,077 posts
Posted: Sunday, October 04, 2015 - 04:09 AM UTC
For control you might want to use a sponge, I always considered the hairspray method more of an extreme wear technique. As you pointed out, you can always go back over it with the cam colours. Practice and experimentation is never useless so don't worry too much about it not looking perfect the first go.

Kimmo
ColinEdm
Staff MemberAssociate Editor
ARMORAMA
Visit this Community
Alberta, Canada
Joined: October 15, 2013
KitMaker: 1,355 posts
Armorama: 1,229 posts
Posted: Sunday, October 04, 2015 - 06:02 AM UTC
I've used sponge and brush on previous models with mixed results, I will see how this turns out, fingers crossed!
ColinEdm
Staff MemberAssociate Editor
ARMORAMA
Visit this Community
Alberta, Canada
Joined: October 15, 2013
KitMaker: 1,355 posts
Armorama: 1,229 posts
Posted: Saturday, October 10, 2015 - 05:23 AM UTC
Well, things have gone sideways so I am currently stripping the paint and will start over!
C_JACQUEMONT
Visit this Community
Loire-Atlantique, France
Joined: October 09, 2004
KitMaker: 2,433 posts
Armorama: 2,325 posts
Posted: Saturday, October 10, 2015 - 05:59 AM UTC
Very interesting blog and pointers. Thanks!

I started my T-20 (regular vehicle, no gun) and stil have to do the tracks and a few details, challenging kit to say the least...

Cheers,


Christophe
ColinEdm
Staff MemberAssociate Editor
ARMORAMA
Visit this Community
Alberta, Canada
Joined: October 15, 2013
KitMaker: 1,355 posts
Armorama: 1,229 posts
Posted: Saturday, October 10, 2015 - 09:24 AM UTC
Thanks Cristophe, "challenging" is much more polite than the term I was going to use...
ColinEdm
Staff MemberAssociate Editor
ARMORAMA
Visit this Community
Alberta, Canada
Joined: October 15, 2013
KitMaker: 1,355 posts
Armorama: 1,229 posts
Posted: Saturday, October 17, 2015 - 09:35 AM UTC
So after some HS chipping misadventure, I stripped the paint and tried again. I also changed my tack on what I want to do with this. I have ordered the Russian SPG crew and will have it in a diorama in a firing position. Re-primered, painted with some modulation followed by drybrushing to pop out some of the detail.


and on to weathering.
ColinEdm
Staff MemberAssociate Editor
ARMORAMA
Visit this Community
Alberta, Canada
Joined: October 15, 2013
KitMaker: 1,355 posts
Armorama: 1,229 posts
Posted: Wednesday, October 21, 2015 - 07:45 AM UTC
Washes, pinwashes and dot filters/streaking done. Next is chipping and a bit of rust, then pigments.


Thudius
Visit this Community
Uusimaa, Finland
Joined: October 22, 2012
KitMaker: 1,194 posts
Armorama: 1,077 posts
Posted: Wednesday, October 21, 2015 - 01:43 PM UTC
Looking good so far.

Kimmo
PaulBrickles
Visit this Community
England - East Anglia, United Kingdom
Joined: April 14, 2015
KitMaker: 188 posts
Armorama: 173 posts
Posted: Wednesday, October 21, 2015 - 02:05 PM UTC
Looks great

Paul

ColinEdm
Staff MemberAssociate Editor
ARMORAMA
Visit this Community
Alberta, Canada
Joined: October 15, 2013
KitMaker: 1,355 posts
Armorama: 1,229 posts
Posted: Monday, October 26, 2015 - 08:38 AM UTC
Pretty much wrapped it up. Added some dirt/mud to the running gear and to areas that the crew would walk on. Not sure if I like it, I overdid it a bit, and I also now see one of the viewing hatches is crooked so I'll have to fix that. Overall, a somewhat challenging build with its fair share of frustrations, but an interesting little beastie. I have MiniArt's Soviet SPG crew that I am building/modifying to include with this in an ambush position diorama.

Cheers!


]


Thudius
Visit this Community
Uusimaa, Finland
Joined: October 22, 2012
KitMaker: 1,194 posts
Armorama: 1,077 posts
Posted: Monday, October 26, 2015 - 04:37 PM UTC
That's looking nice and filthy. I don't think it's overdone as such, you can get quite a bit of muck transferred from boots. Maybe try some streaking effects or a filter to sort of blend it in a little?

Kimmo
 _GOTOTOP