

Hi all, just wondering on the best way of sinking a vehicle into plaster "mud" without the vehicle coming out covered in plaster.
The vehicle i plan on burhing has already been weathered and finished, but as a last minute have planned to add it to a dio.
I was thinking of spraying cling wrap with canola oil spray, placing the canola oil side down onto the fresh plaster then gently push the tank in and leave it there till the plaster has dried.....thoughts?
Hosted by Darren Baker
Burying a pig!

nick_pal

Joined: July 09, 2014
KitMaker: 327 posts
Armorama: 283 posts

Posted: Tuesday, September 01, 2015 - 03:09 PM UTC

jon_a_its

Joined: April 29, 2004
KitMaker: 1,336 posts
Armorama: 1,137 posts

Posted: Tuesday, September 01, 2015 - 05:33 PM UTC
'Could' work, but the clingfilm will want to tear on sharp corners...?
Oiling the clingfilm might not be useful, as it will make the painting harder, & clingfilm will peel off ok anyway.
Also the plaster would have to be a bit runny to flow, & if too thickly applied will crack, unless that is the effect you are looking for?
Suggest you do a small test first.
Buildup the groundwork with colored Styrofoam/etc, with trenches for the depth of wheels/track, minimizing the depth of plaster needed.
Dye the plaster with brown/red/tan poster paint.
good luck
jrutman

Joined: April 10, 2011
KitMaker: 7,941 posts
Armorama: 7,934 posts
Posted: Tuesday, September 01, 2015 - 06:16 PM UTC
You could wait until the plaster is set up and not soupy,then brush some water on your tracks and push away. Should work but experiment first so you get the hang of it?
J
J
obg153
Joined: April 07, 2009
KitMaker: 1,063 posts
Armorama: 1,049 posts

Posted: Tuesday, September 01, 2015 - 07:58 PM UTC
If you have a "shelf queen" of similar size to the vehicle you're using in the dio, you might also consider using it to push into that space/area. That way, you won't be getting your primary vehicle all gunked up and worry about having to clean it up before final assembly.
nick_pal
Joined: July 09, 2014
KitMaker: 327 posts
Armorama: 283 posts
Posted: Thursday, September 03, 2015 - 10:43 AM UTC
So I have just made up a test of 4 different materials to put over the plaster to protect the vehicle I plan to bog. I would upload a photo but the kitmaker gallery won't let me  f-ing technology!
So when I can from left to right is a freezer bag, cling wrap doubled over, single cling wrap and then cling wrap sprayed with canola spray oil. I then indented tracks into the plastic. From first impressions the single layer cling wrap is looking the best, also the freezer bag
f-ing technology!So when I can from left to right is a freezer bag, cling wrap doubled over, single cling wrap and then cling wrap sprayed with canola spray oil. I then indented tracks into the plastic. From first impressions the single layer cling wrap is looking the best, also the freezer bag
nick_pal
Joined: July 09, 2014
KitMaker: 327 posts
Armorama: 283 posts
Posted: Friday, September 04, 2015 - 03:08 PM UTC
So now i have technology sorted, here are the photos of the tests. 1st one is when the plaster was poured, the second is the results.


noddy927

Joined: February 15, 2013
KitMaker: 1,273 posts
Armorama: 568 posts
Posted: Friday, September 04, 2015 - 11:49 PM UTC
2nd no and 3rd I think is too clean a mark. Either 1st or 4th.
Pete
Pete

justsendit
Joined: February 24, 2014
KitMaker: 3,033 posts
Armorama: 2,492 posts
Posted: Saturday, September 05, 2015 - 07:28 AM UTC
I agree
No. 1 (good). I like the grain in No. 4 (best). I have a similar project in mind, so I'm very interested in seeing your final result.
Just a thought Can you get this stuff in your neck of the woods? I was able to find it here on eBay:
DAP 128-oz Fast N Final Lightweight Spackling.
A fellow modeler recommended DAP as a less messy alternative to plaster. Ive only done some limited testing but the results look pretty good so far seems easy to work with and doesnt shrink still need to test track marks. HTH.
Good luck and please keep us posted.
mike
nick_pal
Joined: July 09, 2014
KitMaker: 327 posts
Armorama: 283 posts
Posted: Saturday, September 05, 2015 - 07:32 AM UTC
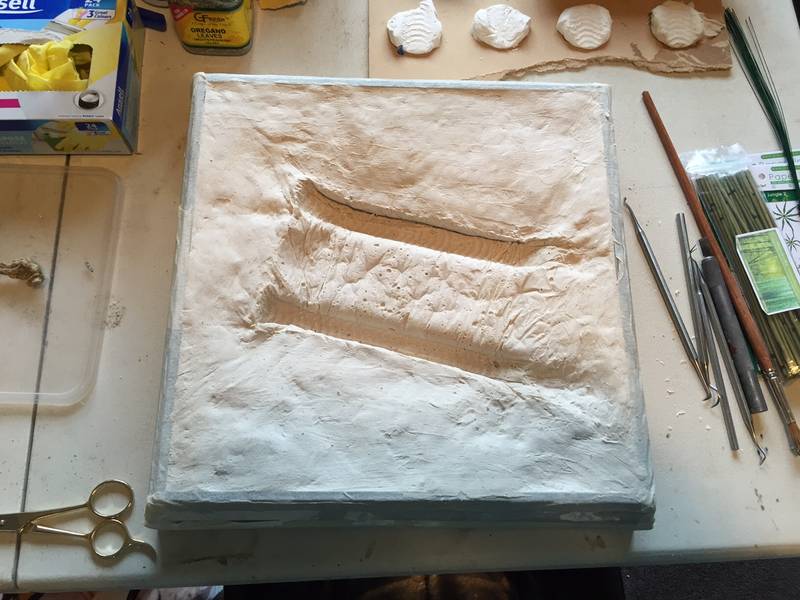
So here is the base, plaster has gone off. I ended up using cling wrap sprayed with cooking spray. While the cling wrap caused a few lines they were easily tidied up with a wet sponge.
I have added tamiya diorama texture paint to the surface. I will add at least 2 coats before i airbrush the surface the correct colours.
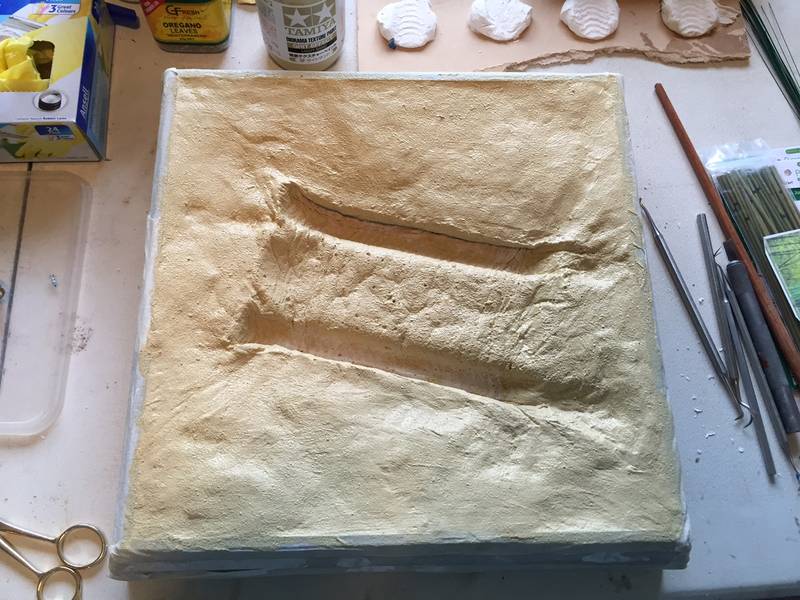
I have added tamiya diorama texture paint to the surface. I will add at least 2 coats before i airbrush the surface the correct colours.
noddy927
Joined: February 15, 2013
KitMaker: 1,273 posts
Armorama: 568 posts
Posted: Sunday, September 06, 2015 - 01:57 AM UTC
looks good Nick
nick_pal
Joined: July 09, 2014
KitMaker: 327 posts
Armorama: 283 posts
Posted: Thursday, September 17, 2015 - 11:04 AM UTC
So I have been trying to upload a few pics from my iPhone without success. I have actually just finished this diorama today. I feel it has come up really well and looks quite bogged and realistic. I think I will title the dio "Stuck......like a pig in s$@t!!".
I won't be able to upload photos from my tablet until I have a new internet provider in a few weeks and I might wait till after the annual SAPMA model exhibition in October 10/11th.
But watch this space!!
I won't be able to upload photos from my tablet until I have a new internet provider in a few weeks and I might wait till after the annual SAPMA model exhibition in October 10/11th.
But watch this space!!
nick_pal
Joined: July 09, 2014
KitMaker: 327 posts
Armorama: 283 posts
Posted: Sunday, September 27, 2015 - 10:29 AM UTC
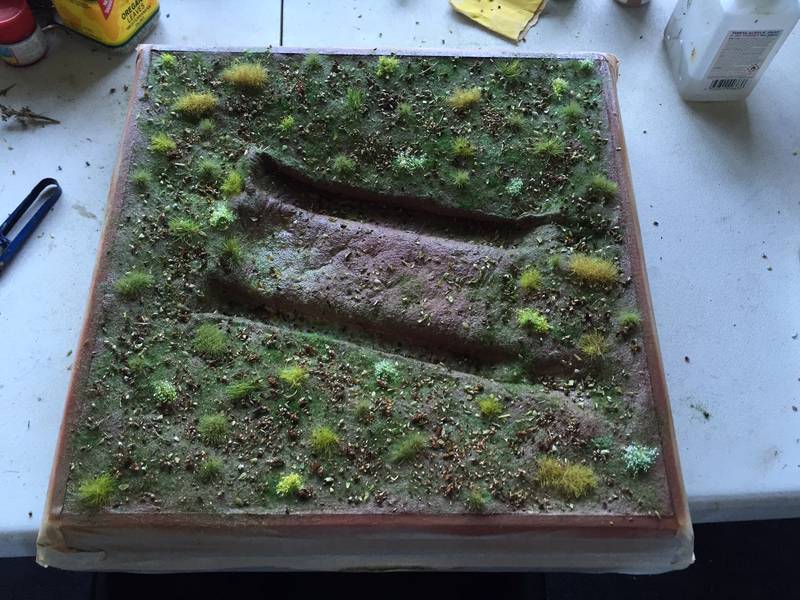
So, here is one of the progress shots i have been able to upload.
Thoughts?
Thoughts?
Removed by original poster on 09/28/15 - 09:49:34 (GMT).
noddy927
Joined: February 15, 2013
KitMaker: 1,273 posts
Armorama: 568 posts
Posted: Sunday, September 27, 2015 - 04:36 PM UTC
Looks good to me Nick
Removed by original poster on 09/28/15 - 13:25:39 (GMT).
justsendit
Joined: February 24, 2014
KitMaker: 3,033 posts
Armorama: 2,492 posts
Posted: Tuesday, September 29, 2015 - 06:05 AM UTC
If you feel like it, the entry of the left track (right edge of base) could use a little work.
Nice!
Nice!

Armorsmith
Joined: April 09, 2015
KitMaker: 1,063 posts
Armorama: 1,000 posts
Posted: Tuesday, September 29, 2015 - 06:30 AM UTC
One thing you might want to consider if it's not to late is that the track marks are too clean. The weight of the vehicle over soft ground would not only leave a fairly deep impression as you have depicted, but the soft earth/mud would also squish (very technical term)out along either sides of the tracks so that the ground on either side if the tracks would not look so clean.
nick_pal
Joined: July 09, 2014
KitMaker: 327 posts
Armorama: 283 posts
Posted: Tuesday, September 29, 2015 - 06:51 AM UTC
So here is another shot with the tank stuck

Thanks for the feedback!!
Thanks for the feedback!!

chefchris
Joined: February 06, 2006
KitMaker: 1,544 posts
Armorama: 1,464 posts
Posted: Tuesday, September 29, 2015 - 08:14 AM UTC
Looks great! But I would think it would take a bit more than that to get that pig stuck 
The Mud looks great, very realistic.
Chris
The Mud looks great, very realistic.
Chris
callmehobbes

Joined: April 17, 2005
KitMaker: 751 posts
Armorama: 740 posts
Posted: Tuesday, September 29, 2015 - 12:14 PM UTC
How about adding clear resin or similar around the wheels to show it being boggy?
Armorsmith
Joined: April 09, 2015
KitMaker: 1,063 posts
Armorama: 1,000 posts
Posted: Tuesday, September 29, 2015 - 10:49 PM UTC
Looks good. Like Paul said you need to make the mud look wet. Acrylic gel medium works great. Just don't stir it up too much or it will make bubbles and look foamy when dry.
nick_pal
Joined: July 09, 2014
KitMaker: 327 posts
Armorama: 283 posts
Posted: Wednesday, September 30, 2015 - 06:20 AM UTC
Thanks for the suggestions, as per one of my previous posts I have actually finished this dio, and this particular shot is a WIP shot. The finished dio has a glossy finish to the mud.
nick_pal
Joined: July 09, 2014
KitMaker: 327 posts
Armorama: 283 posts
Posted: Friday, October 09, 2015 - 02:48 AM UTC
So today is the first day of the SAPMA model expo. I will be entering this dio and maybe another. So here is another shot of progress from my dio.

nick_pal
Joined: July 09, 2014
KitMaker: 327 posts
Armorama: 283 posts
Posted: Friday, October 09, 2015 - 11:10 AM UTC
So i have entered the dio into the SAPMA comp. Here is the near finished result. I added laser cut bamboo leaves to the bamboo and also some creepers through the bamboo and over the log. I received a few good comments while filling out the entry form. It's in the judges hands now


Opinions and thoughts please?
Opinions and thoughts please?
nick_pal
Joined: July 09, 2014
KitMaker: 327 posts
Armorama: 283 posts
Posted: Saturday, October 10, 2015 - 03:46 PM UTC
No luck with this dio today unfortunately, but still got a lot of positive feedback and the only other vehicle I entered won first in its clas and best afv of show, so pretty stoked. Must build a lot more for next years comp!!
 |

WEB HOSTING BY


Copyright ©2021 Armorama and Kitmaker Network, a subsidiary of Silver Star Enterprises
All Rights Reserved. Please read our Conditions of Use and Privacy Policy.
All Rights Reserved. Please read our Conditions of Use and Privacy Policy.