_GOTOBOTTOM
Armor/AFV: Allied - WWII
Armor and ground forces of the Allied forces during World War II.
Hosted by Darren Baker
Asuka Sherman M4A3E8
Silantra
Visit this Community
Putrajaya, Malaysia
Joined: March 04, 2004
KitMaker: 2,511 posts
Armorama: 913 posts
Posted: Friday, September 09, 2016 - 02:19 PM UTC
Hello fellow modellers

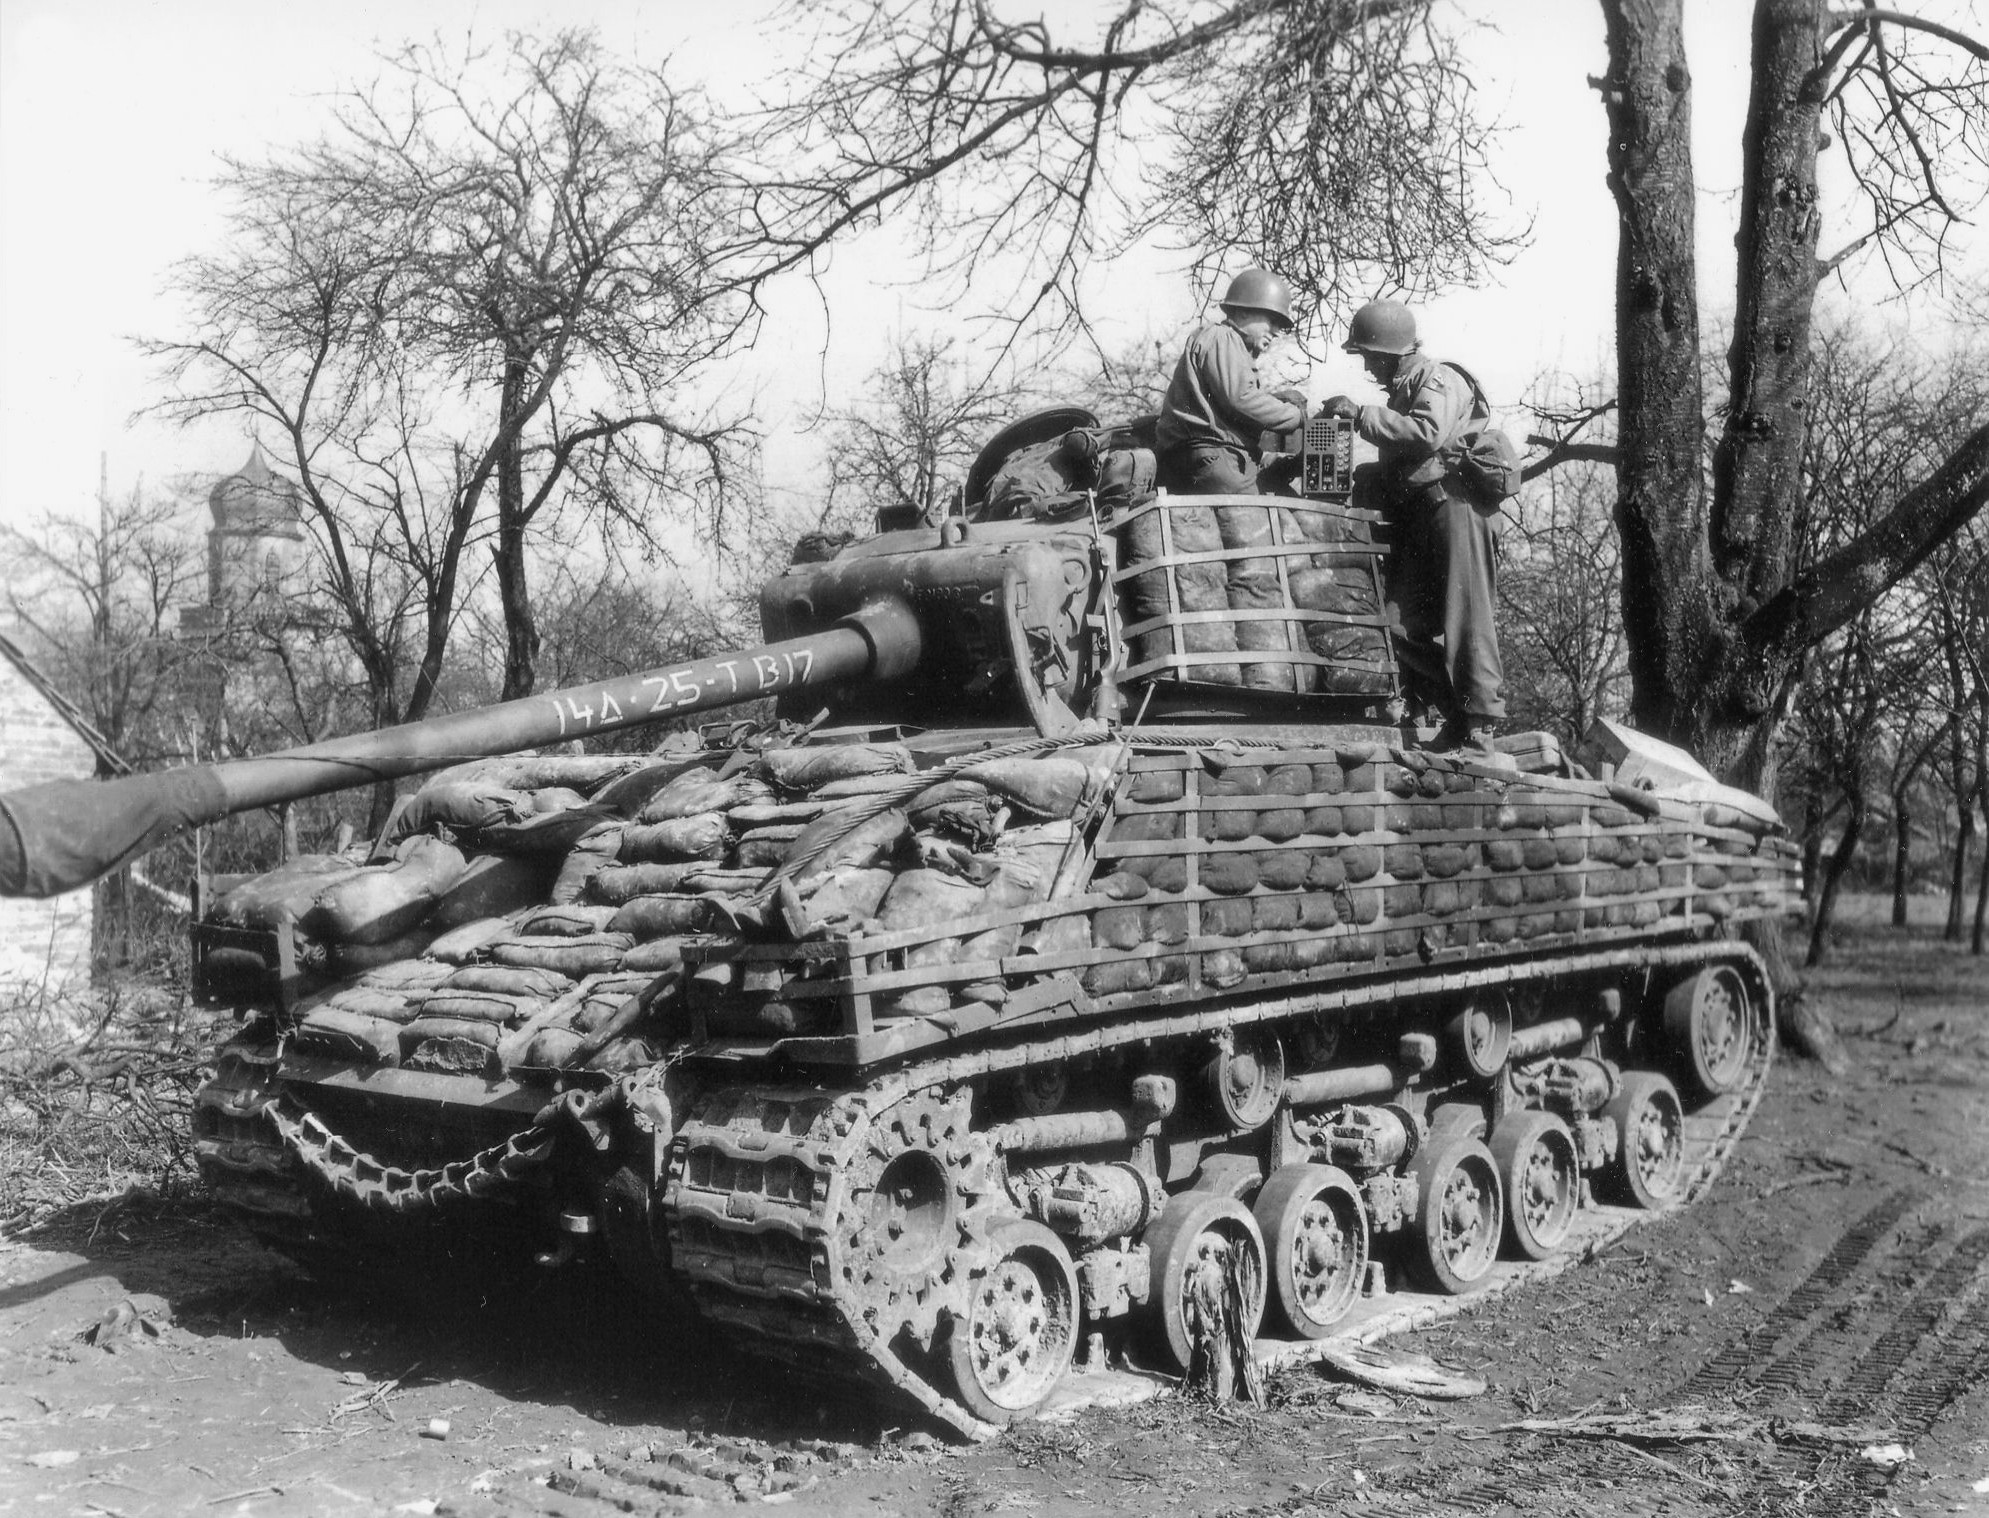
Anothet build...started a month ago..
This is going to be oob...

First time ever o build asuka kit... like all the shermanholics out there said..this is by far the most accurate and superb sherman kit. I concurred with the statement.

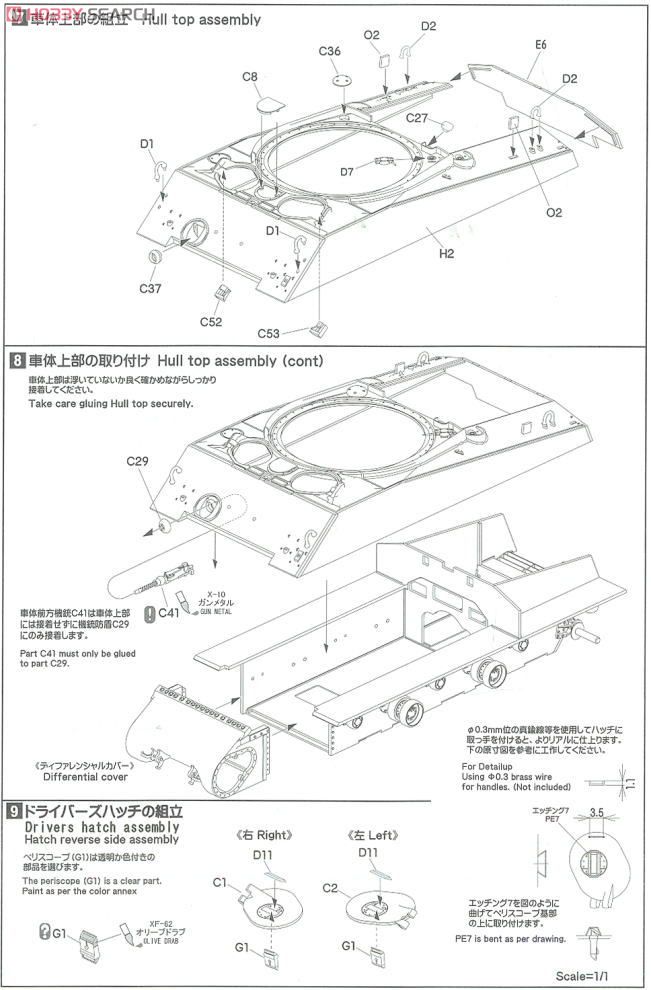
The hull is very different than typical or traditional hull like thouse found in dragon and others. Asuka instructions specifically tell the sequence to follow when assembling the hull... at first i worried about the fitting and the perfect angle of join.. but it was superbly engineered that the fit was excellent.


The hvss boogies are workable..thus adding extra time to do... but this was beautifully engineered again by asuka. Several parts for each hvss boogies...


The rest of the build are straightforward.
I then add welding seam along the turret .. using styrene rod dissolve in cement and 'slice through' using edge of knife..to replicate welding beads.


I replicate n enhance the cast metal with mr surfacer 500..stab with old brush... let dry and sand smooth with 2000 grit sandpaper.


Primed and preshaded with black.

As u can see im doing a threesome here..


First coat of mr.color OD..

Then after a day..another coat of tamiya OD.


After a coat of buff.. clear coat and time to put decals... no specific unit that i chose... always want to do the star with round border


Right now i will continue with the weathering process..just found out i ran out of flat clear coat..duh!!

Will update soon... thanks for looking


Sil
GazzaS
#424
Visit this Community
Queensland, Australia
Joined: April 23, 2015
KitMaker: 4,648 posts
Armorama: 2,248 posts
Posted: Friday, September 09, 2016 - 04:06 PM UTC
Nice looking pair! I like how you textured the Shreman turret.

Gaz
Silantra
Visit this Community
Putrajaya, Malaysia
Joined: March 04, 2004
KitMaker: 2,511 posts
Armorama: 913 posts
Posted: Saturday, September 10, 2016 - 11:13 AM UTC

Quoted Text

Nice looking pair! I like how you textured the Shreman turret.

Gaz


Thanks mate..

Another small update... weathering.. using ak product...


Add washes...


Will add a few more effect before i call it done..
Thanks for looking
ALBOWIE
Visit this Community
New South Wales, Australia
Joined: February 28, 2006
KitMaker: 1,605 posts
Armorama: 1,565 posts
Posted: Sunday, September 11, 2016 - 06:58 AM UTC
Just one small point. There is no weld seam on a T23 Turret, it is a single piece casting. There does appear a faint line on SOME castings from the Sand Moulds they were cast from but it is not a weld seam and generally a lot less pronounced.
CHeers
Al

Silantra
Visit this Community
Putrajaya, Malaysia
Joined: March 04, 2004
KitMaker: 2,511 posts
Armorama: 913 posts
Posted: Monday, September 12, 2016 - 08:22 AM UTC

Quoted Text

Just one small point. There is no weld seam on a T23 Turret, it is a single piece casting. There does appear a faint line on SOME castings from the Sand Moulds they were cast from but it is not a weld seam and generally a lot less pronounced.
CHeers
Al


Hey Al..thanks for highlighting this up... i think i got a bad reference or mixed up ... and its too late now... i just did a google search t23 turret...and yeah..the weld seams doesnt too pronounce...

Too late to corect it..so i would live in guilt...

Thanks

Zaidi
Silantra
Visit this Community
Putrajaya, Malaysia
Joined: March 04, 2004
KitMaker: 2,511 posts
Armorama: 913 posts
Posted: Monday, September 19, 2016 - 01:14 PM UTC
First and foremost, pardon me for not correcting the weld seam on the turret. I will fix it later when i have the mood. Anyway, i called it 'finished' last weekend.

Here are some photos...


thanks for looking....

Sil
Steven000
Visit this Community
Antwerpen, Belgium
Joined: August 07, 2016
KitMaker: 191 posts
Armorama: 120 posts
Posted: Monday, September 19, 2016 - 10:01 PM UTC
Nice job Sil, your weathering looks very good. Beautifull Easy Eight model.

Kind regards
Steven
qcarr1
Visit this Community
Vermont, United States
Joined: March 16, 2015
KitMaker: 67 posts
Armorama: 67 posts
Posted: Monday, September 19, 2016 - 10:54 PM UTC
Wow, your Easy 8 came out amazing! Thanks so much for sharing the photos of various stages of your build as it's nice to see how things look as they're coming together. Great job!
Cantstopbuyingkits
Visit this Community
European Union
Joined: January 28, 2015
KitMaker: 2,099 posts
Armorama: 1,920 posts
Posted: Tuesday, September 20, 2016 - 01:08 AM UTC
I agree, you really nailed the "simple yet awesome" finish for this build.
Silantra
Visit this Community
Putrajaya, Malaysia
Joined: March 04, 2004
KitMaker: 2,511 posts
Armorama: 913 posts
Posted: Tuesday, September 20, 2016 - 05:32 AM UTC
Thanks gentlemen for the compliment....

There are still major error and i'm still learning...

Cheers,

Sil
Rubicon
Visit this Community
California, United States
Joined: February 18, 2009
KitMaker: 125 posts
Armorama: 111 posts
Posted: Tuesday, September 20, 2016 - 06:46 AM UTC
That's a really nice Sherman build.

One question, did the Tamiya Sherman not come with wire guards for all the periscopes?


You can see what I'm talking about in this image, on the open drivers hatch.
Silantra
Visit this Community
Putrajaya, Malaysia
Joined: March 04, 2004
KitMaker: 2,511 posts
Armorama: 913 posts
Posted: Wednesday, September 21, 2016 - 05:47 AM UTC

Quoted Text

That's a really nice Sherman build.

One question, did the Tamiya Sherman not come with wire guards for all the periscopes?


You can see what I'm talking about in this image, on the open drivers hatch.


Hi Jon,

thanks for the kind words.
Actually i have no idea about tamiya easy8. The kit that i build is asuka... and according to this pic below (source from http://www.1999.co.jp/eng/image/10124162/10/0), look at step no9 , the guard is given as PE part PE7. I lost the part actually... grrrr
thanks for bringing it up. I guess i forgot about it


thanks

Sil
ryally
Visit this Community
New South Wales, Australia
Joined: July 29, 2005
KitMaker: 879 posts
Armorama: 330 posts
Posted: Wednesday, September 21, 2016 - 05:54 AM UTC
You have done a great paint job on this
 _GOTOTOP