_GOTOBOTTOM
AFV Painting & Weathering
Answers to questions about the right paint scheme or tips for the right effect.
How to Mud?
Stands24
Visit this Community
Florida, United States
Joined: May 13, 2016
KitMaker: 70 posts
Armorama: 64 posts
Posted: Monday, November 28, 2016 - 09:24 PM UTC
Hey y'all. I'm working on a 1:35 Cobra King and I wanted to give it a worn winter wash, but I also want to put some mud stuck to the underside of the sponsons (partially to cover some seams, partially because I think some would be frozen there) and the sides of the lower hull with the bogeys and whatnot.

To work with, I only have the dirt outside my house, distilled water, and paint. Some Liquid Nails too to give my self-made mud some sticky proprties (I hope). It's too late to go out and buy anything except for like Elmer's glue. Here is the mud I made with all that and some Tamiya brown.


So my questions.
1: How do I get it to stick to the tank?
2: What color should I paint it to get the look of frozen mud?
3: What stage does this go on? After gloss coat & decals, before that, or after gloss coat, decals, weathering, and matte varnish?
Dioramartin
Visit this Community
New South Wales, Australia
Joined: May 04, 2016
KitMaker: 1,476 posts
Armorama: 1,463 posts
Posted: Thursday, December 01, 2016 - 02:25 PM UTC
Hi Ryan

first congrats on having the nous to go DIY, I can’t believe people actually pay good money to buy “mud”. My recipe is somewhat different to yours but it does overcome the problem of failure-to-adhere so maybe it’ll help:

1)Mix powder paint (the primary school stuff, cheap as - black, red, yellow) into a thick paste & test colour when dry – can be deceptive when wet. Too many models have a similar look to hair-dye, what I call “bright brown”. Look at construction vehicles with tracks, the mud is NOT brown at all, it’s grayish darkish yellowish depending on local terrain.

2)Rather than liquid nails I use what in UK & Oz is called Polyfilla – a filler in paste form. Mix a chunk of it with (1) and a little water. I then re-test a daub of it to check the dried colour is good because Polyfilla is white and lightens the shade.

3)Add texture to taste, but only a little (10%-20% of the total mix, too much and adherence drops rapidly) – either sieved fine garden soil, model-railroad ballast, whatever.
I usually brush a thick matt/flat black enamel primer coat on areas to be muddied e.g. underside of sponsons & hull side-walls, lower front & rear hull panels. Then use a blunt brush to daub the mix on – always thinner than you think it should be, you can always add more later. Adherence seems to be OK but I do recall the odd time it wasn’t, so I added a small (approx 10%) amount of PVA/Elmers to the mix and that cured the problem. The wheels and tracks – after painting – can take a more dilute (water-based obviously) version of the mud, which is why I keep the mix in an air-tight plastic container so it keeps indefinitely.

The great thing about this mix is that it can be modified after drying. If it looks overdone I use a sharp pointed blade and just pick off the excess – which also gives a lighter tonal variation. Mud ain’t one colour/shade, ever.
If you scroll back through Photo Features on the home page you’ll find some of my mud in “Diodrama – Final Countdown”.

Regarding your questions, the vehicle was factory painted and all markings were applied, then it went into combat and picked up mud & dirt. So that’s the order. As for frozen mud that’s something I haven’t attempted but I’d probably do all of the above and then just (very) lightly dust it with white and light grey powder paint /pastel chalk. It’s all trial & error, that’s the fun part when you get it right.

Cheers,

Tim
(PS Just because my life is littered with preposterous coincidences – having had zero contact with anyone in Florida before, I’ve just been contacted by a distant cousin living in Vero Beach – her name’s Keira. It wouldn’t surprise me if you knew her…?!)
ceerosvk
Visit this Community
Slovakia
Joined: November 25, 2013
KitMaker: 171 posts
Armorama: 170 posts
Posted: Thursday, December 01, 2016 - 06:49 PM UTC
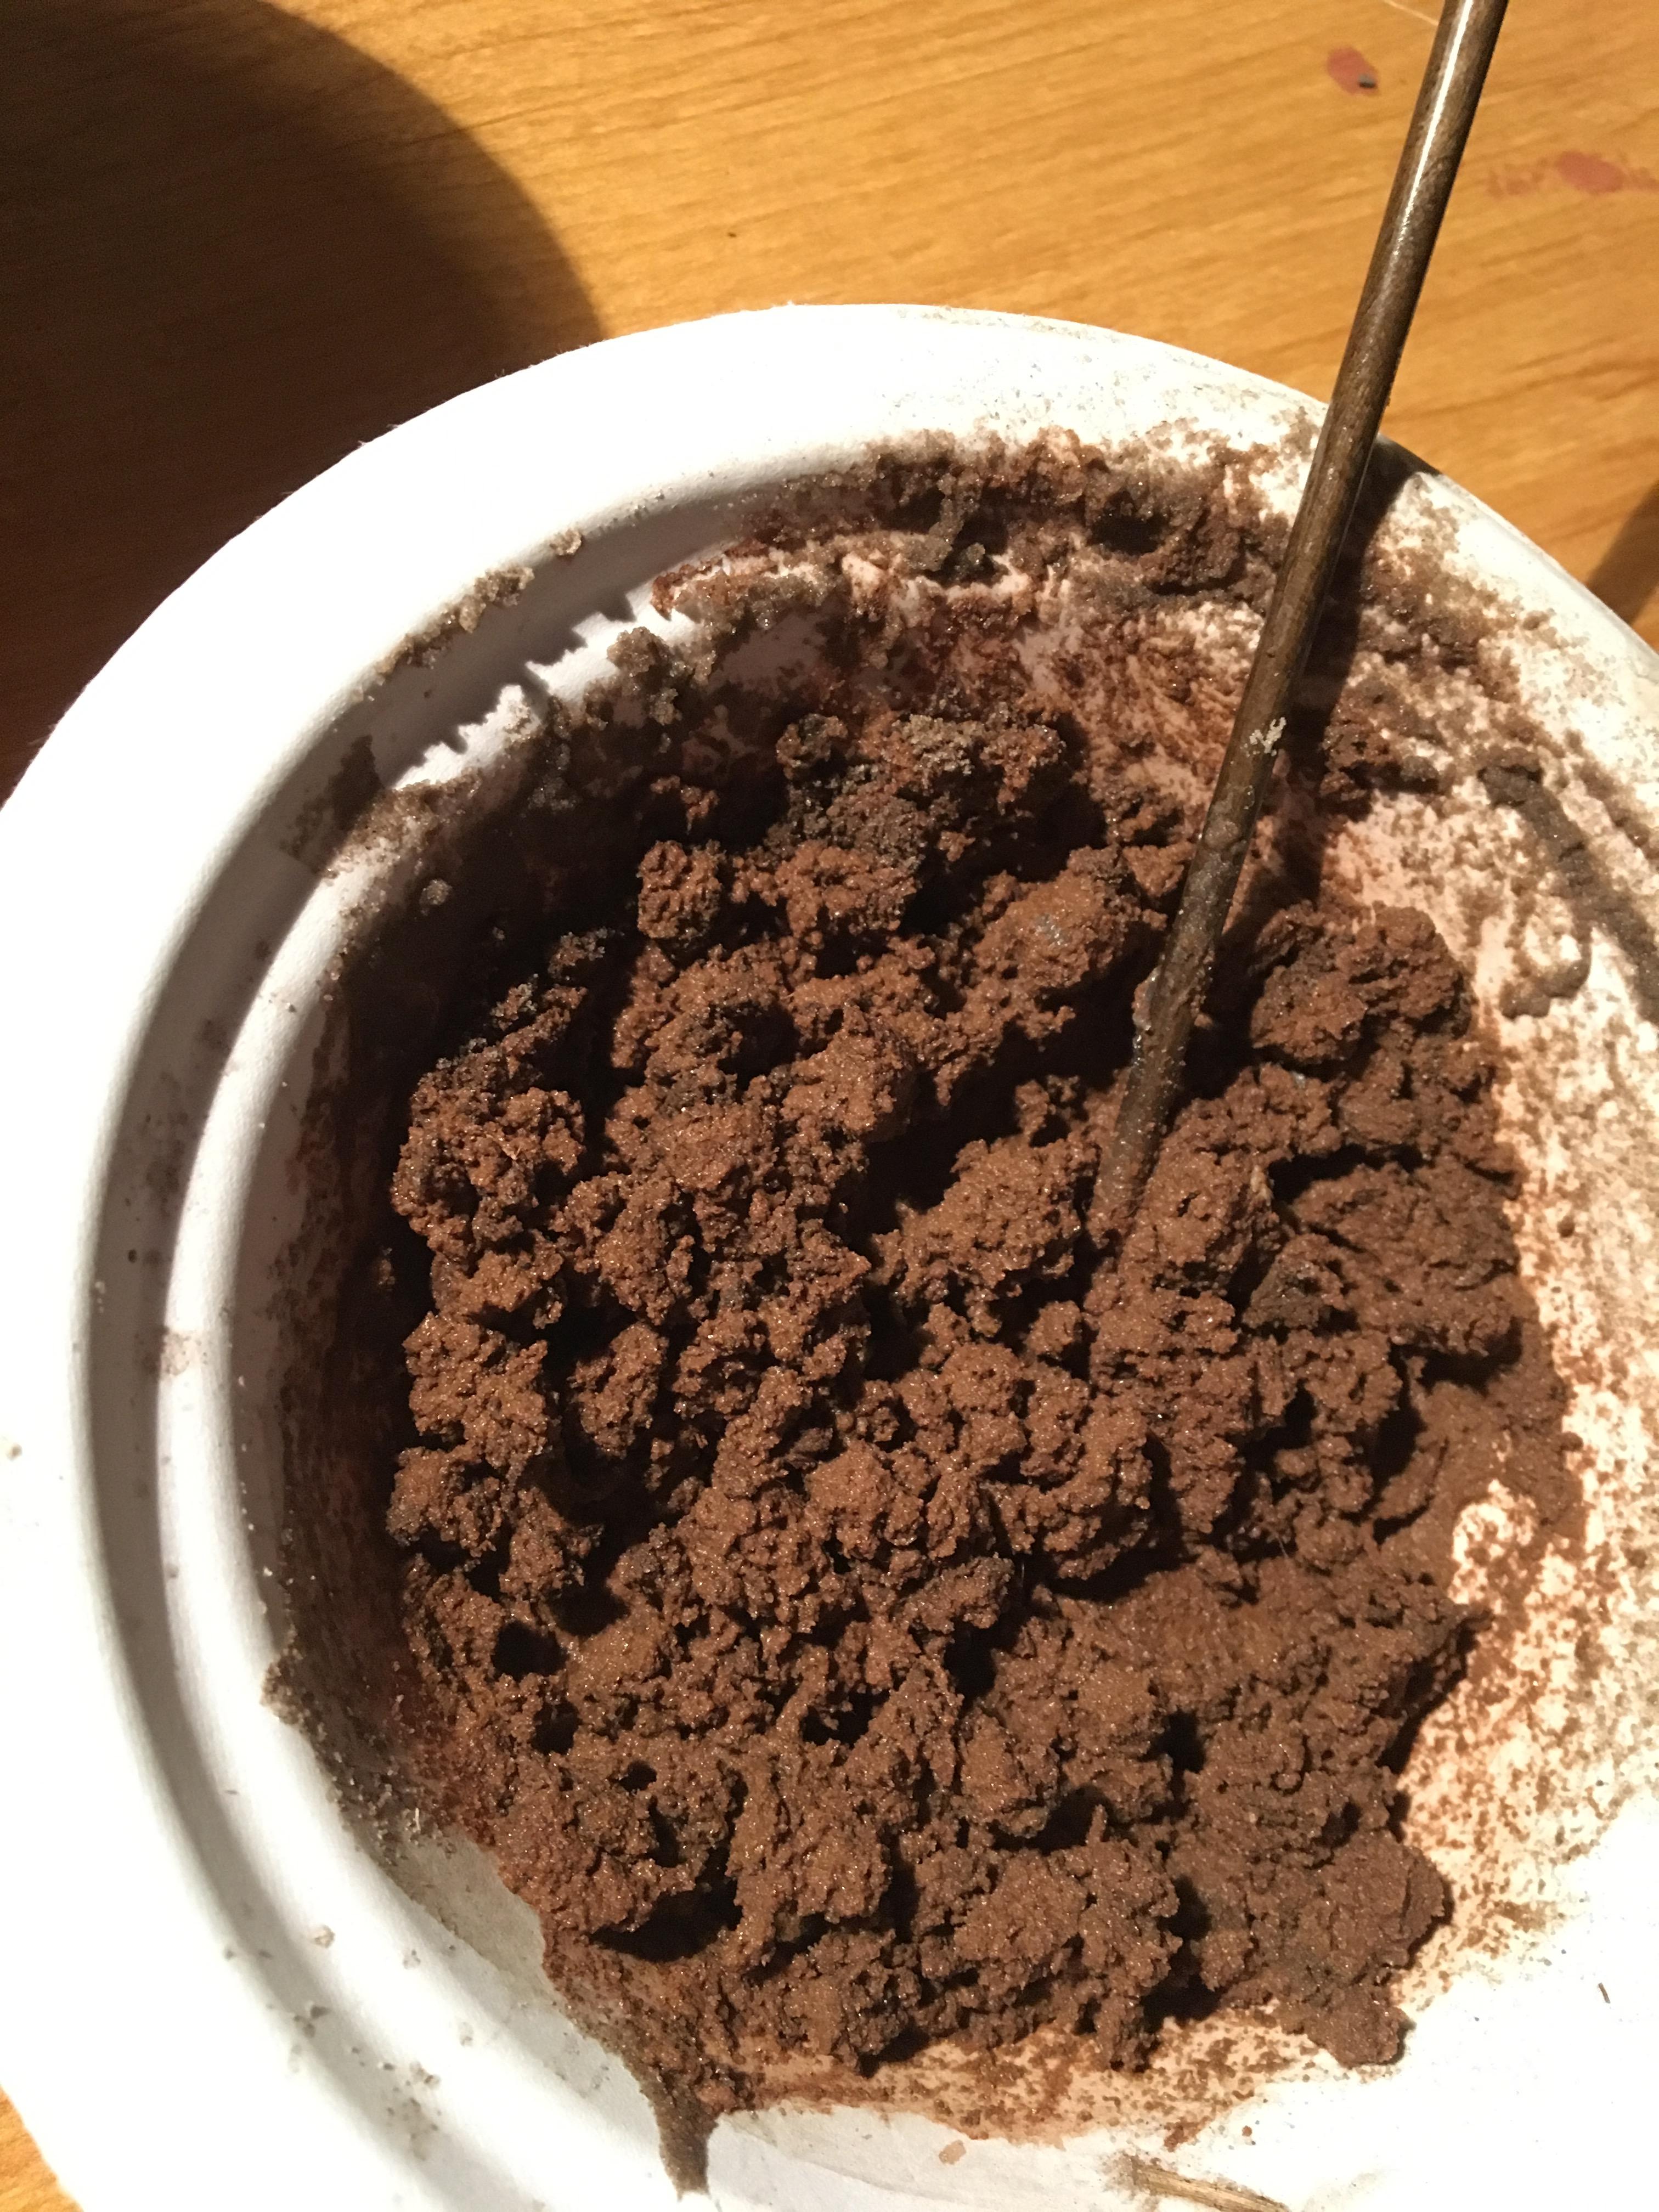
1. What i usually use is a standard building matterial plaster. I mix it up with some pigments, enamel paint (just a tiiiiiny bit) and mig's wet effects. This mixture is guaranteed to stay on the model and not fall off. And it gives you endless shades/tones/color variations for the mud.

2. i'd probably go for a darker color tones for a frozen mud.

3. take a bigger brush, preferably some old, beaten up one. Dip it into the mixture mentioned above. Get an airbrush (you only need the airflow of the airbrush) and blow the air towards the brush. You will get a near perfect of splattered mud/dirt. You can also combine the color tones, i for example apply a larger area with a lighter brown tone for an older, dried up mud effect and than apply a smaller areas with a darker tone for a fresh mud effect.
It takes a bit of practice, you need to play a little with the correct ammunt of the mixture, correct compressor pressure for the airbrush (too strong blow from the pistol will make it look unnatural) and the correct angle from where you blow the air towards the brush and how to position the brush to the model correctly. I stronly suggest to try it on a piece of cardboard / old model or something, but once mastered it works wonderfully.

I'd definitely go for a thinner mixture than the one you posted. If you want a stronger mud pattern on the tank i'd perhaps first fo for a denser mixture and i'd put a bit of liquid white paper/wood glue you can get in a drug store. I use Hekules glue, it is strong as hell and doesnt deform the color, neither the texture of the mixture. Not sure if it's sold in the US, but you get the idea, im sure you can find something like thath. I even used an actual soil mixed with a bit of water and Herkules glue, worked great. you simply dab it on the model on places where you desire to have the heavy mud and than proceed to spray the thinner mixture over it and over other areas as described above.

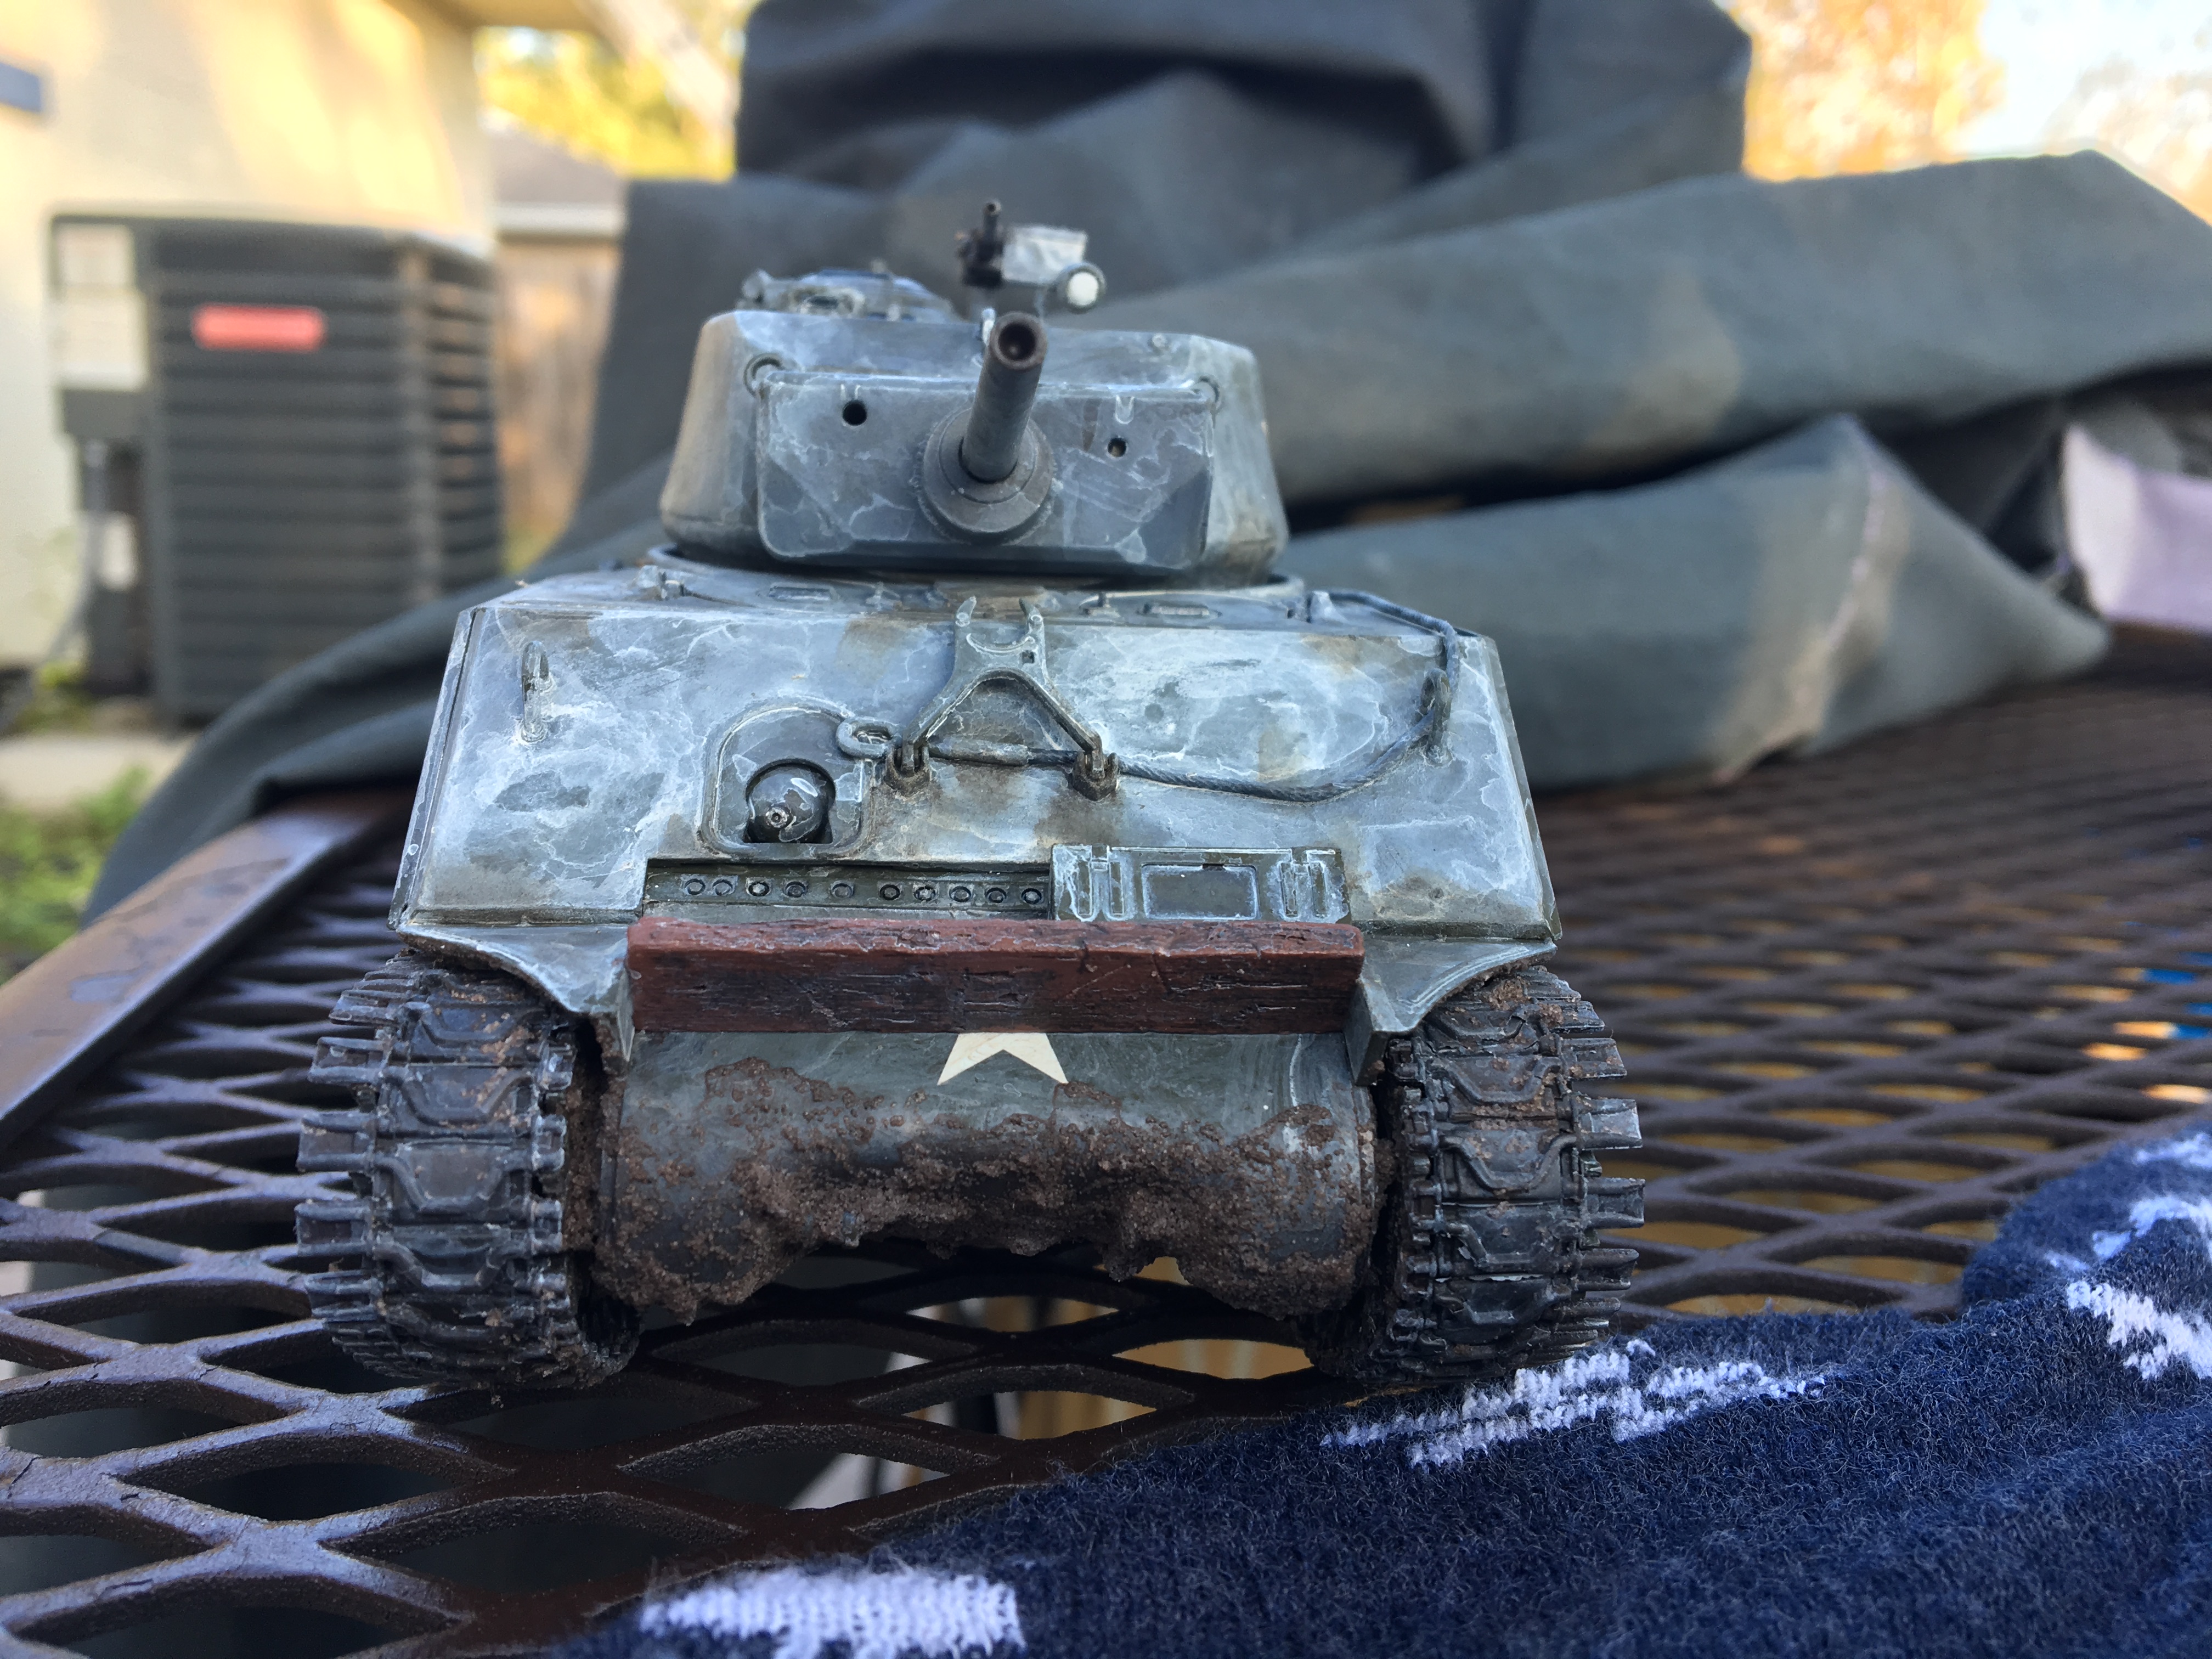
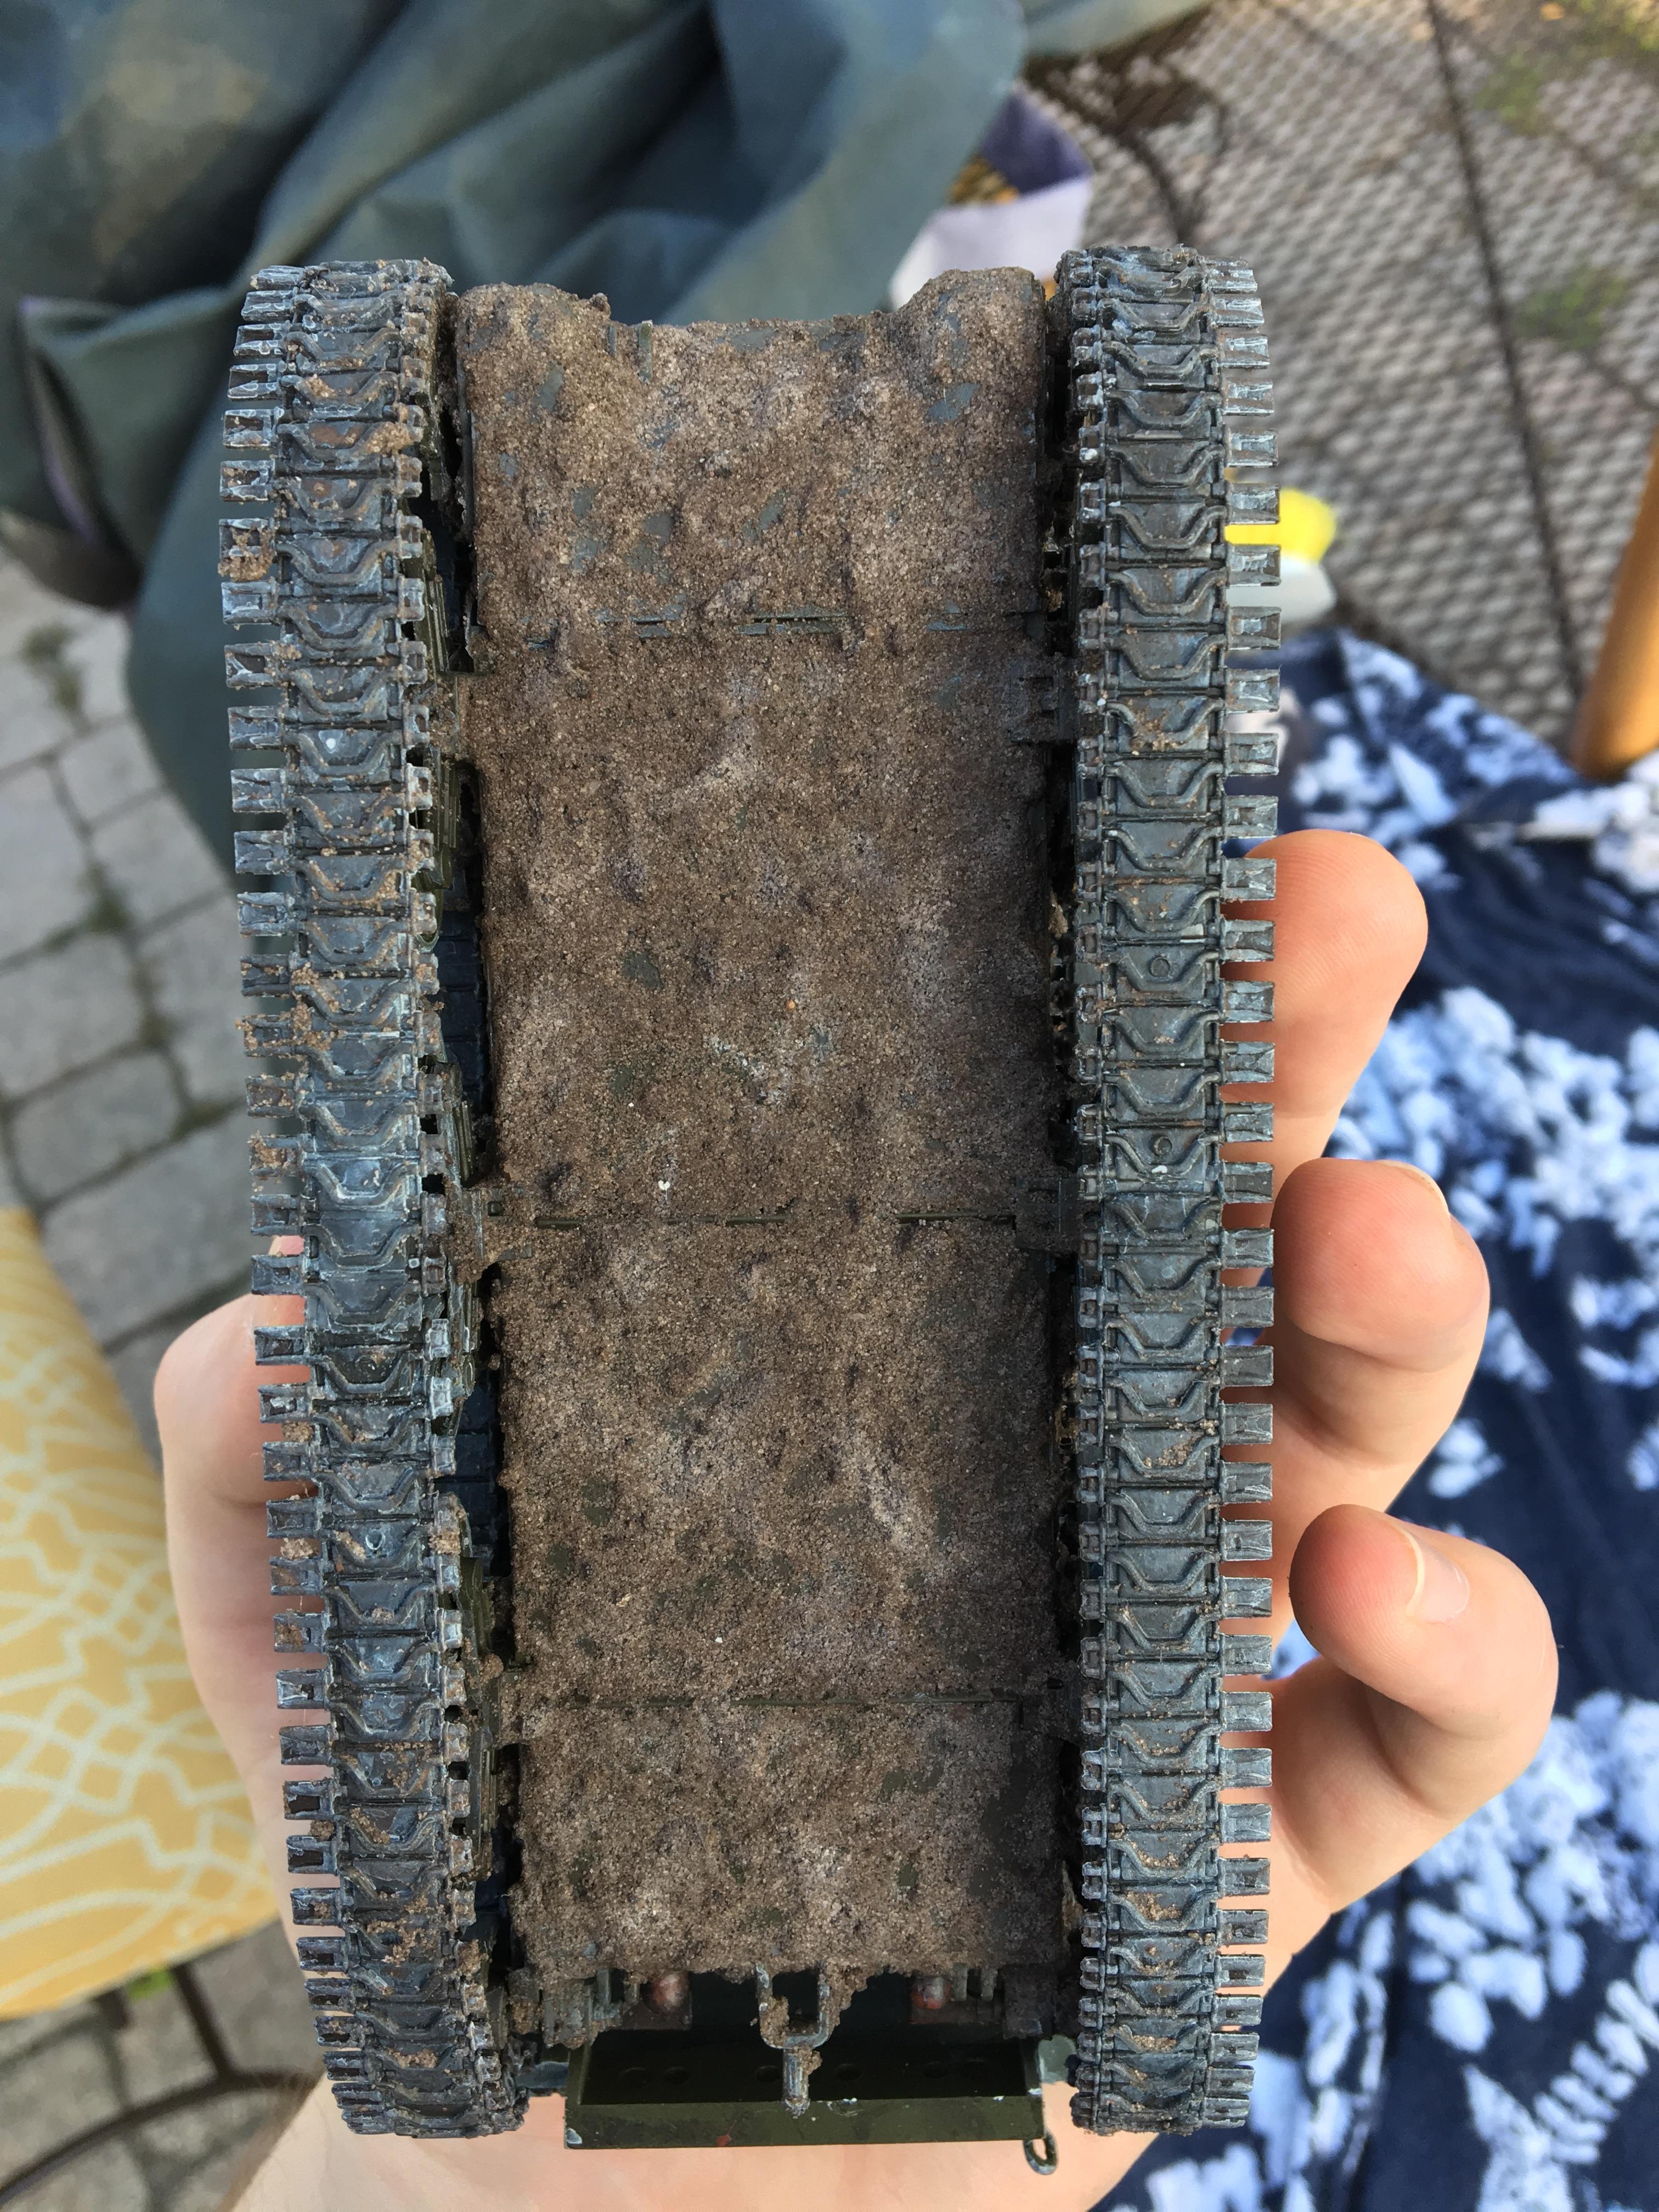
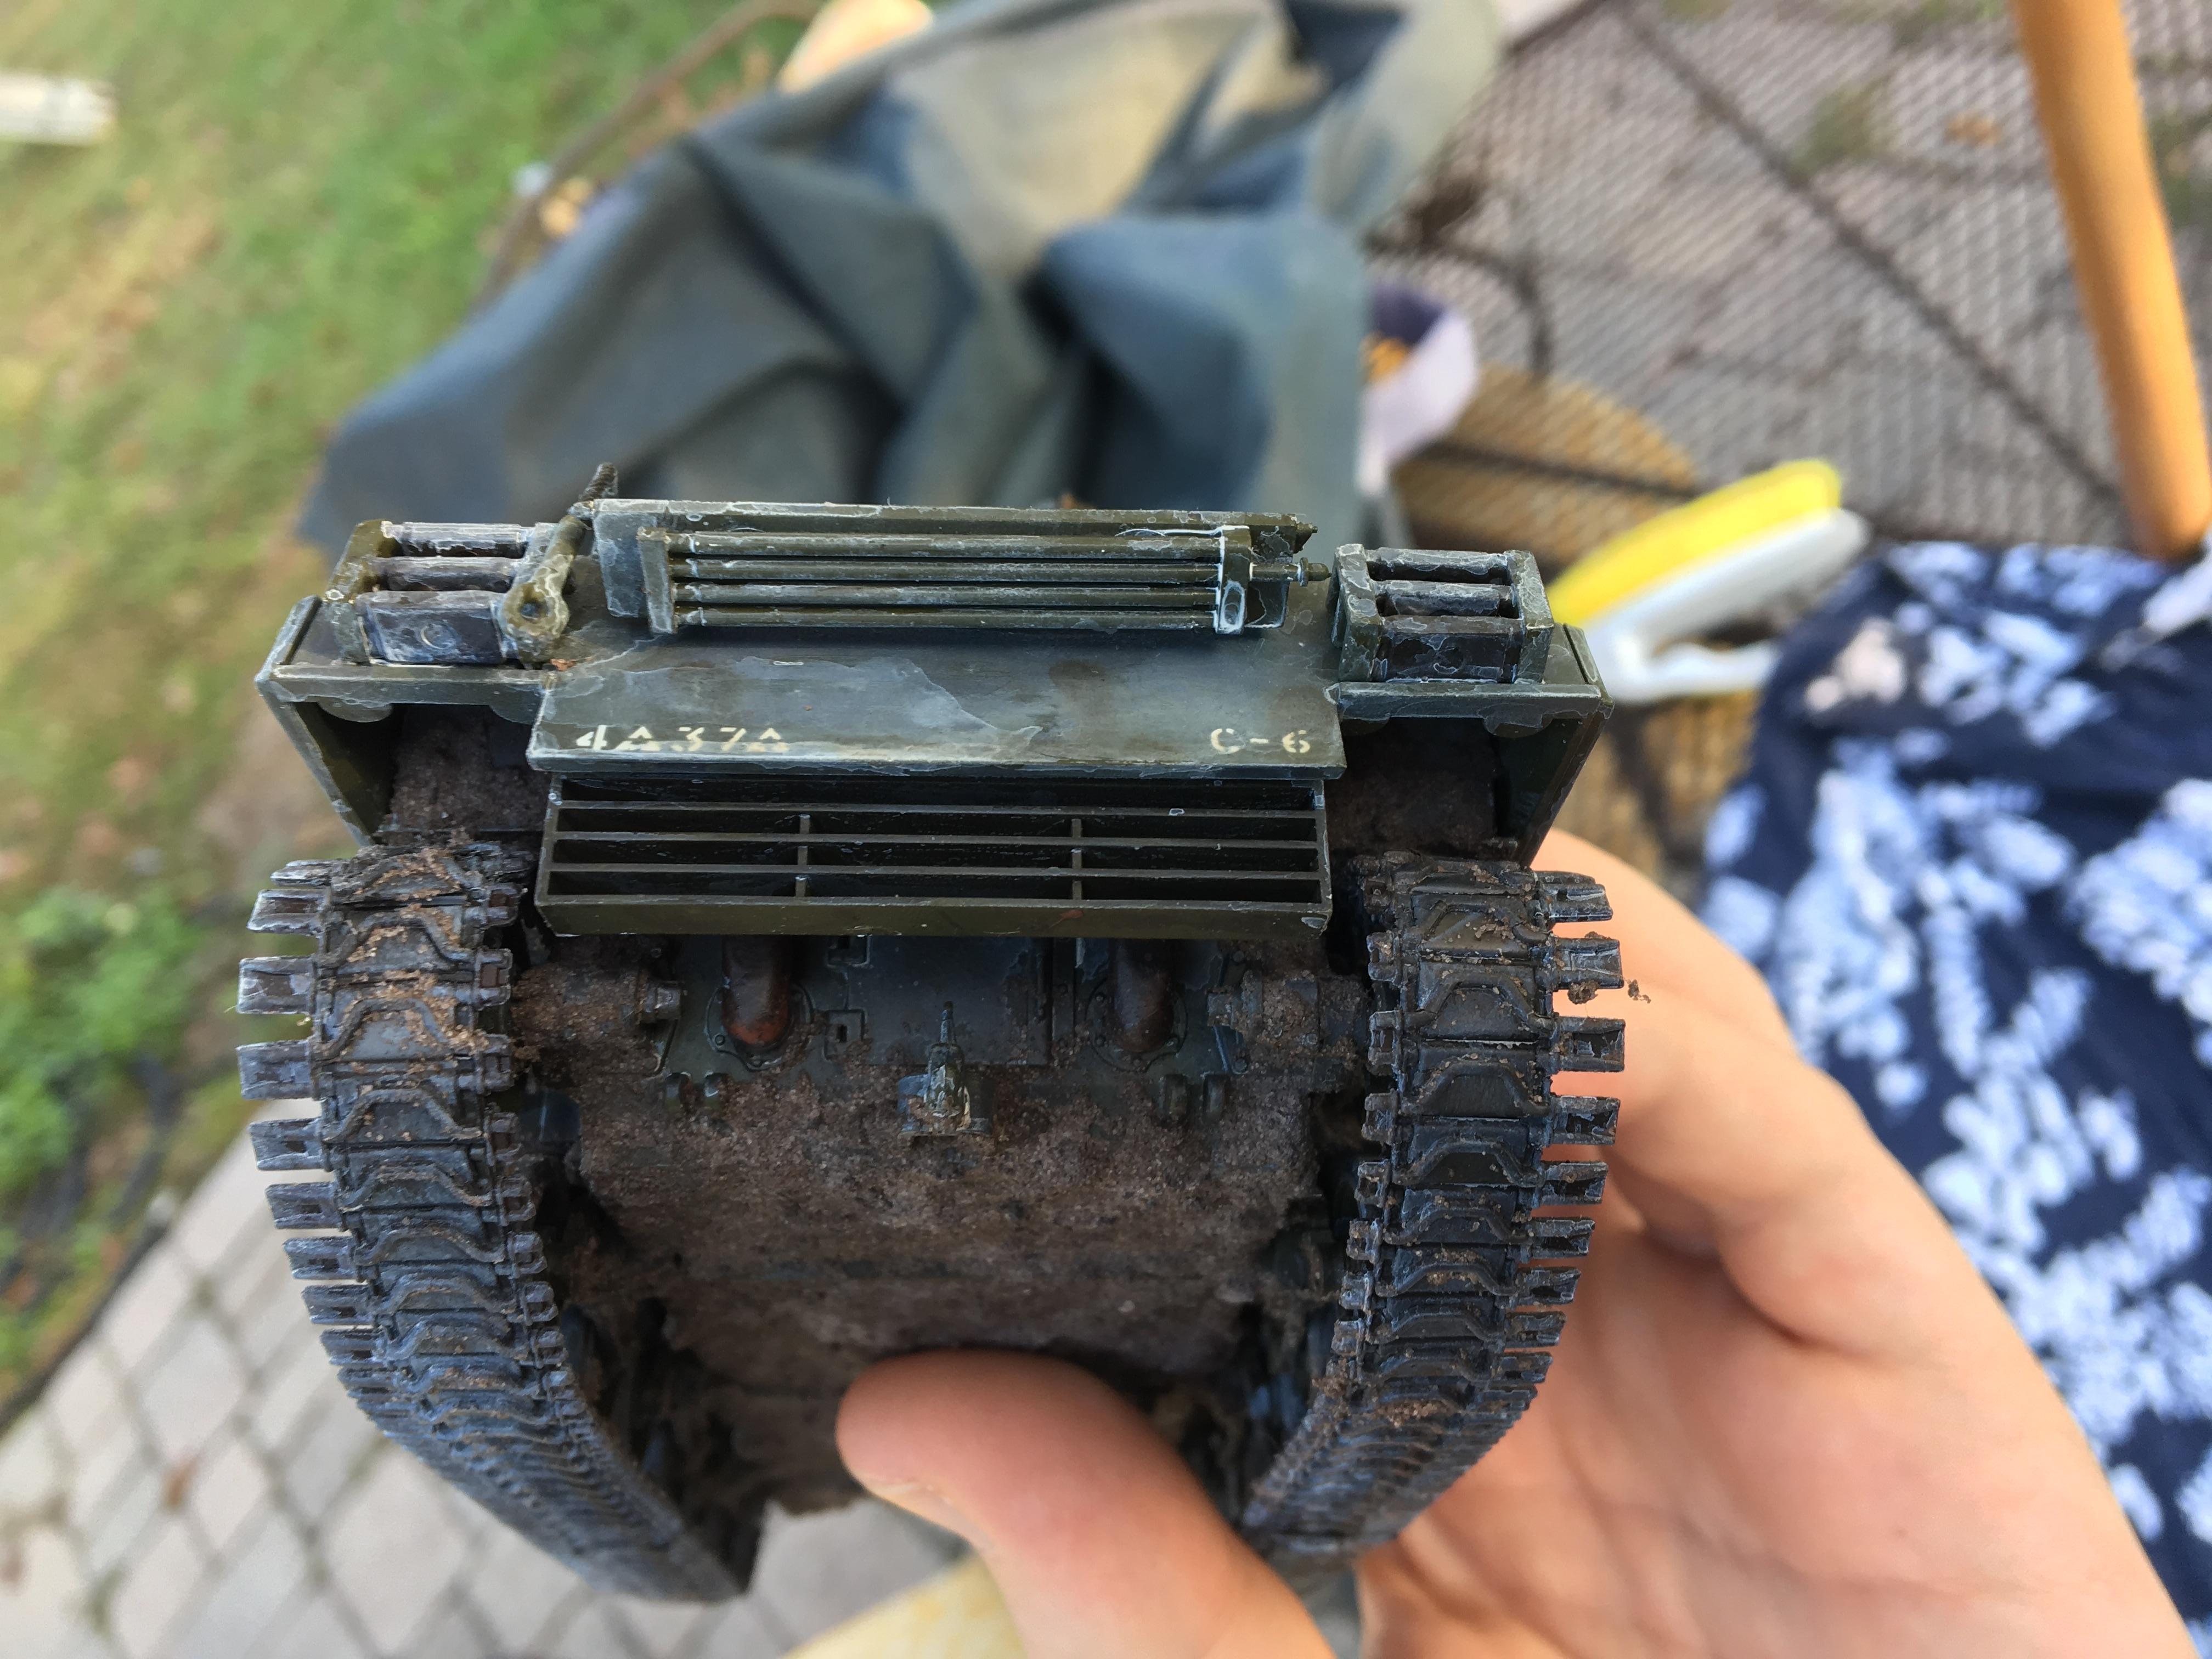
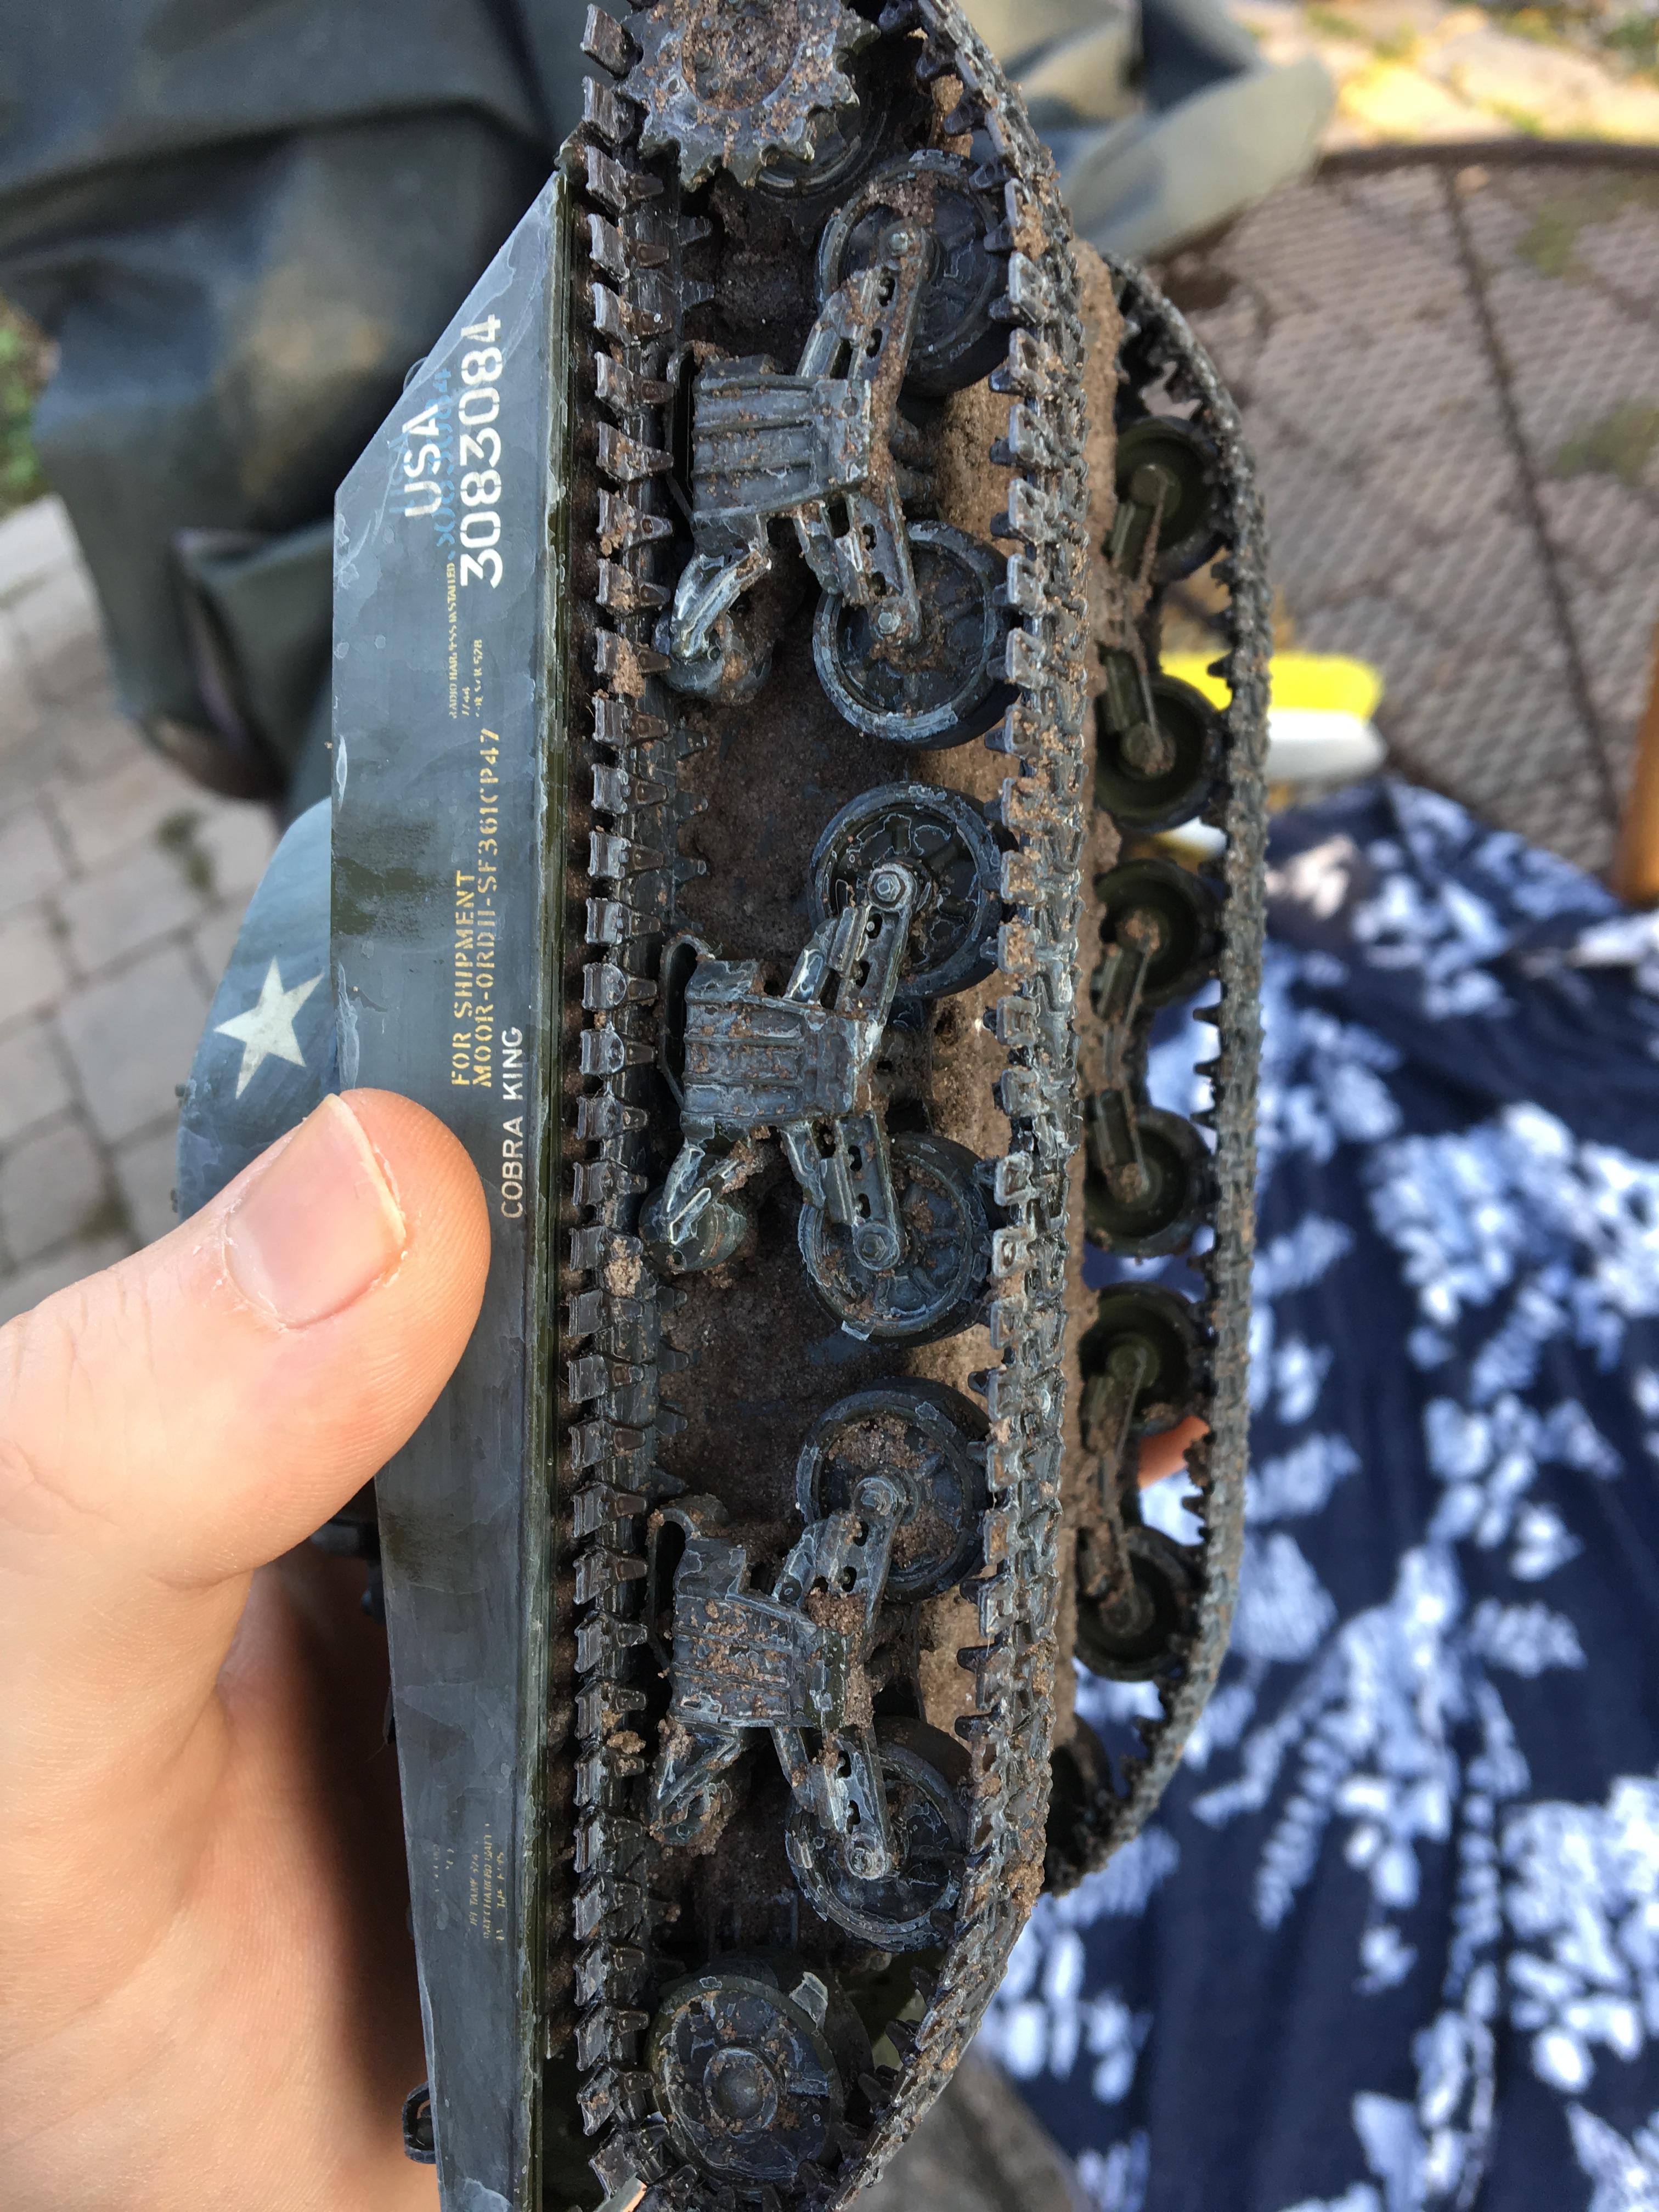
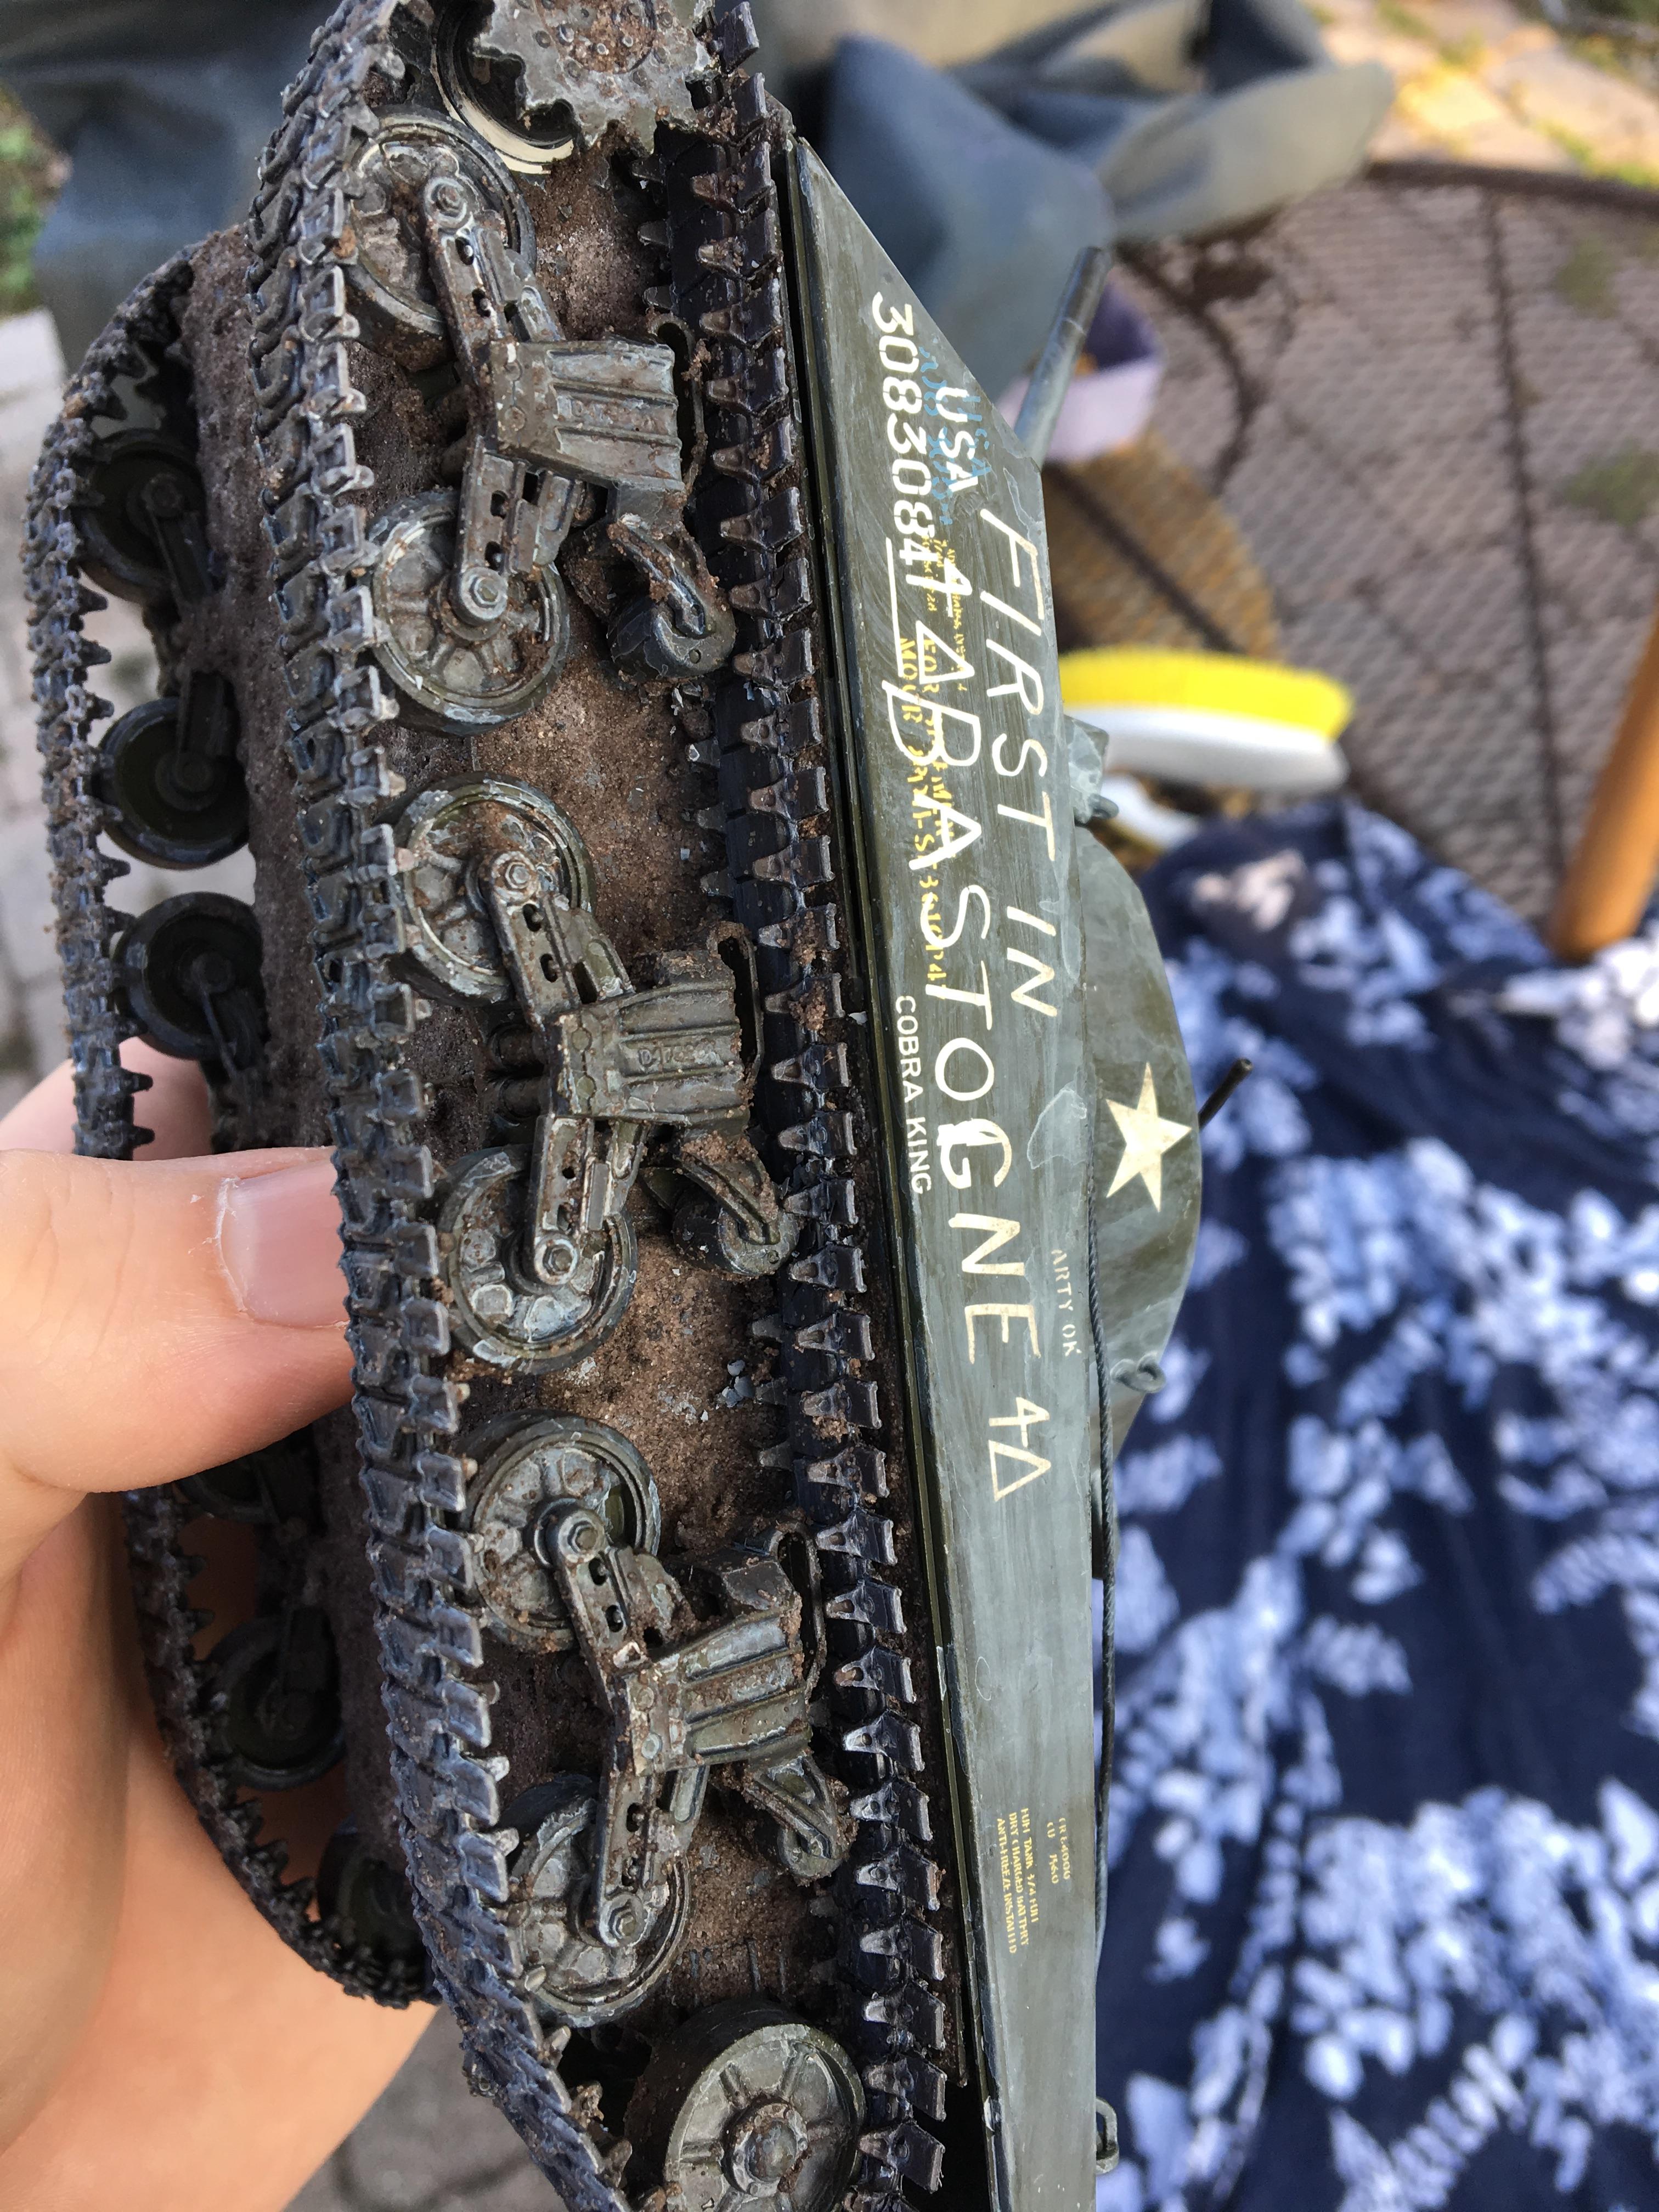
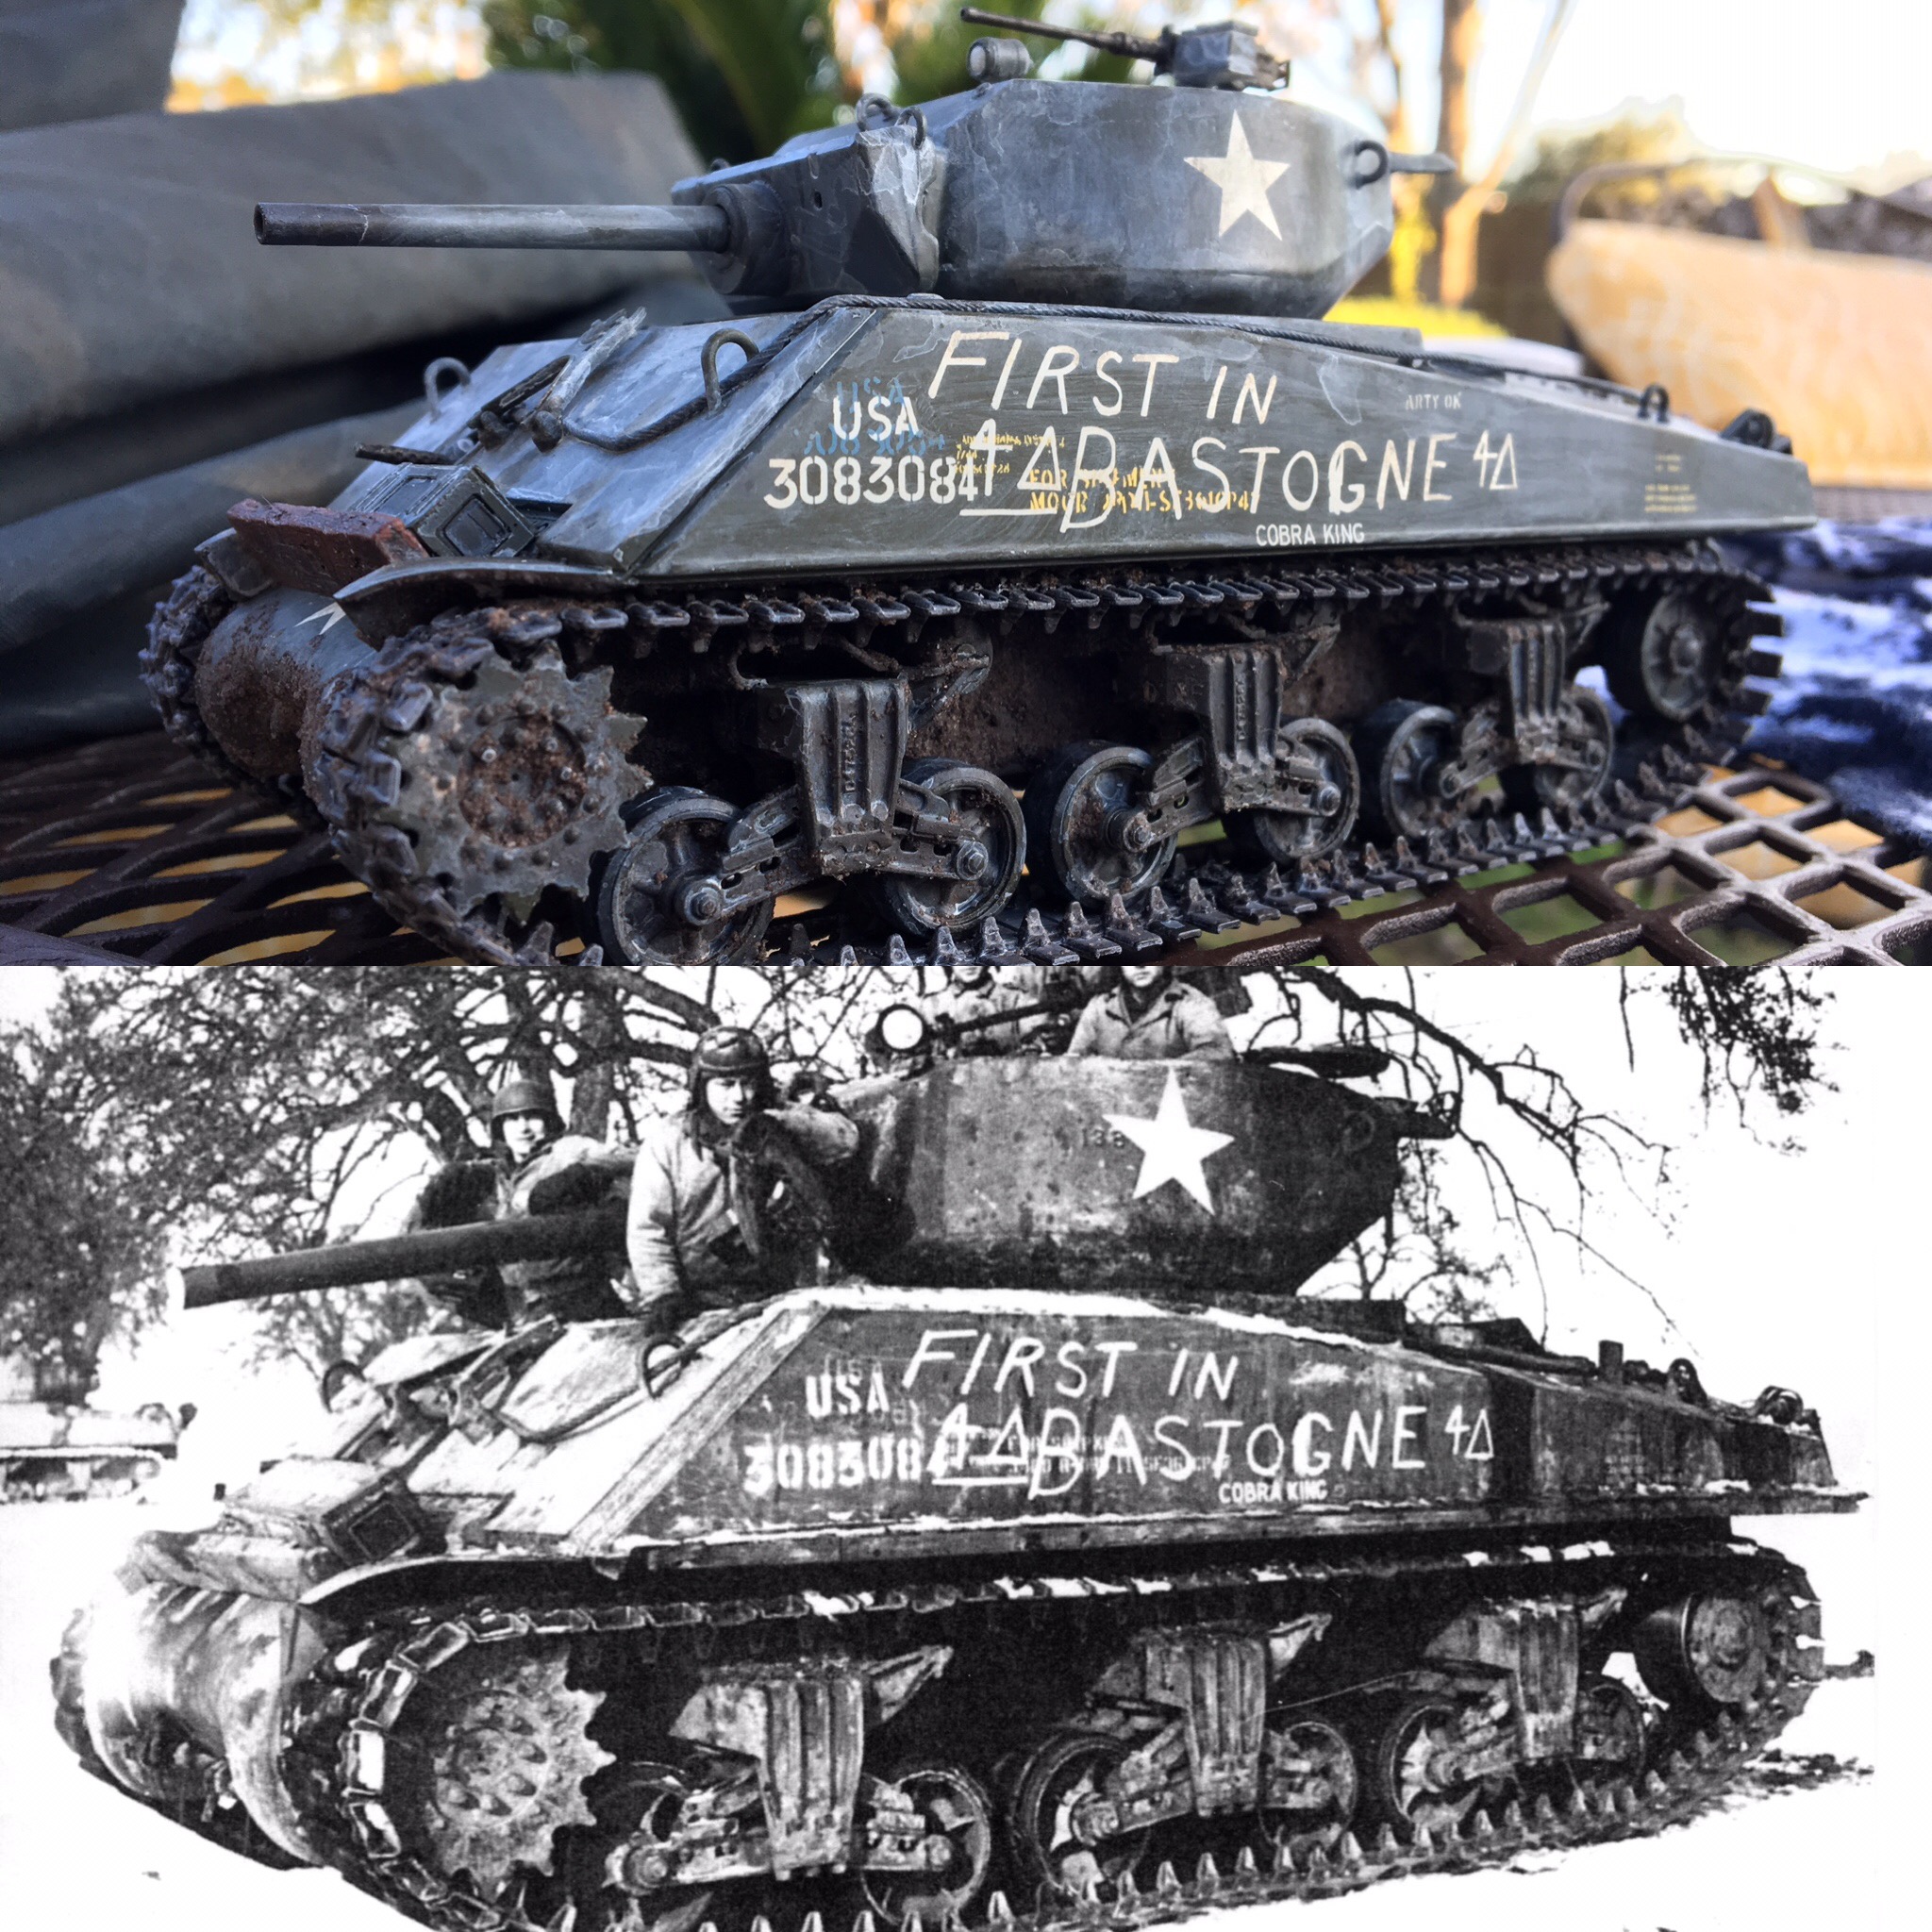
you should get something like this:


TopSmith
Visit this Community
Washington, United States
Joined: August 09, 2002
KitMaker: 1,742 posts
Armorama: 1,658 posts
Posted: Wednesday, December 07, 2016 - 07:39 AM UTC
What is mud? I have been on tanks for years and have learned that there are many styles of mud depending on how long the ground has been wet and the water content of the mud. Most mud has a high water content and only a thin layer sticks, sorta like the mud on a 4 wheel drive car around town. Serious mud from where the ground has been wet a long time but the water content is lower and the clay content is higher can create a thick layer but that doesn't happen very often.

Is the mud wet, partially dried, or dried? Frozen mud is going to look more like the ground and less like mud. How long has the mud been on the tank? If it is fresh then all areas will have a similar look. If the mud is dried there could be sections that have fallen off next to places that are still attached.

This doesn't answer your question but by thinking it out the final product will look more authentic than a kit with mud gobbed all over. Look at photo's to help with an authentic effect.
j76lr
Visit this Community
New Jersey, United States
Joined: September 22, 2006
KitMaker: 1,081 posts
Armorama: 1,066 posts
Posted: Monday, February 06, 2017 - 05:43 AM UTC
nice job
Belt_Fed
Visit this Community
New Jersey, United States
Joined: February 02, 2008
KitMaker: 1,388 posts
Armorama: 1,325 posts
Posted: Monday, February 06, 2017 - 07:01 AM UTC
It really depends on the effect you are after. If you are having trouble getting it to stick, add some thinner to it (water in your case). The color I saw from your pic looks good for winter mud. In my mind, colder months get darker colors while hitter months get lighter colors.

I apply my mud towards the end of my builds. Your model should be painted with its markings on- that how it happens on real vehicles.

If you want to invest in more premixed muds, i highly recomend Ammos Mud and Splashes effects. I swear by them and will not complete a model without them.
DocEvan
Visit this Community
California, United States
Joined: August 09, 2014
KitMaker: 180 posts
Armorama: 180 posts
Posted: Monday, February 06, 2017 - 08:09 AM UTC
Cool idea. The Elmer's glue should be adhesive enough, but you can find more viscous, stickier glues at crafts stores.

I make my mud by mixing acrylic paint with baking soda. I mix in some cut up sisal or hemp rope fibers to mimic grass caught up int he mud.


Glop it on with a paint brush.
1: How do I get it to stick to the tank?

Do an image search for "frozen mud". Any mud-like color will suffice. Your homemade mix is find. Some model paints are actually called "mud"! I suggest that you use flat colored paint. Use glossy for fresh mud.

2: What color should I paint it to get the look of frozen mud?

Think about how mud would go onto a real vehicle. Thus, after all the paint, decal and weathering work is done.

3: What stage does this go on? After gloss coat & decals, before that, or after gloss coat, decals, weathering, and matte varnish?[/quote]
DutyFirst1917
Visit this Community
Colorado, United States
Joined: February 03, 2016
KitMaker: 93 posts
Armorama: 86 posts
Posted: Saturday, February 18, 2017 - 12:04 AM UTC
For me I actually just make up some of the real stuff. I find that just wandering around outside my house and finding the right amount of debris and dirt works perfect. I add in whatever color paint I want the main coat to come out with the donated outdoor matter and go to town on the model. The effect looks great. If I want to add in different colors for drying of some parts then I reduce the debris particles and modify the paint.

Tim


Stands24
Visit this Community
Florida, United States
Joined: May 13, 2016
KitMaker: 70 posts
Armorama: 64 posts
Posted: Saturday, February 18, 2017 - 09:11 AM UTC
Sorry it took so long to reply... I kept forgetting.

I did finish the tank in question in December, and I used real mud. c: I applied Elmer's glue to the desired area & spread it around with a brush, then dabbed/wiped the mud on. After it dried, I dabbed random spots with white paint to make it look like snow was mixed in. Then it was all sealed with a matte coat. Here are a bunch of images.


The finished product vs. the real image.


Thank you all for your tips!
Stands24
Visit this Community
Florida, United States
Joined: May 13, 2016
KitMaker: 70 posts
Armorama: 64 posts
Posted: Saturday, February 18, 2017 - 09:19 AM UTC

Quoted Text

Hi Ryan

first congrats on having the nous to go DIY, I can’t believe people actually pay good money to buy “mud”. My recipe is somewhat different to yours but it does overcome the problem of failure-to-adhere so maybe it’ll help:

1)Mix powder paint (the primary school stuff, cheap as - black, red, yellow) into a thick paste & test colour when dry – can be deceptive when wet. Too many models have a similar look to hair-dye, what I call “bright brown”. Look at construction vehicles with tracks, the mud is NOT brown at all, it’s grayish darkish yellowish depending on local terrain.

2)Rather than liquid nails I use what in UK & Oz is called Polyfilla – a filler in paste form. Mix a chunk of it with (1) and a little water. I then re-test a daub of it to check the dried colour is good because Polyfilla is white and lightens the shade.

3)Add texture to taste, but only a little (10%-20% of the total mix, too much and adherence drops rapidly) – either sieved fine garden soil, model-railroad ballast, whatever.
I usually brush a thick matt/flat black enamel primer coat on areas to be muddied e.g. underside of sponsons & hull side-walls, lower front & rear hull panels. Then use a blunt brush to daub the mix on – always thinner than you think it should be, you can always add more later. Adherence seems to be OK but I do recall the odd time it wasn’t, so I added a small (approx 10%) amount of PVA/Elmers to the mix and that cured the problem. The wheels and tracks – after painting – can take a more dilute (water-based obviously) version of the mud, which is why I keep the mix in an air-tight plastic container so it keeps indefinitely.

The great thing about this mix is that it can be modified after drying. If it looks overdone I use a sharp pointed blade and just pick off the excess – which also gives a lighter tonal variation. Mud ain’t one colour/shade, ever.
If you scroll back through Photo Features on the home page you’ll find some of my mud in “Diodrama – Final Countdown”.

Regarding your questions, the vehicle was factory painted and all markings were applied, then it went into combat and picked up mud & dirt. So that’s the order. As for frozen mud that’s something I haven’t attempted but I’d probably do all of the above and then just (very) lightly dust it with white and light grey powder paint /pastel chalk. It’s all trial & error, that’s the fun part when you get it right.

Cheers,

Tim
(PS Just because my life is littered with preposterous coincidences – having had zero contact with anyone in Florida before, I’ve just been contacted by a distant cousin living in Vero Beach – her name’s Keira. It wouldn’t surprise me if you knew her…?!)


Thanks for the info Tim! Looking back I may have done too much mud on the underside of the tank, but to me it kind of makes sense because the mud is already frozen, and new mud would also freeze on top, thus creating buildup. Still looks odd though...

As for the cousin, Vero Beach is just a few hours away from me, lol!
justsendit
Visit this Community
Colorado, United States
Joined: February 24, 2014
KitMaker: 3,033 posts
Armorama: 2,492 posts
Posted: Saturday, February 18, 2017 - 09:50 AM UTC
How about adding some linear scrape marks along the underside to illustrate that the tank has moved? Otherwise, it looks great!🍺

—mike
ButterFingers
Visit this Community
Alberta, Canada
Joined: March 09, 2017
KitMaker: 2 posts
Armorama: 2 posts
Posted: Monday, March 20, 2017 - 01:12 AM UTC
I personally prefer pigments. Just ground down some chalk pastels and mix with water. To me it seems more in scale and looks neater.
 _GOTOTOP