_GOTOBOTTOM
Armor/AFV: Axis - WWII
Armor and ground forces of the Axis forces during World War II.
Hosted by Darren Baker
Sdkfz 234/3 another shelf queen of mine
Pedro
Visit this Community
Wojewodztwo Pomorskie, Poland
Joined: May 26, 2003
KitMaker: 1,208 posts
Armorama: 1,023 posts
Posted: Sunday, February 19, 2017 - 05:36 AM UTC
DML's very nice model of SDkfz 234/3 that I had won in Dragons MOM contest here on Armorama back in 2007... Started it soon after I got it in the mail, IIRC some of the unpainted construction photos are on my old laptop, will have to dig 'em out.

I've built the interior and stopped, don't really know why, maybe I was afraid to paint it.

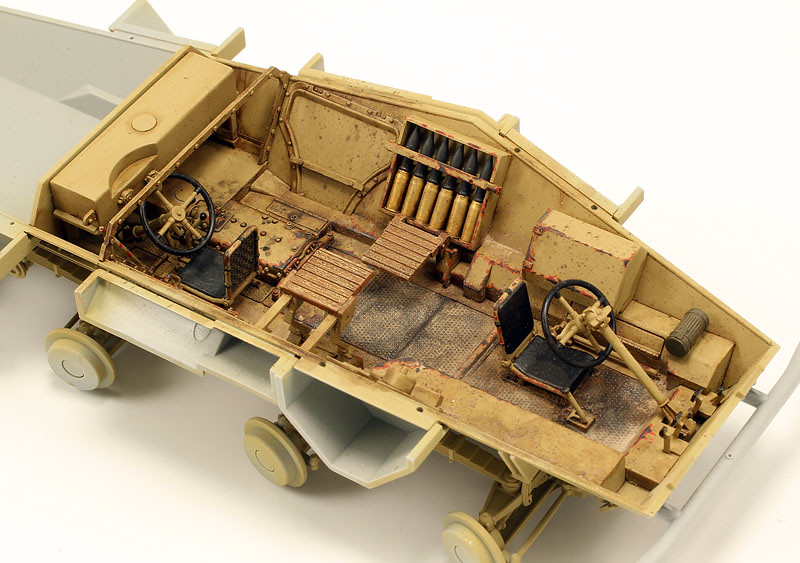
I might have went a bit overboard with chipping, though not much of it will be seen anyway, as evident in some of the following photos. I'm particularly not fond of the size and shape of the chipped area in the middle of the floor.

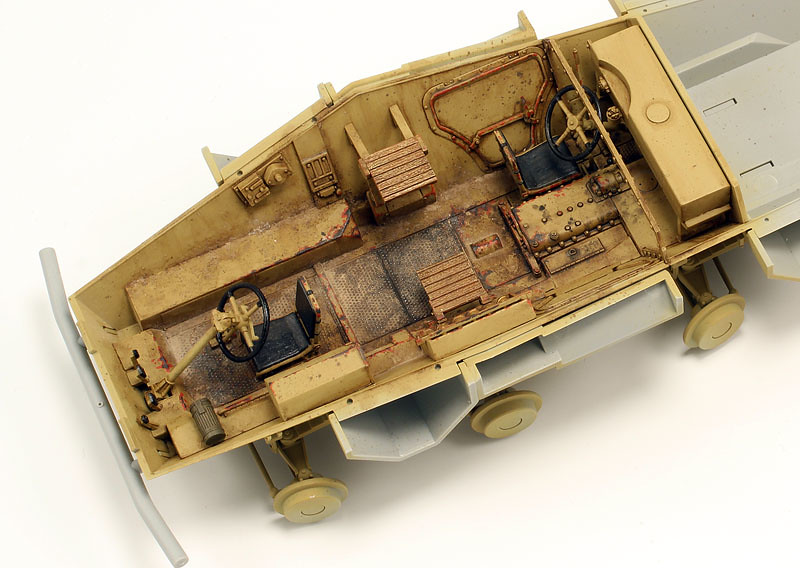
Weathering of the lower half of the fighting compartment consisted of:
- chipping with acrylic paints,
- oil burnt umber wash
- AMMO Earth effect speckling, Earth pigment for dusting

IMG_3856 by Grzegorz Ziecina, on Flickr

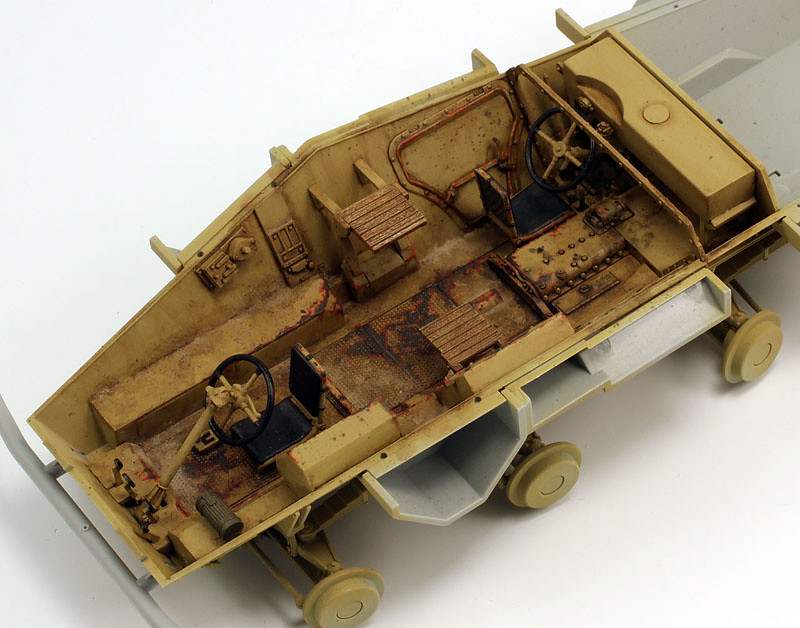
IMG_3857 by Grzegorz Ziecina, on Flickr

IMG_3858 by Grzegorz Ziecina, on Flickr

IMG_3860 by Grzegorz Ziecina, on Flickr

Upper hull interior was lightly weathered with just an oil wash of raw umber, all the visor flaps are moveable and can be opened or closed

IMG_3862 by Grzegorz Ziecina, on Flickr

IMG_3863 by Grzegorz Ziecina, on Flickr

IMG_3865 by Grzegorz Ziecina, on Flickr

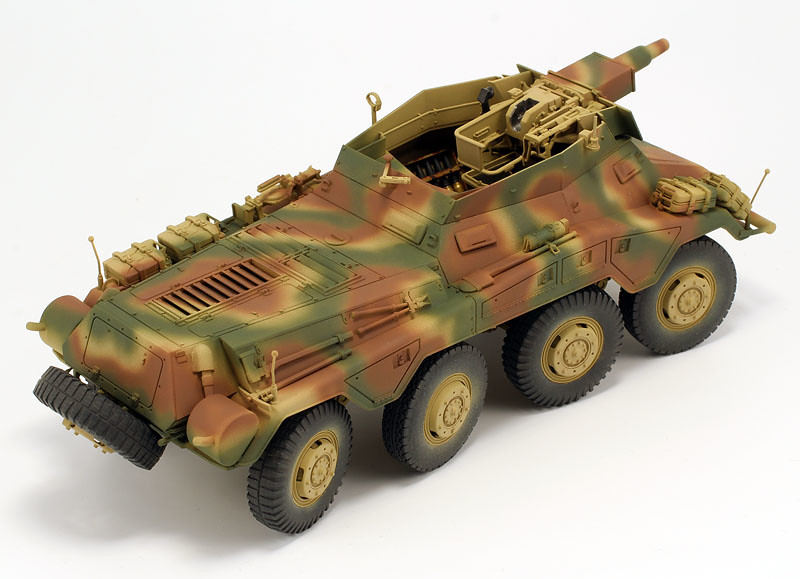
Not much of the interior painting and weathering will be seen anyway, here with just the upper hull in place... even less so with the gun installed


IMG_3870 by Grzegorz Ziecina, on Flickr

IMG_3872 by Grzegorz Ziecina, on Flickr

IMG_3861 by Grzegorz Ziecina, on Flickr

Cheers,
Greg
retiredyank
Visit this Community
Arkansas, United States
Joined: June 29, 2009
KitMaker: 11,610 posts
Armorama: 7,843 posts
Posted: Sunday, February 19, 2017 - 06:22 AM UTC
I'm envious of the interior work. For chipping, I use a sponge brush I picked up at a crafts store. I believe J's Work offers one for about $10usd. I looked forward to seeing how you depict the exterior.
MLD
Visit this Community
Vermont, United States
Joined: July 21, 2002
KitMaker: 3,569 posts
Armorama: 2,070 posts
Posted: Sunday, February 19, 2017 - 07:50 AM UTC
Brilliant work! Getting a look at your work, now I have to get my 234/4 back off the shelf of shame and back into circulation as well.
Pedro
Visit this Community
Wojewodztwo Pomorskie, Poland
Joined: May 26, 2003
KitMaker: 1,208 posts
Armorama: 1,023 posts
Posted: Monday, February 20, 2017 - 03:55 AM UTC
Thanks for the tip Matt, I didn't even knew this tool existed. Earlier in the process I tried to use a piece of dishwashing sponge, but I couldn't get acrylic paints (Vallejo) to give satisfying result. I guess its just difficult to get them in the right amount and dilution on the sponge and to the model without drying, enamels would be much better, but I belive I dont have the right color as enamel paint.

Mike, thank you! As to the 234/4 do it, these kits are a joy to work with, back from the days Dragon actually maintained it's reputation to a high standard.

In the meantime I had reworked the weathering of the tread plates on the floor, should be better now. I'll take and post some photos tommorow and it will be ready for closing of the hull.

Regards,
Greg
retiredyank
Visit this Community
Arkansas, United States
Joined: June 29, 2009
KitMaker: 11,610 posts
Armorama: 7,843 posts
Posted: Monday, February 20, 2017 - 06:13 AM UTC
I have experienced very good results, using Vallejo. I smear a little, on a pallet and pick it up with the sponge brush. The brush also keeps you from chipping concave corners.
Pedro
Visit this Community
Wojewodztwo Pomorskie, Poland
Joined: May 26, 2003
KitMaker: 1,208 posts
Armorama: 1,023 posts
Posted: Tuesday, February 21, 2017 - 04:40 AM UTC

Quoted Text

I have experienced very good results, using Vallejo. I smear a little, on a pallet and pick it up with the sponge brush. The brush also keeps you from chipping concave corners.


Thanks Matt, I'll look for the sponge brush next time I'll be shoping hobby supplies.

As promised, I made new photos of the lower hull with altered weathering of the floor tread plates (I like it a whole lot better now):

IMG_3882 by Grzegorz Ziecina, on Flickr

IMG_3884 by Grzegorz Ziecina, on Flickr

IMG_3881 by Grzegorz Ziecina, on Flickr

IMG_3880 by Grzegorz Ziecina, on Flickr

IMG_3885 by Grzegorz Ziecina, on Flickr

IMG_3886 by Grzegorz Ziecina, on Flickr

Cheers,
Greg
Pedro
Visit this Community
Wojewodztwo Pomorskie, Poland
Joined: May 26, 2003
KitMaker: 1,208 posts
Armorama: 1,023 posts
Posted: Monday, February 27, 2017 - 05:00 AM UTC
Last batch of photos after build completion and it's off to the paintshop!

I finished adding exterior details, this build is almost strictly OOB apart from aber workable clamps used to secure the OVM.

Oddly enough for the tiedown loops around the upper hull Dragon gives you 8 PE parts as an alternative to plastic parts, but you need 10 for this vehicle...
Also the instructions have you remove one of the bolts and the plug for antena(?) base on the engine deck and drill two holes, but it does not specify what for. I'm guessing they just haven't removed this step from the instructions for some other version of the 234. Of course I noticed it just now, not when I was building it several years ago so I had to reinstate the removed details.

Dont mind the wheels, they will be retouched before weathering.
The rest of the vehicle will of course receive german 3 tone camo.

Cheers,
Greg

IMG_3896 by Grzegorz Ziecina, on Flickr

IMG_3895 by Grzegorz Ziecina, on Flickr

IMG_3893 by Grzegorz Ziecina, on Flickr

IMG_3891 by Grzegorz Ziecina, on Flickr

IMG_3889 by Grzegorz Ziecina, on Flickr

IMG_3890 by Grzegorz Ziecina, on Flickr

IMG_3894 by Grzegorz Ziecina, on Flickr
Pedro
Visit this Community
Wojewodztwo Pomorskie, Poland
Joined: May 26, 2003
KitMaker: 1,208 posts
Armorama: 1,023 posts
Posted: Sunday, March 05, 2017 - 03:48 AM UTC
Here it is, basic camo done. I have used tamiya acrylics for the first time with this model, great stuff, I would not be able to achieve this so easily with vallejo acrylics I used until now! Probably some lines could have been tighter, and I'm not entierly happy with shapes of some of the patches, but I count this as a good first time effort as this is my first three tone camo done with AB.
Also not sure if I should camo paint the wheels, what do you guys think?

After some retouches of the parts I'm not 100% happy with, next step: detail painting and the weathering!

Cheers,
Greg

IMG_3898 by Grzegorz Ziecina, on Flickr

IMG_3899 by Grzegorz Ziecina, on Flickr

IMG_3900 by Grzegorz Ziecina, on Flickr

IMG_3902 by Grzegorz Ziecina, on Flickr

IMG_3904 by Grzegorz Ziecina, on Flickr
Steven000
Visit this Community
Antwerpen, Belgium
Joined: August 07, 2016
KitMaker: 191 posts
Armorama: 120 posts
Posted: Sunday, March 05, 2017 - 04:16 AM UTC
That's a very nice camo pattern Greg!
Do you mean Vallejo tip-drying or in what way is the Tamiya paint better for this AB job?

Kind regards
Steven
tatbaqui
Staff MemberNews Writer
ARMORAMA
#040
Visit this Community
Metro Manila, Philippines
Joined: May 06, 2007
KitMaker: 2,713 posts
Armorama: 2,451 posts
Posted: Sunday, March 05, 2017 - 04:36 AM UTC
Very nice camo Pedro -- it came out very well. I like how you've done the colors tight and close. What AB did you use?

I would not worry too much about the shapes. Unless done at the factory, such painting were done at field shops, even by the crew themselves -- and they have other things to be more worried about than having a perfectly laid finish.

Cheers,

Tat
retiredyank
Visit this Community
Arkansas, United States
Joined: June 29, 2009
KitMaker: 11,610 posts
Armorama: 7,843 posts
Posted: Sunday, March 05, 2017 - 07:53 AM UTC
Your build has me interested, in some German half-tracks. I have hit the phase of wanting to build interiors, due to this one. Your camo is brilliant. I look forward to seeing how you match the exterior weathering, with the interior.
Thirian24
Visit this Community
Oklahoma, United States
Joined: September 30, 2015
KitMaker: 2,493 posts
Armorama: 2,344 posts
Posted: Sunday, March 05, 2017 - 08:03 AM UTC
I think you did a fantastic job on that camo! I like it a lot.

As for the rims, I'd leave them the way they are.
Hard_Target
Visit this Community
Virginia, United States
Joined: January 30, 2017
KitMaker: 20 posts
Armorama: 17 posts
Posted: Sunday, March 05, 2017 - 08:09 AM UTC
I think you did a fine job on the paint. I've never seen any photos that appeared to show any of these with cammo on the wheels, so I'd leave them alone. I noticed you have a couple different tire types on this, who makes these? And where can I buy them? I have a Dragon Puma I'm gonna build sometime this year.
Pedro
Visit this Community
Wojewodztwo Pomorskie, Poland
Joined: May 26, 2003
KitMaker: 1,208 posts
Armorama: 1,023 posts
Posted: Sunday, March 05, 2017 - 05:02 PM UTC
Steven, thank you! I think that because tamya acrylics use lighter solvent than Vallejo's water based paint, it is easier to control. With very low pressure and very diluted paint I was not able to go close enough to the surface of the model to not have too much overspray and lay a fine line as the paint was wet and runny on the model, and air from AB would push the paint sideways. I didn't have any tip drying paint when used with vallejo's dedicated thinner, this problem seems to occur when using water to dilute Vallejo paint.

Tamiya on the other hand diluted either with their lacquer thinner or acrylic thinner is much more forgiving as the thinner evaporates quickly. The same is with Humbrol enamels, they are forgiving when painting fine lines, they smell though and dry longer, upside is that when fully dry they are super durable.

Tat, thank you! I used an Iwata HP-C plus, great tool.
You are right about the field applied camo, It's just I envisioned it a little bit different, I wanted more green patches and less brown, probably even less yellow visible to go after one poor photo I'd use for inspiration.
All in all I think I will leave it as is

Matt, thanks I'm glad you like my effort on the camo! German halftrack would be perfect for making nice interior as its visible even as the model is built.

Dustin, thank you!

Timothy, thank you! I'll leave the wheels yellow, indeed, it's even hard to see from most photos what color the wheels are, due to poor quality of the photos and dirt.

Tyres on my model are from the box, dragon gives you alternative 'civilian' pattern tyres (three of those) and I think that there's a full set of 'gelande' tyres provided. You also get two types of rims: with 2 or 5 holes.
Your Puma should have the same running gear and wheels options.
For aftermarket wheels, Panzerart makes at least 3 sets of resin wheels, just their rim pattern differs slightly on the same type of rim from Dragon, so mixing would not look that good. I also see that Alliance Model Works makes some sets, don't know the company though and whether they are available or not.

Cheers,
Greg

tatbaqui
Staff MemberNews Writer
ARMORAMA
#040
Visit this Community
Metro Manila, Philippines
Joined: May 06, 2007
KitMaker: 2,713 posts
Armorama: 2,451 posts
Posted: Thursday, March 09, 2017 - 02:54 AM UTC

Quoted Text

I used an Iwata HP-C plus, great tool.


Thanks Greg -- will keep that in mind. Looking forward to more of your progress. Cheers, Tat
bairdlander
Joined: May 16, 2007
KitMaker: 53 posts
Armorama: 51 posts
Posted: Wednesday, March 22, 2017 - 04:55 PM UTC
What color do you use for chipping?
celt15
Visit this Community
Wales, United Kingdom
Joined: September 16, 2016
KitMaker: 95 posts
Armorama: 91 posts
Posted: Tuesday, March 28, 2017 - 04:53 AM UTC
Like your work very much,thanks for sharing.
Bodeen
#026
Visit this Community
Pennsylvania, United States
Joined: June 08, 2002
KitMaker: 1,744 posts
Armorama: 1,359 posts
Posted: Tuesday, March 28, 2017 - 08:35 AM UTC
Awesome work. The interior is great. Super job.
Pedro
Visit this Community
Wojewodztwo Pomorskie, Poland
Joined: May 26, 2003
KitMaker: 1,208 posts
Armorama: 1,023 posts
Posted: Wednesday, March 29, 2017 - 12:45 AM UTC
Bairdlander, for general chipping I use german grey Vallejo paint. Here for the interior I used german grey, mix of vermilion and 'red leather' for red oxide chips, pencil lead for picking out most exposed edges and Tamiya's gunmetal for drybrushing tread plates on the floor.

Kenneth, Jeff, thanks I'm glad you like my effort!

While answering Tat's question about my AB setup I forgot to mention I use my Iwata with crown cap, it lets me get really close to the model and put on very fine lines.

Cheers,
Greg
seabee1526
Visit this Community
Michigan, United States
Joined: September 14, 2007
KitMaker: 185 posts
Armorama: 130 posts
Posted: Monday, August 31, 2020 - 04:18 AM UTC
very very nice
 _GOTOTOP