

Hosted by Darren Baker
T2/M31 TRV

27-1025

Joined: September 16, 2004
KitMaker: 1,281 posts
Armorama: 1,222 posts
Posted: Monday, December 04, 2017 - 08:17 PM UTC
Doing some work on the new Takom kit which by the way is very nice. The kit instructions and some other builds Ive seen show the spare drive sprockets stored laying across the top of the boom. Cant find any actual pictures of that and wanted to know if they were clamped or otherwise secured up there?

Frenchy

Joined: December 02, 2002
KitMaker: 12,719 posts
Armorama: 12,507 posts
Posted: Monday, December 04, 2017 - 08:56 PM UTC
Quoted Text
Cant find any actual pictures of that and wanted to know if they were clamped or otherwise secured up there?
Here's the only period picture I've found so far :
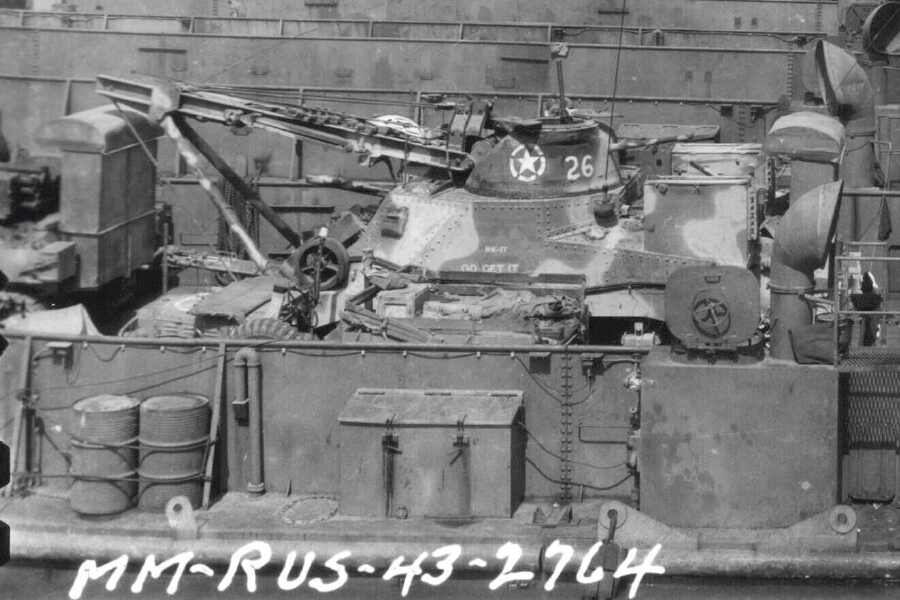
I guess there could be brackets of some kind welded to the boom...
H.P.
27-1025
Joined: September 16, 2004
KitMaker: 1,281 posts
Armorama: 1,222 posts
Posted: Saturday, December 09, 2017 - 04:17 AM UTC
A few in progress pics of the Takom kit. I totally deviated from the kit instruction build sequence so I could avoid fit issues on the hull panels. I made sure the join surfaces were glass smooth and went one small section at a time and was pleased with the result. Wish I had done this with my M3.


barkingdigger

#013

Joined: June 20, 2008
KitMaker: 3,981 posts
Armorama: 3,403 posts
Posted: Saturday, December 09, 2017 - 04:35 AM UTC
Quoted Text
Doing some work on the new Takom kit which by the way is very nice. The kit instructions and some other builds Ive seen show the spare drive sprockets stored laying across the top of the boom. Cant find any actual pictures of that and wanted to know if they were clamped or otherwise secured up there?
Looking in Heavy Wrecker a few shots suggest either brackets or upstanding bolts roughly along the centre-line of the zigzag top bracing. My guess is maybe a strap-metal hoop to catch a sprocket tooth at one end and a bolt in a tapped hole at the other end of each sprocket ring, using the mounting holes already present. (They cannot be loose, or they'd be shaken off pretty quick...)
By the way, did the tranny cover come without casting marks, or did you shave off kit marks before adding Archer marks?
27-1025
Joined: September 16, 2004
KitMaker: 1,281 posts
Armorama: 1,222 posts
Posted: Saturday, December 09, 2017 - 05:55 AM UTC
Quoted Text
Quoted TextDoing some work on the new Takom kit which by the way is very nice. The kit instructions and some other builds Ive seen show the spare drive sprockets stored laying across the top of the boom. Cant find any actual pictures of that and wanted to know if they were clamped or otherwise secured up there?
Looking in Heavy Wrecker a few shots suggest either brackets or upstanding bolts roughly along the centre-line of the zigzag top bracing. My guess is maybe a strap-metal hoop to catch a sprocket tooth at one end and a bolt in a tapped hole at the other end of each sprocket ring, using the mounting holes already present. (They cannot be loose, or they'd be shaken off pretty quick...)
By the way, did the tranny cover come without casting marks, or did you shave off kit marks before adding Archer marks?
They had some molded in on the center and right piece which look fine but I like the look of the Archer foundry marks better. Agree with your comments about the spare sprocket rings. Ive left them off for the time being. Going to look for some other photo evidence of stowage options.

KoSprueOne

Joined: March 05, 2004
KitMaker: 4,011 posts
Armorama: 1,498 posts
Posted: Saturday, December 09, 2017 - 11:37 PM UTC
Quoted Text
Quoted Text27-1025 -
Doing some work on the new Takom kit which by the way is very nice. The kit instructions and some other builds Ive seen show the spare drive sprockets stored laying across the top of the boom. Cant find any actual pictures of that and wanted to know if they were clamped or otherwise secured up there?
Barkingdigger -
Looking in Heavy Wrecker a few shots suggest either brackets or upstanding bolts roughly along the centre-line of the zigzag top bracing. My guess is maybe a strap-metal hoop to catch a sprocket tooth at one end and a bolt in a tapped hole at the other end of each sprocket ring, using the mounting holes already present. (They cannot be loose, or they'd be shaken off pretty quick...)
By the way, did the tranny cover come without casting marks, or did you shave off kit marks before adding Archer marks?
Heavy Wrecker and US Armored Funnies have photos of the mounting hardware as Barkingdigger describes as along the center on the middle angled supports.
They are hard to see but I think it is like this:
It looks like two mounting points for each sprocket. One being what looks like a hook which catches the minor diameter, between two teeth (or from inside the inner opening). The second mount point is a stud which sticks through one of the sprocket holes and a nut is driven down to secure it.
In one of the photos in Heavy Wrecker, p 14 there is a perfect shot from above of an M31 rolling off of a landing craft. It has rope wrapped around this mounting hardware though and I think it's where the box art comes from.

27-1025
Joined: September 16, 2004
KitMaker: 1,281 posts
Armorama: 1,222 posts
Posted: Sunday, December 10, 2017 - 04:57 AM UTC
No definitive answer yet regarding the stowage but I did find a site that might be of interest to those wanting to build this kit.
http://the.shadock.free.fr/sherman_minutia/tankrecovery/m31_trv.html
http://the.shadock.free.fr/sherman_minutia/tankrecovery/m31_trv.html
27-1025
Joined: September 16, 2004
KitMaker: 1,281 posts
Armorama: 1,222 posts
Posted: Sunday, December 10, 2017 - 08:10 AM UTC
Close to ready for a coat of primer and see where corrections need to be made.


ericadeane
Joined: October 28, 2002
KitMaker: 4,021 posts
Armorama: 3,947 posts
Posted: Sunday, December 10, 2017 - 03:43 PM UTC
Chris: On page 7 of Zaloga's "US Armored Funnies" is a picture of an M31B1. You can make out two bolts sticking out of the diagonal framework slats that a sprocket would be secured into place. In pictures of the Latrun M31, you see holes where they were. I'll get some pics to you later.
27-1025
Joined: September 16, 2004
KitMaker: 1,281 posts
Armorama: 1,222 posts
Posted: Sunday, December 10, 2017 - 05:50 PM UTC
Quoted Text
Chris: On page 7 of Zaloga's "US Armored Funnies" is a picture of an M31B1. You can make out two bolts sticking out of the diagonal framework slats that a sprocket would be secured into place. In pictures of the Latrun M31, you see holes where they were. I'll get some pics to you later.
Thanks!! Help as always much appreciated.

barrowb98
Joined: April 20, 2015
KitMaker: 119 posts
Armorama: 119 posts
Posted: Sunday, December 10, 2017 - 06:34 PM UTC
That's looking very nice. I'll have to remember that assembly method whenever I get around to one of the Takom M3-series (though I'll probably wait and see how Miniart's first)

m4sherman
Joined: January 18, 2006
KitMaker: 1,866 posts
Armorama: 1,808 posts

Posted: Monday, December 11, 2017 - 01:05 AM UTC
Quoted Text
Doing some work on the new Takom kit which by the way is very nice. The kit instructions and some other builds Ive seen show the spare drive sprockets stored laying across the top of the boom. Cant find any actual pictures of that and wanted to know if they were clamped or otherwise secured up there?
This is a scan of the picture from the service manual. Years ago a WWII vet gave me a folder with all the prints used in the manual.
The spare sprockets were held on with bolts through the holes in the sprockets into the zig zag straps. A couple are clear, but a couple are not, and probably covered by the cables. The center sprocket is very clear, so that should be how the other two are.
https://gallery.kitmaker.net/data/500/M31_top.jpg
27-1025
Joined: September 16, 2004
KitMaker: 1,281 posts
Armorama: 1,222 posts
Posted: Monday, December 11, 2017 - 01:21 AM UTC
Quoted Text
Quoted TextDoing some work on the new Takom kit which by the way is very nice. The kit instructions and some other builds Ive seen show the spare drive sprockets stored laying across the top of the boom. Cant find any actual pictures of that and wanted to know if they were clamped or otherwise secured up there?
This is a scan of the picture from the service manual. Years ago a WWII vet gave me a folder with all the prints used in the manual.
The spare sprockets were held on with bolts through the holes in the sprockets into the zig zag straps. A couple are clear, but a couple are not, and probably covered by the cables. The center sprocket is very clear, so that should be how the other two are.
https://gallery.kitmaker.net/data/500/M31_top.jpg
I think we have a winner!!! Great picture and thank you very much for sharing that.
m4sherman
Joined: January 18, 2006
KitMaker: 1,866 posts
Armorama: 1,808 posts
Posted: Monday, December 11, 2017 - 01:27 AM UTC
Found a view from the underside. It looks like the sprockets were bolted on using bolts with jam nuts. Maybe the same bolts used to hold the sprockets to the hubs.
https://gallery.kitmaker.net/data/500/M31_under.jpg
https://gallery.kitmaker.net/data/500/M31_under.jpg
m4sherman
Joined: January 18, 2006
KitMaker: 1,866 posts
Armorama: 1,808 posts
Posted: Monday, December 11, 2017 - 01:27 AM UTC
Quoted Text
Quoted TextQuoted TextDoing some work on the new Takom kit which by the way is very nice. The kit instructions and some other builds Ive seen show the spare drive sprockets stored laying across the top of the boom. Cant find any actual pictures of that and wanted to know if they were clamped or otherwise secured up there?
This is a scan of the picture from the service manual. Years ago a WWII vet gave me a folder with all the prints used in the manual.
The spare sprockets were held on with bolts through the holes in the sprockets into the zig zag straps. A couple are clear, but a couple are not, and probably covered by the cables. The center sprocket is very clear, so that should be how the other two are.
https://gallery.kitmaker.net/data/500/M31_top.jpg
I think we have a winner!!! Great picture and thank you very much for sharing that.
Glad to help.
KoSprueOne
Joined: March 05, 2004
KitMaker: 4,011 posts
Armorama: 1,498 posts
Posted: Monday, December 11, 2017 - 07:28 AM UTC
Quoted Text
Quoted Textm4sherman -
Doing some work on the new Takom kit which by the way is very nice. The kit instructions and some other builds Ive seen show the spare drive sprockets stored laying across the top of the boom. Cant find any actual pictures of that and wanted to know if they were clamped or otherwise secured up there?
This is a scan of the picture from the service manual. Years ago a WWII vet gave me a folder with all the prints used in the manual.
The spare sprockets were held on with bolts through the holes in the sprockets into the zig zag straps. A couple are clear, but a couple are not, and probably covered by the cables. The center sprocket is very clear, so that should be how the other two are.
https://gallery.kitmaker.net/data/500/M31_top.jpg
Quoted Text
m4sherman -
Found a view from the underside. It looks like the sprockets were bolted on using bolts with jam nuts. Maybe the same bolts used to hold the sprockets to the hubs.
https://gallery.kitmaker.net/data/500/M31_under.jpg
BINGO! Thanks for sharing these pictures.
Excellent progress on the M31 especially with your added detail touches.

KurtLaughlin
Joined: January 18, 2003
KitMaker: 2,402 posts
Armorama: 2,377 posts
Posted: Tuesday, December 12, 2017 - 05:59 AM UTC
Quoted Text
Found a view from the underside. It looks like the sprockets were bolted on using bolts with jam nuts. Maybe the same bolts used to hold the sprockets to the hubs.
https://gallery.kitmaker.net/data/500/M31_under.jpg
Jam nuts or self-locking nuts?
KL
27-1025
Joined: September 16, 2004
KitMaker: 1,281 posts
Armorama: 1,222 posts
Posted: Friday, December 15, 2017 - 01:54 AM UTC
Moving on with the information on hand. Want to get some paint on this thing and still need to do the running gear.


KoSprueOne
Joined: March 05, 2004
KitMaker: 4,011 posts
Armorama: 1,498 posts
Posted: Friday, December 15, 2017 - 04:18 AM UTC
Nice progress. That mounting method looks good. Is that string supplied in the kit? Good quality I don't see any loose fibers sticking out.
27-1025
Joined: September 16, 2004
KitMaker: 1,281 posts
Armorama: 1,222 posts
Posted: Friday, December 15, 2017 - 06:06 AM UTC
Quoted Text
Nice progress. That mounting method looks good. Is that string supplied in the kit? Good quality I don't see any loose fibers sticking out.
Not sure where the string came from, don't think it was in the kit. We'll see if it takes paint.
27-1025
Joined: September 16, 2004
KitMaker: 1,281 posts
Armorama: 1,222 posts
Posted: Saturday, December 23, 2017 - 05:15 AM UTC
A bit closer to the primer stage. Adding some tool tie down straps and retaining chains for the fuel filler caps. To ease painting the retaining chains on the boom legs will be the last thing added.


27-1025
Joined: September 16, 2004
KitMaker: 1,281 posts
Armorama: 1,222 posts
Posted: Wednesday, December 27, 2017 - 04:06 AM UTC
Primer coat and two base coats. Will let that cure a bit before adding markings, running gear, etc.


bat-213

Joined: December 30, 2011
KitMaker: 902 posts
Armorama: 788 posts
Posted: Wednesday, December 27, 2017 - 04:56 AM UTC
 your build is looking great .


clovis899

#155
Joined: May 05, 2002
KitMaker: 774 posts
Armorama: 605 posts
Posted: Wednesday, December 27, 2017 - 05:13 AM UTC
Thanks Chris,
Your build looks absolutely first rate! Was trying real hard to resist going out and buying one, but you are making it very hard to continue to put up much of a fight.
Cheers,
Rick
Your build looks absolutely first rate! Was trying real hard to resist going out and buying one, but you are making it very hard to continue to put up much of a fight.
Cheers,
Rick
27-1025
Joined: September 16, 2004
KitMaker: 1,281 posts
Armorama: 1,222 posts
Posted: Wednesday, December 27, 2017 - 05:21 AM UTC
Quoted Text
Thanks Chris,
Your build looks absolutely first rate! Was trying real hard to resist going out and buying one, but you are making it very hard to continue to put up much of a fight.
Cheers,
Rick
just go ahead and surrender. It's a very nice kit that goes together with minimal fuss if you take your time. You won't regret it.
 |

WEB HOSTING BY


Copyright ©2021 Armorama and Kitmaker Network, a subsidiary of Silver Star Enterprises
All Rights Reserved. Please read our Conditions of Use and Privacy Policy.
All Rights Reserved. Please read our Conditions of Use and Privacy Policy.