

Hi all,
I'm assembling a kit of a Conqueror Mk II of Amusing Hobby.
I would like some suggestions for building and painting this kit.
What is the best color match from the range of Tamiya or Gunze? I suppose that it should be a semiglossy bronze green.
What about a canvas cover for the space between the turret and the hood of the gun? Should it be covered by a flexible cover, as suggested but not illustrated in the box?
Would the spare tankers of a Chieftain of Tamiya fit on it?
Any suggestions will be welcome.
Armor/AFV
For discussions on tanks, artillery, jeeps, etc.
For discussions on tanks, artillery, jeeps, etc.
Hosted by Darren Baker, Mario Matijasic
Conqueror Mk II of Amusing Hobby

MassimoTessitori

Joined: March 14, 2013
KitMaker: 278 posts
Armorama: 278 posts
Posted: Monday, April 22, 2019 - 05:39 PM UTC

GTDeath13

Joined: June 12, 2015
KitMaker: 921 posts
Armorama: 919 posts

Posted: Monday, April 22, 2019 - 06:04 PM UTC
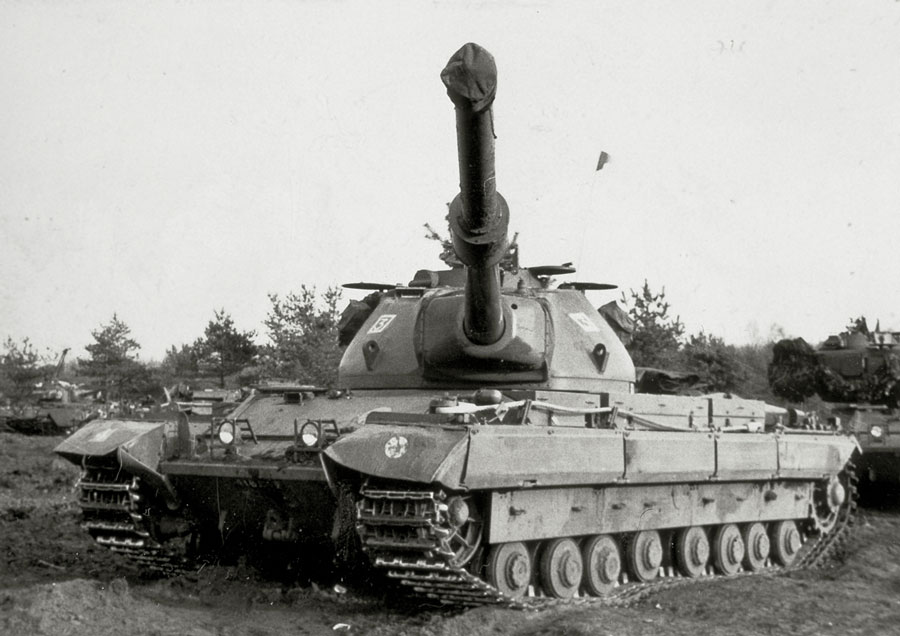
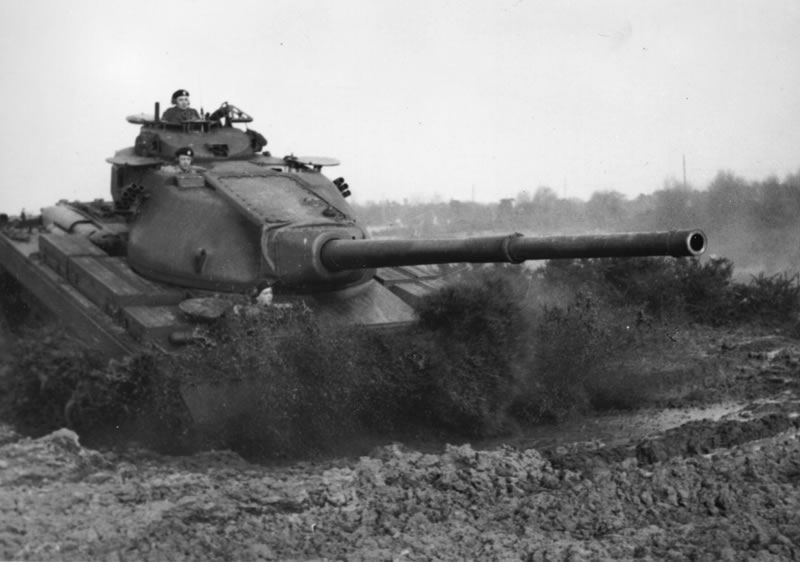
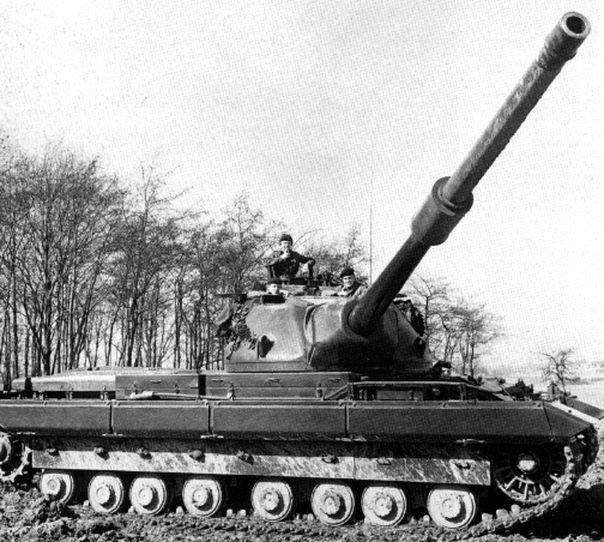
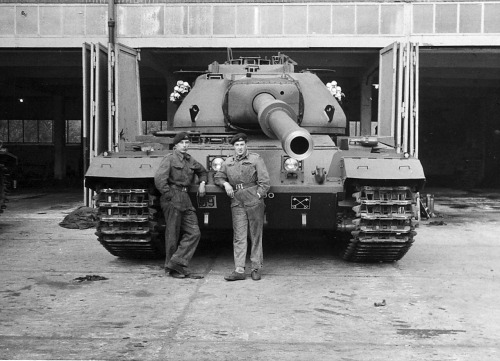
You definately should use a canvas cover for the mantlet. Here are some photos for reference:


petbat

Joined: August 06, 2005
KitMaker: 3,353 posts
Armorama: 3,121 posts
Posted: Monday, April 22, 2019 - 09:12 PM UTC
Hi Massimo
The pics posted are a mix of Mark 1 and Mk11.
There is no correct colour out of the bottle, you will need to mix your own. The colour was deep Bronze Green and was a colour the British used up to 1939 and then began to use again after the war. See the article by Mike Starmer
https://www.mafva.org/british-vehicle-camouflage-1939-45/
who suggests the following:
Deep Bronze Green BS.24
Mix: 2 x Humbrol 2 + 4 x Revell 84 + 1 x Humbrol 33 or 85. Alternative is Revell 65 + black in ratio 10:1 approx.
Tamiya: 8 x XF5 + 5 X XF63 satin over.
A crewmen wearing a tanker pixie suit would be the most appropriate for the vehicle. eg the British/Commonwealth AFV figure set by Bronco.35098


errains

#045

Joined: September 23, 2005
KitMaker: 362 posts
Armorama: 350 posts
Posted: Monday, April 22, 2019 - 11:53 PM UTC

MassimoTessitori
Joined: March 14, 2013
KitMaker: 278 posts
Armorama: 278 posts
Posted: Tuesday, April 23, 2019 - 12:32 AM UTC
Thank you to you all, all these informations are very useful.
The build log is excellent too.
Perhaps I have to be worried for the tracks and suspensions... I've utilized the springs, let's see about the resistance of the components.
Regards
Massimo
The build log is excellent too.
Perhaps I have to be worried for the tracks and suspensions... I've utilized the springs, let's see about the resistance of the components.
Regards
Massimo

BootsDMS

Joined: February 08, 2012
KitMaker: 978 posts
Armorama: 965 posts
Posted: Tuesday, April 23, 2019 - 12:57 AM UTC
Massimo,,
You can make a mantlet cover either from tape (as the instructions for my Mk 1 suggest) or with something like Milliput - I find the latter the best method as you can add creases and folds a little easier.
I do not know of an acrylic colour (and the suggestions so far may well work) but in enamels you can't go far wrong using Revell 65 - Bronze Green - for a 1:35 model; it will require a gloss varnish though.
The 1944 pattern "Pixie" tank suit will definitely work for crew figures, but also remember that the green combat uniform of the time was also worn, in conjunction with the then issued coveralls.
Brian
MassimoTessitori
Joined: March 14, 2013
KitMaker: 278 posts
Armorama: 278 posts
Posted: Tuesday, April 23, 2019 - 01:22 AM UTC
Hi Brian,
is the green uniform the same of the crew of the Chieftain of Tamiya? So, the choice is between a green uniform and a coverall... of what color?
On the last posted photo, I think to see two tankers with the same coverall, but the colors look different. Am I wrong?
is the green uniform the same of the crew of the Chieftain of Tamiya? So, the choice is between a green uniform and a coverall... of what color?
On the last posted photo, I think to see two tankers with the same coverall, but the colors look different. Am I wrong?
BootsDMS
Joined: February 08, 2012
KitMaker: 978 posts
Armorama: 965 posts
Posted: Tuesday, April 23, 2019 - 02:06 AM UTC
I'm afraid I don't know what the colours are for the Tamiya Chieftain crew; the Combat Smock at the time was an Olive Green colour - I would say, using Humbrol enamels that their Light Olive No 86 would be about right; lightened a bit to replicate wear and tear etc.
I don't know what colour the coveralls in the Conqueror photo would have been as I've never seen any.
If you wish to display your figures in the model then I imagine only the upper part of the body would be seen so depicting them wearing the Combat Smock should work.
The real thing looked like the one included here:
https://www.the-saleroom.com/en-gb/auction-catalogues/james-and-son-auctioneers/catalogue-id-srjam10049/lot-02ae4c23-f56d-4683-a3c0-a4d700ef4008
(I'm sure there are better images elsewhere). It was often worn with a button on hood. Rank badges (for NCOs) would be the usual chevron/crown mix, at that time usually worn on both sleeves. Officer rank would usually be on slip-on badges on the epaulettes.
MassimoTessitori
Joined: March 14, 2013
KitMaker: 278 posts
Armorama: 278 posts
Posted: Tuesday, April 23, 2019 - 07:10 AM UTC
Hi,
Thank you for your suggestions.
I have googled a bit, seems that the pixie suit can be of various shades of khaki, brown, green or camouflaged.
A thing that worries me is that this tank has 4 hatches and usually they are all open with the crew protruding.
So I'll have to find four tankers, or at least the upper part of them, with the same suit and in different positions.
Seems that some surgery will be required.
BootsDMS
Joined: February 08, 2012
KitMaker: 978 posts
Armorama: 965 posts
Posted: Tuesday, April 23, 2019 - 07:48 AM UTC
Massimo,
Don't forget Ultracast figures; they're resin and therefore more expensive than injected plastic, but their figures in the "Pixie" tank suits are really useful.
Brian
Don't forget Ultracast figures; they're resin and therefore more expensive than injected plastic, but their figures in the "Pixie" tank suits are really useful.
Brian
iowabrit
Joined: November 06, 2007
KitMaker: 585 posts
Armorama: 557 posts

Posted: Tuesday, April 23, 2019 - 09:03 AM UTC
The Tamiya Chieftain crew figures would work for the Conc. Most regiments wore green overalls often with a cammo jacket for warmth but if the crew were Royal Tank Regiment the overalls would be black (as would the beret). In my regiment (13/18H) we wore blackened web belts with polished brass buckles, green overalls, very dark navy blue berets and black boots DMS. Of course this was a little later (early 1970's) after the Conc was taken out of service, but as Brian said the ultracast figures in the pixie suits would also be right.
For the tank itself I found Vallejo acrylic 70.897 bronze green looks pretty good. When first painted the tanks were semi gloss which lost some of its shine over time but could be brought back to gloss using oily rags....often the case for inspections or open days/parades.
For the tank itself I found Vallejo acrylic 70.897 bronze green looks pretty good. When first painted the tanks were semi gloss which lost some of its shine over time but could be brought back to gloss using oily rags....often the case for inspections or open days/parades.
MassimoTessitori
Joined: March 14, 2013
KitMaker: 278 posts
Armorama: 278 posts
Posted: Tuesday, April 23, 2019 - 05:31 PM UTC
Hi,
I'm sure that Ultracast figures are excellent, but the most part of the crew will be only protruding his head and arms out of the tank so this possibility will be taken in consideration for future works.
Interesting note about black suits... I don't know what are the units proposed by the decals sheet of the kit. It gives two possibilities: one with a red hollow triangle on the turret, and another one with an hollow yellow circle on the turret and a yellow/red square with white 2 on its hull front. Could anyone identify the units, please? What distinctive should make the tanks of the Royal Tank Regiment recognizable?
BootsDMS
Joined: February 08, 2012
KitMaker: 978 posts
Armorama: 965 posts
Posted: Tuesday, April 23, 2019 - 09:57 PM UTC
Massimo,,
The triangle and circle are Squadron - ie the subdivisions of a regiment - markings; they represent A and C Squadron respectively.
The cross keys (white on black) is the formation sign of (the then) 2nd Infantry Division; the white "2" on a bisected red/yellow square indicates an armoured regiment in an Armoured or Infantry Brigade grouping (itself belonging to a Division) - British Army organisation is never for the faint-hearted!
The red square containing a red silhouette of a jerboa (desert rat) is the sign of the 7th Armoured Brigade, part of 1st Division.
The skull and crossbones is the Motto (capbadge) of the 17th/21st Lancers.
I don't know enough about the Royal Tank Regiment black coveralls to confirm whether or not they were in use during Conqueror's service (1955 to 1966); if they were you could depict your model as a vehicle from 5th Royal Tank Regiment which in 1962 were serving in the British Army of the Rhine - ie Germany. You would need to use the 7th Brigade marking for this, but there may well have been other markings such as individual tank names but I am not sure about these. Of courser, camouflage nets and mud are your friend here!
Brian

pod3105

Joined: August 08, 2010
KitMaker: 466 posts
Armorama: 444 posts
Posted: Tuesday, April 23, 2019 - 10:39 PM UTC
Would these be of any use to you?
https://miniart-models.com/wp-content/uploads/2016/04/35121_art.jpg
https://miniart-models.com/wp-content/uploads/2016/04/35121_art.jpg
MassimoTessitori
Joined: March 14, 2013
KitMaker: 278 posts
Armorama: 278 posts
Posted: Wednesday, April 24, 2019 - 01:10 AM UTC
Hi Brian,
thank you for your notes. So, the bisected yellow-red square with number 2 is not of a Royal Tank Regiment, so I have to choose between green uniform or khaki-brown pixie, isn't it?
What is likely for the hat, black, dark blue or what else?
Hi Paul,
the set of Miniarms looks attractive, but at the moment I have ordered the set of Bronco. Their dress seems lighter, so I don't think that I can mix them.
Regards
Massimo
iowabrit
Joined: November 06, 2007
KitMaker: 585 posts
Armorama: 557 posts
Posted: Wednesday, April 24, 2019 - 01:24 AM UTC
17/21st Lancers would have a very dark blue (almost black) beret with the cap badge of a silver skull and crossbones. Overalls should be a medium dark green I think (not sure when they were introduced).
Google will help with the cap badge. The Red/Yellow bisected square is the Corps sign for Royal Armoured Corps and would be carried by every regiment in the corps.
For Royal Tank Regiment the beret and overalls would be black (the black overalls were reintroduced in the early fifties after WWII) They also carried a sleeve badge of the silhouette of a WWI tank in white on the upper right arm. A google image search for Royal Tank Regiment will find lots of pictures.
MassimoTessitori
Joined: March 14, 2013
KitMaker: 278 posts
Armorama: 278 posts
Posted: Wednesday, April 24, 2019 - 02:49 AM UTC
Hi, I've googled a bit and found two variants of the badge for the hat: one with a glove and one with the inscription RAC, both inside a ring of leaves with a small crown on the top. What is the right one for the late '50s?
About the hat, it looks black on the photos that I've seen.
About the hat, it looks black on the photos that I've seen.
BootsDMS
Joined: February 08, 2012
KitMaker: 978 posts
Armorama: 965 posts
Posted: Wednesday, April 24, 2019 - 03:11 AM UTC
Quoted Text
Hi Brian,
thank you for your notes. So, the bisected yellow-red square with number 2 is not of a Royal Tank Regiment, so I have to choose between green uniform or khaki-brown pixie, isn't it?
What is likely for the hat, black, dark blue or what else?
Hi Paul,
the set of Miniarms looks attractive, but at the moment I have ordered the set of Bronco. Their dress seems lighter, so I don't think that I can mix them.
Regards
Massimo
Massimo,
If you wish to depict a Royal Tank Regiment model, I feel you have a couple of options:
a. 1st Royal Tank Regiment. This was based in Germany in 1962 and was part of the 2nd Division. Markings therefore could be (based on what come with the kit) reading left to right as you look at the tank:
Bridge Classification plate (80 on yellow circle) on mudguard.
Royal Armoured Corps red/yellow square on lower hull plate.
Vehicle Registration Number. Do not use 40 BA 86 as this was for a Mark 1.
2nd Division cross keys on lower hull plate.
I think there should be a Union Flag on the right hand mudguard but the kit doesn't come with these; you might find one in the Tamiya Chieftain kit.
b. 5th Royal Tank Regiment - based in Fallingbostel, Germany in 1962.
Reading left to right again:
Bridge Plate.
Armoured Corps red/yellow square.
Vehicle Registration Number.
Brigade formation Sign - Jerboa (7th Armoured).
Union Flag on mudguard.
Squadron markings on turret sides in both cases as takes your fancy.
Crew conceivably in black coveralls with or without Green Combat Smocks, or Pixie Suits - both perfectly acceptable I imagine for 1962. As I think Steve described, black beret - silver badge (stylized WW1 tank in a wreath surmounted by a crown but we're talking 1:35 here!)
Brian
MassimoTessitori
Joined: March 14, 2013
KitMaker: 278 posts
Armorama: 278 posts
Posted: Thursday, April 25, 2019 - 04:55 PM UTC
Hi Brian,
thank you very much for these informations.
The decals sheet shows emblems with crossed keys of two different sizes; I suppose that the bigger one is for the front plate and the smaller one for the rear.
I have one more question about the tools and spare tracks on the tank: were they left in natural colors, dark steel and wood, or painted in some way?
Regards
Massimo
BootsDMS
Joined: February 08, 2012
KitMaker: 978 posts
Armorama: 965 posts
Posted: Thursday, April 25, 2019 - 08:23 PM UTC
Quoted Text
Hi Brian,
thank you very much for these informations.
The decals sheet shows emblems with crossed keys of two different sizes; I suppose that the bigger one is for the front plate and the smaller one for the rear.
I have one more question about the tools and spare tracks on the tank: were they left in natural colors, dark steel and wood, or painted in some way?
Regards
Massimo
Massimo,
I don't quite know why Amusing Hobby have included smaller markings for the rear, however, probably best to go with what they've given you - unless you wish to pay for other markings!
I would think that for the time the tools etc were painted in natural wood/steel colours; they also add interest if painted like this against the glossy Bronze Green.
Good luck with your model; I am a great fan of Conqueror and am currently (occasionally!) working on Amusing Hobby's Mk 1. I have also made Dragon's Mk 2.
Brian

G-man69
Joined: October 17, 2017
KitMaker: 944 posts
Armorama: 928 posts
Posted: Thursday, April 25, 2019 - 09:43 PM UTC
Hi Massimo,
I wanted to respond earlier to your post but unfortunately life got in the way of things, . I recently completed the Amusing Hobby Conqueror build that 'errains' kindly referred you to earlier in your post...thanks for all your support and kind words Eric.
In regards of the question regarding acrylic paint I found that Tamiya XF-11 (J.N.Green) was given as an equivalent to the Revell 65 colour given by 'BootsDMS'.
I simply 'googled' equivalents and got the following:
RL32165 Enamel Paint Solid Matt Bronze Green (RAL6031) REVELL Paint Numbers = 65, HUMBROL Paint Numbers = 75, VALLEJO Paint Numbers = 893, and TAMIYA Paint Numbers = XF11.
How close these all are to each other I can't say, but I hope it helps.
With regards the small and large 'crossed key' decals, I think you'll find they're for two different marking options as opposed to being used together, front and back, on the same version. The large one is used on the rear hull of the version given on the first page of the 'Painting/Marking Guide', i.e. the scheme I used with the white '4' within a white triangle positioned forwards on the turret sides. The smaller one appears to go on the hull front on the version with the yellow circle positioned to the rear of the turret sides, as shown on the second page.
I concur with 'Boots DMS' regarding the colour of the tools, natural wood and metal, they're the colours I used.
As an aside, I found the advice given by 'BootsDMS' throughout my build to be invaluable, he definitely helped keep me on the straight and narrow regarding the mighty Conqueror.
I hope the above is of use and I look forwards to seeing some images of your build being posted.
Regards,
G
I wanted to respond earlier to your post but unfortunately life got in the way of things,
. I recently completed the Amusing Hobby Conqueror build that 'errains' kindly referred you to earlier in your post...thanks for all your support and kind words Eric.In regards of the question regarding acrylic paint I found that Tamiya XF-11 (J.N.Green) was given as an equivalent to the Revell 65 colour given by 'BootsDMS'.
I simply 'googled' equivalents and got the following:
RL32165 Enamel Paint Solid Matt Bronze Green (RAL6031) REVELL Paint Numbers = 65, HUMBROL Paint Numbers = 75, VALLEJO Paint Numbers = 893, and TAMIYA Paint Numbers = XF11.
How close these all are to each other I can't say, but I hope it helps.
With regards the small and large 'crossed key' decals, I think you'll find they're for two different marking options as opposed to being used together, front and back, on the same version. The large one is used on the rear hull of the version given on the first page of the 'Painting/Marking Guide', i.e. the scheme I used with the white '4' within a white triangle positioned forwards on the turret sides. The smaller one appears to go on the hull front on the version with the yellow circle positioned to the rear of the turret sides, as shown on the second page.
I concur with 'Boots DMS' regarding the colour of the tools, natural wood and metal, they're the colours I used.
As an aside, I found the advice given by 'BootsDMS' throughout my build to be invaluable, he definitely helped keep me on the straight and narrow regarding the mighty Conqueror.
I hope the above is of use and I look forwards to seeing some images of your build being posted.
Regards,
G
MassimoTessitori
Joined: March 14, 2013
KitMaker: 278 posts
Armorama: 278 posts
Posted: Friday, April 26, 2019 - 07:59 AM UTC
Hi Brian,
thank you for your suggestions.
I would like to know your impressions on the kit of Dragon.
Hi Gareth,
your building blog gives a lot of informations, I like a lot your work on that model and its base.
You are right on the livery page, my one was a bit bended and ruined and I didn't notice that it was folded and the proposed versions are four. My fault. The versions are attractive enough, I would know the unit and place of each one but the sheet doesn't say anything on this.
I'll certainly post the photos of this one; I hope to finish it within the summer: for reasons relative to the (dis)organization of my home, I assemble kits during the cold season (thanks Tamiya Limonene cement) and complete them during the hot one, when I can ventilate better.
Still a doubt: the reel on the turret should have some rope rolled on; what type and color of rope?
Regards
Massimo
BootsDMS
Joined: February 08, 2012
KitMaker: 978 posts
Armorama: 965 posts
Posted: Friday, April 26, 2019 - 09:11 AM UTC
Quoted Text
Hi Brian,
thank you for your suggestions.
I would like to know your impressions on the kit of Dragon.
Hi Gareth,
your building blog gives a lot of informations, I like a lot your work on that model and its base.
You are right on the livery page, my one was a bit bended and ruined and I didn't notice that it was folded and the proposed versions are four. My fault. The versions are attractive enough, I would know the unit and place of each one but the sheet doesn't say anything on this.
I'll certainly post the photos of this one; I hope to finish it within the summer: for reasons relative to the (dis)organization of my home, I assemble kits during the cold season (thanks Tamiya Limonene cement) and complete them during the hot one, when I can ventilate better.
Still a doubt: the reel on the turret should have some rope rolled on; what type and color of rope?
Regards
Massimo
Massimo,
I built the Dragon kit a few years ago; it went together well enough and benefited from a few extra details. Some dimensions are reportedly wrong but the details were easy enough to fix. I enjoyed making it. I added a crew in all the hatches and displayed it as in service in Germany with some German soldiers viewing it.
Don't worry about adding "rope" (actually signals cable) to the reel; it was hidden by a canvas cover fastened with a tongue and buckle arrangement. Just use thin plastic card to effect this and perhaps a spare etch buckle.
Brian
MassimoTessitori
Joined: March 14, 2013
KitMaker: 278 posts
Armorama: 278 posts
Posted: Friday, April 26, 2019 - 06:08 PM UTC
Hi Brian,
has it to cover the outer diameter of the reel, or the part between the disks?
Quoted Text
Don't worry about adding "rope" (actually signals cable) to the reel; it was hidden by a canvas cover fastened with a tongue and buckle arrangement. Just use thin plastic card to effect this and perhaps a spare etch buckle.
has it to cover the outer diameter of the reel, or the part between the disks?
BootsDMS
Joined: February 08, 2012
KitMaker: 978 posts
Armorama: 965 posts
Posted: Friday, April 26, 2019 - 09:56 PM UTC
The part between the disks.
 |

WEB HOSTING BY


Copyright ©2021 Armorama and Kitmaker Network, a subsidiary of Silver Star Enterprises
All Rights Reserved. Please read our Conditions of Use and Privacy Policy.
All Rights Reserved. Please read our Conditions of Use and Privacy Policy.