

Armor/AFV
For discussions on tanks, artillery, jeeps, etc.
For discussions on tanks, artillery, jeeps, etc.
Hosted by Darren Baker, Mario Matijasic
Separate track links

RobCosta

Joined: November 09, 2019
KitMaker: 14 posts
Armorama: 10 posts
Posted: Friday, December 06, 2019 - 10:33 AM UTC
I have a Trumpeter T-90 kit with separate track links. Do you cement the links together (with use of a jig)? How do you end up with a flexible track that shapes to the wheels? Can you buy tracks that are already put together or are not so time consuming to put together? What are Meng double-pin tracks?

CMOT


Joined: May 14, 2006
KitMaker: 10,954 posts
Armorama: 8,571 posts

Posted: Friday, December 06, 2019 - 10:38 AM UTC
Are the tracks workable or just individual links?
If workable glue is rarely used.
if individual track link you make up a short run and let them semi cure. you then offer them up to the model and shape them where they will sit on the finished model. then remove and allow to fully cure and then repeat the process until a full track run is completed.
RobCosta
Joined: November 09, 2019
KitMaker: 14 posts
Armorama: 10 posts
Posted: Friday, December 06, 2019 - 10:46 AM UTC
Individual links. I don't know what you mean by "semi cure". Use plastic cement for the individual links? What are "workable" tracks? What is the difference between single pin and double pin tracks?
CMOT
Joined: May 14, 2006
KitMaker: 10,954 posts
Armorama: 8,571 posts
Posted: Friday, December 06, 2019 - 10:53 AM UTC
The parts are stuck together but still flexible is semi cured as opposed to rigid which would be fully cured.

RobinNilsson

Joined: November 29, 2006
KitMaker: 6,693 posts
Armorama: 5,562 posts
Posted: Friday, December 06, 2019 - 10:55 AM UTC
My method:
Basics:
Look at the tank from the side: There is one length on the ground, flat if the "ground" is flat et.c. Then there are short lengths going up from the ground towards the idler and the drive sprocket, these can be straight, hanging down or
bent upwards/inwards depending on what the tank is doing (moving forward, backward, turning or small maneuvers). Then comes the curved bits around the idler and the sprocket. Depending on the type of track on the real vehicle the top
run is either almost totally straight or hangs down slightly. Look at images of the real thing before building, Shermans and US tanks = straight, German WWII = slight sagging, Soviet WWII significant sag. Look at images!
Use solvent glue like Humbrol Liquid Poly, do NOT use tube glue unless you are an expert in handling that stuff. Liquid glue took my modelling forward by leaps an bounds.
How to do it:
Described for one side of the tank:
Make a long flat section that goes from the middle of the first road wheel to the middle of the last road wheel. Let it dry completely. By middle of the road wheel I mean the point where it touches flat ground.
Make a long run to reach from the sprocket wheel (one tooth onto the sprocket wheel) all the way to the top of the idler wheel. For a PzIII or IV it should hang down
about the thickness of one track link (check images), on a Sherman it is straight.
Put it in position on the tank when it is still slightly soft but DO NOT glue it in place yet. Gently shape the track sagging (check images), one link should engage the sprocket and the other end bent down over the idler if the section is long enough.
Now you have the top and bottom sections of the track and need to join them.
Make a short bit (short bit A) , 3 to 4 links and shape around the sprocket wheel, three to four bits is the longest section that will still be removable from the sprocket when it is dry. Make a short bit (short bit B), 5-7 links and shape around the idler (no teeth -> longer section is possible to remove when dry) DO NOT glue to the idler yet.
Now it is time to start to start counting links for the two sections that will go up from the ground towards the sprocket and the idler. The difficult part here is to get just the right curve. These two sections is where you adjust the total length of the
track so that you don't end up with a gap shorter than one track link.
The instruction sheets for Dragon kist usually show the correct number of links.
The length (C) from the ground up to the sprocket wheel should reach 1-2 teeth onto the sprocket leaving a gap at least the length of 'short bit A' between itself and the top run. The section going up to the idler shall be made to reach from the bottom run all the way up to short bit B and short bit B shall reach the top run.
Now you have two long bits where the glue has dried (top and bottom) and two
short semi soft bits, one going between top and bottom around the idler and one
connecting the bottom bit to the sprocket wheel. Gently bend the shorter bits so that the track sits correctly. Check images. It may be necessary to give the top run a little more or a little less sag to get everything to fit, gentle force.
When everything has dried it is time to join the lengths (except short bit A) to one long deep U and make another short bit, AA, to fill in the last few links on the sprocket wheel. If you feel that this is tricky then leave the length C loose until mounting on the tank.
When all this has dried you will have three pieces: the deep U, short bit A and AA (plus possibly length C),
Time for painting, the deep U is fragile but it can still be handled if you are careful.
Paint the base colour and most of the later steps, ask the forum for hints and tips about colours and stuff. The last painting can be done with the track on the tank.
The insides, the side of the track touching the wheels, should be painted before mounting on the tank, outsides are easy to reach afterwards.
The track is mounted on the tank by pushing it on from the idler end, if you are right handed: sprocket wheel to the left, left hand holds tank, right hand holds track and pushes track to the left towards the sprocket. Fit the links over the sprocket and glue in place. By making the joins over the sprocket wheel the teeth will hold everything in place. Use very fine and thin sandpaper to remove the paint where the road wheels and return rollers touches the track and add small amounts of liquid glue. Let it dry.
Time for last paint job.
Please feel free to ask questions, the description above will be hard to understand until you sit there with the pieces working it out. Ask and ask again
while building and I will try to answer.
Just for the fun of it I built and M113 with indy-track and glued all the wheels to track so that the whole assembly could be taken off the vehicle in one piece.
I don't remember if it was just for the fun of it or if there was something forcing me but I know that it can be done
regards / Robin

panzerbob01
Joined: March 06, 2010
KitMaker: 3,128 posts
Armorama: 2,959 posts
Posted: Friday, December 06, 2019 - 11:46 AM UTC
I clean links, count links for one run / side, and assemble the entire run with cementing, followed by mounting and shaping the flexible cemented run onto the mounted road-gear. I prop the flexible run in my formed position, and let completely dry. I then remove the run and wheels for separate painting. I paint and weather the hull, and paint and weather the wheels and formed track-runs. I add the painted wheels and track-runs to the painted hull, and touch up the weathering as needed.
To assemble the run: Count out cleaned links for one run. Lay down a strip of blue painter's tape on your bench sticky-side up (tape the strip down at the ends to keep it in place in a good working location in front of you). Line up and fit together sections of 10 - 20 links per by sticking a first link horn-up on the tape and adding links in a straight line behind that starter link. Brush the section with a modest amount of thin cement, making sure that cement gets to the "hinge points / connection points". Quickly start the next section while the first sets up. Once enough sections are done, assemble them into the run. Pick each section off the tape by running a knife blade underneath to release it from the tape, and connect each in turn to the first section to complete the run. Cement these newest joins, and wait several minutes for them to set up. Release the entire run from the tape and turn it on edge and "pre-form" it into a generalized arch of approximate idler-to-sprocket length. While holding this arch on edge on the bench-top. Press it down to get all the links in line (that's as much "jig" as one needs here - what you want to achieve is to get all links in line).
While the run is still flexible, mount it on the top side of the already-mounted wheels-and-rollers set and wrap it around the idler and sprocket and bend it under to the ground side. Press in sag as desired, and prop it in place by wedging balls of paper between the fender and the track run. After checking that the form is pretty close, fit the track onto the sprocket and in the correct idler and wheel and roller fits, wrap it under the road wheels, and place the hull and track upright for drying. Do the other side.
It's easier to do it then to actually try to write about how to do it!
Generally, handling and positioning links in the sections is best done using a tweezer. Once you have a feel for how links fit together and what they look like when correctly positioned, this whirls along very fast.
IF the tracks are actually some type of snap / lock-together link set - an "operable" or "working" set - the linking process CAN be the same (stick link to tape and click each next link into the line using tweezers - but NO cement step!) IF they simply snap together - or it may work to actually hold the links in the hand and snap them together. Depends on the set. Track sets with pins are a different thing entirely.
IF the links need to have horns added... This can easily be done when assembling the sections as above, if the horns are cleaned and ready (AND you have practiced how those horns fit into those links). You can also add the horns to the dry formed runs.
MOST "non-working" sets, such as Dragon "Magic Track" sets, go together very quickly using the described technique. Even tiny Pz. 1 tracks work well this way.
Avoid using the hottest cement - Tamiya thin or extra-thin works well, as does Testor's.
Try it out!
Cheers! Bob
d111298pw

#456
Joined: September 22, 2016
KitMaker: 654 posts
Armorama: 638 posts
Posted: Friday, December 06, 2019 - 05:34 PM UTC
For "semi-cure" I glue the links together for the section I want. Let it sit for 15 to 20 minutes. Then place and form them as needed. Remove and let sit overnight to completely dry.

MassimoTessitori

Joined: March 14, 2013
KitMaker: 278 posts
Armorama: 278 posts
Posted: Saturday, December 07, 2019 - 08:20 PM UTC
Hi,
I use to do it more or less as Robin, assembling the straight parts into lengths.
For the curved lengths: in the case of T-90, there are parts that connect the links that Trumpeter represents as solidal to the link, but in the real thing they should be articulated and assume an intermediate orientation between the links that they join. These parts can be bended by hand before assembling the tracks.
Some of these bended links can be assembled together before painting, using the spockets and tensioning wheels as jigs, while some other bended links are kept unglued as a reserve to fill the remaining gaps between the lengths.
Then, I paint wheels and tracks separately, then I mount them gluing to the wheels.
Of course, the sprocket and tensioning wheel have to be free to rotate during the process, they will be fixed with a bit of thin glue after the adjustment of the tracks.
In the past, I've started from the part below in contact with road wheels, continued up to the sprockets and tensioning wheel, then closed with the upper part of the track, using the sag to regulate the length of the upper part.
With this system, I often had problems closing the upper part without gaps, because sag has limits to be realistic.
Recently I've started to leave the tensioner (support of the tensioning wheel) movable till the mounting on of the tracks; so I could move the tensioning wheel forward or backwards to adjust the length of the track without leaving gaps.
Another thing: this process is unforgiving in case of bad alignment of the road wheels, sprockets and tensioning wheels, while workable tracks and vinyl tracks are by far more forgiving for this problem. So, the alignment of all wheels has to be carefully checked with rulers before mounting the tracks.
Tank1812
Joined: April 29, 2014
KitMaker: 1,112 posts
Armorama: 886 posts
Posted: Sunday, December 08, 2019 - 03:23 AM UTC

Scarred
Joined: March 11, 2016
KitMaker: 1,792 posts
Armorama: 1,186 posts
Posted: Sunday, December 08, 2019 - 05:55 AM UTC
If some of those descriptions were a little long or confusing here is a video of what was being said. Kinda. In the vid he is using a slow drying glue and using longer runs of track but the idea is the same.
https://m.youtube.com/watch?v=bE58_pQTF6g
Edit: Two more vids.
https://m.youtube.com/watch?v=Kf5TBEN_Eks
https://m.youtube.com/watch?v=yK8fTO6-DtY
https://m.youtube.com/watch?v=bE58_pQTF6g
Edit: Two more vids.
https://m.youtube.com/watch?v=Kf5TBEN_Eks
https://m.youtube.com/watch?v=yK8fTO6-DtY
RobCosta
Joined: November 09, 2019
KitMaker: 14 posts
Armorama: 10 posts
Posted: Tuesday, December 10, 2019 - 02:43 AM UTC
Can you buy tracks that are already assembled?
Scarred
Joined: March 11, 2016
KitMaker: 1,792 posts
Armorama: 1,186 posts
Posted: Tuesday, December 10, 2019 - 05:57 AM UTC
Don't be intimidated. They only look hard. Pre-planning will take most of the dread away. When I get a kit with indi-links I build the suspension first so I have maximum room to install and fiddle with the tracks I use alligator clip, tape and small clamps to hold the various track sections in place while I work on other sections. Before I install the idler and drive sprockets I can get the links around the curve of the sprocket easier just use short lengths of tracks to fit the curve. One th curve is set I'll mount the drive an idler sprockets. Once I get the tracks done I let them dry in place then remove the sections until final assembly and paint.
Sometimes I miss the old vinyl tracks but the look of indi-links is 10 times better.
Sometimes I miss the old vinyl tracks but the look of indi-links is 10 times better.
DickJones

Joined: November 12, 2014
KitMaker: 44 posts
Armorama: 44 posts
Posted: Tuesday, December 10, 2019 - 07:09 AM UTC
The best links I have found to be by Fruilmodel. But expensive, often the same price as the tank.
The worst track links I have ever put together were Meng's workable track links on the Leo 2a7. First it took a very long time to prepare then assemble. But the worst thing by far was the fragility of the links. Those tracks, with me, broke just by breathing on them. It was an absolute nightmare fitting them to the actual tank.
Even now I try not to touch that tank through fear of that PITA set of tracks coming off.

varanusk

Joined: July 04, 2013
KitMaker: 1,288 posts
Armorama: 942 posts
Posted: Tuesday, December 10, 2019 - 08:13 PM UTC
Quoted Text
Can you buy tracks that are already assembled?
Minor did them for small vehicles and they were great, infortunately they seem to be discountinued...
http://minor-web.com/Tracks.html
tankmodeler
#417

Joined: March 01, 2004
KitMaker: 3,123 posts
Armorama: 2,539 posts

Posted: Wednesday, December 11, 2019 - 07:28 AM UTC
Quoted Text
Can you buy tracks that are already assembled?
Generally, no.
The alternative to individual link tracks is the old style rubber band/vinyl track.
Definitions:
Individual link track - track provided in individual links to be assembled by the modeller. Generally, if simply called simply "individual link" the speaker is implying that although individual links, they must be glued together to form an eventually rigid set of tracks, but this in not necessarily so, so clarity is usually needed in discussions.
Workable Track: A subset of the above, they are individual track that, when assembled, are still free to articulate/move.
Length and Link track: track supplied as both individual links and as length s of track premoulded as one longer chain. The individual links are, almost always, the bits that g around the curves of the track and the lengths are the straight(ish) runs. When assembled the whole assembly is rigid and unmovable.
Rubber band track: lengths of flexible vinyl track. Old school. Usually with compromises in accuracy due to being mouulded in one piece. The biggest issue with this is their inability to properly depict draped metal track and the need to a rather large join that disrupts several track links and needs to be carefully hidden when completed.
These next two have nothing to do, specifically, with models. They are the definition of real track types seen on armoured vehicles.
Single Pin: Each track is joined directly with the next track using a single pin forming a simple hinge joint. All WW2 German tank track and (I think) all postwar Russian track is single pin.
https://functionbay.com/documentation/onlinehelp/default.htm#!Documents/singlepintracklink.htm
Double Pin: Each track link has a hinge pin at both the forward and aft end of the link and links are joined together using a separate very small link that picks up the ends of the track pins. On American tanks these were termed End Connectors and as the name suggests they connected the pins on the end of two adjacent tracks together. Almost all American WW2 track was double pin as has been most US post ware track.
https://functionbay.com/documentation/onlinehelp/default.htm#!Documents/doublepintracklink.htm
Hope that helps?
Paul

RobinNilsson
Joined: November 29, 2006
KitMaker: 6,693 posts
Armorama: 5,562 posts
Posted: Wednesday, December 11, 2019 - 07:59 AM UTC
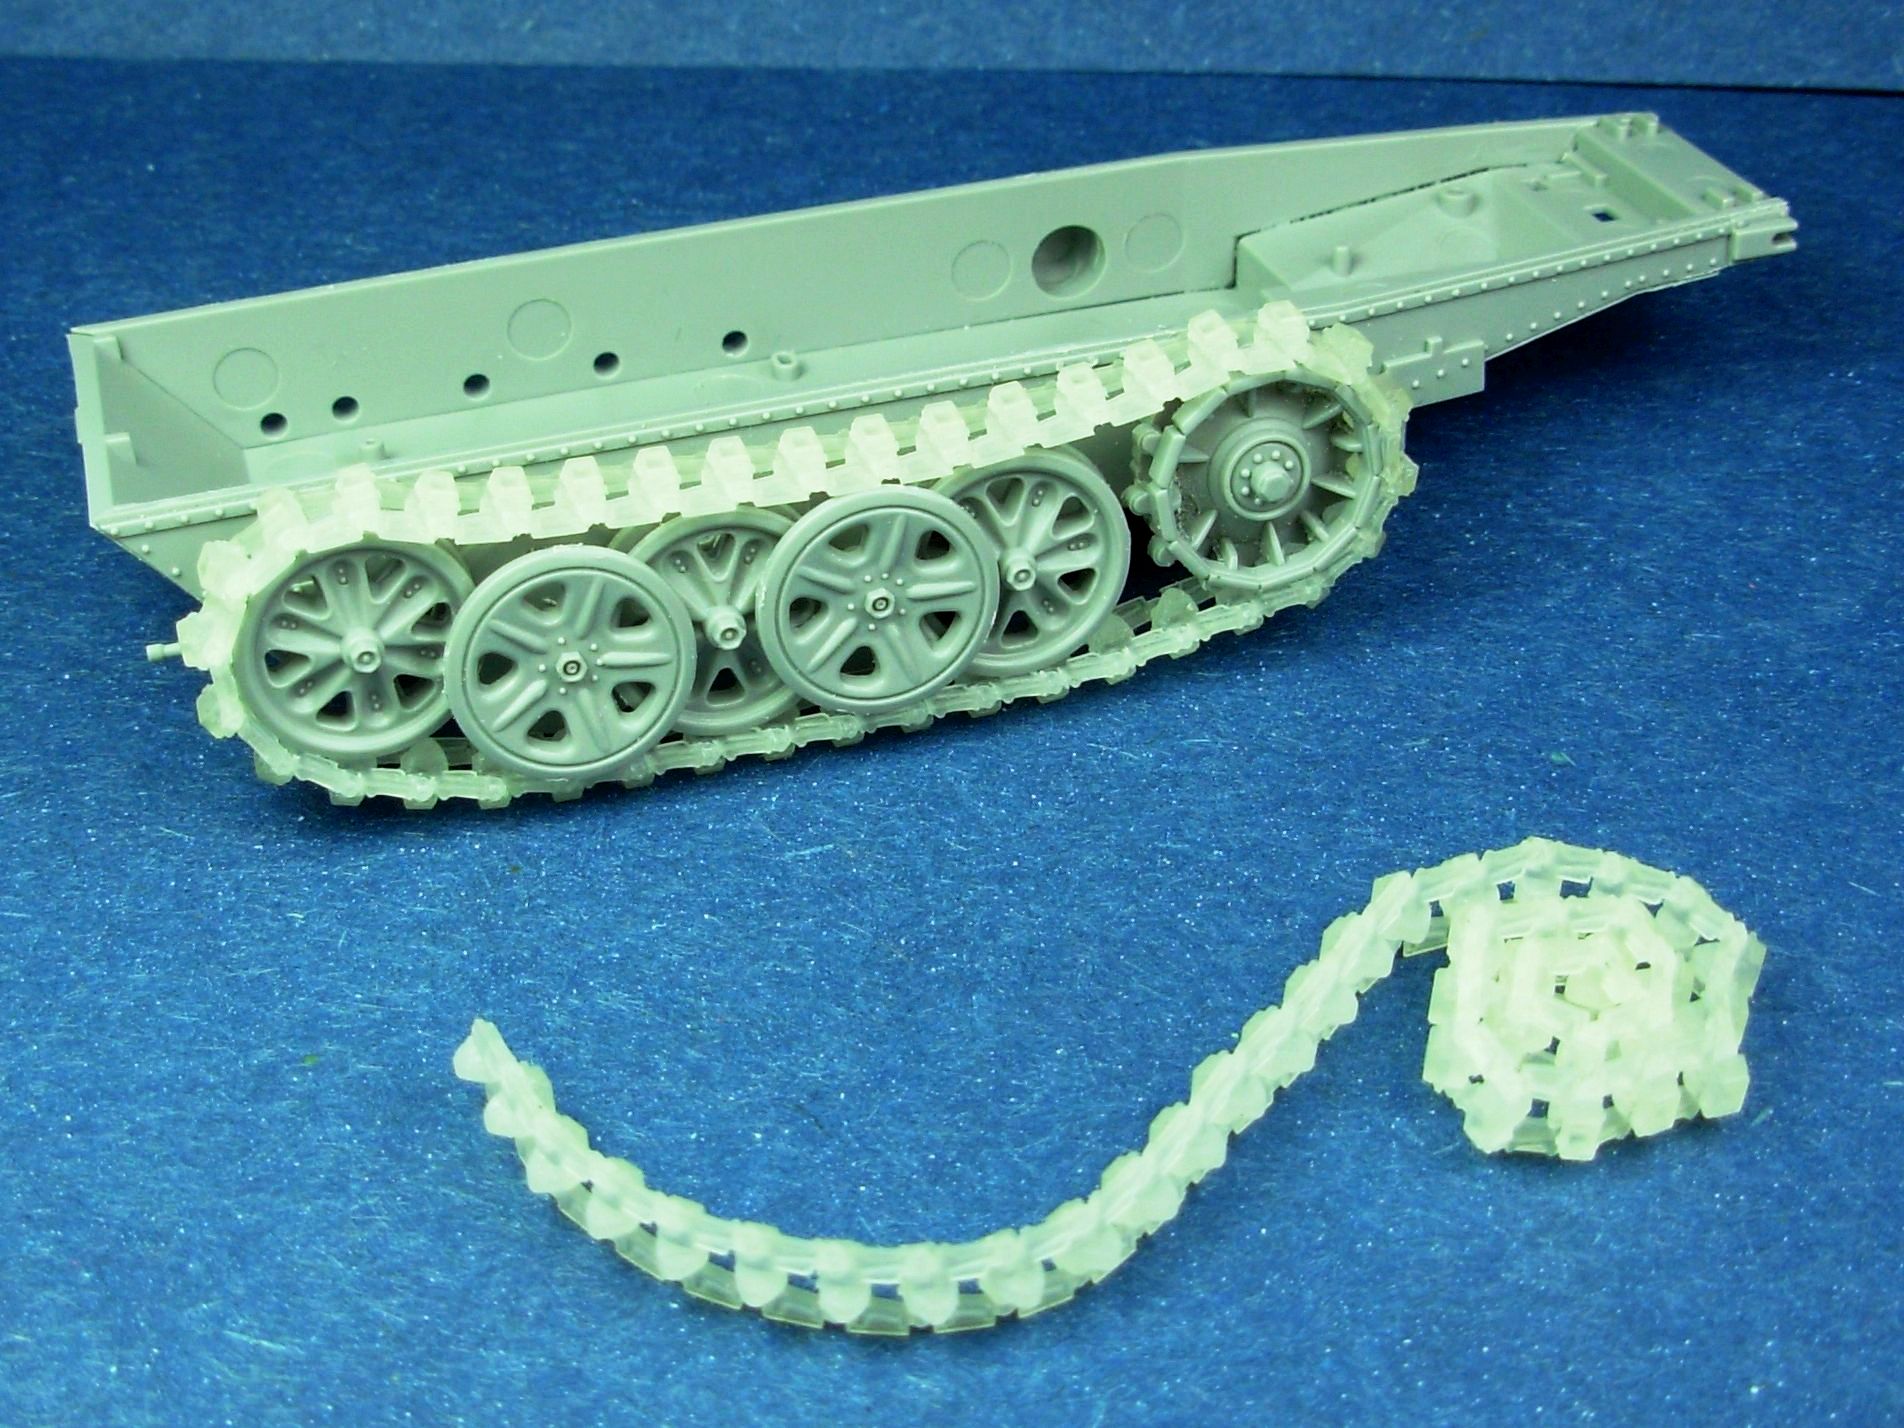
Some "modern" Russian vehicles also have double-pin tracks. If these links are moulded in one piece with the end connectors (and sometimes also a center connector/guide horn) then it will work just fine for straight or nearly straight sections,
it can look a little odd when bent around the first and last road wheel,
it will look ugly when bent around the idler and
it will look horrible or maybe not even fit when bent around the sprocket wheel.
The end connectors must be angled in relation to both of the links it connects and that requires some brute force or cutting and gluing to get it right.
/ Robin
BMP-1

Link to full size image:
http://www.grubbyfingersshop.com/walkaround_galleries/BMP-1_MCAB_Miramar_Walkaround/content/bin/images/large/BMP1_Miramar_Walkaround_06_GrubbyFingers.jpg
it can look a little odd when bent around the first and last road wheel,
it will look ugly when bent around the idler and
it will look horrible or maybe not even fit when bent around the sprocket wheel.
The end connectors must be angled in relation to both of the links it connects and that requires some brute force or cutting and gluing to get it right.
/ Robin
BMP-1
Link to full size image:
http://www.grubbyfingersshop.com/walkaround_galleries/BMP-1_MCAB_Miramar_Walkaround/content/bin/images/large/BMP1_Miramar_Walkaround_06_GrubbyFingers.jpg
Scarred
Joined: March 11, 2016
KitMaker: 1,792 posts
Armorama: 1,186 posts
Posted: Thursday, December 12, 2019 - 06:28 AM UTC
I just found something interesting on Shapeways, 3d printed aftermarket tracks. I wonder what glue would be used, if the layers are noticeable, if they take paint easily, what type of paint (enamel or acrylic) would be needed and how long they'll last.
Maybe someone is on to something.
https://www.shapeways.com/product/782SSQQER/ets35t02-hotchkiss-h39-tracks?optionId=62829921&li=marketplace
Maybe someone is on to something.
https://www.shapeways.com/product/782SSQQER/ets35t02-hotchkiss-h39-tracks?optionId=62829921&li=marketplace
tankmodeler
#417
Joined: March 01, 2004
KitMaker: 3,123 posts
Armorama: 2,539 posts
Posted: Tuesday, December 17, 2019 - 08:31 AM UTC
Quoted Text
I wonder what glue would be used
Regular CA glues work fine. The gel type is better as there is a fine-grained matte texture to the parts and thin CA tends to wick across that surface.
Quoted Text
if the layers are noticeable
On something like these tracks, no. On a broader surface, maybe (probably), but these? No.
Quoted Text
if they take paint easily
After a quick isopropyl wipe, yes.
Quoted Text
what type of paint (enamel or acrylic)
Any work just fine as long as the surface has been gently cleaned with isopropyl (and even pretty well without cleaning).
Quoted Text
how long they'll last.
Last in what sense? As long as they are painted and kept away from strong UV (which would wreck the normal paint anyway) and you don't "zoom" the tank around the floor, they'll last as long as styrene track.
Quoted Text
Maybe someone is on to something.
Printed track has been around a long time. Dave Harper made 3D printed LVT-1 track 20+ years ago when the technology was first emerging. The problem has always been that they were much more expensive than other AM track. Now, however, at CAD$27 a set, they are very competitive, if not cheaper, than Fruil or other AM track, so their time may have come at last.
Paul

vettejack
Joined: November 23, 2012
KitMaker: 1,277 posts
Armorama: 1,254 posts

Posted: Wednesday, December 18, 2019 - 01:33 AM UTC
Quoted Text
Can you buy tracks that are already assembled?
On EBay...type in: "1/35 assembled metal tracks"
Pricey, but sometimes worth the cost. I have quite a few 'assembled' in the stash.
 |

WEB HOSTING BY


Copyright ©2021 Armorama and Kitmaker Network, a subsidiary of Silver Star Enterprises
All Rights Reserved. Please read our Conditions of Use and Privacy Policy.
All Rights Reserved. Please read our Conditions of Use and Privacy Policy.