

Following my first armor model build of Dragon 6954 Panzer III Ausf.J, I decided to concentrate on the Panzer III variants. I wanted to sample other kit manufacturers to experience the differences in the engineering and detail of the various kit makers. I picked up Takom's latest kit the Panzer III Ausf. M. I will attempt to log this build just pointing out any issues and modifications that might prove helpful to anyone else working this kit up. There are several in box reviews available on YouTube. I'll see how this goes...Ken
Hosted by Darren Baker
Takom 8002 Pz.Kpfw.III Ausf.M (1:35)

KKarns


Joined: April 24, 2020
KitMaker: 83 posts
Armorama: 83 posts
Posted: Tuesday, August 18, 2020 - 06:30 AM UTC
Removed by original poster on 08/18/20 - 18:47:05 (GMT).
KKarns
Joined: April 24, 2020
KitMaker: 83 posts
Armorama: 83 posts
Posted: Tuesday, August 18, 2020 - 07:07 AM UTC
I will start with a review of the tools that come with the kit. The open end of the clamps for the tools are molded very nicely with the exception of the open end being filled. Dragon molded clamps aren't as detailed as PE but they certainly come with the open end open! I proceeded to drill a small hole through the end and then extended the hole to match the original rectangular opening with my #11 blade. The fidelity of the tools is passable but not up to what you would expect in a modern kit. The part lines are heavy and there was some flash. This is fixable but annoying. The pry/crow bar was a good bit larger than the dragon one and looked clunky so I replaced that with the Dragon part. The shovel had way too large of mounting pedestals and it made the shovel ride too high for my taste so I filed those down. In addition, the shovel blade was way too thick from the side view, so I also shaved that down with my #11 blade to a more natural appearance. The Axe and Starter crank looked OK and were treated by opening the clamp holes and fixing the part lines. The bolt cutters had the clamp on backwards with the opening facing the upper hull. The clamp should have the opening facing the outside of the fender (ref. Panzer Tracts No. 3-3) so I swapped that with a Dragon part once again. At first blush the fire extinguisher looks good...Once I get all the tools sorted out I'll start on the running gear...

phil2015
Joined: July 27, 2015
KitMaker: 502 posts
Armorama: 325 posts
Posted: Tuesday, August 18, 2020 - 07:14 AM UTC
Quoted Text
I have no clue as to how to post pictures along with my forum post so I'll describe as best I can...
I opened an account on imgur (it's free). Upload pictures there. Then click on a picture in imgur and it will give you a bunch of code option. Copy the BBC code and paste it in your pic here et voila! your pic will appear.

Removed by original poster on 08/18/20 - 20:00:06 (GMT).
KKarns
Joined: April 24, 2020
KitMaker: 83 posts
Armorama: 83 posts
Posted: Tuesday, August 18, 2020 - 08:02 AM UTC

KKarns
Joined: April 24, 2020
KitMaker: 83 posts
Armorama: 83 posts
Posted: Tuesday, August 18, 2020 - 08:03 AM UTC
Sweet...old dog, new trick! Thanks much.
KKarns
Joined: April 24, 2020
KitMaker: 83 posts
Armorama: 83 posts
Posted: Tuesday, August 18, 2020 - 08:11 AM UTC

Here is the tool sprue for the Takom kit. Note the wire cutters. The one off the sprue on the right is a Dragon part. Note the location of the clamp opening which is the opposite of the Takom part. The Dragon part is the correct orientation. Also note the filled in clamp openings. These had to be drilled out and shaped.
KKarns
Joined: April 24, 2020
KitMaker: 83 posts
Armorama: 83 posts
Posted: Tuesday, August 18, 2020 - 08:14 AM UTC

Here is the Takom kit shovel. Note the opened up clamp opening. I also thinned down just the blade portion of the shovel as it was way out of scale with respect to thickness. Hard to get a pic of this modification.
KKarns
Joined: April 24, 2020
KitMaker: 83 posts
Armorama: 83 posts
Posted: Thursday, August 20, 2020 - 12:07 PM UTC
I started on the lower hull and suspension. I really want to like this Takom kit but its making that a bit difficult already! Takom gets points for the tub style one piece lower hull. Very nice and crisp detail and the piece is rigid and without warping. However, the finish is glass smooth without the slightest bit of armor texture. I will be adding this with Tamiya putty and thin cement mix. There are significant part lines on just about every piece with some flash. I installed the suspension arms and idler adjustment and other small bits without too much trouble other than cleaning up the parts.
The road wheels are a different story!...sigh.

The two road wheels come with a key tab to mate the inner and outer wheels. The wheels themselves had the normal part line and sprue tabs to clean up. The bad part is, both inner and outer wheels have the pegs, which have flash on the ends, and when putting the wheels together the pegs don't line up and interfere with a snug fit. I had to cut the shorter pegs off the outer wheel as far down as I could so the two wheels would snug up good. However, the holes in the rims of the two wheels don't line up and this can't be corrected due to the interlocking key way of the inner hubs (see pic above). maybe they are not suppose to line up but would think the would.
The road wheels are a different story!...sigh.
The two road wheels come with a key tab to mate the inner and outer wheels. The wheels themselves had the normal part line and sprue tabs to clean up. The bad part is, both inner and outer wheels have the pegs, which have flash on the ends, and when putting the wheels together the pegs don't line up and interfere with a snug fit. I had to cut the shorter pegs off the outer wheel as far down as I could so the two wheels would snug up good. However, the holes in the rims of the two wheels don't line up and this can't be corrected due to the interlocking key way of the inner hubs (see pic above). maybe they are not suppose to line up but would think the would.
KKarns
Joined: April 24, 2020
KitMaker: 83 posts
Armorama: 83 posts
Posted: Thursday, August 20, 2020 - 12:13 PM UTC

Here is a close up of the finished wheel. Note the misalignment of the holes in the rims.
On the plus side, Takom did a marvelous job of the road wheel detail. In addition, note the lettering of CONTINENTAL. This is the correct spelling of road wheel lettering. Dragon uses the word spelled CONTINENTAU, with a U at the end rumored due to copyright issues. So we modelers would have to convert the U to an L by carving off a bit of the U. Fiddly work for sure.
More later...Ken
KKarns
Joined: April 24, 2020
KitMaker: 83 posts
Armorama: 83 posts
Posted: Friday, August 21, 2020 - 08:32 AM UTC
After further messing around with the road wheels, I was able to shift the inner and outer wheel set to allow the holes in the rims to line up. The key tab system of centering the two wheels is so sloppy I could turn the wheels in relation to each other to get the holes lined up. Had to be very careful to make sure the spacing was even all the way around as the pegs didn't allow for this.
I think in the end the wheels will look great, just more work getting there than should be.
Worked on the rear of the vehicle and assembled the two piece exhaust as far as I could without attaching it to the vehicle to allow painting and detailing off the tank. Again, some flash and part lines on just about every piece. I dry fit the rear plate, water tight vent assembly, upper hull and lower hull. Good thing as the rear corners, where all these come together, was as they say "not a good fit". I had to do some sanding and shaving with my #11 blade to get everything to mesh up. Even then I plan to scribe out the weld beads and make new ones once it's all together along with putting in armor texture on the main armor pieces. Back to the bench.

dylans

Joined: March 05, 2009
KitMaker: 394 posts
Armorama: 380 posts
Posted: Friday, August 21, 2020 - 04:32 PM UTC
I will be following this one closely Ken. can you show us where you had the issues with the hull? I just picked one of these up last week.
KKarns
Joined: April 24, 2020
KitMaker: 83 posts
Armorama: 83 posts
Posted: Friday, August 21, 2020 - 11:29 PM UTC
Hey Dylan,
Sure will. I just scribed out the old weld seam that didn't look good after the fitting of the upper rear plate. I will be putting in a new weld here. I will refer to the actual sprue and part number for you. Will get this posted by this evening. Glad to have you along and we'll see if we can't make something out of this kit despite it's issues thus far!Lol.
Sure will. I just scribed out the old weld seam that didn't look good after the fitting of the upper rear plate. I will be putting in a new weld here. I will refer to the actual sprue and part number for you. Will get this posted by this evening. Glad to have you along and we'll see if we can't make something out of this kit despite it's issues thus far!Lol.
KKarns
Joined: April 24, 2020
KitMaker: 83 posts
Armorama: 83 posts
Posted: Saturday, August 22, 2020 - 08:42 AM UTC
Hi Dylan,
The issues that I have with the lower hull are depicted in step #6 of the instruction book. Part #D13 contains the water tight vent hatches and is wedge shaped and fits between the tow cable attachments and the underside of the lower hull extension pieces. On mine this was not a good fit as the part did not want to go far enough back so I had to file and adjust the part. once this fit was corrected I glued it in place. I left the muffler off part #D18 and when dry fitting this plate (D18), found I needed to shift it laterally to line up each side with the lower hull sides. However, the tabs on the inside on either side did not allow for this. I had to file those down a bit to give me a bit of side-to-side movement to line up the plate with the lower hull piece. These two corners is where all three pieces have to join. There is also a weld seam that runs down along the mating of part #D18 and the lower hull extension piece. This was mucked up getting all the pieces to line up and glued so I carved out the seam and will add another weld bead here. Also, part #s A30 and A31 were hindering the fit of the rear plate D18, so I just left them off as they won't show once the upper hull is in place. If you want to have the hatches here open, then those plates can technically be seen from underneath. Mine are going to be closed. Also, forgot to mention in step 2 your told to install part #s D41 and D42 to the lower hull extensions. When dry fitting the upper hull I had to files these down as they stuck up too high and didn't allow the upper hull to sit flush on top of the lower hull.
The accuracy seems to hold up well based on reference photos save for a few minor issues I will go over next time. This has to do with the exhaust pipes and the water tight hatch covers.
More later...
KKarns
Joined: April 24, 2020
KitMaker: 83 posts
Armorama: 83 posts
Posted: Sunday, August 23, 2020 - 12:42 AM UTC

Here is a pic of the rear corner that has the issues. I have got everything lined up and glued with armor texture added and the weld seam replaced.
Note how part #D18 (rear plate) rests on top of part#D13 (hatch plate) and the bottom is flush. Other variants, the rear plate is one piece and extends below . Reference photos show this is correct for the M variant. So Takom get points for this authentic detail.
KKarns
Joined: April 24, 2020
KitMaker: 83 posts
Armorama: 83 posts
Posted: Sunday, August 23, 2020 - 12:45 AM UTC

Another shot of the rear detail as described above.
KKarns
Joined: April 24, 2020
KitMaker: 83 posts
Armorama: 83 posts
Posted: Sunday, August 23, 2020 - 12:54 AM UTC

Here is where I'm deducting points from Takom's attention to detail. The hatch covers, in reference photos, have a wing nut/handle affair that allows the opening of the hatches from the outside. Takom did not provide this detail rather there was just a nub where the wing nut/handle would go (left side hatch cover in the image above) I added a wing nut from spare parts from my Dragon Panzer III J build (right side hatch cover). Now, not positive the wing nut I added matches the original part exactly as I can't see good detail on reference photos. Once I find out exactly what these looked like I can just replace them.
KKarns
Joined: April 24, 2020
KitMaker: 83 posts
Armorama: 83 posts
Posted: Sunday, August 23, 2020 - 01:01 AM UTC

Here is the finished detail on the rear. Wing nuts/handles added, armor trexture, and the rear center tow coupling was welded to the armor cap over the access port. This was reportedly for towing a fuel trailer. So, I added a weld seam around this coupling. More pronounced than on the original I'm sure!

AOS

Joined: September 29, 2005
KitMaker: 75 posts
Armorama: 74 posts
Posted: Sunday, August 23, 2020 - 03:03 AM UTC
For the "standard position" it would be better to glue the two big hatches (A7) open. You have fixed them closed, this is only for fording waters.
KKarns
Joined: April 24, 2020
KitMaker: 83 posts
Armorama: 83 posts
Posted: Sunday, August 23, 2020 - 04:30 AM UTC
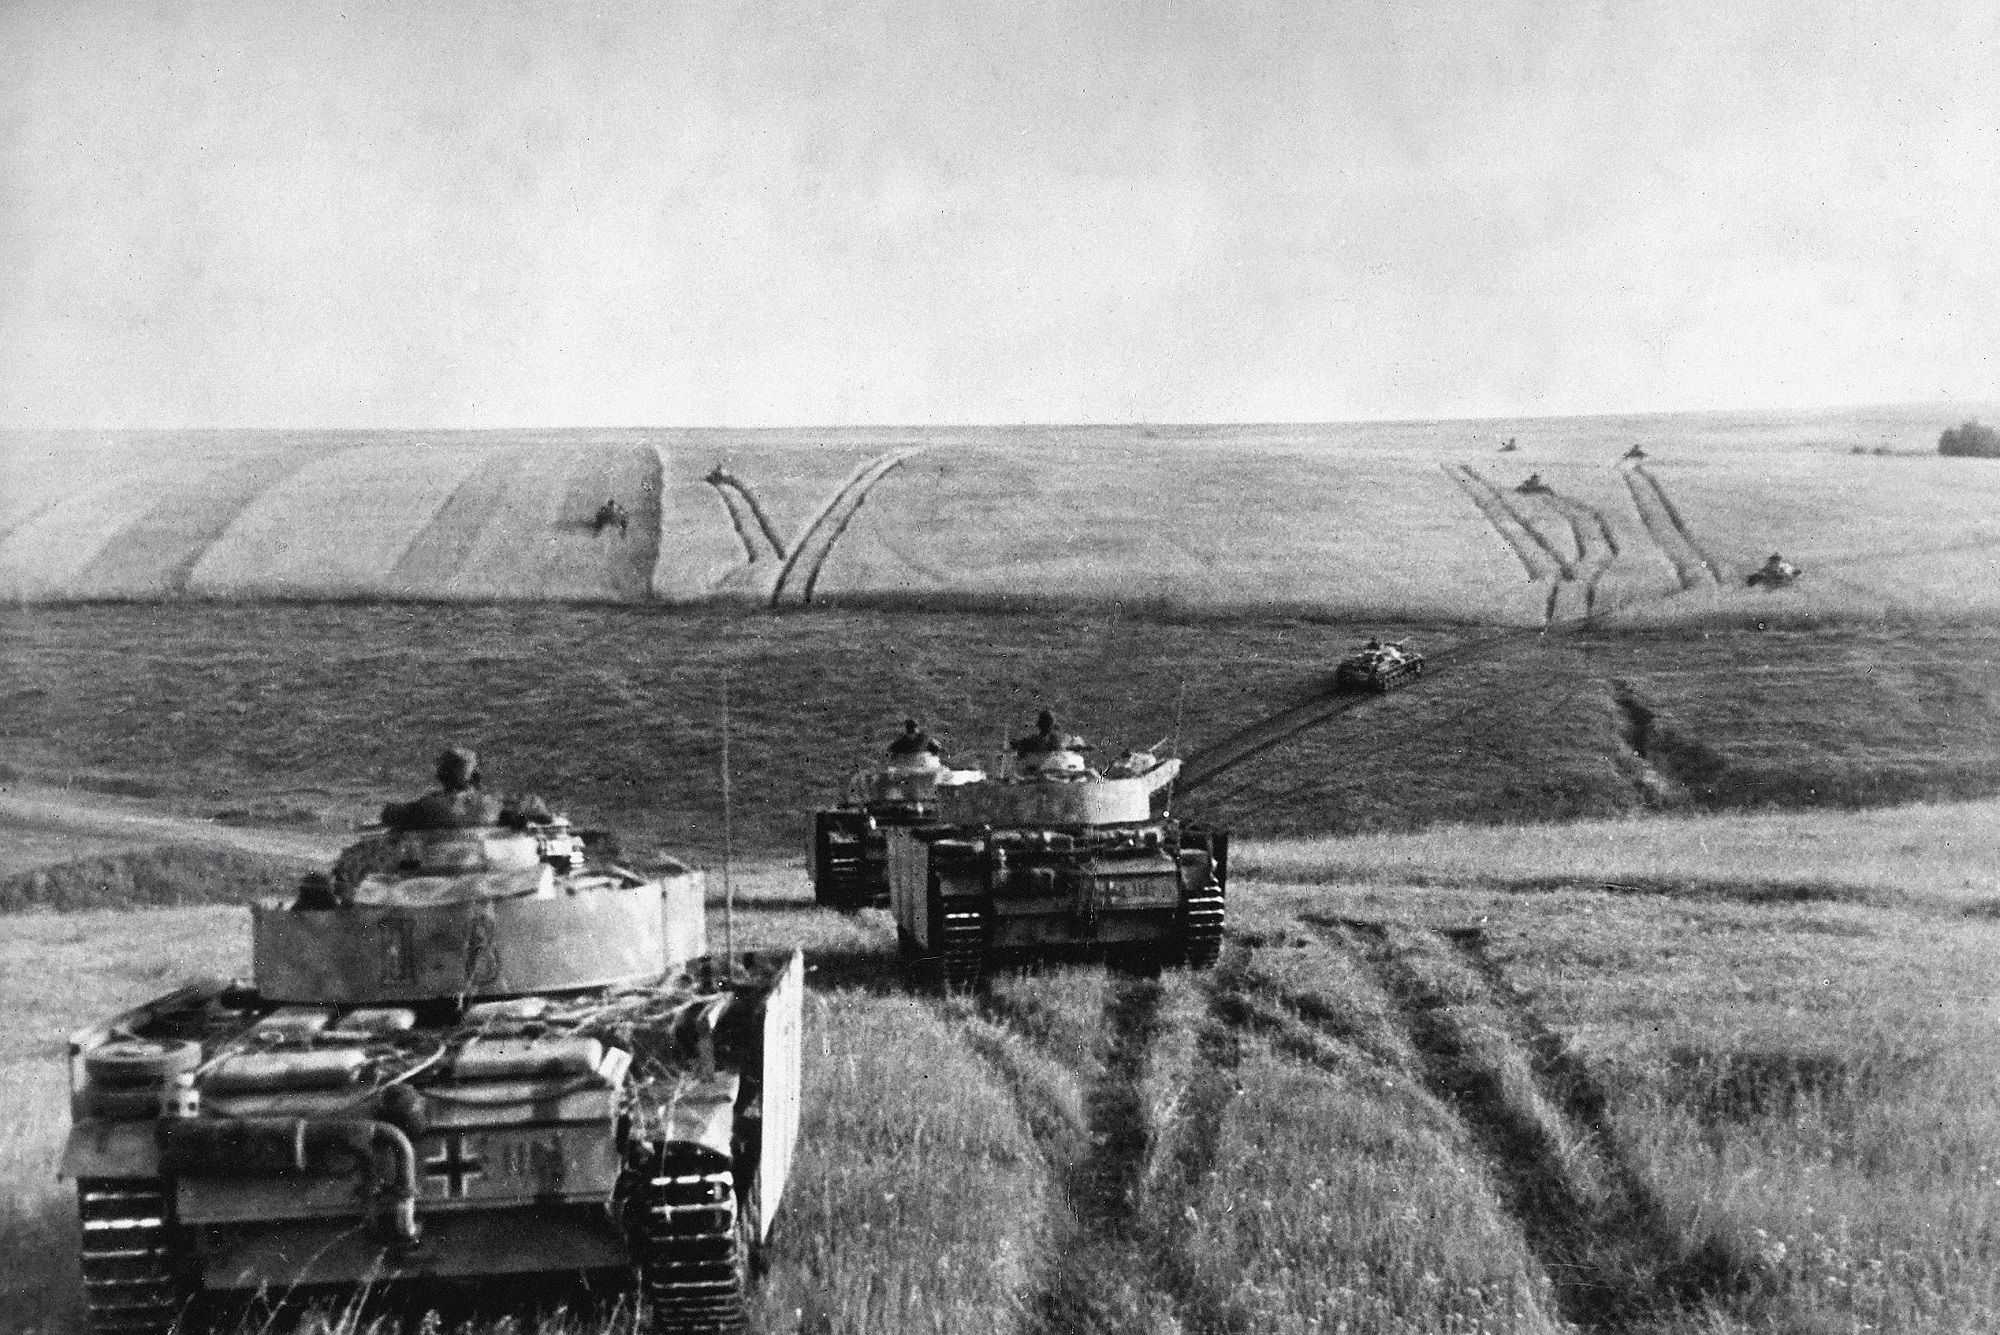
Thanks for the note Andreas. The hatches of course can be modeled open or closed. There are reference photos showing both configurations (open and closed).
The image above is a couple of Ms steaming along in an open grass field with both tanks having the hatches closed. Maybe they came from a fording situation or are going to be in one...who knows. Modeling them open would have given an extra level of detail and interest to the rear of the vehicle...
KKarns
Joined: April 24, 2020
KitMaker: 83 posts
Armorama: 83 posts
Posted: Sunday, August 23, 2020 - 04:32 AM UTC

Here is an M with the hatches open....
KKarns
Joined: April 24, 2020
KitMaker: 83 posts
Armorama: 83 posts
Posted: Sunday, August 23, 2020 - 05:46 AM UTC
Well...the part lines, pin marks, and flash on the tracks for this model were going to require more work than I want, or should have, to do and in the end the fidelity is going to be marginal at best. So...I ordered a set of Friulmodel workable metal tracks. I now have more invested in the tracks than I do the model kit! I am determined to make this kit a successful venture...
AOS
Joined: September 29, 2005
KitMaker: 75 posts
Armorama: 74 posts
Posted: Sunday, August 23, 2020 - 07:01 AM UTC
Ah,ok. I took my references and "investigated" the function of the fording system ... Maybe driving with closed hatches would also make sense in winter condition to keep the engine compartment warm. 
brekinapez
Joined: July 26, 2013
KitMaker: 2,272 posts
Armorama: 1,860 posts
Posted: Sunday, August 23, 2020 - 07:55 AM UTC
Quoted Text
Ah,ok. I took my references and "investigated" the function of the fording system ... Maybe driving with closed hatches would also make sense in winter condition to keep the engine compartment warm.
Not winter in that pic, though.
 |

WEB HOSTING BY


Copyright ©2021 Armorama and Kitmaker Network, a subsidiary of Silver Star Enterprises
All Rights Reserved. Please read our Conditions of Use and Privacy Policy.
All Rights Reserved. Please read our Conditions of Use and Privacy Policy.