_GOTOBOTTOM
Armor/AFV: Braille Scale
1/72 and 1/76 Scale Armor and AFVs.
Hosted by Darren Baker
IJA Type 4 'Ke-Nu' Light Tank
Braille
#135
Visit this Community
California, United States
Joined: August 05, 2007
KitMaker: 1,501 posts
Armorama: 1,485 posts
Posted: Saturday, November 24, 2012 - 09:50 PM UTC
I can’t believe Novem-beer is almost over, here’s hoping those celebrating Thanksgiving, wherever you may have been feasted heartily!

I recently reviewed this kit here on Armorama and as I had mentioned in the review I would be building it to see how this little guy will go together. The kit itself is well enough detailed that anyone could easily forgo the little fixes and extras that I’ve added on this first posting and still have an impressive vehicle when finished. There are not a lot of parts involved in getting the chassis together but I get a lot of enjoyment from correcting and adding details to my builds, that’s just me!

I’ve gone ahead and listed what I did for those interested in dumping tons of time hunched over on their workbench adding minuet details that can only be seen under a high power microscope. So, let’s get on with this 'itty-bitty' little half-breed tank.


There are but a few surviving photographs of the Imperial Japanese Army’s Type 4 ‘Ke-Nu’ light tank in existence, that I am aware of, and those are not of very good quality. I found this black and white copy on the Internet, used here for reference and discussion purposes. This particular vehicle is sporting the hollow copper tube aerial antenna suspended 2/3rds of the way around the turrets circumference via support rods.
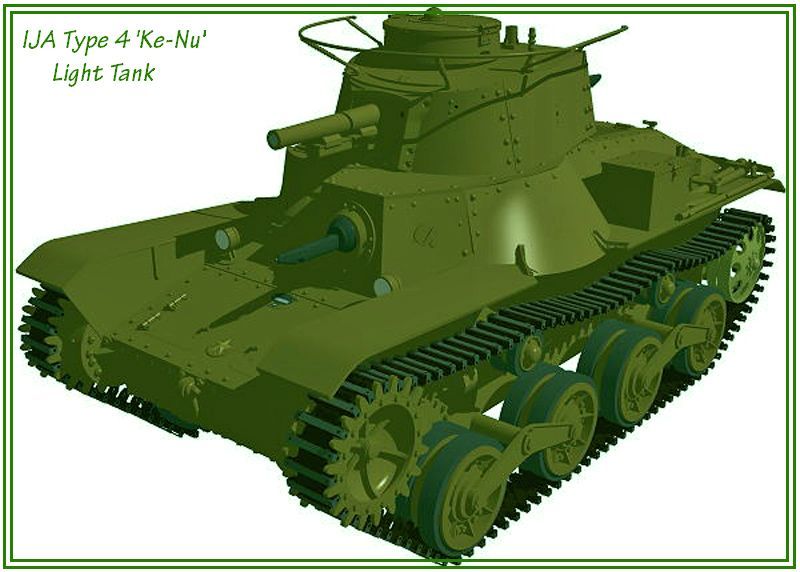

I also found this 3D CAD drawing depicting the Type 4 ‘Ke-Nu’ wearing a single color willow green paint scheme?
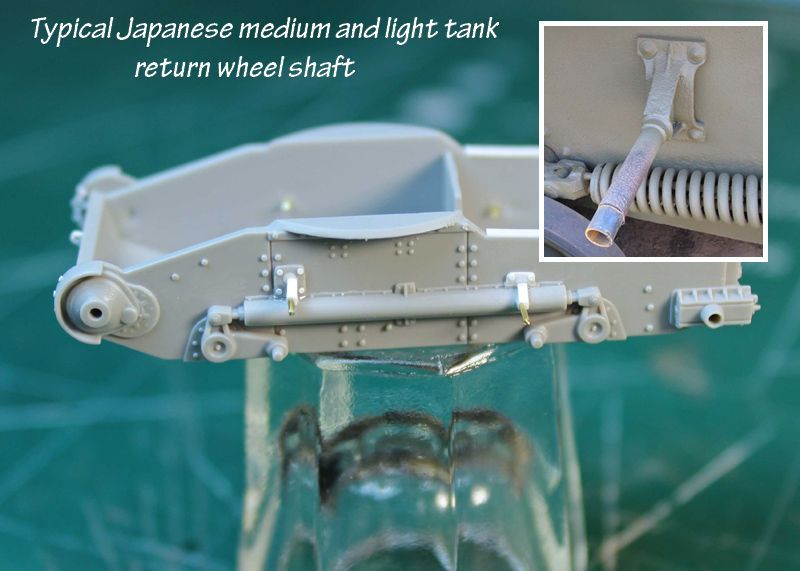

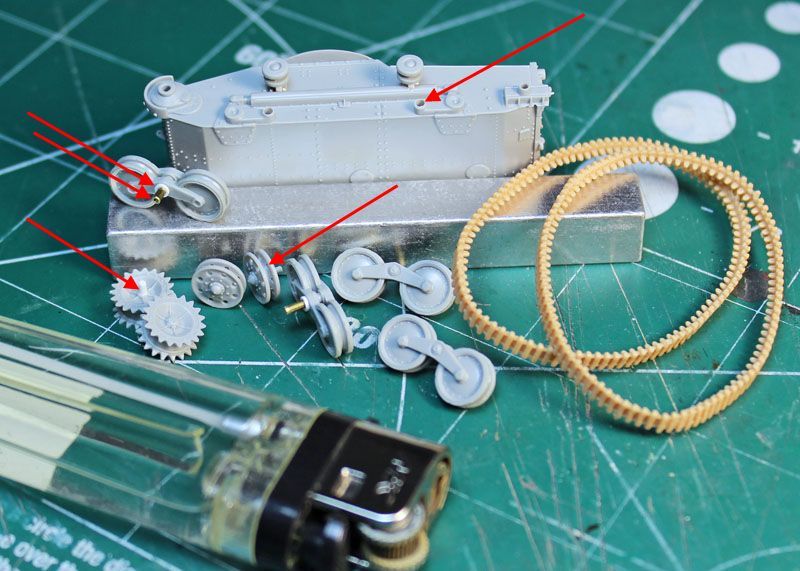
Here I’ve gone and replaced the incorrect kits cone shaped track return wheel shafts with.020” (0.508 mm) diameter brass rod and .030” (0.762 mm) thick styrene strip shaped to represent the actual parts as used on these tanks. The brass rods have yet to be trimmed to length and will serve as guide pins for the track return wheels. I also lowered the position of both rear track return wheel shaft stations to match reference photographs of the Type 95 ‘Ha-Go’, as these shaft locations would also have remained unchanged on the Type 4 ‘Ke-Nu’.
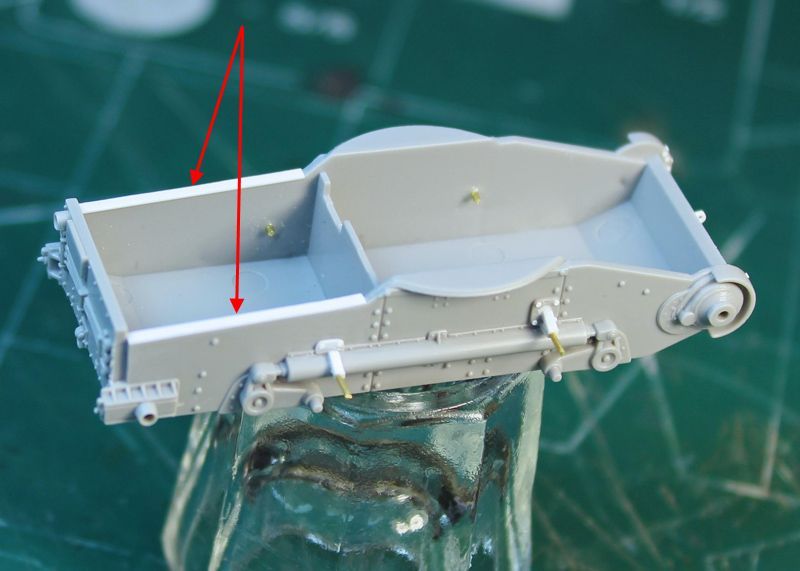

.010” (0.254 mm) thick styrene strips were added where indicated on the photograph to fill in the gaps between the upper and lower hull parts found on my kit example during test fitting.
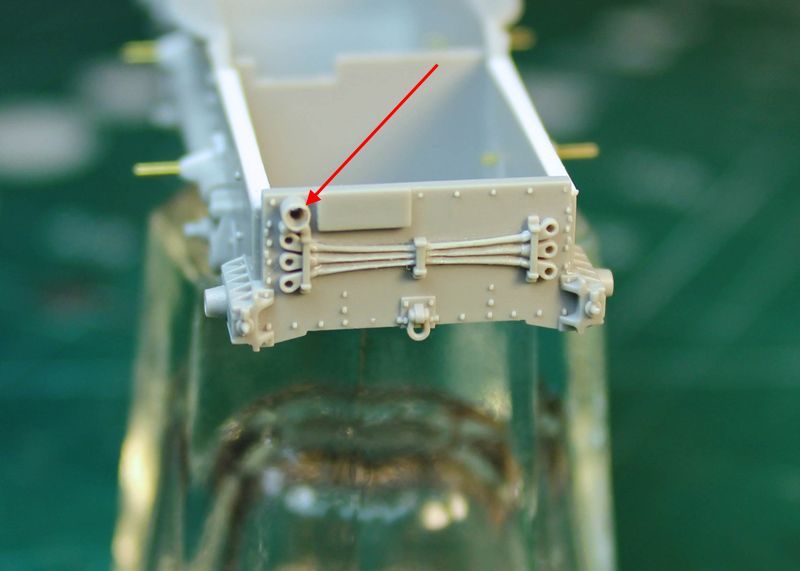

The rear taillight was drilled out with a #55 drill [.052” (1.3208 mm)] to make room for a MV Products LS – 301 red lenses. The holes on the towing cable ends were also slightly enlarged and a scribing tool was used to removed material between the cables and the rear hulls armor plate.

** The upper and lower hulls are fitted together on the following photographs and are yet to be cemented **
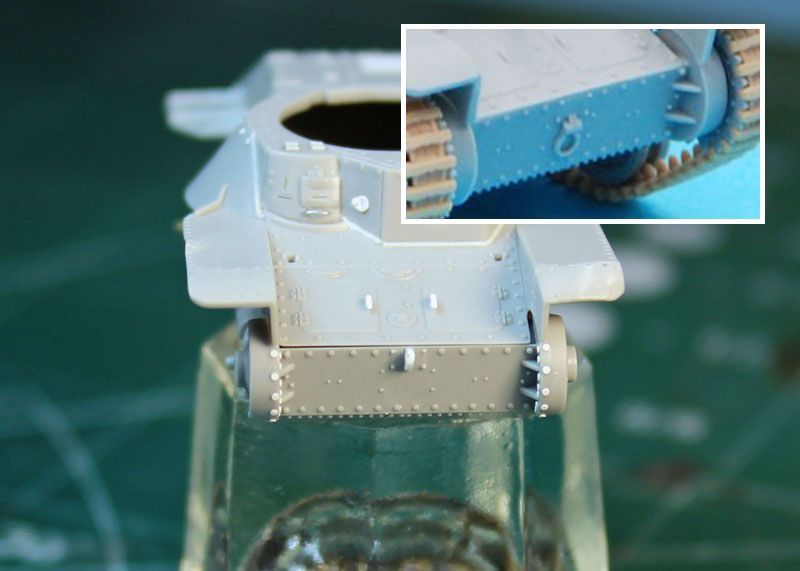

Using my punch and die set .018” (0.4572 mm) diameter X .005” (0.127 mm) thick styrene disks were added to replicate the missing conical bolts on the transmission drive housing armor guards. The front towing shackle and hook was removed from its incorrect lower position and a new shackle fabricated from .015” (0.381 mm) thick styrene strip was placed in its correct location.
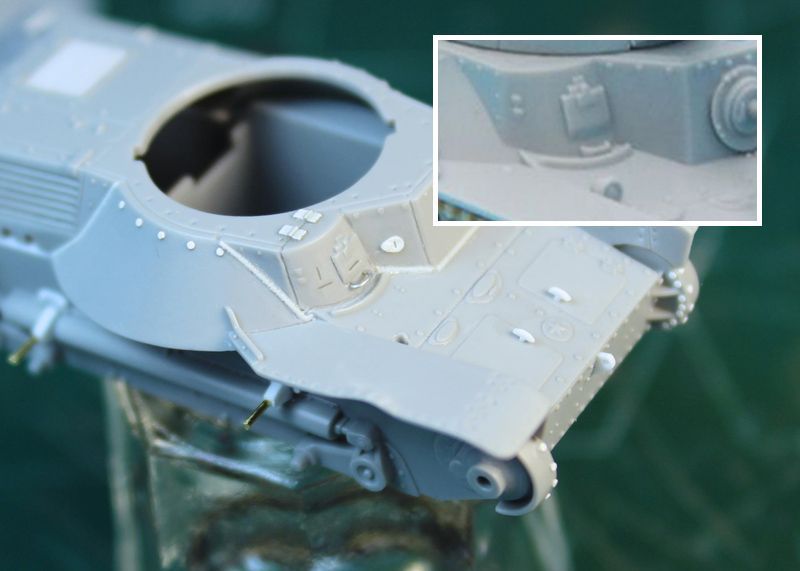

The molded on handle on the driver’s hinged armor escape hatch was replaced with a .015” (0.381 mm) diameter soft metal wire. Weld seams, hatch hinges, view slits on the escape hatch, viewing port guards, conical bolts and transmission hatch handles were added or replaced with styrene to enhance the already well detailed kits upper hull.
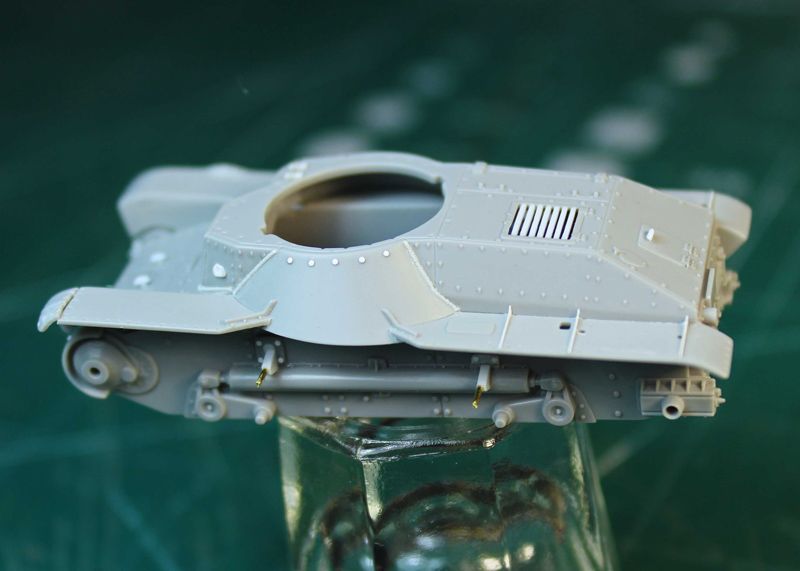

This left side view of the kits chassis shows the rebuilt styrene grating on the upper rear hulls deck engine hatch I made to replace the kits solid non-perforated molding.
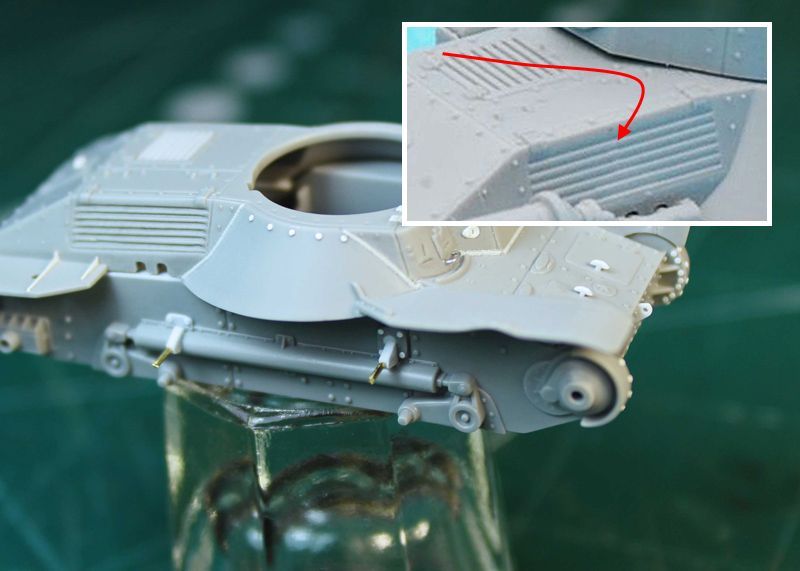

Using a scribing tool I carefully reworked the incorrectly molded side engine hatch louvers as they are pointing upwards and they should be facing downwards. The outline of the hatch frame was also added as this is missing on the kit molding.
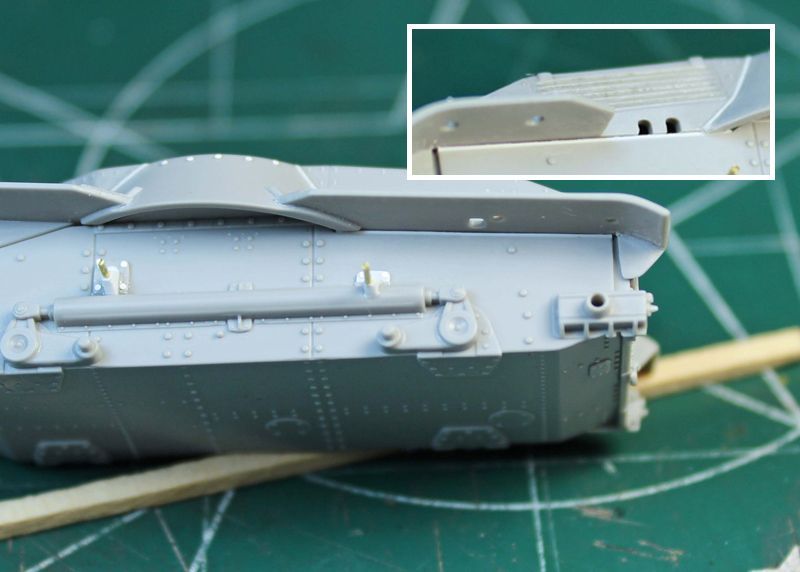

Although you could still see a slight gap, between the upper and lower hulls engine compartment, it was quit pronounced on my kit example before adding pieces of styrene strip, these gaps will disappear once the hull halfs are cemented together.
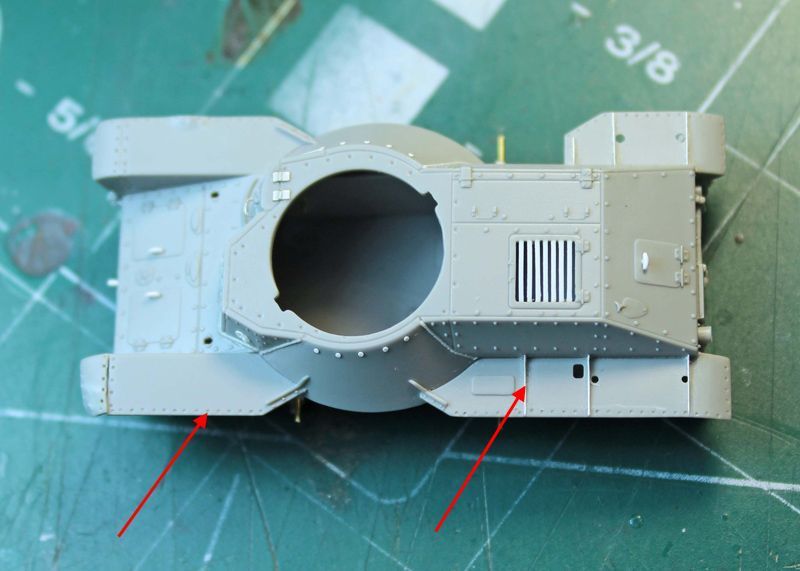

An apartment cockroach overhead view of the upper hull, NOT, but I’m just saying! Here you can see that I have added the rivets on the edges that attach the sheet metal fenders to their respective frames. I also replaced the molded on rod shaped fender supports with more to scale .005” (0.127 mm) thick styrene strips. Oh, and I added a bit of fender damage, what would a tank be without this feature?

Thanks for stopping by to have a look, more on the way.
As always any and all comments are welcome.
~ Eddy
PantherF
Visit this Community
Indiana, United States
Joined: June 10, 2005
KitMaker: 6,188 posts
Armorama: 5,960 posts
Posted: Saturday, November 24, 2012 - 10:37 PM UTC
Amazing work Eddy.

I KNOW what scale this is and the size too so what you're doing is very impressive.


~ Jeff
spacewolfdad
Visit this Community
England - West Midlands, United Kingdom
Joined: May 23, 2010
KitMaker: 642 posts
Armorama: 593 posts
Posted: Sunday, November 25, 2012 - 12:18 AM UTC
Hi Eddy,

I see you are working your magic again, wonderful walk through of the modifications. I was thinking of getting some of the Dragon Japanese tanks and this will be an excellent reference for my future builds. With regard to conical bolts, I have recently purchased (at Modelworld, Telford) some moulded ones from MasterClub and they appear very good indeed.

http://stores.ebay.co.uk/Masterclub-UK/Rivets-bolts-and-nuts-/_i.html?_fsub=1805000017&_sid=521633887&_trksid=p4634.c0.m322

I have used some of the ordinary bolts and they work really well. I shall be following the progress of this build closely and look forward to the next instalment.

All the best,

Paul
wing_nut
Visit this Community
New Jersey, United States
Joined: June 02, 2006
KitMaker: 1,212 posts
Armorama: 674 posts
Posted: Sunday, November 25, 2012 - 12:52 AM UTC
Nice looking start on that one Eddy.

I agree re: the Masterclub resin bolts. I have used them on the fenders on the little KT. Not as good as the brass from Scale Hardware but factor in that it about 1/5 the price they are very nice.
tread_geek
Visit this Community
Ontario, Canada
Joined: March 23, 2008
KitMaker: 2,847 posts
Armorama: 2,667 posts
Posted: Sunday, November 25, 2012 - 04:56 AM UTC
@Braille - Eddy,

Fantastic start to this little tyke! Your Blogs are always a joy to follow and this one should be no exception. Your redoing of the engine side louvres is particularly interesting but I can't imagine the actual process.

I'll be particularly interested in how you handle the Type 97 turret. From my research it seems pretty much in the "ball park," detail wise. The only real exception is the viewing ports on it. Dragon represents them as shallow dimples in the plastic. On my Early Version Chi Ha I found that a #76 drill was ideal for boring them out.

Cheers,
Jan
Braille
#135
Visit this Community
California, United States
Joined: August 05, 2007
KitMaker: 1,501 posts
Armorama: 1,485 posts
Posted: Tuesday, November 27, 2012 - 09:36 AM UTC
@PantherF – Jeff,

Thanks for the kind comments Jeff, it is really much appreciated. I just can’t keep away from working in this scale for too long. I really need to get back to updating my Campaign(s) larger scale builds, hopefully soon.

@spacewolfdad – Paul,

Thanks for dropping by and especially thanks for posting a link and information on those molded nuts & bolts from MasterClub. I checked them out on the ‘evilbay’ link you posted and ordered a bunch of different nut and bolt sets (lots of 72nd & 35th scale projects in the works that could use this added and needed detailing). Unfortunately I didn’t know about these aftermarket items as I could have used their Hex bulletproof (conical) bolt 0.6mm MC435092 on this project. Anyhow, much appreciated Paul.

@wing_nut – Marc,

Yup! I went and took a closer look at your KT and sure enough the nuts are there supporting the side fenders, NICE! Glad I went ahead and ordered these pieces especially after seeing them applied on the model. Thanks for dropping by Marc, appreciated!

@tread_geek – Jan,

I happen to have Dragon’s Type 95 ‘Ha-Go’ (North China Version) in the waiting and will post up a SBS on revamping the engine side louvers, especially for you!

Jan, your correct about the Type 97 turrets details and also about the viewing ports, however on some of my reference photographs the Japanese apparently modified and changed these openings from a round hole into an oblong shaped one. Other than that I think the turret remains the same as used on the Type 97, still need to do some research before building it! I checked the drill size you mentioned you used against the kits turret viewing ports and that drill size works for me, thanks!

And also thanks everyone, that didn’t leave a comment, for stopping by and having a look!

~ Eddy
DaGreatQueeg
Visit this Community
Napier, New Zealand
Joined: August 01, 2005
KitMaker: 1,049 posts
Armorama: 841 posts
Posted: Tuesday, November 27, 2012 - 09:55 AM UTC
Fantastic detailing Eddy !!
calvin_ng
Visit this Community
United States
Joined: June 23, 2008
KitMaker: 1,024 posts
Armorama: 753 posts
Posted: Tuesday, November 27, 2012 - 11:58 AM UTC
The detail put in is nice! Especially at this scale, I wish DML would release this kit in 1/35, it'd make an interesting subject.
Panther64
#261
Visit this Community
North Carolina, United States
Joined: September 12, 2005
KitMaker: 395 posts
Armorama: 365 posts
Posted: Tuesday, November 27, 2012 - 02:53 PM UTC
As always Eddy, just amazing work and awesome pictures to follow. Thank's for the little "tutorial" on the camera settings. BTW-what happened to the Merkava? I was following that one too.
weathering_one
Visit this Community
Ontario, Canada
Joined: April 04, 2009
KitMaker: 458 posts
Armorama: 456 posts
Posted: Tuesday, November 27, 2012 - 03:57 PM UTC
It was a great review and this blog is just icing on the cake. I've seen a Dragon Chi Ha at a show so I can appreciate the size of this build. I'll be watching this one!

Regards,
AJ
Dangeroo
#023
Visit this Community
Zurich, Switzerland
Joined: March 13, 2009
KitMaker: 2,058 posts
Armorama: 1,656 posts
Posted: Tuesday, November 27, 2012 - 08:39 PM UTC
Eddy, great work on that little beast. Magnificient detail that could go through as 1/35 if you ask me.

Cheers!
Stefan
Braille
#135
Visit this Community
California, United States
Joined: August 05, 2007
KitMaker: 1,501 posts
Armorama: 1,485 posts
Posted: Wednesday, November 28, 2012 - 09:43 AM UTC
@DaGreatQueeg – Brent,

Thanks for dropping in Brent! And thanks for the kind words, yes it’s somewhat detailed but I’m hoping my painting skills will yield half as much excitement as your builds do!

@calvin_ng – Calvin,

Thanks for the kind words Calvin, it’s much appreciated. Hopefully DML will release this kit in that scale and all of the other Japanese vehicles too. You may already know about DML’s recent release of JIN’s ‘Ka-Mi’ amphibious light tank in 35th scale? If your interested and don’t already know Russ ‘russamotto’ Amott
reviewed
that kit here on Armorama and Artyom ‘Neonik’ Nikolaev, has a fantastic ongoing build log here rendering Cyber-Hobby’s release of this kit but with included pontoons. Have you checked out Gary ‘BBD468 Bogg’s recent build log on Tamiya’s Type 97 Shinhoto Chi-Ha ? Jan ‘tread_geek’ reviewed almost all of the DML released 72nd scale Japanese tanks. Well I better stop here, I’m getting carried away!

Calvin, I like and think that these vehicles make for interesting modeling subjects. It’s going to be awhile before I will dig into more Japanese vehicles because my table is full at the moment and I have a slew of scheduled builds in the waiting. Don’t we all?

@Panther64 – Kerry,

Kerry, good of you to drop by, thanks for the kind word it’s much appreciated. I’m glad you like the presentation; these are the first photographs using the new Canon EOS Ti3. I have a long ways to go before I’m happy with my presentations but I’m learning something new. Kerry, I am still working on the Merkava and will post an update, hopefully as soon as I am finished with a review that I am currently working on. I really need to get better organized!!! BTW, that's a superb avitar you got there!

@weathering_one – AJB,

AJB, whaz’ up! Thanks for stopping in and having a look see and for the kind words, much appreciated. Glad you are enjoying this blog, more coming! Yes, this is such a small subject! From working with this kit I could better understand Jan ‘tread_geek’ Etal’s possible frustration with having to use tweezers and such in helping to get things together on these tiny Japanese model tanks, not to mention using optical headgear.


@Dangeroo – Stefan,

Thanks for dropping in and for the kind words, much appreciated. Glad you like what I’m doing, its comments like yours and from those like you and above commenting here that keeps me going. This is one heck of a fun hobby! And my wife knows were I am at night, hihi . . .

Again, thanks a bunch for dropping by and having a look, much appreciated. Turrets coming up next!
~ Eddy
Braille
#135
Visit this Community
California, United States
Joined: August 05, 2007
KitMaker: 1,501 posts
Armorama: 1,485 posts
Posted: Friday, December 07, 2012 - 09:06 PM UTC
Oh where oh where are thou, Decem-beer,

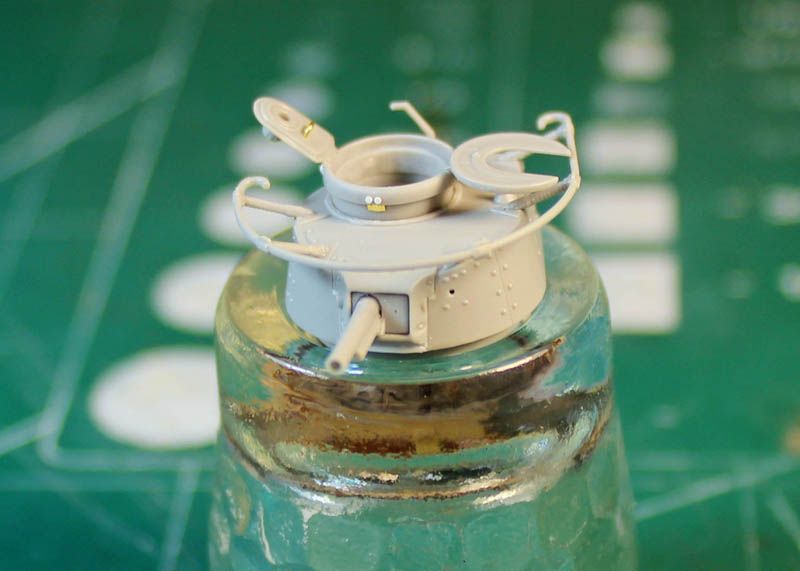
I’m such a slow builder and easily get side tracked so I can’t believe I actually completed the turret in under a few weeks! Besides the added modifications I did to the turret I only found one assembly issue but the parts fit is excellent.


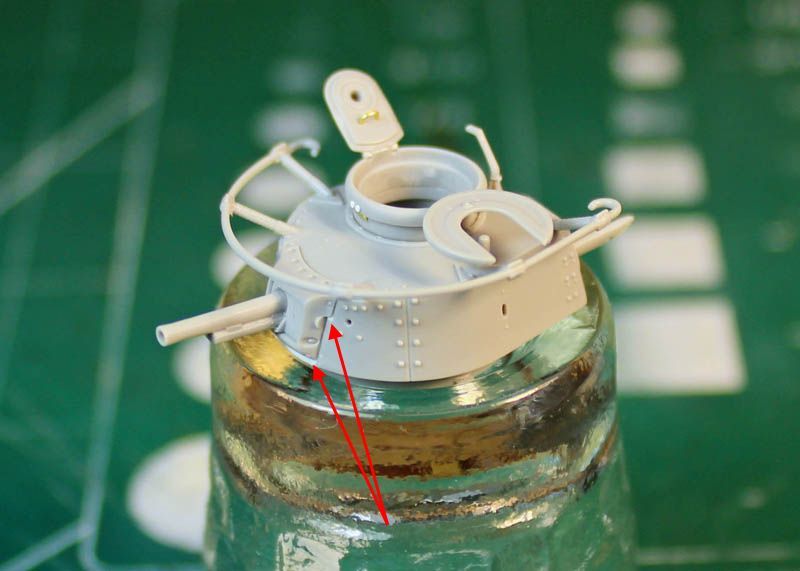
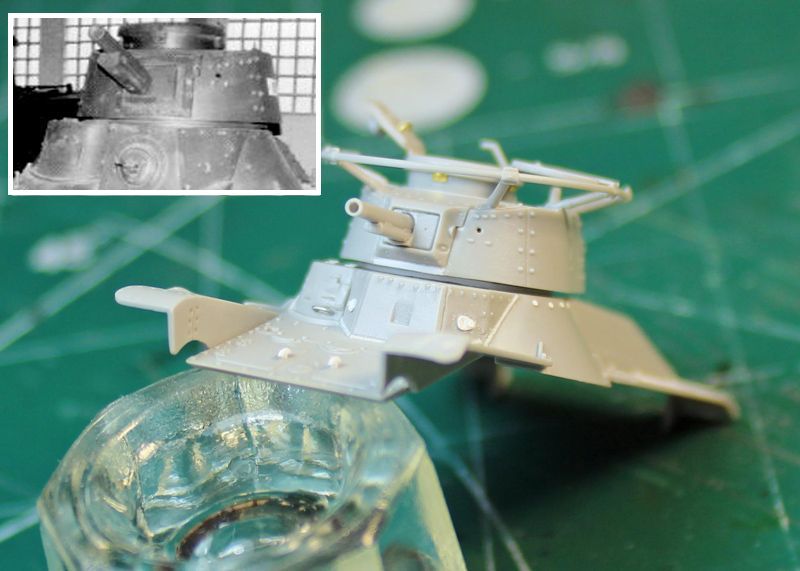
For the size of this kit Dragon provided this kit with lavishly detailed surface detail on the inside of both hatch sections so I decided to pose them open. I went and added the missing conical bolts around the top edge of the Commander’s copula (same size conical bolts as mentioned above for the hulls transmission drive housing armor guards). I closed up the periscope hole on the mantle beside the Type 90 57mm gun because on the ‘Ke-Nu’ the periscope was moved over to the front left side of the turret.


I shaved off the handhold on the smaller hatch and replaced it with .012” (0.3048 mm) diameter brass wire. The gun mantle mounts flush against the turret but on the real deal it sits slightly proud so I added a .010” (0.254 mm) thick shims where indicated. I drilled out all of the viewing and periscope holes with a .0135” (0.3429 mm) #80 drill bit attached to a small pin vise. For the turrets oblong side viewing ports two evenly spaced vertical holes were drilled and joined together with an Xacto blade.


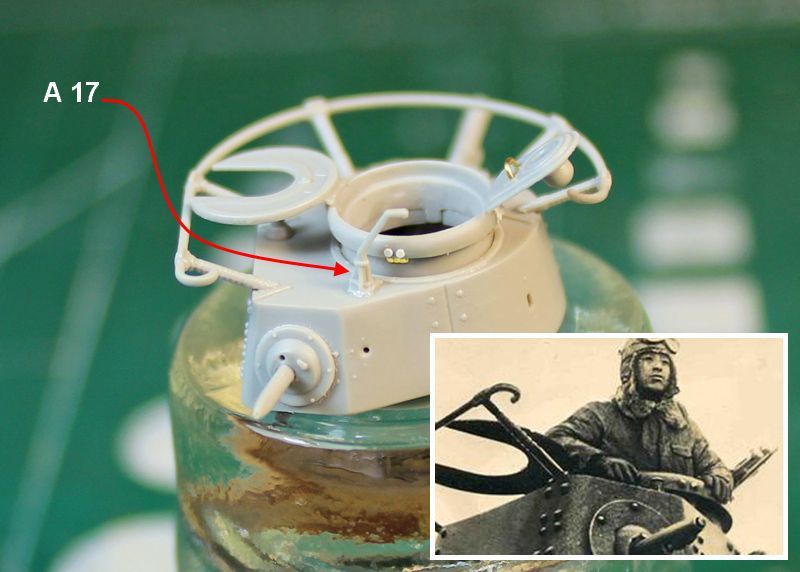
To determine the angle(s) of the open hatches I used a photograph I found on the Internet. Note the exposed Type 97 7.7mm machine guns ball mount on the inset photograph as apposed to the kits later MG ball mount armor housing. The only assembly issue I found was with the angled rod supported by the pedestal (A17) that is fixed just behind the Commander’s cupola. I could not find any photographs showing this part complete with the angled rod. There is a slot on the turrets roof for locating and orienting this part but this causes the rod to be in the way and not allowing for the hatch to be opened by the crew. I don’t know if this rod could be swiveled out of the way from inside the turret? So I removed the protruding guide pin and placed the part facing 90° to the right – looks right to me, hihi.


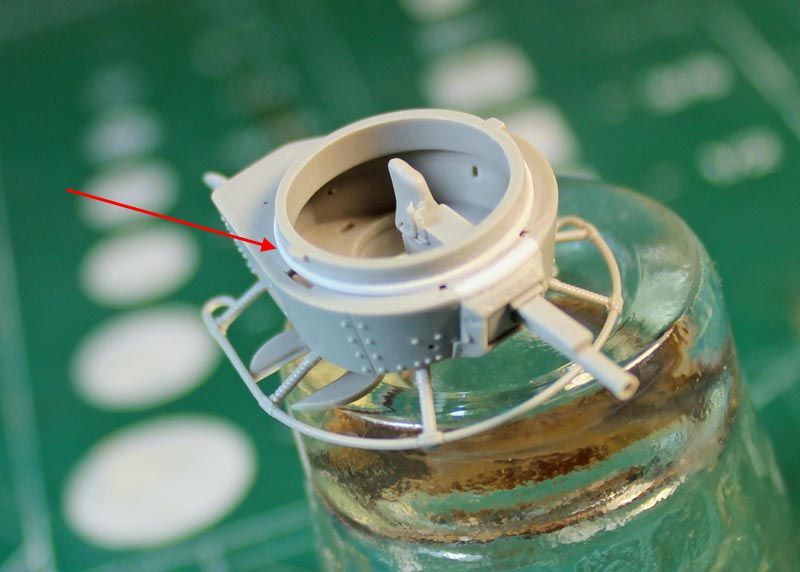
I added a .010 x .020” (0.25 x 0.5 mm) strip styrene around the upper edge of the turrets ring to create a gap between the turret and hull. Using super glue evenly spaced at four spots around the turret ring I tacked down the strip styrene in steps allowing the glue to set before moving on to the next spot after which I ran a brush dampened with Microscale Micro Weld liquid cement. Most of the other liquid cements tend to cause the strip styrene to crack when its wrapped around contours like on this example. A few of the last ‘Ke-Nu’s’ produced did not have a hinged armor hatch for the driver so this gap would not have been as pronounced as on the vehicles having the hinged armor hatch.


The turret mounted on the hull showing the gap between them. Photographs indicate that there were varying differences on the shape of these hatches and the hulls structure that houses the machine gun. The inset photograph is of the captured preserved ‘Ke-Nu’ at the Kubinka museum in Russia (note the gap and difference on the drivers wider hatch as opposed to the kits molded narrow one). I went ahead and enlarged the Type 90 57mm gun barrels opening with a # 67 .032” (0.8128 mm) drill for a better scale appearance.

Thanks again for stopping by to have a look at this new update, many more on the way. As always any and all comments are welcome.
~ Eddy
tread_geek
Visit this Community
Ontario, Canada
Joined: March 23, 2008
KitMaker: 2,847 posts
Armorama: 2,667 posts
Posted: Saturday, December 08, 2012 - 05:19 AM UTC
Eddy,

Very interesting what you are doing with this beast. I really like the look with the turret hatches open but unless you can come up with a figure to fill the opening, you'll need a bit of an interior. An interior wouldn't be too hard to cobble together as most Japanese tank interiors were spartan to the point of almost being crude. The Type 97 turret had no turret basket so basically you'd see the hull floor with a drive shaft in the middle and two or three storage boxes on the hull side floor under the turret area. Also from what I've read most Japanese tanks didn't have a full firewall between the crew and engine compartments.

Since I'm not really that familiar with the Ke-Nu I can only go with what I've discovered from my Type 97 builds. That part A17, the machine gun pintle, did I mention that positioning issue in either of my reviews? I did as you and lopped off the locating lug so as to get it to not get in the way of the opening hatch. Another interesting point about the Type 97 turret is that in the command tank version, the 57mm gun was a dummy with either no bore in the muzzle or very thin walls.

Adding the plastic strip to the turret ring is something that I might have missed. Obviously, and unlike a Chi Ha, it truly sits proud of the hull top and not flush. I somewhat question the elongated side vision slot! In all the pictures that I've looked at, I never ran into a Type 97 turret with it. However, who can really say what modifications they might have made to the turrets during this upgrade/convertion.

All in all, great work on both the kit and the Blog.

Cheers,
Jan
Braille
#135
Visit this Community
California, United States
Joined: August 05, 2007
KitMaker: 1,501 posts
Armorama: 1,485 posts
Posted: Saturday, December 08, 2012 - 09:03 AM UTC
@tread_geek – Jan,

I should have reread through your Type 97 ‘Chi-Ha’ kit review and saved myself a lot of time researching part A17. I did not know about this part being a machine gun pintel, thanks for pointing that out. During my research on the ‘Ke-Nu’ I noted many different subtle changes on these tanks. The WWII Japanese tanks / vehicles is a subject that lacks the reference backing that other subjects have. So even with many period photographs and those that I found on the museum display tanks I could not tell when certain modifications were implemented, introduced or why on these vehicles.

Knowing some of this could also help in determining aproximimately at what time these vehicles were produced and when certain modifications were introduced. Not having this information adds a lot of confusion and can be frustrating for anyone wanting to accurately render one of these tanks. The best source for information on these vehicles and subject is contained on Japanese modeling websites, magazines and reference books, and these are currently only in Japanese text. With the recent influx and interest in Japanese vehicle kits this may hopefully change?

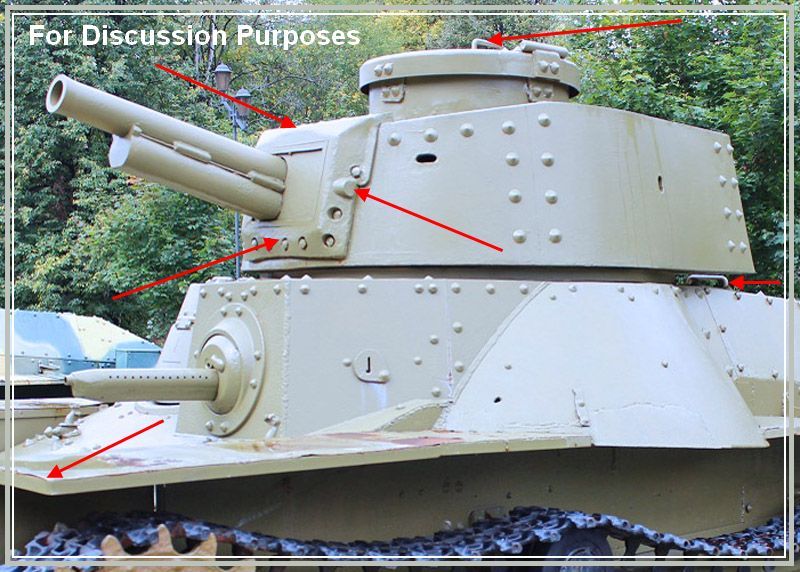
I have here one example that I found on the Internet of a ‘Ke-Nu’, but I don’t know at which museum this vehicle exists? From everything that I have read thus far my understanding was that only one serving example exited, that being the captured one displayed in Russia at the Kubinka museum. The photograph of this tank apparently and obviously disputes this. For one you simply could not just mount a Type 97 ‘Chi-Ha’ turret onto the Type 95 ‘Ha-Go’ chassis without extensive modifications. That said let’s take a close look at this example.


On this museum example of the ‘Ke-Nu’ light tank the turret sports oblong shaped viewing ports on both sides of the turret as well as both front and rear periscope holes. This is not the only vehicle I found sporting these holes in that shape. Ok, let’s have a look at the other differences. The front fenders are shortened. The main guns mantle casting has rounded edges where indicated verses the straight edged ones more commonly found. This mantle is also sporting a completely round cast support gun pinion verses the more common half moon shaped one. Handles have been added to the turret hatch, engine access hatch on the rear deck and to the engine access louvered panel on the left rear side (not shown). These handles may have been added by the field workshop on this particular vehicle, as I have not found any photographs of other vehicles with these? The tracks also sport odd shaped guide horns (not shown well in this photograph).

Many of the earlier Japanese tanks sported a brass star on the glacis plate but this item began to disappear late in the war. The kit features this item but I had considered removing this, as I had not found any photographs with this brass star on any of the ‘Ke-Nu’s’ that I have or seen on the Internet.

BTW Jan, after viewing the photographs that I have I found that the forward and rear turret periscope hole openings were a bit to small so I have since have enlarged them with the suggested #76 .020” (0.508 mm) drill bit. Thanks for providing me with that piece of information on your prior posting here. That’s a better match to the photographs of the actual vehicles periscope holes than the prior (smaller) holes I had originally drilled. I however, left the turret side viewing ports alone as I thought these looked just about right. I found a figure that I could stuff in the turrets opening, I'll need to think on this a bit?

~ Eddy
tread_geek
Visit this Community
Ontario, Canada
Joined: March 23, 2008
KitMaker: 2,847 posts
Armorama: 2,667 posts
Posted: Sunday, December 09, 2012 - 04:14 AM UTC
@Braille - Eddy,

You are absolutely correct in that there seems to be a very serious lack of information about Japanese armour. Obviously anything can happen with a field expedient modification and often did to the point where two tanks going through the same modification look different. The photo you provide above might suggest that this particular turret might have been a late production (these are usually simplified to cut production time). I think this because something about its shape doesn't seem right. To me the most obvious difference is the lack of bolts below the forward vision slit and any around the one further back. I am sure that they would not take the time to remove these bolts and plug their resulting holes. One thing that I have learned when researching things is often anything goes.

Cheers,
Jan
spacewolfdad
Visit this Community
England - West Midlands, United Kingdom
Joined: May 23, 2010
KitMaker: 642 posts
Armorama: 593 posts
Posted: Sunday, December 09, 2012 - 05:40 AM UTC
Hi Eddy,

Wonderful update, I am bookmarking these as I will be making some Japanese armour. Thank you for taking the time and trouble to show us how to enhance the model, it is appreciated very much, especially by me. Keep up the good work.

All the best,

Paul
PedroA
Visit this Community
Valencia, Spain / España
Joined: December 27, 2010
KitMaker: 324 posts
Armorama: 322 posts
Posted: Wednesday, December 12, 2012 - 04:49 AM UTC
Hi Eddy.

Excellent review and detailing. I see an excellent kit although you have made a lot of small modification. Well perhaps when I finish some of my models, I will buy this kit.

Un abrazo.
Braille
#135
Visit this Community
California, United States
Joined: August 05, 2007
KitMaker: 1,501 posts
Armorama: 1,485 posts
Posted: Wednesday, December 12, 2012 - 08:20 PM UTC
@tread_geek – Jan,

Good catch on the missing conical bolts on the ‘Ke-Nu’s’ turret. Because I wasn’t interested in replicating the oblong shaped periscope opening on the turret front I missed that detail. There are other subtle differences on the above photographed ‘Ke-Nu’ but I didn’t mention all of them mostly because I am in the dark about those differences. I have to agree with you about the research aspect that often anything goes on armored and soft skinned vehicles!

Thanks for following along it is much appreciated Jan, especially since you’ve already built a number of WWII Japanese tanks – I could use all your help and all the help I can get with these vehicles.

@spacewolfdad – Paul,

Thanks for the kudo’s, it’s my pleasure to help and share with you and anyone how I go about putting my builds together. This of course is ever evolving due to modelers like yourself posting and sharing your builds here and giving insight as to what changes, modifications and items were used to render the final vehicle. I have another Japanese vehicle in the stash but I don’t know when I will be able to get to that one? My interest in these Japanese vehicles is high right now so I may build another one next? Be ready to create another folder on your computer when that happens, hihi!

@PedroA – Pedro,

Thanks for dropping in 'primo' and checking out my latest build. Pedro this is a nicely detailed little kit, I’m thinking that the real issue is going to be the camouflage paint scheme, especially since I have not yet rendered this in any scale! Come to think of it not even on a ‘wingama’thing’ (my new word for this week).

So you might build one of these huh? Pedro, with your talent you could easily render any of the WWII Japanese vehicles that may never see the light of day in plastic, hihi! I have not forgotten your rendition of a WWII Japanese heavy self-propelled gun. Hopefully Dragon or one of the leading plastic manufactures will also release more Japanese vehicles in both popular armor scales – 35th and 72nd scale.

~ Eddy
Braille
#135
Visit this Community
California, United States
Joined: August 05, 2007
KitMaker: 1,501 posts
Armorama: 1,485 posts
Posted: Wednesday, December 12, 2012 - 08:36 PM UTC
Not even a week between updates and I'm back,


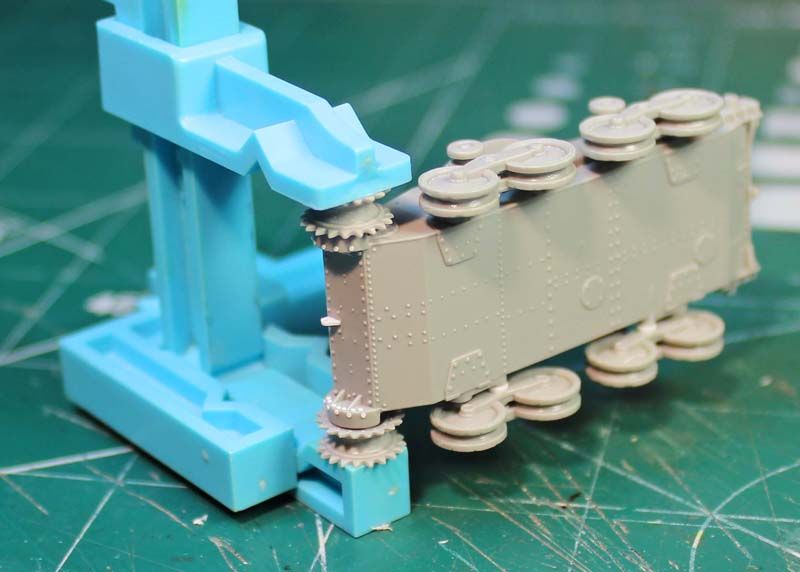
The ‘Ke-Nu’s’ suspension and tracks. The holes on the boogie assemblies to accept the hulls swing arm shafts are larger in diameter so I fabricated new swing arm shafts from .060” (1.524 mm) diameter brass tube. .020” (0.508 mm) thick styrene shims were made using a punch and die set to space the boogies away from the hulls swing arms and for aligning them to both the drive and idler wheels. The original molded drive wheel shafts where replaced with .035” (0.889 mm) diameter styrene rods because the shaft holes on the hulls drive wheel housings are much larger in diameter. The rear idler wheels were chucked to a motor tool and with a cutter the center areas were deepened. (NO, I don’t smoke!)


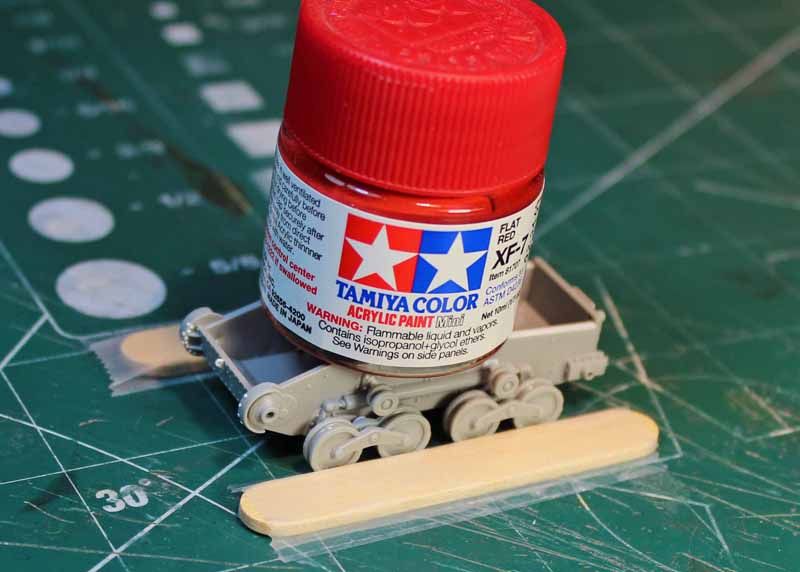
Mini craft sticks were taped to the cutting mat to keep the boogie assemblies aligned and vertical with added weight to the hull to keep all the wheels flat against the surface.


Clamps were used to keep the drive wheels aligned and parallel to the hull while the cement dried overnight.


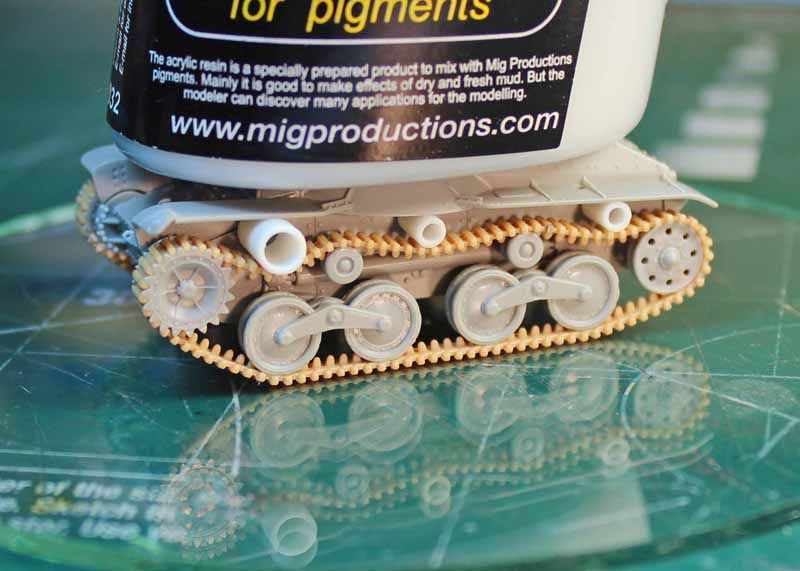
.187” (4.7498 mm) and .125” (3.175 mm) diameter styrene tubes were wedged between the upper hulls fenders and tracks to secure the tracks to the dive sprockets, return wheels and idlers. This permits the tracks to be cemented further around the circumference of the wheels allowing for better track sag. The DS tracks are somewhat elastic so they will slightly spring back after the styrene tubes are removed. Weight was added to the chassis to keep the cemented tracks and boogie wheels together, the parts were allowed to set up overnight.

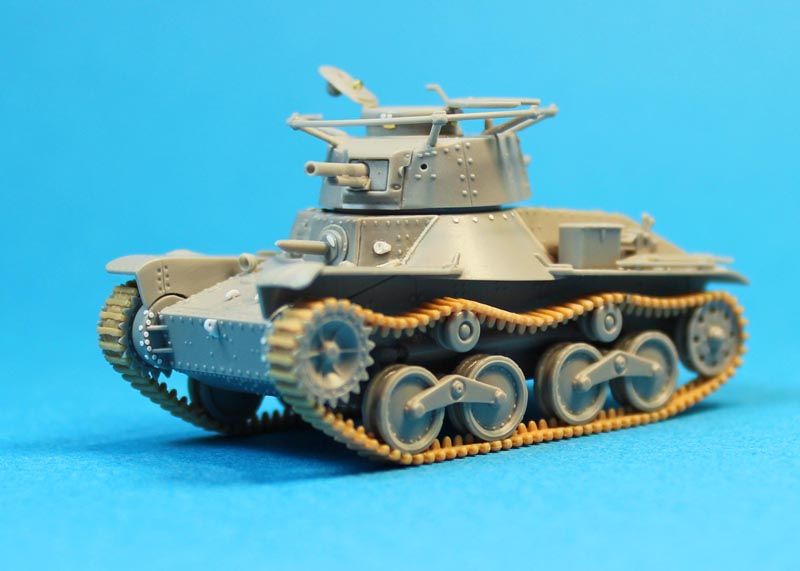
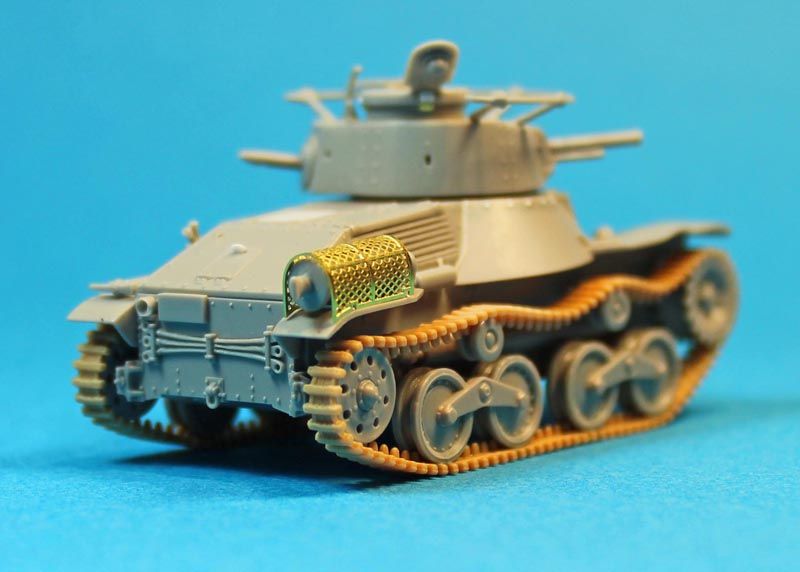
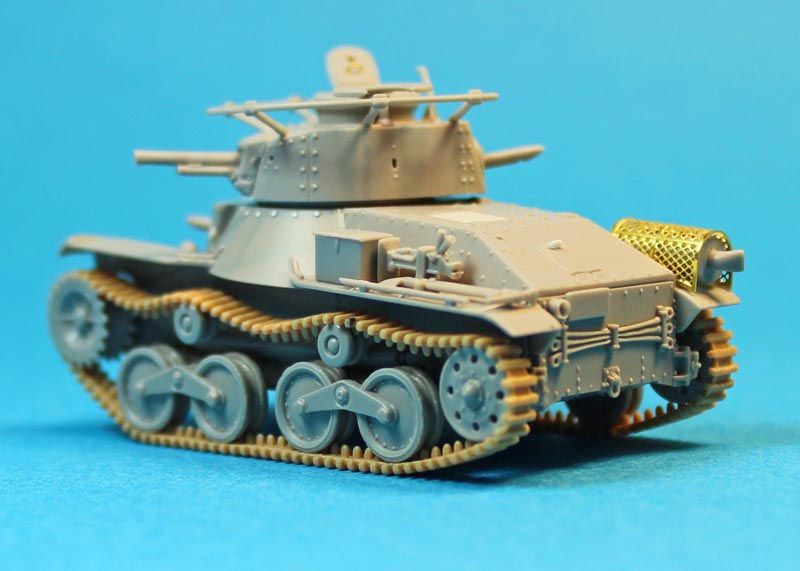
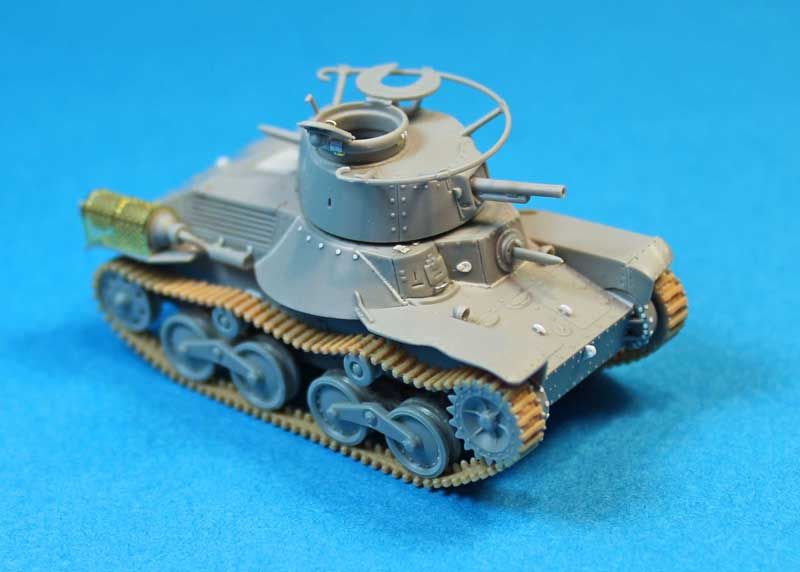
** The completed assembled model with tools **


The Type 97 separately molded crow bar (A18) was used to replace the left rear fenders molded on piece. It was also shortened to match the kits original crow bar.


Thanks for stopping by to have a look, hope you like it, painting begins.
As always any and all comments are welcome.
~ Eddy
PanzerAlexander
Visit this Community
Attica, Greece / Ελλάδα
Joined: February 17, 2010
KitMaker: 625 posts
Armorama: 608 posts
Posted: Wednesday, December 12, 2012 - 09:01 PM UTC
This small model is a real gem and I really like your precise additions.

P.A.
tread_geek
Visit this Community
Ontario, Canada
Joined: March 23, 2008
KitMaker: 2,847 posts
Armorama: 2,667 posts
Posted: Thursday, December 13, 2012 - 04:26 AM UTC
@Braille - Eddy,

You've really zipping along with this build! To me at least, it seems like you've put this thing together with lightning speed, despite all the modifications. I was going to mention to you about the extremely fragile and sloppy fitting suspension components but you've conquered the issue with great skill. with the DS tracks, you can stretch them to a degree but for the ones on this tiny beast (and the Chi Ha) you'd have to be extremely careful as they are quite fine and delicate, despite the way they appear in the pictures.

Since you've totally assembled the tank I anticipate painting this beast is going to be challenging. The camo scheme looks fairly standard for IJA tanks. Might I suggest Tamiya XF-49 Khaki for the overall base, XF-13 J.A. Green and XF-68 NATO Brown for the other colours (suitably lightened for "scale effect").

Cheers,
Jan
Braille
#135
Visit this Community
California, United States
Joined: August 05, 2007
KitMaker: 1,501 posts
Armorama: 1,485 posts
Posted: Thursday, December 13, 2012 - 10:34 AM UTC
@PanzerAlexander – Alexander,

Thank you for dropping in and for the comment, it’s much appreciated. Alexander, yes she’s a small one but still full of detailing potential. So what are you working on?

@tread_geek – Jan,

I don’t know what’s got into me lately because I’m not building at my usual slow paced speed, it may be that I’m not spending as much of my modeling time on the Internet as I normally do and have switched that over to the workstation, hihi! I may just continue this trend or I’ll only get a couple of builds started and maybe finish one a year . . . of course spending time on the Internet is basically a hobby in itself. Plus I really need to rekindle my painting skills, not much practice when completing only one model in a year’s length of time.

Speaking of painting I’m glad you chimed in about the camouflage colors, wasn’t sure which colors to chose, let me explain. I had just started to check the one reference book that I have on WWII Japanese tanks for painting the camouflage colors and pattern that were used in the war and to see if I had any of those colors on hand? From what I’ve just read the late war standardized camouflage paint scheme for a Japanese army tank would have had only three-colors. Let’s look at the individual colors . . .

By the end of the war the Japanese army generally painted the tanks in an overall base coat of ‘parched grass’ primer, also called ‘Khaki’, somewhat like the Germans 1942 dark yellow color. This primer base coat is a rust-preventive paint and was intended to be applied over all outside surfaces of the tank including the tracks. So I’ll have to compare your suggested Tamiya XF-49 Khaki to their XF-60 Dark Yellow to get an idea on which way to go for the base color? And in this scale it may be a good idea to use the Khaki color to lighten the Dark Yellow for scale effect. The kits painting & Markings guide suggests a ‘wood brown’ for the base color, that being closer to Tamiya’s XF-49 Khaki, humm.

This leave the two-principle camouflage colors, those being a dark olive and a dark mahogany brown. According to my reference book the dark olive color could range anywhere from being a dark olive green to an olive drab. Tamiya’s XF-13 J.A. Green as you suggest is a shoe-in and could be lightened with a lighter green for scale effect to achieve the dark olive color. That leaves us with the mahogany brown and your suggestion would be to use Tamiya’s XF-68 NATO brown. Here’s where I’m confused, the kits instructions are calling out to use a ‘burnt iron’ color for the dark mahogany brown? And according to my reference this second principle camouflage color remained the same color throughout the war. So the NATO brown it is! This color could be lightened with the ‘Khaki’ color for scale effect. The camouflage colors where originally applied in hard edges but by 1943 an increasing practice of applying the colors with feathered edges via spray guns had became all but standard.

The interior color for tanks were painted in a very Light Gray and sometimes, depending on the manufacturing plant (horror of modeling horrors) Silver (as in Bud Light). I may stick to the very Light Gray and call it a day but I’ll need to think on that? The tools including the jack came painted in a dull brown color sometimes referred to as ‘Japanese artillery brown’, apparently this color was the standard finish for Japanese ordnance, tools, jack, main gun and corresponding gun housing. I’ll need to check and see if such a color exists on the hobby charts or come up with what has been posted on the forums for this color? Any suggestions?

~ Eddy
tread_geek
Visit this Community
Ontario, Canada
Joined: March 23, 2008
KitMaker: 2,847 posts
Armorama: 2,667 posts
Posted: Saturday, December 15, 2012 - 04:38 AM UTC
@Braile - Eddy,

That book you mention sounds suspiciously like the Steve Zaloga, Japanese Tanks 1939-45? For various reasons I've based my colours roughly on the Chi Ha example at the Yasukuni Shrine Museum (logic would suggest that the people in the country that built the tank might have a better idea of the colours). After reading scores of articles, one must take any "standard" with a grain of salt. Despite best intentions, they were generally less than universal, especially as the war progressed). Also of interest is that two sources that I read indicated that the factory applied camo was "hand painted" in many cases.

There is an excellent thread here on Armorama that discusses these colours and you can find it HERE. In this is also a discussion with paint samples of Japanese Artillery Brown which they sum up as "a browner version of the Tamiya Khaki." Hope this helps!

Cheers,
Jan
Braille
#135
Visit this Community
California, United States
Joined: August 05, 2007
KitMaker: 1,501 posts
Armorama: 1,485 posts
Posted: Sunday, December 16, 2012 - 08:47 AM UTC
@tread_geek – Jan,

Yes, the reference that I mention is in fact Steve Zaloga’s book! This is also the book I used for the review and where I got the information regarding the camouflage colors. Jan, thanks for taking the time to reply, in light of you finishing up a few campaign projects, it’s much appreciated.

As for using a spray gun to apply the camouflage paint towards the end of the war, well there are almost no photographs depicting this practice that I could find. This may be due to the Japanese keeping almost all of these later produced vehicles at home for the expected allied invasion? After the war these vehicles were destroyed so very little if any photographs exists showing the actual patterns / schemes or weather or not the paint was applied by hand or not. Fortunately, a great deal of the original vehicle production and assembly documents do exist and with the recent spark in interest of these Japanese vehicles we’ll be able to see new publications, in English text, in the near future. Let's keep our fingers crossed!!!

Thank you for posting a link concerning the Japanese Artillery Brown. I read through the post and attached linked postings and was happy to see that in fact the Japanese had changed the original base color late in the war yet left the two original primary camouflage colors unchanged. I had already applied the primer and base coat when I read through the posts. And yes, apparently the Japanese Artillery Brown would be as you stated above “a browner version of the Tamiya Khaki.” This will be a big help to me when I paint the tools and jack. I do intend to render a spray gun applied camouflage on this little vehicle – ‘it is my duty to stir up the cows and let them do a little mowing’

~ Eddy
 _GOTOTOP