

Hosted by Darren Baker
British Advance in Normandy WIP
SiStorey

Joined: March 14, 2014
KitMaker: 242 posts
Armorama: 161 posts

Posted: Saturday, October 11, 2014 - 02:36 AM UTC
Yeah I know what you mean, could have went totally over board with it but a mixture of doing a little then building it up and getting a little bored helped I think haha

jrutman

Joined: April 10, 2011
KitMaker: 7,941 posts
Armorama: 7,934 posts
Posted: Saturday, October 11, 2014 - 02:57 AM UTC
I always appreciate the skill it takes to model realistic chipping and rusting,etc. I do kind of chuckle when I see a model of a tank that might have been in use about 2 months before it was knocked out modeled to look like it had been sitting in the open air at Aberdeen for 40 years or so.
But like I said,I am always careful to admire the skill it took to make it look like that.
J
But like I said,I am always careful to admire the skill it took to make it look like that.
J
SiStorey
Joined: March 14, 2014
KitMaker: 242 posts
Armorama: 161 posts
Posted: Saturday, October 11, 2014 - 03:00 AM UTC
Yeah I agree, its a fine art of putting just enough on it make it look like a battle hardened machine rather than a museum show piece. But I think I've done good with the twins. Going to add just a small amount of rust on it, mainly around the exhaust area, once again something I've never done so fingers crossed! lol
SiStorey
Joined: March 14, 2014
KitMaker: 242 posts
Armorama: 161 posts
Posted: Saturday, October 11, 2014 - 03:18 AM UTC
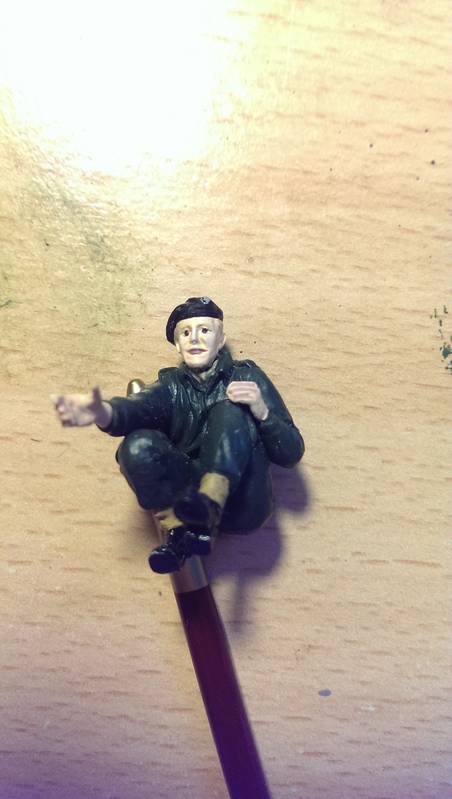
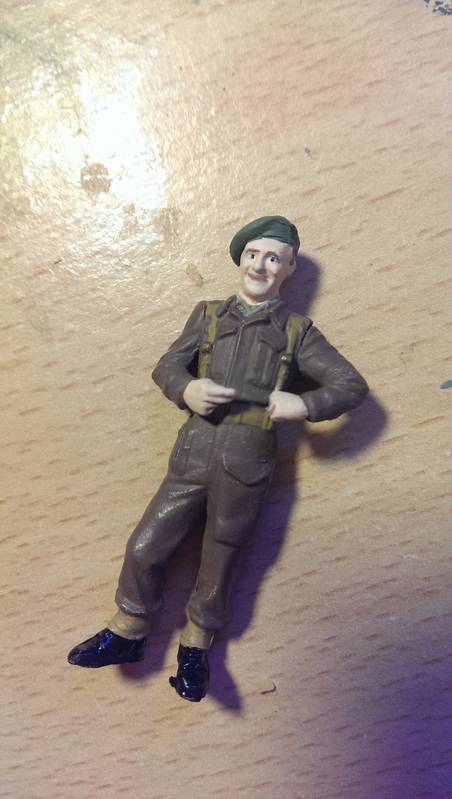
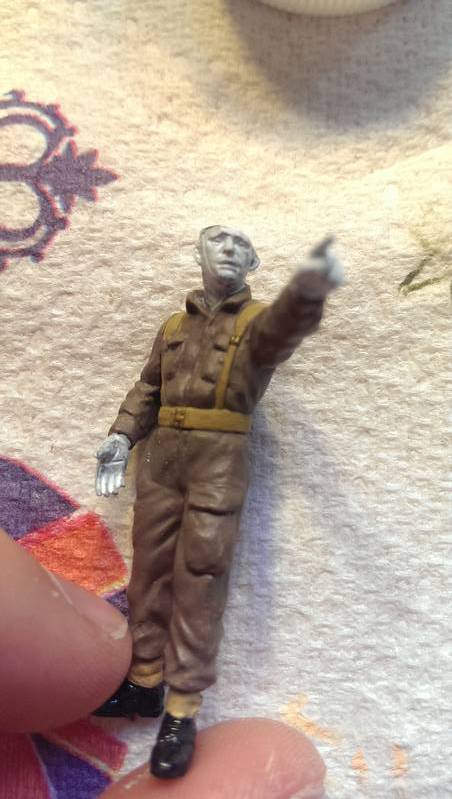
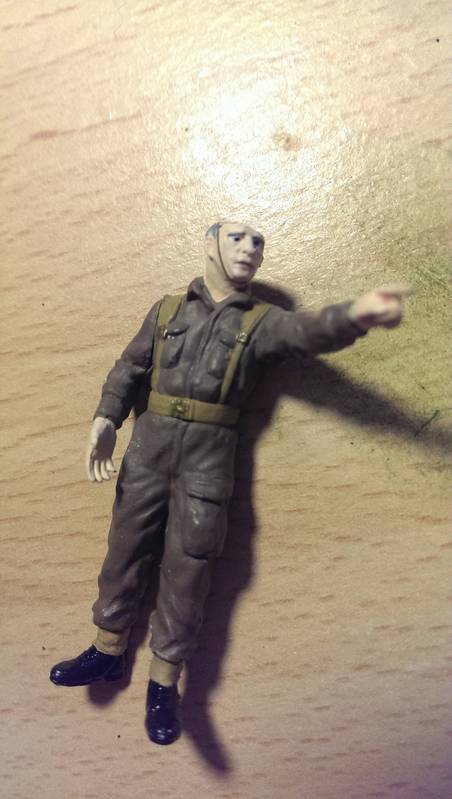
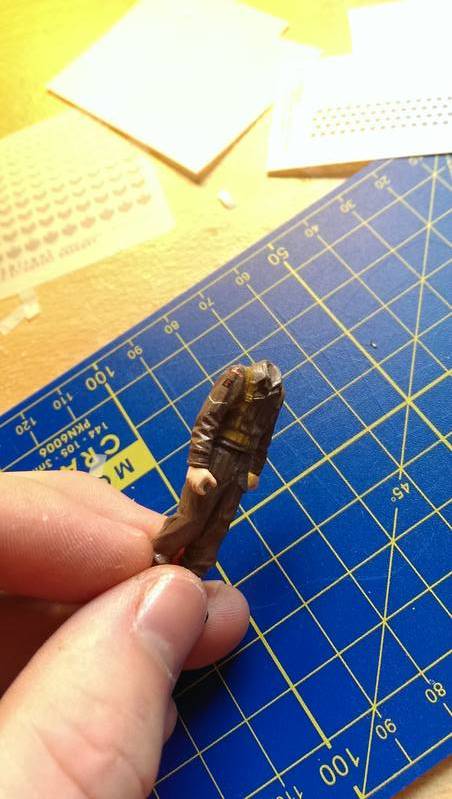
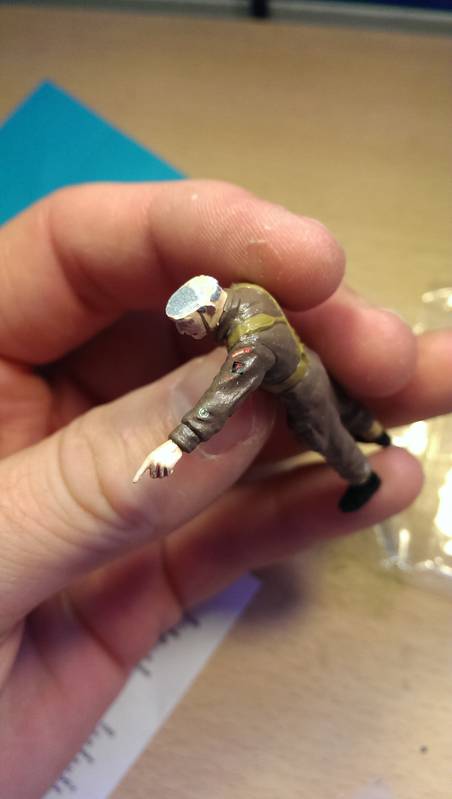
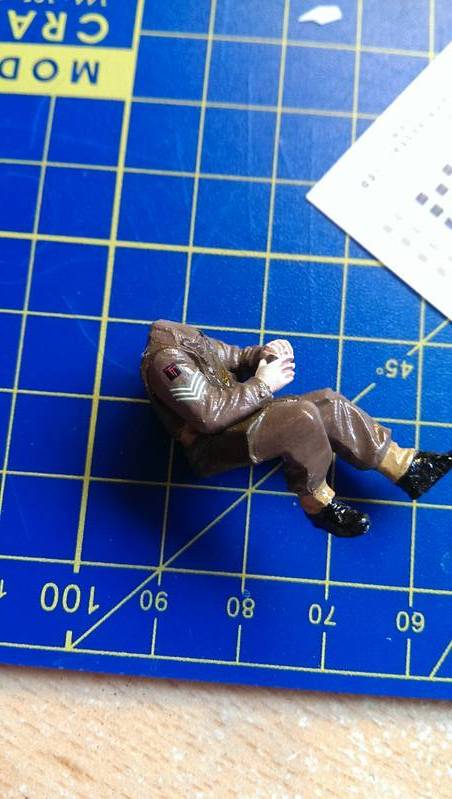
Well I've got most of the figures now all basic painted. Sorry the images aren't amazing, using my phone and not the best of lighting so the colours are a bit more visible in real life.
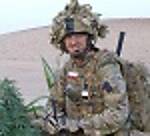
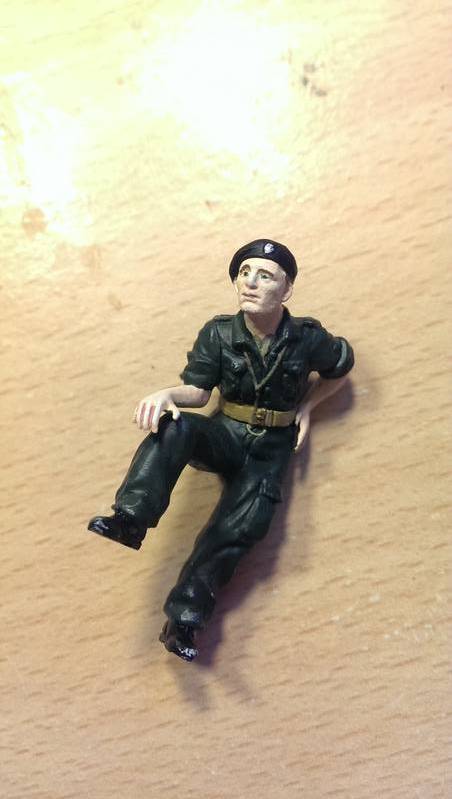
Tanker Commander:
Tank Crewman:
Tank Crewman:
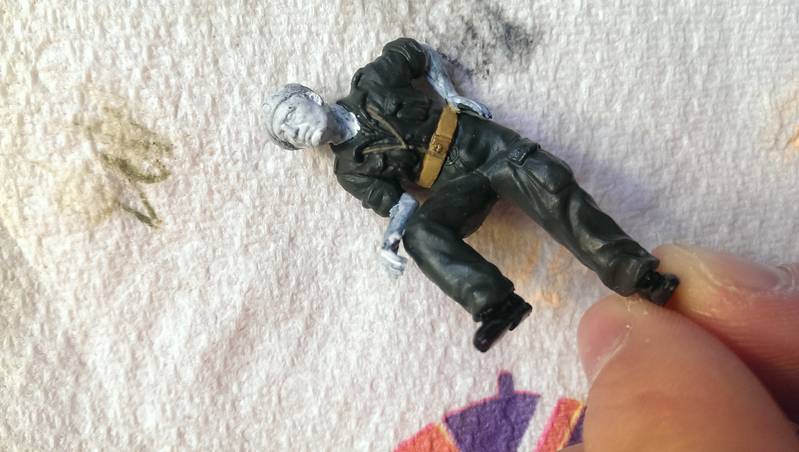
Bren Gun Crew:
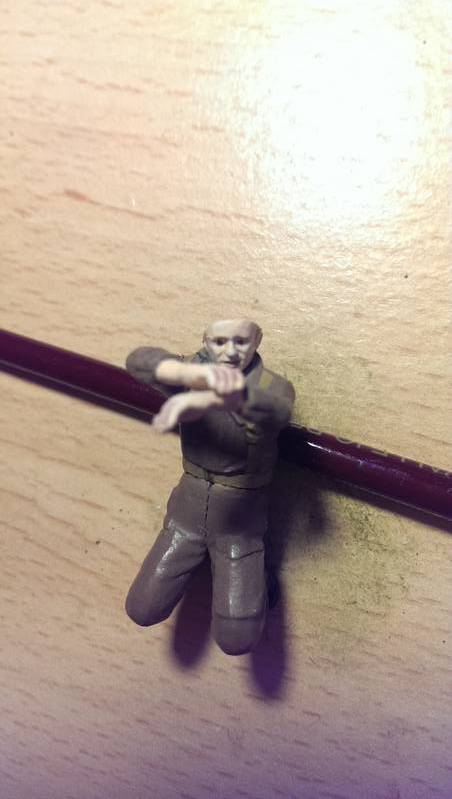
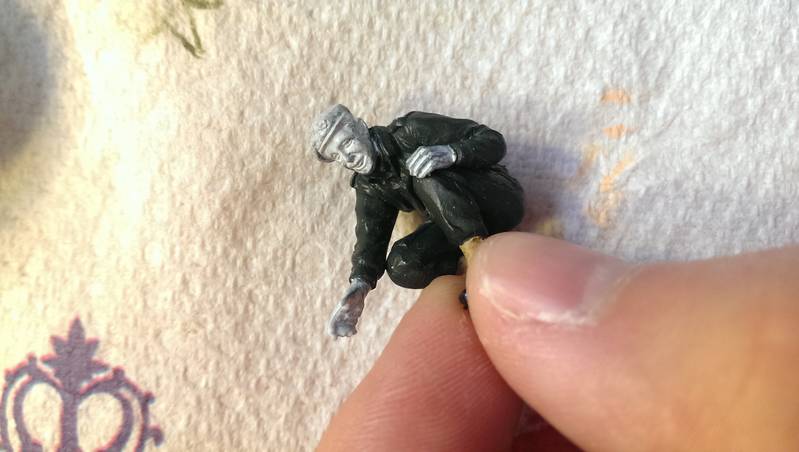
Bren Gun Crew:

Soldier:
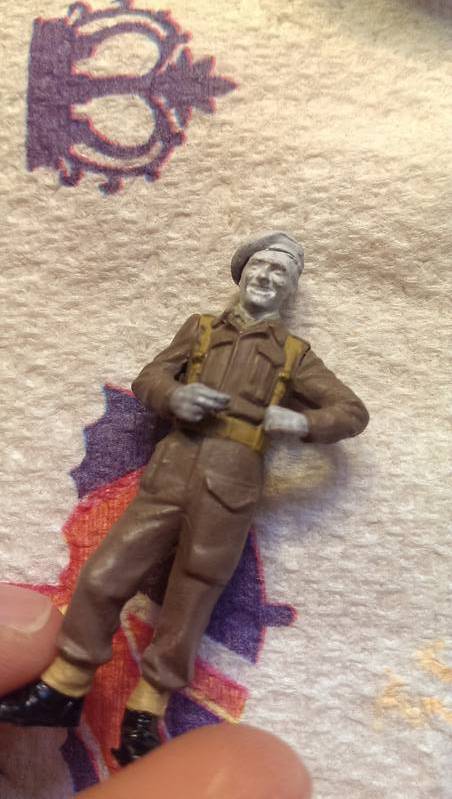
Soldier:
Still got the heads of about 7 other figures but I'll do them on another day. However very happy with the progress today.
Tanker Commander:
Tank Crewman:
Tank Crewman:
Bren Gun Crew:
Bren Gun Crew:
Soldier:
Soldier:
Still got the heads of about 7 other figures but I'll do them on another day. However very happy with the progress today.
jrutman
Joined: April 10, 2011
KitMaker: 7,941 posts
Armorama: 7,934 posts
Posted: Saturday, October 11, 2014 - 05:19 AM UTC
Ah yes,
Nice to see you didn't forget the obligatory pointing guy!
Nice work so far.
Would you consider painting a strip of dark flesh across the top of the eyes to help get rid of the pop-eyed look? It is fairly easy and gets good results.
I have faith in you buddy.
J
Nice to see you didn't forget the obligatory pointing guy!
Nice work so far.
Would you consider painting a strip of dark flesh across the top of the eyes to help get rid of the pop-eyed look? It is fairly easy and gets good results.
I have faith in you buddy.
J
SiStorey
Joined: March 14, 2014
KitMaker: 242 posts
Armorama: 161 posts
Posted: Saturday, October 11, 2014 - 06:45 AM UTC
How dark are talking and do you mean on the eye lid or just the area between the eye and the eye brow?
SiStorey
Joined: March 14, 2014
KitMaker: 242 posts
Armorama: 161 posts
Posted: Saturday, October 11, 2014 - 07:54 AM UTC
NEED HELP!
I need help to work out what the three horizontal lines are underneath recognition flash, the TT symbol.

I'm thinking its to do with the section the person is in but not to sure, can anyone help?
I need help to work out what the three horizontal lines are underneath recognition flash, the TT symbol.
I'm thinking its to do with the section the person is in but not to sure, can anyone help?
stufer

Joined: May 25, 2003
KitMaker: 416 posts
Armorama: 342 posts

Posted: Saturday, October 11, 2014 - 08:25 AM UTC
I think it relates to which infantry brigade of the Northumbrian Division this soldier is with,but I don't have any references in front of me,someone much more knowledgeable than me can probably tell you.......(off the top of my head the 231st Infantry Brigade but I may be wrong) Its a scarlet stripe for infantry (the arm of service stripe) 1 stripe for the 1st numbered brigade,2 for the second and yep,3 for the third.
please somebody back me up/totally correct me on this
Histoire & Collections 2 volume set on The British Soldier will help on this

please somebody back me up/totally correct me on this
Histoire & Collections 2 volume set on The British Soldier will help on this
SiStorey
Joined: March 14, 2014
KitMaker: 242 posts
Armorama: 161 posts
Posted: Sunday, October 12, 2014 - 12:15 AM UTC
Quoted Text
I think it relates to which infantry brigade of the Northumbrian Division this soldier is with,but I don't have any references in front of me,someone much more knowledgeable than me can probably tell you.......(off the top of my head the 231st Infantry Brigade but I may be wrong) Its a scarlet stripe for infantry (the arm of service stripe) 1 stripe for the 1st numbered brigade,2 for the second and yep,3 for the third.
please somebody back me up/totally correct me on this
Histoire & Collections 2 volume set on The British Soldier will help on this
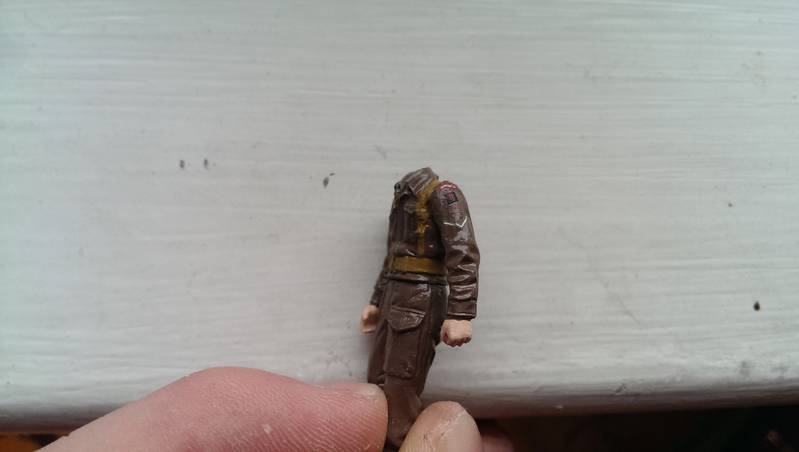
Hey steve, dont worry, the kind guys at Archer Transfers have given me all the info! lol
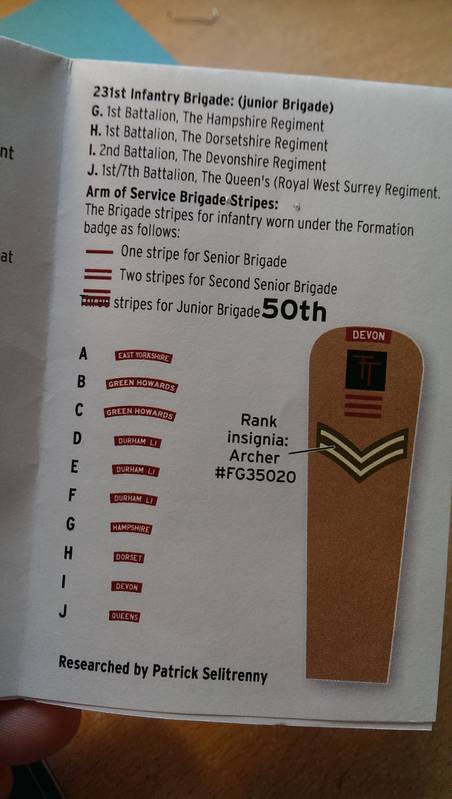
So yeah its there to denote which unit is the Senior Brigade. But cheers for your help though Steve!
So first time giving these a go, fiddly as hell, like really fiddly but it's getting there, maybe not perfectly placed but I'm happy.
jrutman
Joined: April 10, 2011
KitMaker: 7,941 posts
Armorama: 7,934 posts
Posted: Sunday, October 12, 2014 - 02:38 AM UTC
Quoted Text
How dark are talking and do you mean on the eye lid or just the area between the eye and the eye brow?
I mean across the top of the pupil so you can tone down the pop-eyed look a bit. If you look at yourself in the mirror you will see your pupils are never fully seen but always have a part covered by the eye lids either top,bottom,or both.
No worries,I still have problems painting this area after 50 years!
J
Paulinsibculo

Joined: July 01, 2010
KitMaker: 1,322 posts
Armorama: 1,239 posts

Posted: Sunday, October 12, 2014 - 04:11 AM UTC
Hi Si,
Maybe you are able to find the old books from Francois Verlinden:
"The System" or his modeling magazines, vol 1, number 1 (clothing)and 2 (faces).
They will provide you with all info to do faces very succesfully.
In case you do not have them or can not find them, just send me an email and I will scan them for you.
Furthermore, on the Life Color Flesh Set there is also a clear help how to paint a face, with high light and shadow advises.
Looking forward to see your buil finished.
P.
SiStorey
Joined: March 14, 2014
KitMaker: 242 posts
Armorama: 161 posts
Posted: Sunday, October 12, 2014 - 04:39 AM UTC
Paul I've sent you a private message.
Jerry I get you now, I'll give that a go and make them not as poppy outty as they look. I'll get there with them lol but cheers for your advice
Jerry I get you now, I'll give that a go and make them not as poppy outty as they look. I'll get there with them lol but cheers for your advice
stufer
Joined: May 25, 2003
KitMaker: 416 posts
Armorama: 342 posts
Posted: Sunday, October 12, 2014 - 06:32 AM UTC
Si,I guess the moral of the story is read the instructions fully!!! Good to see the memory isn't failing me totally....
Nice work so far,this is turning into an epic build.How did the whole Archer Transfer experience go for you?the uniform sets are something I've always been after but I've usually found something else to spend my pennies on (!!!)
Nice work so far,this is turning into an epic build.How did the whole Archer Transfer experience go for you?the uniform sets are something I've always been after but I've usually found something else to spend my pennies on (!!!)
SiStorey
Joined: March 14, 2014
KitMaker: 242 posts
Armorama: 161 posts
Posted: Sunday, October 12, 2014 - 06:34 AM UTC
I aint going to lie it was a couple of hours of swearing and shouting but they didnt go on to badly. The rank slides where a bit of nightmare to put on as they where an older set so were not as tacky as the TT transfers but them ones went on easy as, even for being so small.
I'd say give them a try, they have really made the figures stand out for me!
I'd say give them a try, they have really made the figures stand out for me!
SiStorey
Joined: March 14, 2014
KitMaker: 242 posts
Armorama: 161 posts
Posted: Monday, October 13, 2014 - 04:13 AM UTC
Well no pictures today as I'm currently experimenting on the painting the faces again using some old models of mind and Humbrol paints as the base colour as the more I look at the figures the more I dont like them. So practice practice practice.
Thanks for the email Paul, nice little read that was
Thanks for the email Paul, nice little read that was
Paulinsibculo
Joined: July 01, 2010
KitMaker: 1,322 posts
Armorama: 1,239 posts
Posted: Monday, October 13, 2014 - 04:57 AM UTC
Hi Si, hopefully good old Francois' techniques may give you the results you want. But, please, keep in mind, if you like the results, that is the only thing that counts.
Some guys just have a level of painting a normal modeling human being never can achieve. That is why I am always flabbergasted after reading books like The Nordic Style.
Don't make us wait too long.
Cheers
P.
Some guys just have a level of painting a normal modeling human being never can achieve. That is why I am always flabbergasted after reading books like The Nordic Style.
Don't make us wait too long.
Cheers
P.
SiStorey
Joined: March 14, 2014
KitMaker: 242 posts
Armorama: 161 posts
Posted: Monday, October 13, 2014 - 05:00 AM UTC
Yeah I know, its all about if I'm happy with them and the more I'm looking at the the less I'm not lol
I'll hopefully have one of my trial figures up tomorrow if all goes well lol
I'll hopefully have one of my trial figures up tomorrow if all goes well lol
SiStorey
Joined: March 14, 2014
KitMaker: 242 posts
Armorama: 161 posts
Posted: Monday, October 13, 2014 - 11:15 PM UTC
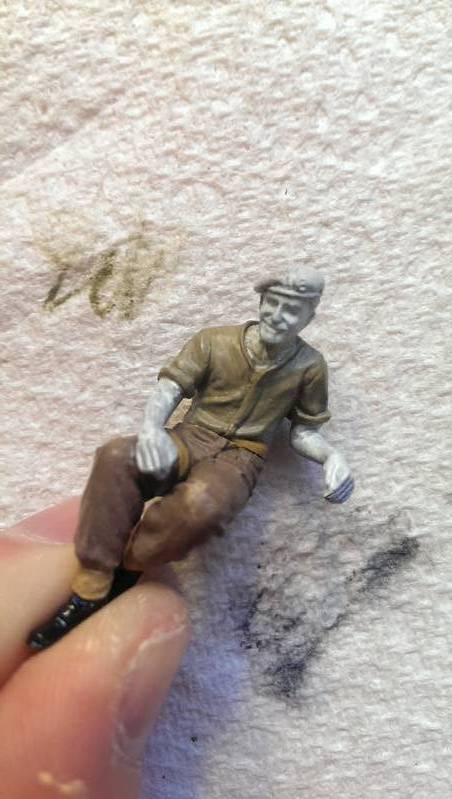
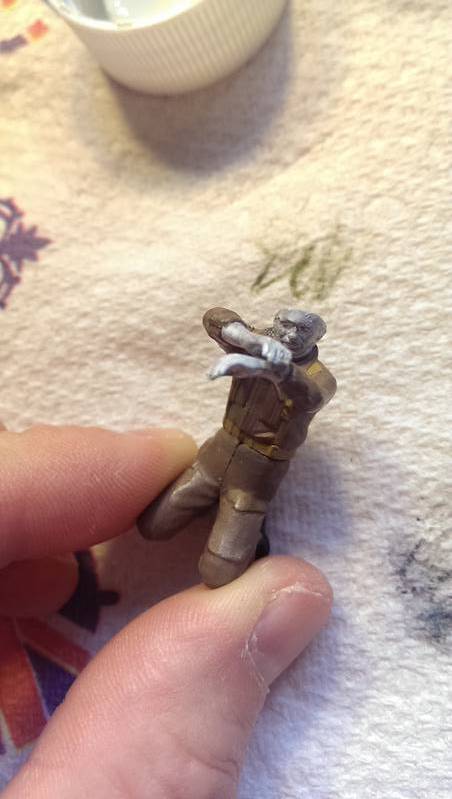
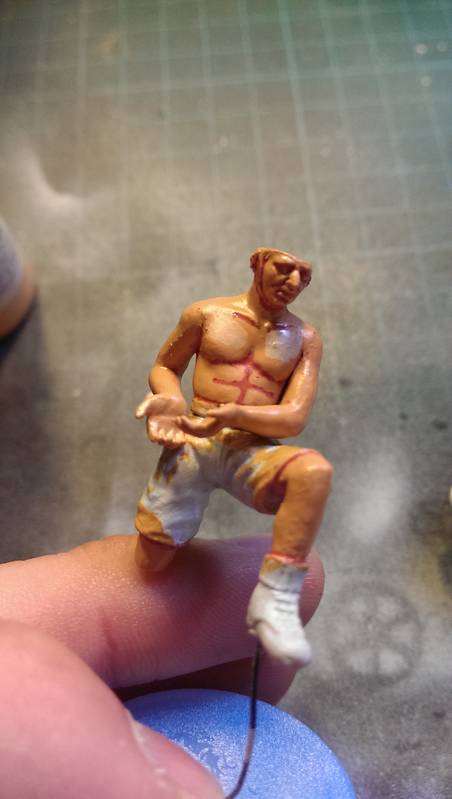
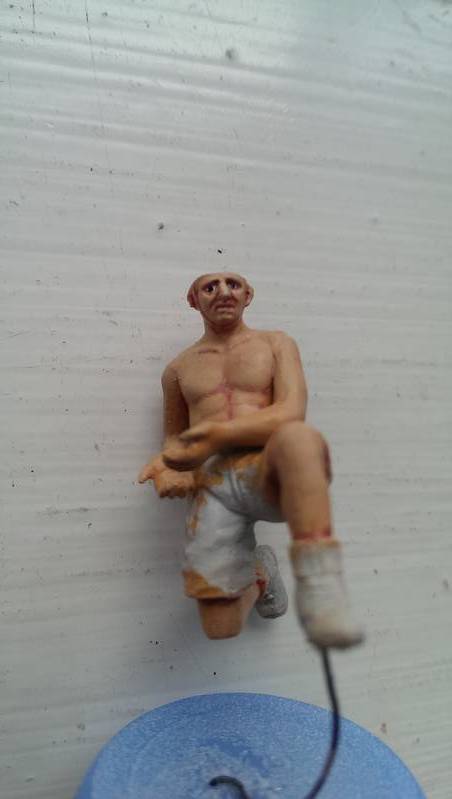
OK, so these figures will NOT be going in the diorama however I needed some trial and error figures and these two were in the firing line.
What I'll do is give you's a step by step guide about how I did it, what paints I used and what methods I used for applying them. But hopefully the way I've done it this time makes them look so much better than previous.
So to begin, I painted the two figures yesterday with Humbrol Matt 61 ( the flesh colour) and let that dry solid over night.
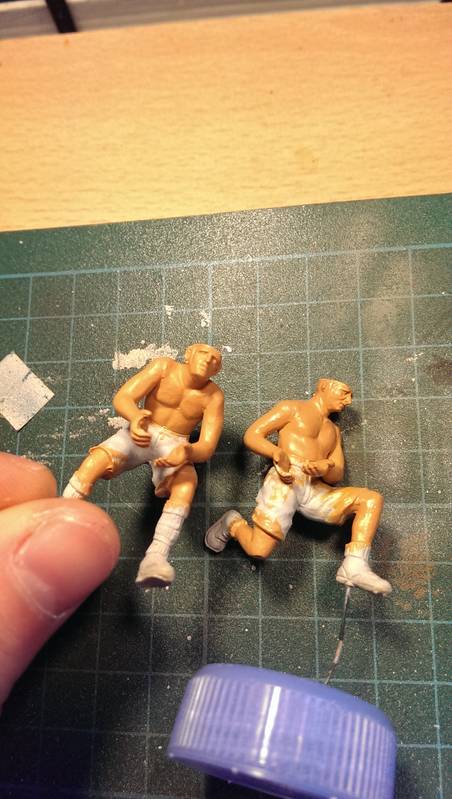
So today, after getting an early stack from work (before 9 in the morning, winning!) I went about test painting the kneeling of the two soldiers.
Firstly I went a painted the darker areas in first using Vallejo DARK RED 70.946 diluted with a drop or tw of Vallejo Air Brush Thinner.
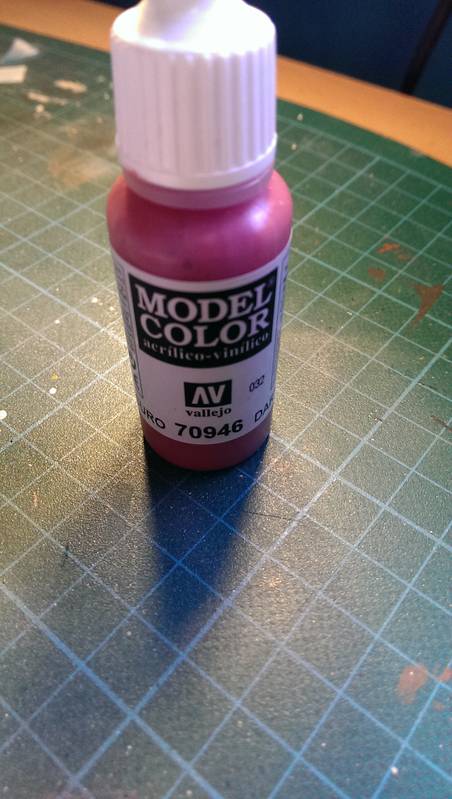
I aimed to keep the red in areas of shade, as I've read and be shown of the internet, areas like under the eyes, under the nose, those bits between the cheeks and the lips. I also went around the strap of the helmet as well. On the body, I aimed to get under all the muscley areas, the pecks, abs etc and also under the arms where there would be darker shadows.
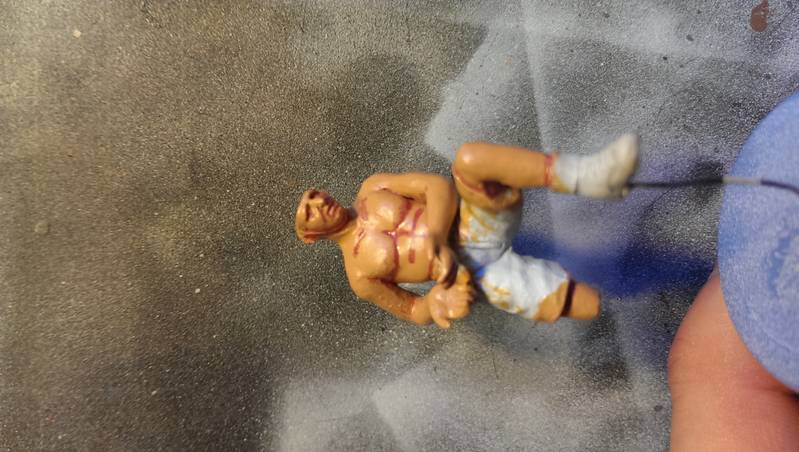
Next I tidied up the red with some of the thinner solution as there was some over spill onto areas that there shouldn't have been.
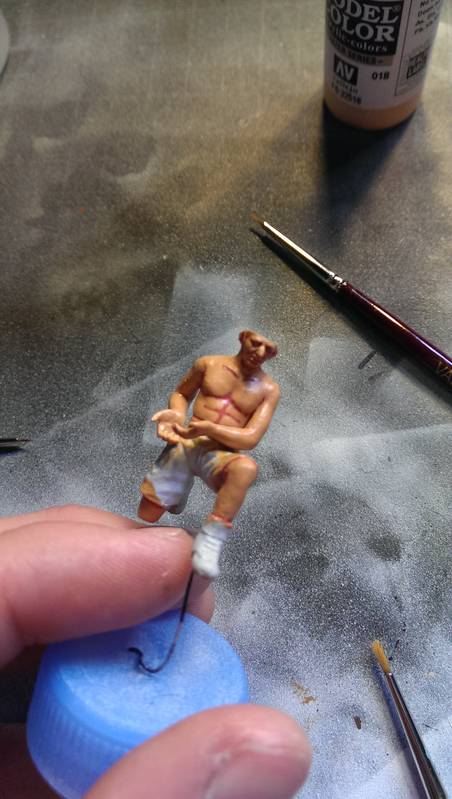
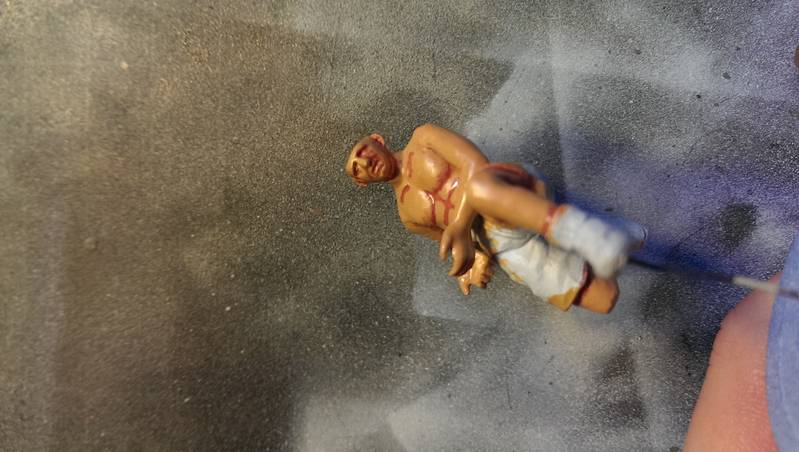
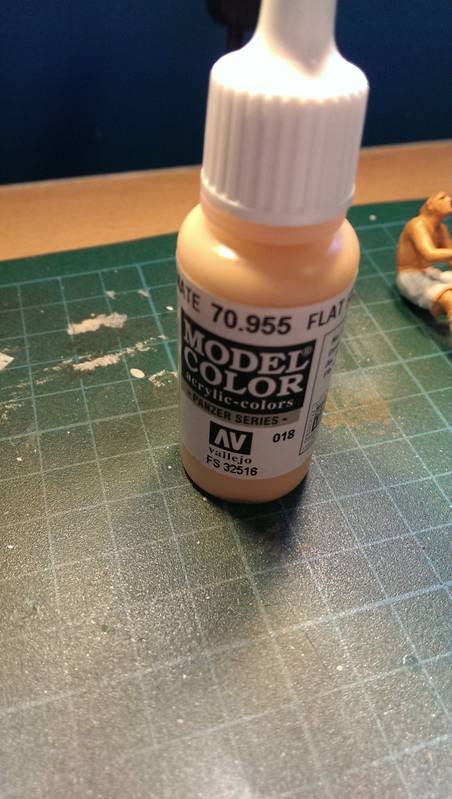
After that, I added some lighter tones to areas that would receive more light. For this is used Vallejo FLAT FLESH 70.955.
 />
/>
Using a little bit of water I merged the lighter colour over the areas required to take the edge off the base skin colour.
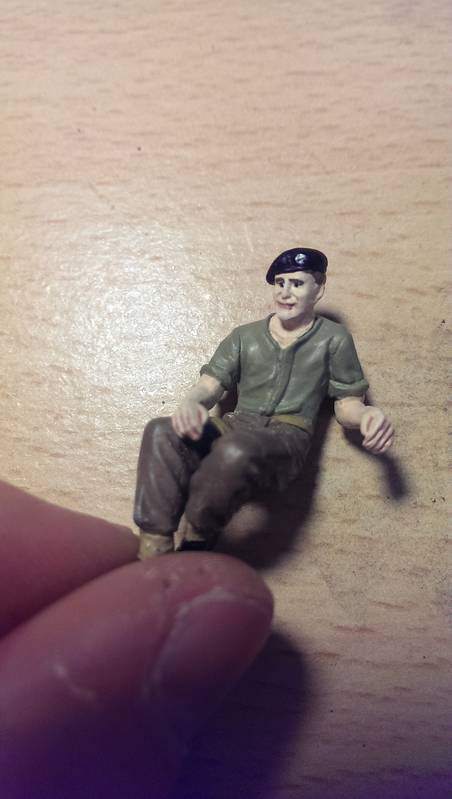
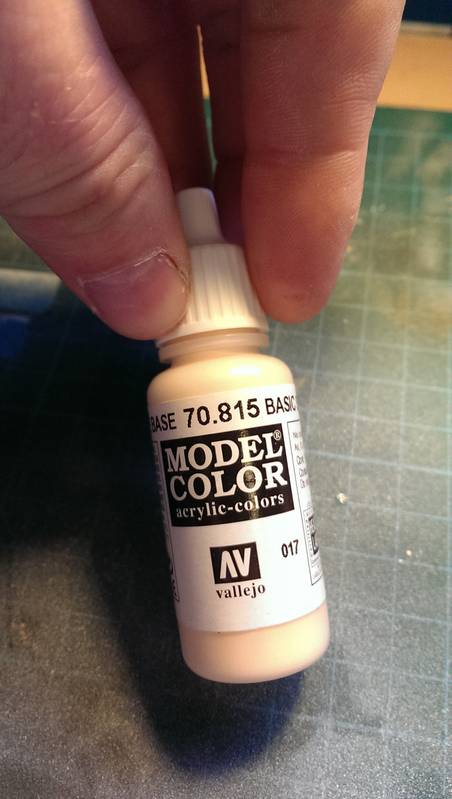
Next using Vallejo 70.815 BASIC FLESH I went about adding highlights to the face. Mainly the nose, Top of the cheeks and top of the chin.

Then added some of the FLAT FLESH to the sides of the face to help blend the colours together. I also gave the whole body a dry brush using the same colour to help merge the colours.
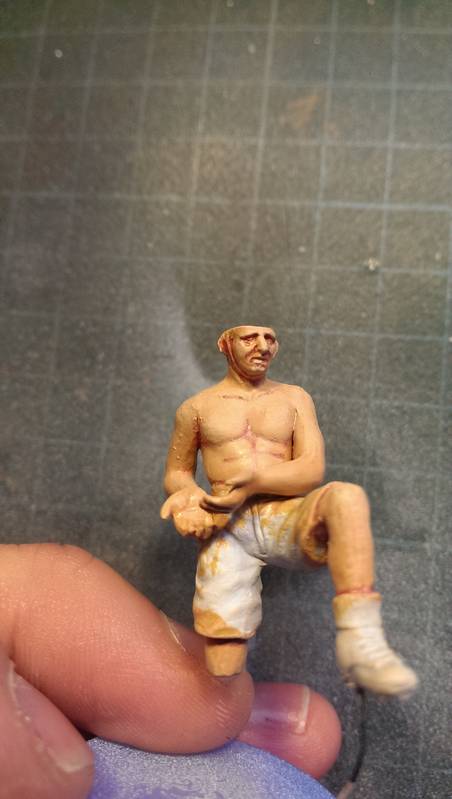
Next after another dry brushing, but only a very gentle one with the BASIC SKIN TONE on the face and areas of the body that needed highlighting I added the eyes. To do that I used Vallejo OFF WHITE 70.820 to paint the white parts of the eyes then once that had dried I used Tamiya X-4 BLUE to paint the pupil. I remembered to make sure I covered most the white with the blue and tried my best not to get the popping eye that I had on the other figures.
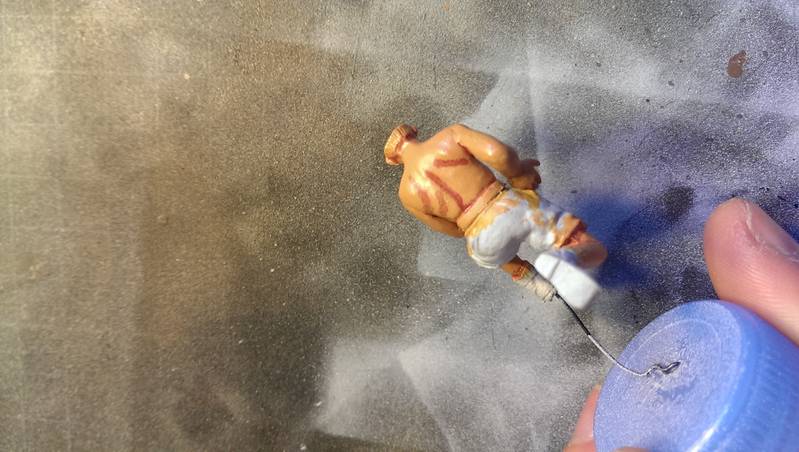
And Finally, the hair. I scratched off all the paint so it was back to the plastic, then using my craft knife I went and scratched lots of little lines in the hair, following the hair line to make it stand out a little more. Also I painted the eye brows in this colour as well.
From there I painted the base coat of Vallejo 70.822 GERMAN C. BLACK BROWN as the base layer.

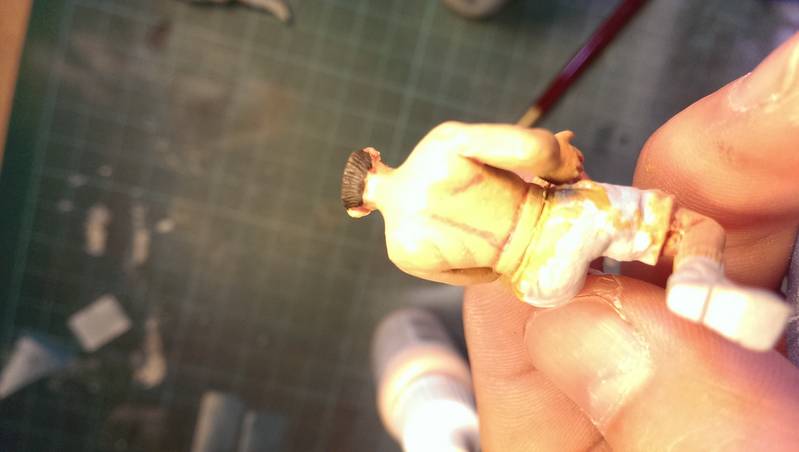
Next I used Valljo 70.873 US FIELD DRAB to dry brush over the hair and also to paint the chin strap for the helmet as well.
So Ladies and Gentlemen this is the final product for the skin side at least.
Hope this has enlightened some people who struggle with figure, trial and error is all I can say, trial and error.

What I'll do is give you's a step by step guide about how I did it, what paints I used and what methods I used for applying them. But hopefully the way I've done it this time makes them look so much better than previous.
So to begin, I painted the two figures yesterday with Humbrol Matt 61 ( the flesh colour) and let that dry solid over night.
So today, after getting an early stack from work (before 9 in the morning, winning!) I went about test painting the kneeling of the two soldiers.
Firstly I went a painted the darker areas in first using Vallejo DARK RED 70.946 diluted with a drop or tw of Vallejo Air Brush Thinner.
I aimed to keep the red in areas of shade, as I've read and be shown of the internet, areas like under the eyes, under the nose, those bits between the cheeks and the lips. I also went around the strap of the helmet as well. On the body, I aimed to get under all the muscley areas, the pecks, abs etc and also under the arms where there would be darker shadows.
Next I tidied up the red with some of the thinner solution as there was some over spill onto areas that there shouldn't have been.
After that, I added some lighter tones to areas that would receive more light. For this is used Vallejo FLAT FLESH 70.955.
/>Using a little bit of water I merged the lighter colour over the areas required to take the edge off the base skin colour.
Next using Vallejo 70.815 BASIC FLESH I went about adding highlights to the face. Mainly the nose, Top of the cheeks and top of the chin.
Then added some of the FLAT FLESH to the sides of the face to help blend the colours together. I also gave the whole body a dry brush using the same colour to help merge the colours.
Next after another dry brushing, but only a very gentle one with the BASIC SKIN TONE on the face and areas of the body that needed highlighting I added the eyes. To do that I used Vallejo OFF WHITE 70.820 to paint the white parts of the eyes then once that had dried I used Tamiya X-4 BLUE to paint the pupil. I remembered to make sure I covered most the white with the blue and tried my best not to get the popping eye that I had on the other figures.
And Finally, the hair. I scratched off all the paint so it was back to the plastic, then using my craft knife I went and scratched lots of little lines in the hair, following the hair line to make it stand out a little more. Also I painted the eye brows in this colour as well.
From there I painted the base coat of Vallejo 70.822 GERMAN C. BLACK BROWN as the base layer.
Next I used Valljo 70.873 US FIELD DRAB to dry brush over the hair and also to paint the chin strap for the helmet as well.
So Ladies and Gentlemen this is the final product for the skin side at least.
Hope this has enlightened some people who struggle with figure, trial and error is all I can say, trial and error.
jrutman
Joined: April 10, 2011
KitMaker: 7,941 posts
Armorama: 7,934 posts
Posted: Tuesday, October 14, 2014 - 02:02 AM UTC
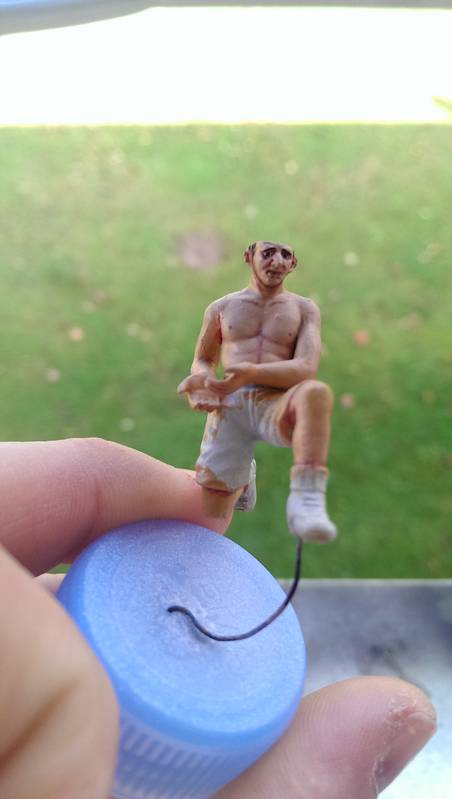
I don't know what your view is,but I see these guys as a big big improvement. You apparently have a very steep learning curve! LOL
These old figs from the antique Tamiya set bring back memories,don't they? Look at the size of those hands and feet! You know what they sat about big feet,don't you?
Big shoes,of course! What were YOU thinking?
Sorry,I crack myself up,too much coffee,sorry.
J
These old figs from the antique Tamiya set bring back memories,don't they? Look at the size of those hands and feet! You know what they sat about big feet,don't you?
Big shoes,of course! What were YOU thinking?
Sorry,I crack myself up,too much coffee,sorry.
J
SiStorey
Joined: March 14, 2014
KitMaker: 242 posts
Armorama: 161 posts
Posted: Tuesday, October 14, 2014 - 02:42 AM UTC
Quoted Text
I don't know what your view is,but I see these guys as a big big improvement. You apparently have a very steep learning curve! LOL
These old figs from the antique Tamiya set bring back memories,don't they? Look at the size of those hands and feet! You know what they sat about big feet,don't you?
Big shoes,of course! What were YOU thinking?
Sorry,I crack myself up,too much coffee,sorry.
J
Haha very true Jerry, big feet big socks haha
Yeah you got to love the old tamiya kits. Be good if they re launched them all to the level of the newer kits like but hey, work with what we got lol
I'm seeing it as a big improvement, with out a shadow of a doubt, but I know that there's even more I can do to make them better lol
Cheers though J
jrutman
Joined: April 10, 2011
KitMaker: 7,941 posts
Armorama: 7,934 posts
Posted: Tuesday, October 14, 2014 - 03:03 AM UTC
I have actually stumbled across a very good use for the old Tamiya hands. I wish I had saved some of the older figs that I recently threw away as the over-sized hands make great gloved hands with a bit of tweeking.
J
J
SiStorey
Joined: March 14, 2014
KitMaker: 242 posts
Armorama: 161 posts
Posted: Tuesday, October 14, 2014 - 03:09 AM UTC
Thats not actually a bad shout that lol

justsendit
Joined: February 24, 2014
KitMaker: 3,033 posts
Armorama: 2,492 posts
Posted: Tuesday, October 14, 2014 - 04:39 AM UTC
Wow, Si! This is a big improvement my congrats!
Reminds me ... I really need to get cracking with my figures since I just keep spinning my wheels. However, I am hanging on to your words in this post which is more fuel for the fire.
Thank you for sharing the knowledge.
mike
Reminds me ... I really need to get cracking with my figures since I just keep spinning my wheels. However, I am hanging on to your words in this post which is more fuel for the fire.
Thank you for sharing the knowledge.
mike
SiStorey
Joined: March 14, 2014
KitMaker: 242 posts
Armorama: 161 posts
Posted: Tuesday, October 14, 2014 - 04:53 AM UTC
Your more than welcome Mike. Just remember there's always room to get better as in my eyes there still not perfect lol But cheers and get cracking on your figures lol
Paulinsibculo
Joined: July 01, 2010
KitMaker: 1,322 posts
Armorama: 1,239 posts
Posted: Tuesday, October 14, 2014 - 06:20 AM UTC
Hi Si, Pls. Check your email! Good to see that you did quite some reading and practicing. With a very good result. Chapeau!
 |

WEB HOSTING BY


Copyright ©2021 Armorama and Kitmaker Network, a subsidiary of Silver Star Enterprises
All Rights Reserved. Please read our Conditions of Use and Privacy Policy.
All Rights Reserved. Please read our Conditions of Use and Privacy Policy.