_GOTOBOTTOM
Armor/AFV: Allied - WWII
Armor and ground forces of the Allied forces during World War II.
Hosted by Darren Baker
Dragon T-28 Superheavy Tank Interior
jmsbd07
Visit this Community
Minnesota, United States
Joined: April 11, 2014
KitMaker: 96 posts
Armorama: 94 posts
Posted: Tuesday, June 24, 2014 - 08:22 AM UTC
I have thought about scratch building a interior for my Dragon T-28/T95 Superheavy tank and so far here is the only interior digram that i have found on the internet.

for the engine compartment i will be using a V8 engine from one of my old car models and i can modify that to look like the ford GAF V8.
transmission and other bits will be scratched too.
Breech and ammo racks will be crated from streme or brass pipe .Not sure what diameters required at the moment.

the part that I am also questioning is how should I open up the upper hull to view the interior ?

heres my first thought for doing it, it would be one solid piece for the top.

1/35th Dragon T-28 by Tommy Styrvoky, on Flickr
jmsbd07
Visit this Community
Minnesota, United States
Joined: April 11, 2014
KitMaker: 96 posts
Armorama: 94 posts
Posted: Tuesday, July 22, 2014 - 02:32 AM UTC
found some more reference material for the interior.

From a book by R.P. Hunnicutt "firepower"

T95 GMC interrior photos by Tommy Styrvoky, on Flickr

I think this should be enough to start progress on the kit. There isn't much for photography of the engine bay but first I have to open up the engine deck hatches that I all ready glued down.
jmsbd07
Visit this Community
Minnesota, United States
Joined: April 11, 2014
KitMaker: 96 posts
Armorama: 94 posts
Posted: Sunday, July 27, 2014 - 09:48 AM UTC
1/35 T28 Super heavy tank by Tommy Styrvoky, on Flickr

some progress, I don't think I will be able to open up the engine deck. I fear I will break the hatches, I pried on one but had no success.
jmsbd07
Visit this Community
Minnesota, United States
Joined: April 11, 2014
KitMaker: 96 posts
Armorama: 94 posts
Posted: Monday, July 28, 2014 - 05:14 AM UTC
T95 interior by Tommy Styrvoky, on Flickr

I scaled the interior image and measured distances in pixels, these will give me a rough estimate of distances when converted into mm and then further scaled to 1/35th.
27-1025
Visit this Community
North Carolina, United States
Joined: September 16, 2004
KitMaker: 1,281 posts
Armorama: 1,222 posts
Posted: Monday, July 28, 2014 - 05:23 AM UTC
I'll be following this one closely. Could be epic. Good luck.
JPTRR
Staff MemberManaging Editor
RAILROAD MODELING
#051
Visit this Community
Tennessee, United States
Joined: December 21, 2002
KitMaker: 7,772 posts
Armorama: 2,447 posts
Posted: Monday, July 28, 2014 - 05:35 AM UTC
Tommy,

Looks like a great start! This will be VERY interesting.
jmsbd07
Visit this Community
Minnesota, United States
Joined: April 11, 2014
KitMaker: 96 posts
Armorama: 94 posts
Posted: Monday, July 28, 2014 - 03:48 PM UTC
more progress
1/35 T28 Super Heavy Tank by Tommy Styrvoky, on Flickr

This is my first experience with Squadron green putty and this stuff works great when thinned with isopropyl alcohol. The parts have yet to be sanded so it's still a rough coat. Also any idea how well the putty would hold up when used to fill the space between the hull and the removable top part.

I have been wondering about the ammunition for this beast, if i use
1/4" rod and chuck it in a drill I could taper it down to the required .30mm.

Another thought maybe have a crew loading a shell.

Hopefully i might just take my time with this build because it's my second scratch build.
TankSGT
Visit this Community
New Jersey, United States
Joined: July 25, 2006
KitMaker: 1,139 posts
Armorama: 946 posts
Posted: Monday, July 28, 2014 - 04:21 PM UTC
Green Stuff is not that strong. Milliput which hardens rock hard might be a better option.

Tom
TigerFan182
Visit this Community
United Kingdom
Joined: June 07, 2014
KitMaker: 45 posts
Armorama: 45 posts
Posted: Monday, July 28, 2014 - 10:40 PM UTC
Looking great Tommy, a very interesting project.

A little tip for filling the gap in the roof. Coat the edge of the hull cut out with Vasaline, put the roof in place and fill the gap with milliput. Once the milliput starts to harden it will grip to the roof piece but not the hull (due to the Vasaline). You should then be able to remove the roof, clean the vasaline off and put the roof back. Bingo, gap is filled but the roof still comes off.

Give it a test first on a scrap model though to get the hang of it.
ninjrk
Visit this Community
Alabama, United States
Joined: January 26, 2006
KitMaker: 1,381 posts
Armorama: 1,347 posts
Posted: Tuesday, July 29, 2014 - 04:18 AM UTC
You might want to track down the crew who got the T28 moving back in 2010 at the Patton Museum (they have a volunteers page) and they opened it up and took pictures.

jmsbd07
Visit this Community
Minnesota, United States
Joined: April 11, 2014
KitMaker: 96 posts
Armorama: 94 posts
Posted: Tuesday, July 29, 2014 - 06:06 AM UTC
i sent them a E-mail from the volunteers page hopefully some more reference material will arise.
jmsbd07
Visit this Community
Minnesota, United States
Joined: April 11, 2014
KitMaker: 96 posts
Armorama: 94 posts
Posted: Monday, August 04, 2014 - 01:34 PM UTC
found myself some more interior shots of it


still no reply from the museum but I was able to find a E-mail of one of the guys who worked on it , so hopefully he might have more information on it.

here is the link to the website where I found these photos
http://www.weaponsofwwii.com/forum/viewtopic.php?f=12&t=854&p=45652&hilit=t28#p45652
jmsbd07
Visit this Community
Minnesota, United States
Joined: April 11, 2014
KitMaker: 96 posts
Armorama: 94 posts
Posted: Thursday, August 14, 2014 - 04:00 PM UTC
T28 Super heavy tank 1/35 by Tommy Styrvoky, on Flickr
a small update, I added a firewall and the removable upper part of the hull has a majority of the gaps filled, the next part to build will be the breech assembly, and I will be adding smaller details of the firewall.

for the breech, it will have to be weighed for better balance, the trunnions will have to be moved further back .34" for the 12" of armor at the front.

It will be a while before I can get the supplies necessary to start on the breech because school will be starting in the next 2 weeks.
jmsbd07
Visit this Community
Minnesota, United States
Joined: April 11, 2014
KitMaker: 96 posts
Armorama: 94 posts
Posted: Sunday, August 17, 2014 - 09:29 AM UTC
I reinforced the lower glacis plate the scale accurate thickness, reinforcement L angles were removed from the bottom of the hull and 2 parts of .040" styrene were added. Some work was done to the Firewall, and on the upper hull there were stops added to prevent the removable upper part from falling down when in position.
1/35 T28 Super Heavy Tank dragon by Tommy Styrvoky, on Flickr
jmsbd07
Visit this Community
Minnesota, United States
Joined: April 11, 2014
KitMaker: 96 posts
Armorama: 94 posts
Posted: Wednesday, September 24, 2014 - 01:28 PM UTC
It may be a while before I post any more posts, it has gotten qute hectic with school work, and I still need to get supplies for the floor and portions of the breech.
165thspc
#521
Visit this Community
Kentucky, United States
Joined: April 13, 2011
KitMaker: 9,465 posts
Armorama: 8,695 posts
Posted: Thursday, September 25, 2014 - 05:26 AM UTC
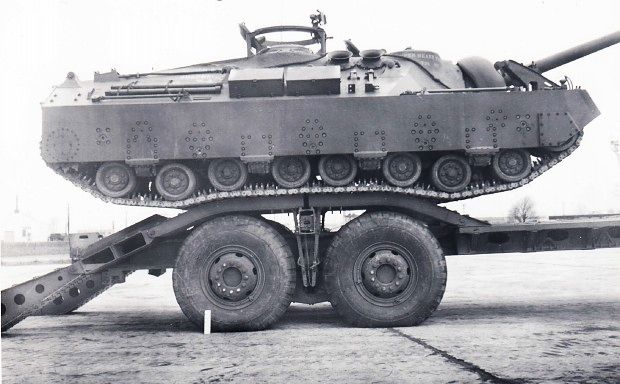
An interesting photo of the T-28:


(Photo from the collection of Saul Garcia II)
PantherF
Visit this Community
Indiana, United States
Joined: June 10, 2005
KitMaker: 6,188 posts
Armorama: 5,960 posts
Posted: Thursday, September 25, 2014 - 07:58 AM UTC
OMG Look at the size of those tires!


Jeff
AikinutNY
Visit this Community
Pennsylvania, United States
Joined: October 21, 2003
KitMaker: 683 posts
Armorama: 630 posts
Posted: Saturday, September 27, 2014 - 01:02 PM UTC
I guess the T-28 is not a good load for my Dragon Wagon!
165thspc
#521
Visit this Community
Kentucky, United States
Joined: April 13, 2011
KitMaker: 9,465 posts
Armorama: 8,695 posts
Posted: Wednesday, October 01, 2014 - 11:23 PM UTC
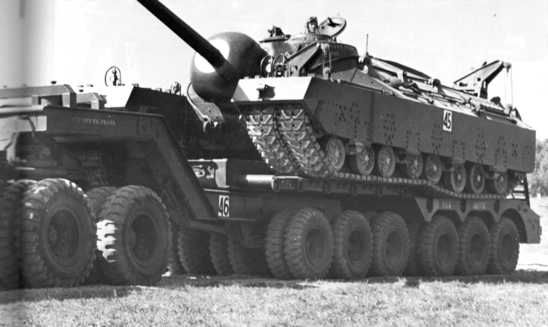
Perhaps not:


The T-67, 48 wheel articulated trailer.
(The front 3 axles can turn separately from the rear 3 axles as the trailer chassis is hinged in the middle.)
jmsbd07
Visit this Community
Minnesota, United States
Joined: April 11, 2014
KitMaker: 96 posts
Armorama: 94 posts
Posted: Sunday, October 05, 2014 - 10:34 AM UTC
I got the materials to continue on with the project, though I may have gotten some of the wrong diameter tubing for the breech.

supplies by Tommy Styrvoky, on Flickr
jmsbd07
Visit this Community
Minnesota, United States
Joined: April 11, 2014
KitMaker: 96 posts
Armorama: 94 posts
Posted: Monday, October 06, 2014 - 02:50 PM UTC
I'm wondering if the floor has space between the bottom plate and the floor paneling. The cross section blueprint above, it seems as if there isn't a space, but after looking at this photo, there appears to be some floor space for linkages.


jmsbd07
Visit this Community
Minnesota, United States
Joined: April 11, 2014
KitMaker: 96 posts
Armorama: 94 posts
Posted: Monday, October 20, 2014 - 03:40 PM UTC
well I finally have made more headway over the past week, the frontal armor thickness was added, I got some brass tubing and learned how to solder it.IMG_4184 by Tommy Styrvoky, on Flickr

first off the floor was added to it, the rear wall that seperates the fighting compartment from the engine bay was redesigned.
T28 Super Heavy tank 1/35 interior WIP by Tommy Styrvoky, on Flickr
the trunnions for the old barrel were removed and new mounts will be made for 1/8 in rod.
T28 Super Heavy tank 1/35 interior WIP by Tommy Styrvoky, on Flickr
The frontal armor was made with .100x.100 styrene and .40 styrene for rear wall, the ring inside the armor was bent using a candle as a heat source. Then it was loaded with putty to fill gaps.T28 Super Heavy tank 1/35 interior WIP by Tommy Styrvoky, on Flickr
The new wall for the fighting compartment is the top one, bottom is old one.
T28 Super Heavy tank 1/35 interior WIP by Tommy Styrvoky, on Flickr
parts of the breech and the brass recoil tube and hydropneumatic recoil dampeners. They will either be filled with epoxy to cover the ends or I may punch out styrene discs for them. the aluminum barrel will have the "nub" on the end of it cut off and a hole will be drilled into it and tapped for a bolt. This bolt will be inserted to the brass assembly and a 1/8 in rod will be inserted to the side and the whole front of the tube will be filled with epoxy.
T28 Super Heavy tank 1/35 interior WIP by Tommy Styrvoky, on Flickr
jmsbd07
Visit this Community
Minnesota, United States
Joined: April 11, 2014
KitMaker: 96 posts
Armorama: 94 posts
Posted: Tuesday, December 30, 2014 - 10:02 AM UTC
I finally got some time to put some decent work into the model during my Christmas break.

New stuff, I have added the storage bins on the right side of the vehicle, basically every thing in the back right corner of the fighting compartment has been added (excluding commander's seat and fire extinguisher.) The hull has been textured and I finally figured out a method of securely affixing the aluminum barrel to the brass breech, I shimmed a thin piece of aluminum between the brass tubing around the barrel and CA glued all of it together. Though the connection between the barrel, mantlet and breech are all dry fitted. most of the interior components have been dry fitted as well. The ammunition racks racks are slightly too long, so they will be remade and I need to get some 3/16 rod for making the shells. I also finished part of this model that I dreaded the most when I got, the tracks, though I had some problems, after I airbrushed the first one, one of the 3 bits that would secure the track in a loop broke off, and it was hard like a plastic, not vinyl. I wonder if it was because of the paint or it could have been from them being airbrushed in the garage... it was below freezing too. Though I connected them together, I just have to be careful with them.
1/35 T28 Super Heavy tank by Tommy Styrvoky, on Flickr

1/35 T28 Super Heavy tank by Tommy Styrvoky, on Flickr

1/35 T28 Super Heavy tank by Tommy Styrvoky, on Flickr

1/35 T28 Super Heavy tank by Tommy Styrvoky, on Flickr
I added the bolts for the mantlet and have begun working on the drivers station.
1/35 T28 Super Heavy tank by Tommy Styrvoky, on Flickr

1/35 T28 Super Heavy tank by Tommy Styrvoky, on Flickr

1/35 T28 Super Heavy tank by Tommy Styrvoky, on Flickr
The trapezoidal part was interesting to make, it involved cutting 16 pieces of 3/8 in long brass tubes of 1/8 in diameter and stacking them up.

One question I have about this part is this a holder for the bullet end of the shell , as I am wondering from all the photos of the interior, as the shells look as if they are lacking a point on the end of them, unless they are just there to stimulate a final weight, could the T28 have used 2 part ammo?

Also I got this kit to build from Christmas
1/35 T28 Super Heavy tank by Tommy Styrvoky, on Flickr

All I need to do next is get a Maus to go with all of my super heavies
jmsbd07
Visit this Community
Minnesota, United States
Joined: April 11, 2014
KitMaker: 96 posts
Armorama: 94 posts
Posted: Saturday, February 07, 2015 - 09:53 AM UTC
I finally got some time to finish up some of the running gear on it. I was also able to use a radio from a Tamiya M4 Sherman, so that will save time instead of building a scratch-built one with my novice skills.

1/35 T28 Super Heavy tank by Tommy Styrvoky, on Flickr

radio mounted
1/35 T28 Super Heavy tank by Tommy Styrvoky, on Flickr
jmsbd07
Visit this Community
Minnesota, United States
Joined: April 11, 2014
KitMaker: 96 posts
Armorama: 94 posts
Posted: Thursday, April 23, 2015 - 07:53 AM UTC
It has been a couple months since the last update, this is a small update, as I am preoccupied with a couple other models below, I finished painting the tracks and got some 3/16 rod for the ammunition, but I had the same issue as before, the DS tracks became very brittle,and a couple of the track pins broke off. hopefully the rest of the tracks will hold up and not crumble to pieces ...

1/35 models progress by Tommy Styrvoky, on Flickr
 _GOTOTOP