

OK, a HEMTT newbie question:
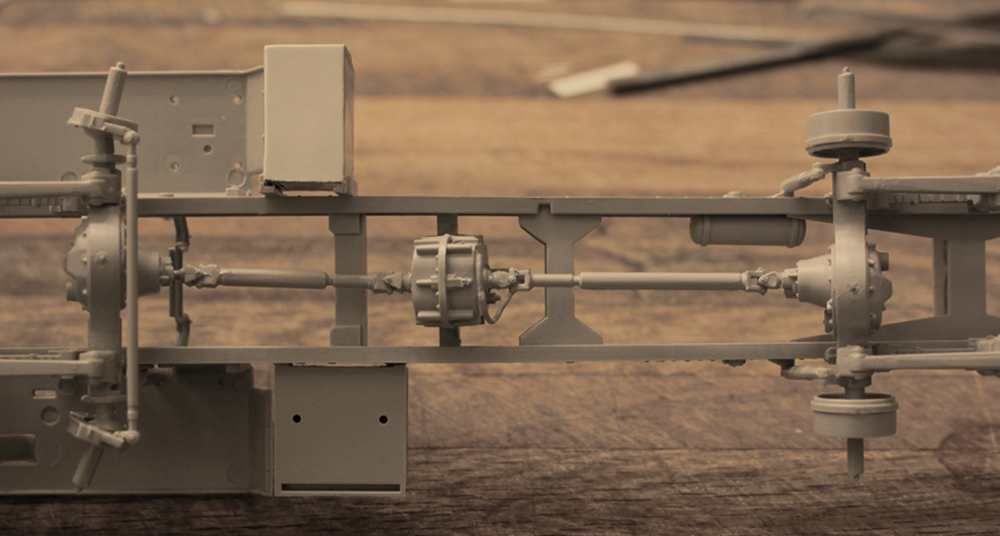
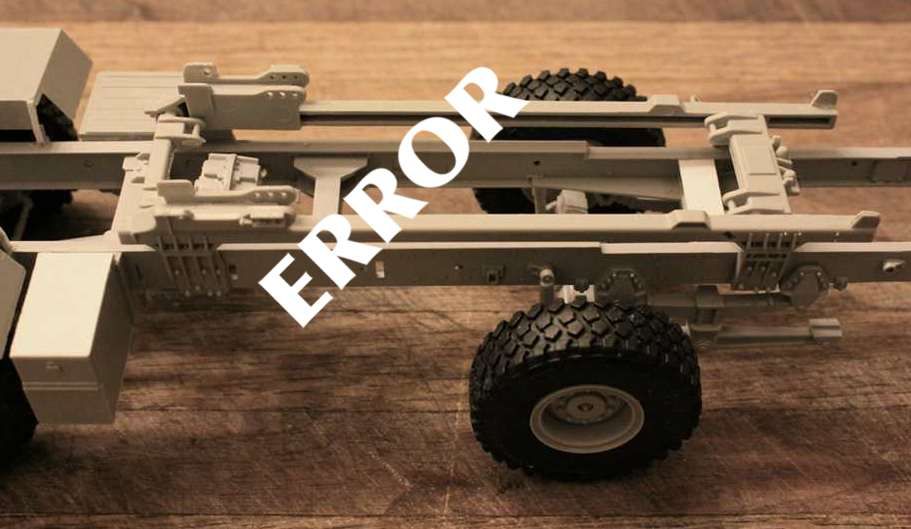
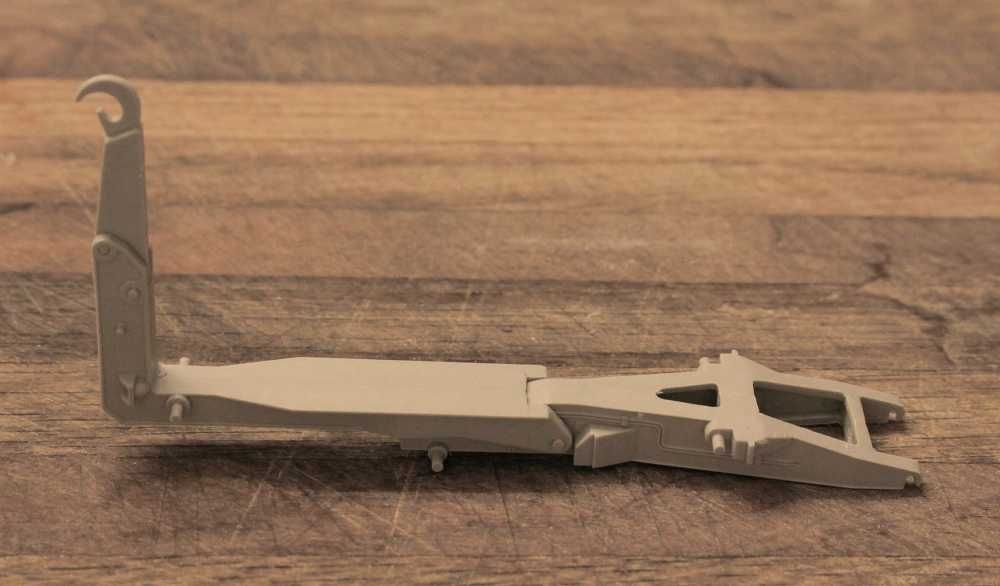
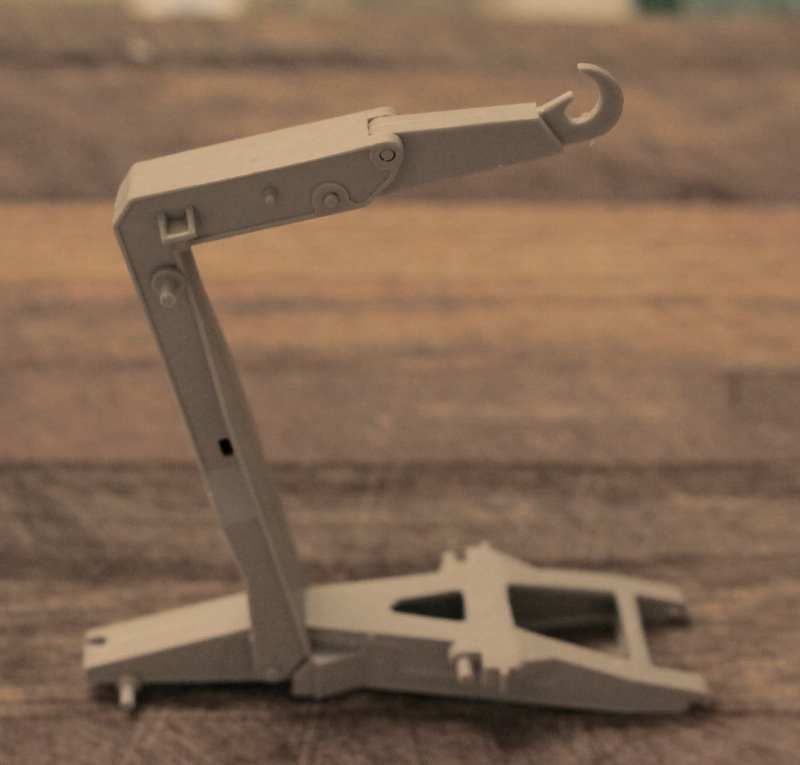
What are the two vertical arms that are mounted to the frame about at the point where the transmission is?
They appear to have bull's eye swivels mounted right at their ends, a lot like the 3 point hitch arms on a farm tractor?????
Armor/AFV
For discussions on tanks, artillery, jeeps, etc.
For discussions on tanks, artillery, jeeps, etc.
Hosted by Darren Baker, Mario Matijasic
My first HEMTT - the Italeri LHS

165thspc

#521

Joined: April 13, 2011
KitMaker: 9,465 posts
Armorama: 8,695 posts
Posted: Friday, August 05, 2016 - 05:35 PM UTC


HeavyArty

Joined: May 16, 2002
KitMaker: 17,694 posts
Armorama: 13,742 posts
Posted: Friday, August 05, 2016 - 06:06 PM UTC
Looking good so far. Keep up the great detailing work.
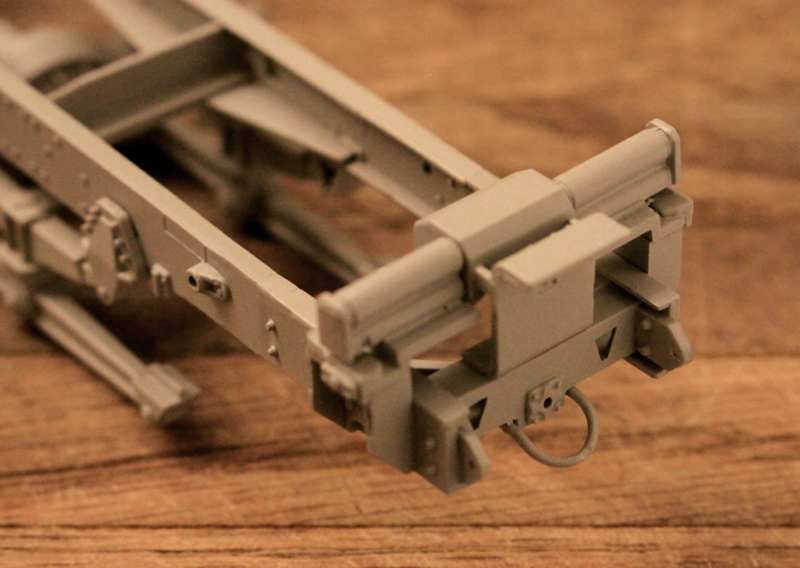
They are the forward lift points. Due to the design of the cab, if you try to lift it from the top using the front tow points (under the front cab overhang), you will crush the cab. When lifting it vertically, clevises are attached to these points and the rear lift points and it can be hoisted vertically in this manner.
Quoted Text
What are the two vertical arms that are mounted to the frame about at the point where the transmission is?
They are the forward lift points. Due to the design of the cab, if you try to lift it from the top using the front tow points (under the front cab overhang), you will crush the cab. When lifting it vertically, clevises are attached to these points and the rear lift points and it can be hoisted vertically in this manner.
165thspc
#521
Joined: April 13, 2011
KitMaker: 9,465 posts
Armorama: 8,695 posts
Posted: Friday, August 05, 2016 - 08:57 PM UTC
That driveline is driving me crazy!
TIme to change to working on something else!
Started this morning building the rear frame extension with all those LHS rollers. (Leaving off the outmost rollers as they might get knocked off during later construction.)
TIme to change to working on something else!

Started this morning building the rear frame extension with all those LHS rollers. (Leaving off the outmost rollers as they might get knocked off during later construction.)
165thspc
#521
Joined: April 13, 2011
KitMaker: 9,465 posts
Armorama: 8,695 posts
Posted: Friday, August 05, 2016 - 09:01 PM UTC
Also started on the cab:
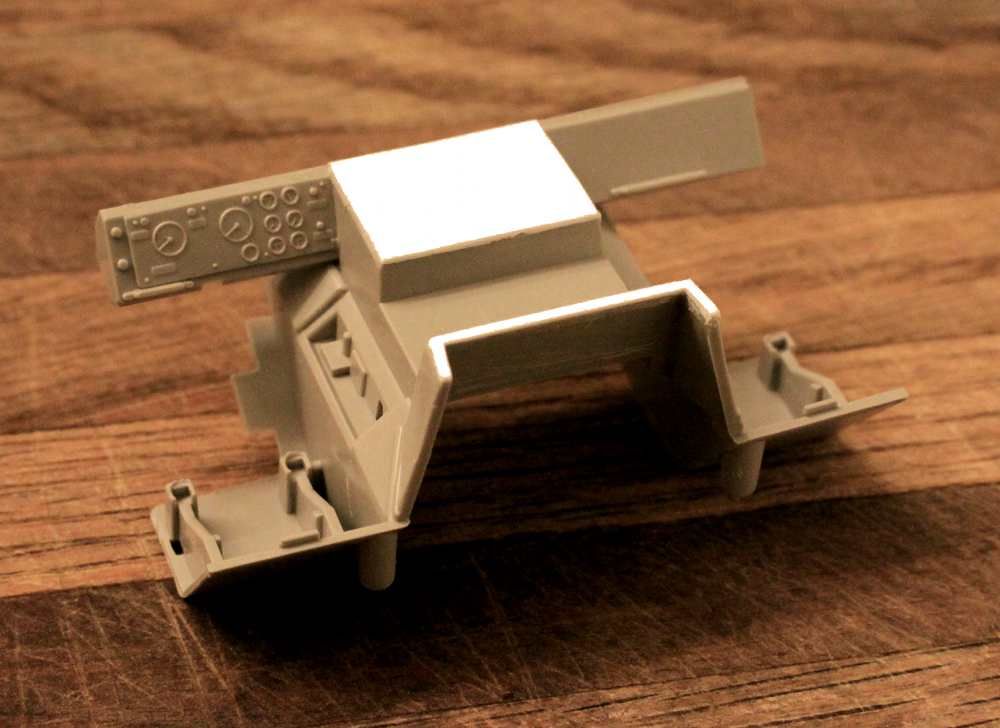
Using some Evergreen sheet plastic to cover up some unsightly seams and filling in a gap you could see through.
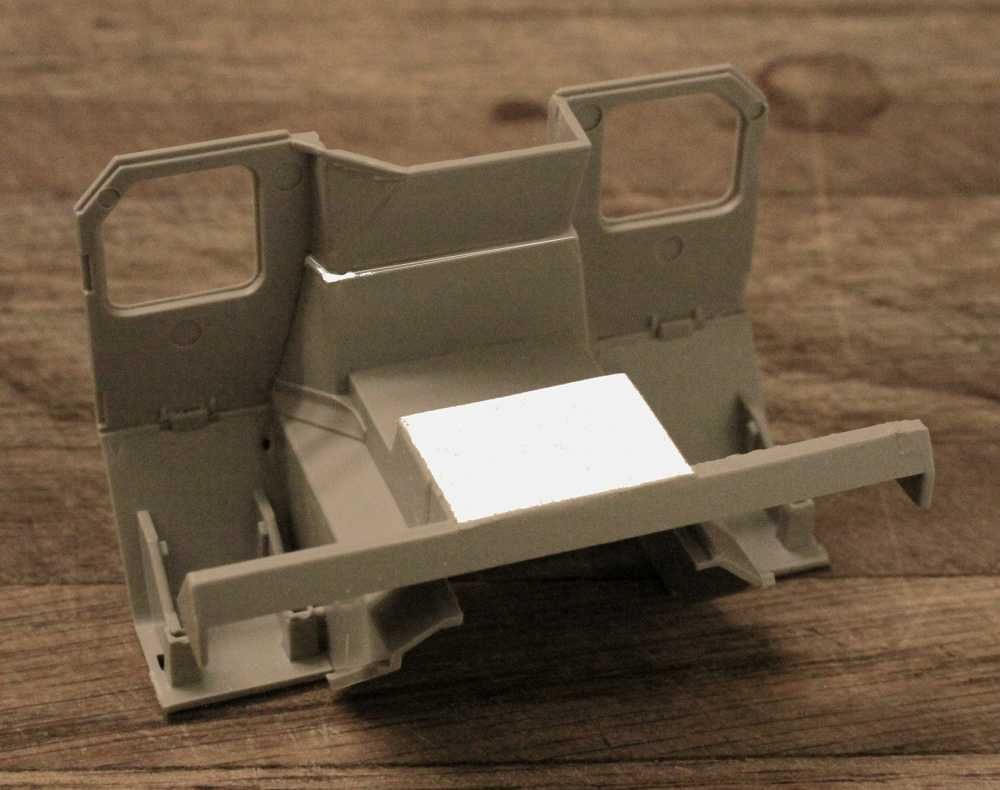
I will be taking care on some of those ejector pin marks but many won't be seen in the final assembly.

Using some Evergreen sheet plastic to cover up some unsightly seams and filling in a gap you could see through.

I will be taking care on some of those ejector pin marks but many won't be seen in the final assembly.
165thspc
#521
Joined: April 13, 2011
KitMaker: 9,465 posts
Armorama: 8,695 posts
Posted: Friday, August 05, 2016 - 09:29 PM UTC

Since this M1120 is actually going to have an engine and radiator I am going to open up all those up and down chimney air vents built into the back of the cab.


I will also have to open up the front panel of the engine housing for all that airflow.
165thspc
#521
Joined: April 13, 2011
KitMaker: 9,465 posts
Armorama: 8,695 posts
Posted: Saturday, August 06, 2016 - 12:22 AM UTC
Thank You Gino - makes perfect sense. Do you think it is ever ok to leave a couple of clevises attached up there?
165thspc
#521
Joined: April 13, 2011
KitMaker: 9,465 posts
Armorama: 8,695 posts
Posted: Saturday, August 06, 2016 - 12:23 AM UTC
Suspension frustration will send you in other directions!

HeavyArty
Joined: May 16, 2002
KitMaker: 17,694 posts
Armorama: 13,742 posts
Posted: Saturday, August 06, 2016 - 12:27 AM UTC
Quoted Text
Thank You Gino - makes perfect sense. Do you think it is ever ok to leave a couple of clevises attached up there?
I don't see why you couldn't leave the clevises in place.
165thspc
#521
Joined: April 13, 2011
KitMaker: 9,465 posts
Armorama: 8,695 posts
Posted: Saturday, August 06, 2016 - 07:36 AM UTC
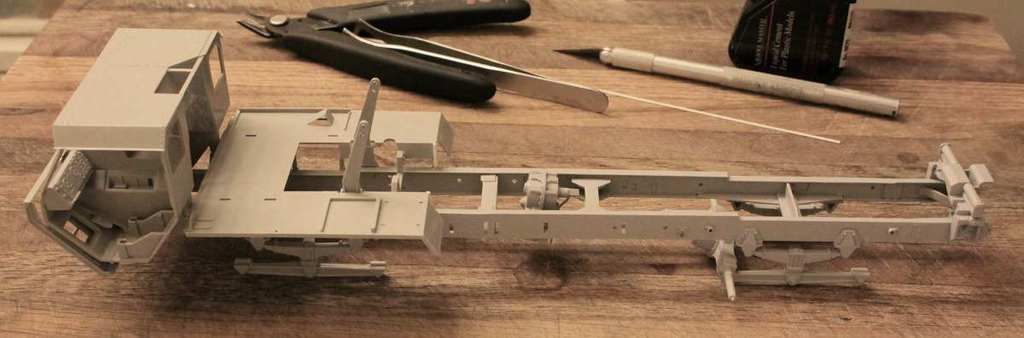
Well - the two center axles are now live!
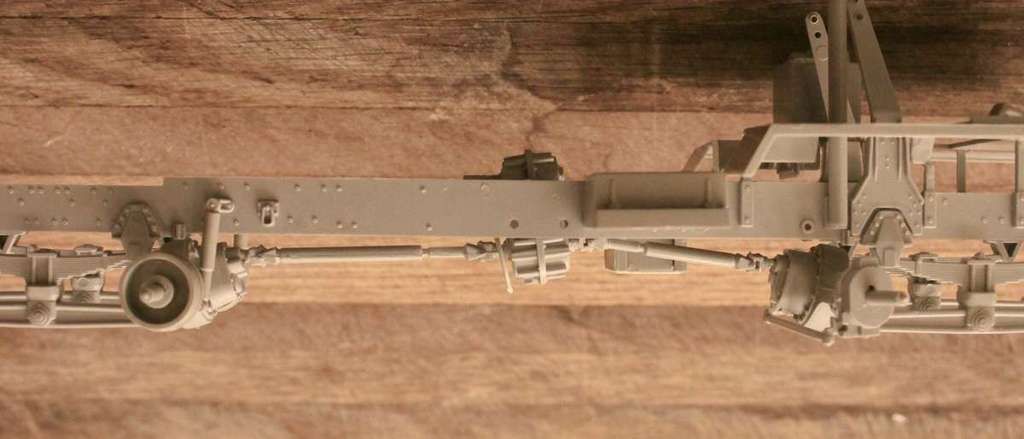
- and the boy is up off his knees:


- and the boy is up off his knees:


Stickframe

#362
Joined: December 01, 2013
KitMaker: 1,661 posts
Armorama: 1,202 posts

Posted: Saturday, August 06, 2016 - 10:46 AM UTC
Hi Mike -
wow, even with lots of modifications, you are moving fast on this build! Looking forward to seeing more
Cheers
Nick
wow, even with lots of modifications, you are moving fast on this build! Looking forward to seeing more
Cheers
Nick
165thspc
#521
Joined: April 13, 2011
KitMaker: 9,465 posts
Armorama: 8,695 posts
Posted: Saturday, August 06, 2016 - 06:09 PM UTC
Thanks Nick
Had the Saturday all to myself so it was 8am till 11pm working on the truck. Very enjoyable but I might be loosing steam as I head into the new week!
Had the Saturday all to myself so it was 8am till 11pm working on the truck. Very enjoyable but I might be loosing steam as I head into the new week!

j76lr
Joined: September 22, 2006
KitMaker: 1,081 posts
Armorama: 1,066 posts
Posted: Saturday, August 06, 2016 - 06:57 PM UTC
I built the gun truck version . its a nice kit ! I wish posting pics were easier !!
HeavyArty
Joined: May 16, 2002
KitMaker: 17,694 posts
Armorama: 13,742 posts
Posted: Saturday, August 06, 2016 - 08:25 PM UTC
Quoted Text
I built the gun truck version . its a nice kit ! I wish posting pics were easier !!
Posting pics are simple. First host it on a picture site, I prefer Photobucket. Next, copy the url from the photo host site and paste it between the image tags [i m g] post url here [ / i m g] , but without spaces and your photo will show.
[ i m g] http://i1375.photobucket.com/albums/ag455/cjuran1990/DSCF1440_zps4d446202.jpg [/ i m g]
Without spaces...
Not mine, but you get the idea.
165thspc
#521
Joined: April 13, 2011
KitMaker: 9,465 posts
Armorama: 8,695 posts
Posted: Saturday, August 06, 2016 - 08:53 PM UTC
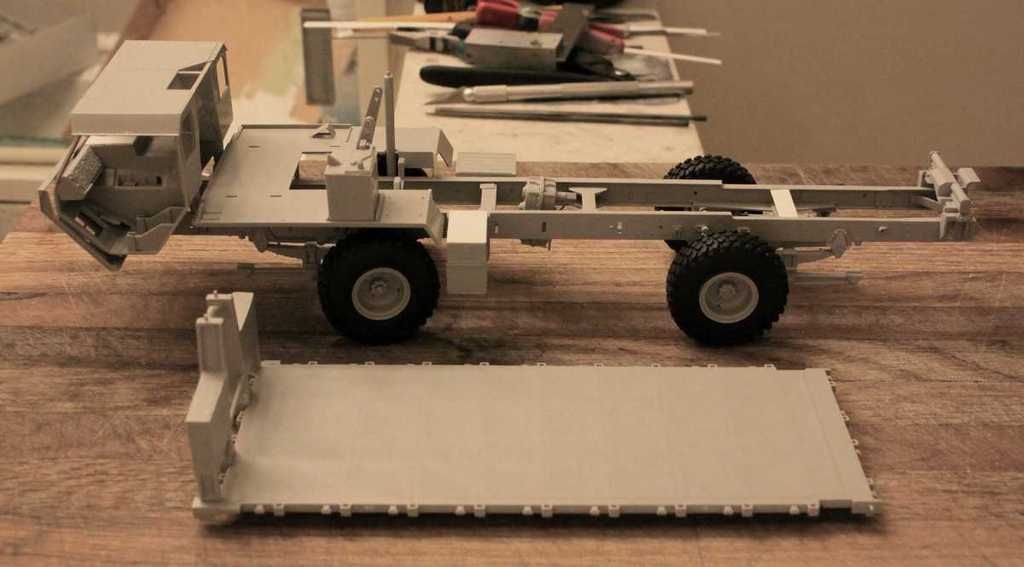
Worked on the LHS sub-frame this morning:
WARNING WARNING: In what you see here the LHS sub-frame has been installed BACKWARDS! My bad!
WARNING WARNING: In what you see here the LHS sub-frame has been installed BACKWARDS!
The two large saddles should be at the rear of the vehicle!
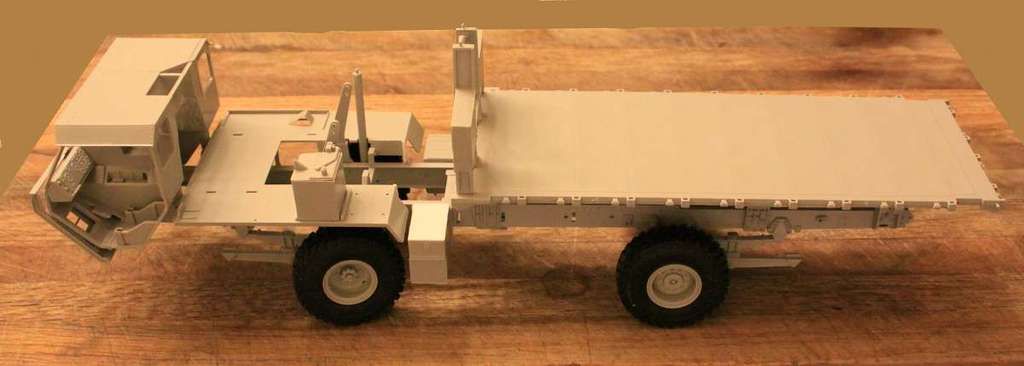
For the first time I can now pose the vehicle with the flat rack in the proper position.
WARNING WARNING: In what you see here the LHS sub-frame has been installed BACKWARDS! My bad!

WARNING WARNING: In what you see here the LHS sub-frame has been installed BACKWARDS!
The two large saddles should be at the rear of the vehicle!

For the first time I can now pose the vehicle with the flat rack in the proper position.

165thspc
#521
Joined: April 13, 2011
KitMaker: 9,465 posts
Armorama: 8,695 posts
Posted: Saturday, August 06, 2016 - 09:21 PM UTC
I am liking these new rubber tires more than I did at first! I think I WILL use them instead of going the resin route!
However there seems to be a slight fit problem between the tire and the rim. The rim appears to be a tad bit wider than the tire so the tire doesn't want to "seat" properly on the rim.
I think I have a solution though. More on this later.

However there seems to be a slight fit problem between the tire and the rim. The rim appears to be a tad bit wider than the tire so the tire doesn't want to "seat" properly on the rim.
I think I have a solution though. More on this later.

165thspc
#521
Joined: April 13, 2011
KitMaker: 9,465 posts
Armorama: 8,695 posts
Posted: Saturday, August 06, 2016 - 10:23 PM UTC
I really like getting the chance to work with some of these massive (we're talking scale here) components for a change.


165thspc
#521
Joined: April 13, 2011
KitMaker: 9,465 posts
Armorama: 8,695 posts
Posted: Saturday, August 06, 2016 - 10:26 PM UTC


Armored76

Joined: September 30, 2013
KitMaker: 1,615 posts
Armorama: 1,500 posts
Posted: Sunday, August 07, 2016 - 10:38 AM UTC
That's some great progress there and an interesting subject! I wish I had half of your building speed 
I'll be watching this myself, for sure!
I'll be watching this myself, for sure!

Taylornic
Joined: January 10, 2005
KitMaker: 337 posts
Armorama: 332 posts

Posted: Sunday, August 07, 2016 - 12:07 PM UTC
Mike, what's your thoughts on the LHS parts from the kit?
165thspc
#521
Joined: April 13, 2011
KitMaker: 9,465 posts
Armorama: 8,695 posts
Posted: Sunday, August 07, 2016 - 03:22 PM UTC
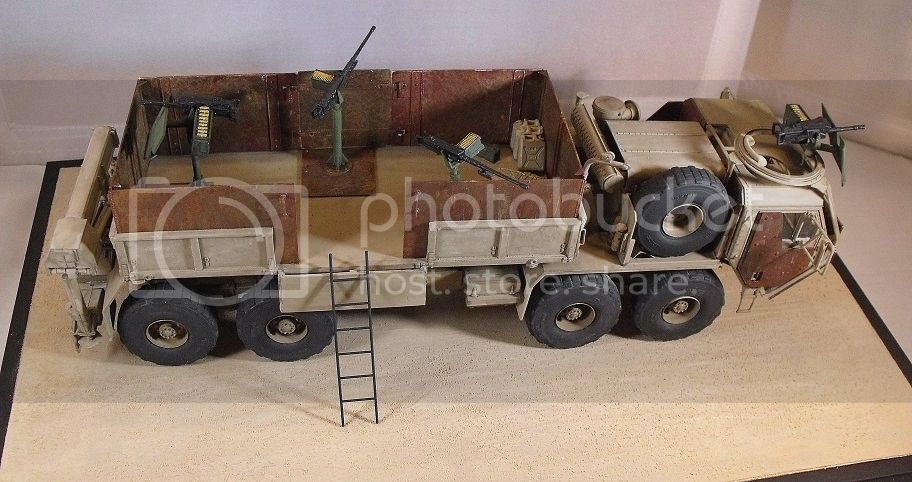
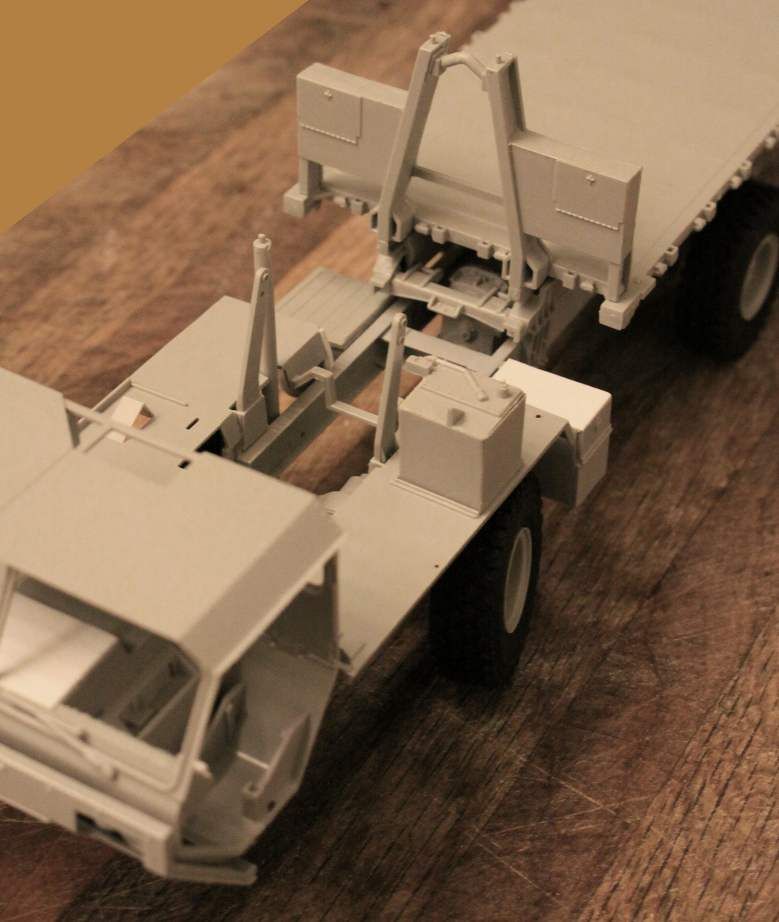
Taylor, It is difficult to put my finger on it exactly but I can tell you that the new LHS parts have been created using the latest technology and have been engineered with considerably more talent than the original model. The new parts are very well done.
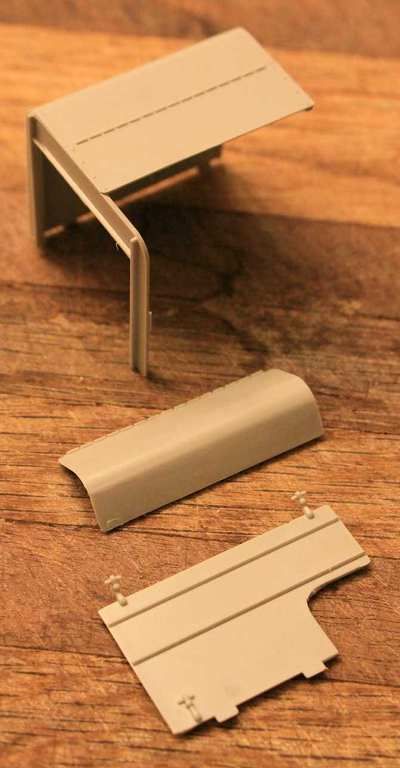
Something that really impressed me was the texture and shaping of the flat rack decking. It would have been very easy for the designers to just give us just a flat, unadorned, boring surface here but no - they went over and above for us.
The photo below falls way short of showing just how nicely done this surface is. The floor of the flat rack has a beautifully done distressed "used" look to it. You see the imprint of the girders below the floor and there is a very natural sag to the sheet metal between the girders as if this rack has seen some moderately hard use. Then too the surface has a very well done natural "tooth" texture to it which is a real relief from the more common grossly smooth flat glossy surface! Great stuff!
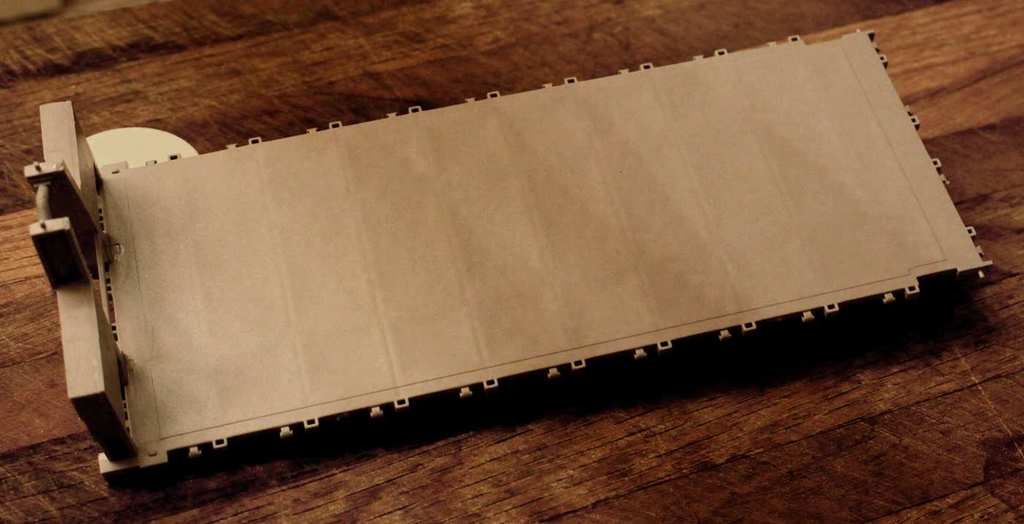
Make no mistake the surface treatment to this deck is in no way some sort of simple scheme to hide the typical molding stress lines often found in this type broad flat surface.
This decking is nothing short of a work of art! ! ! It is outstanding!
165thspc
#521
Joined: April 13, 2011
KitMaker: 9,465 posts
Armorama: 8,695 posts
Posted: Sunday, August 07, 2016 - 03:40 PM UTC
Getting ready for that resin engine to arrive!
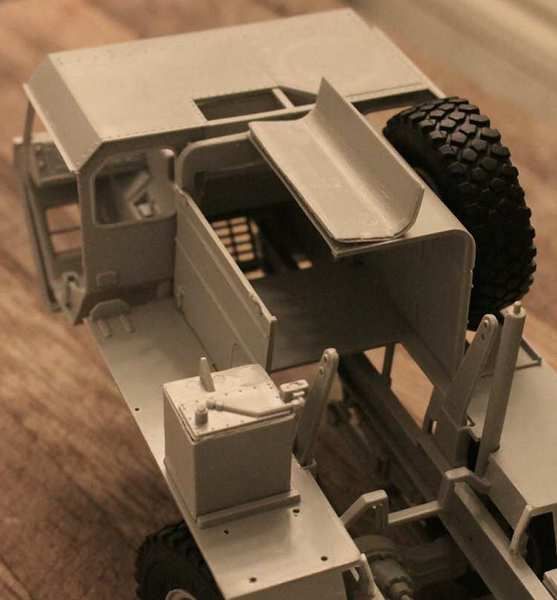
I have opened up all the air vents that go through the cab as well as cutting open the engine cowl to show off that beautiful engine!

I have opened up all the air vents that go through the cab as well as cutting open the engine cowl to show off that beautiful engine!


HeavyArty
Joined: May 16, 2002
KitMaker: 17,694 posts
Armorama: 13,742 posts
Posted: Sunday, August 07, 2016 - 04:35 PM UTC
Looing really good. The flat rack parts and the lift mechanism for it look really top notch. They should blend perfectly with the Trumpeter M983 parts for mine.
165thspc
#521
Joined: April 13, 2011
KitMaker: 9,465 posts
Armorama: 8,695 posts
Posted: Sunday, August 07, 2016 - 05:17 PM UTC
Quoted Text
Looing really good. The flat rack parts and the lift mechanism for it look really top notch. They should blend perfectly with the Trumpeter M983 parts for mine.
Gino, I think you are right on with that idea. I have not gotten my hands on the new HEMTT but from what I have seen the two should work together very well and show the same level of accomplishment and technique.
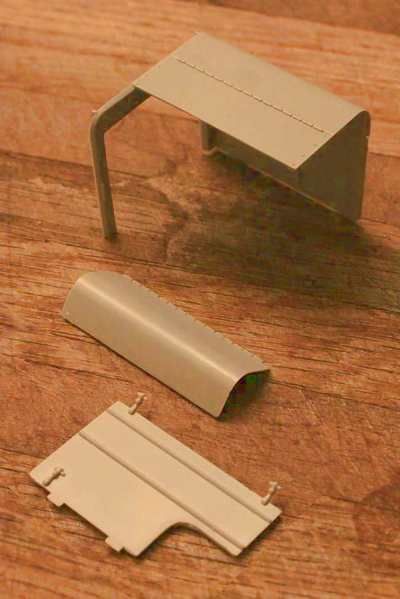
I tried again with the camera. Here is perhaps a better shot of the deck texture.

165thspc
#521
Joined: April 13, 2011
KitMaker: 9,465 posts
Armorama: 8,695 posts
Posted: Sunday, August 07, 2016 - 05:21 PM UTC
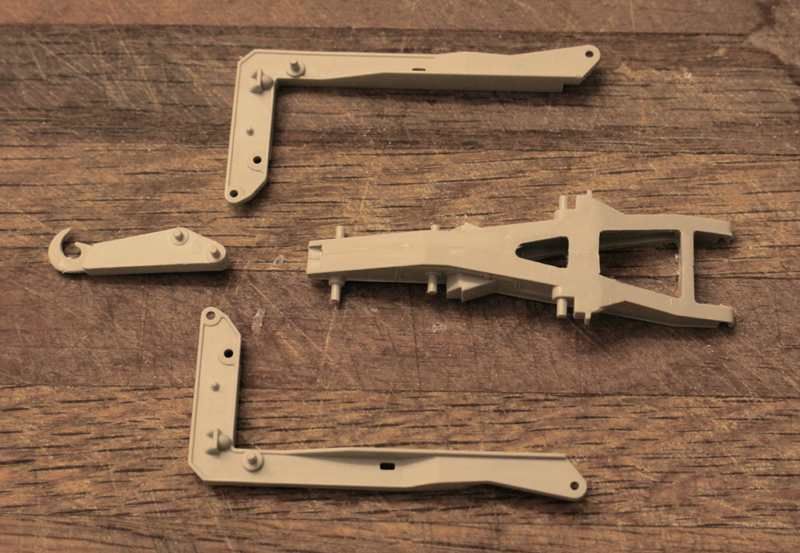
A couple more shots along those same lines:
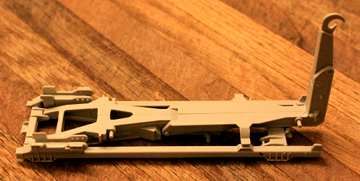
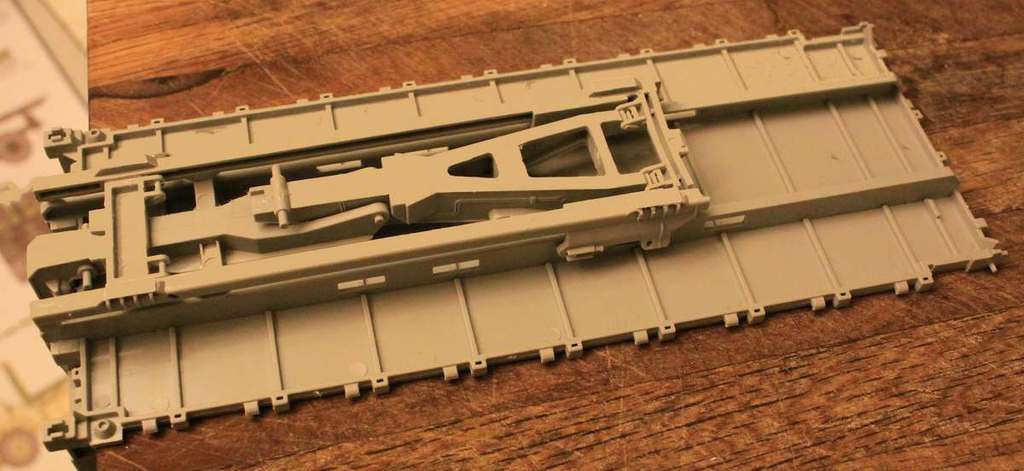
I am sweating a bit over the idea of trying to glue those hydraulic cylinders together and have them function properly!


I am sweating a bit over the idea of trying to glue those hydraulic cylinders together and have them function properly!
165thspc
#521
Joined: April 13, 2011
KitMaker: 9,465 posts
Armorama: 8,695 posts
Posted: Sunday, August 07, 2016 - 06:02 PM UTC
One of the reasons I went for this model is that when the flat rack is posed in the unloaded position the frame details and all this massive mechanism can clearly be seen. I like that! This is the primary reason I want the running gear to be as correct as possible! If this were a HEMTT fuel truck I wouldn't care so much.
 |

WEB HOSTING BY


Copyright ©2021 Armorama and Kitmaker Network, a subsidiary of Silver Star Enterprises
All Rights Reserved. Please read our Conditions of Use and Privacy Policy.
All Rights Reserved. Please read our Conditions of Use and Privacy Policy.