Building the 1/16th. Jagdtiger from Trumpeter
United States
Joined: October 14, 2012
KitMaker: 2,663 posts
Armorama: 2,649 posts
Posted: Wednesday, December 21, 2016 - 10:45 PM UTC

Here's my next project, it'll probably take to spring to finish it.
That is if any of you are interested in it.
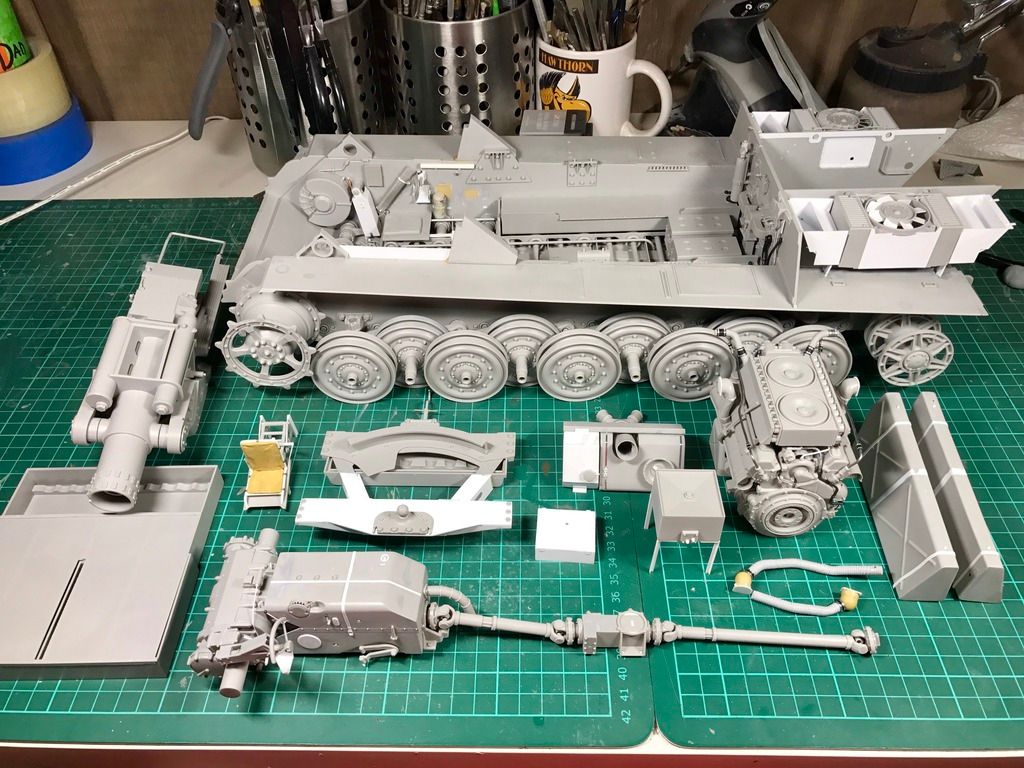
The boxes inside the box.

Inside the boxes.

United States
Joined: October 14, 2012
KitMaker: 2,663 posts
Armorama: 2,649 posts
Posted: Wednesday, December 21, 2016 - 10:53 PM UTC
This is going to be a really BIG ONE.

There is some warpage of both the upper and lower hull parts.


I have to get use to posting pics. again , it's been a while.
Donald
Rhode Island, United States
Joined: May 10, 2002
KitMaker: 3,581 posts
Armorama: 2,782 posts
Posted: Thursday, December 22, 2016 - 11:48 PM UTC
United States
Joined: October 14, 2012
KitMaker: 2,663 posts
Armorama: 2,649 posts
Posted: Friday, December 23, 2016 - 01:40 AM UTC
I got mine from Squadron, they list for about $400 U.S. Squadron has them for about $300, but if you catch them on sale you can get it a lot cheaper.
When I ordered it they were having a sale with 25% off every thing, that brought the cost down to $232.00 U.S. including shipping and I get about $60.00 U.S in Squadron Bucks in January.
Donald
United States
Joined: October 14, 2012
KitMaker: 2,663 posts
Armorama: 2,649 posts
Posted: Friday, December 23, 2016 - 01:43 AM UTC
Ok now on to the building.
I'm starting with the lower hull this time.
Here are the inner side panels .

There is a tab in the opening where the Idler arm mounts .
If you trim off this tab you can make the Idler Arm adjustable.

The pins on B13 need to be shortened slightly.

B13 goes on the lower rear edge of the hull , as shown there are 2 of them.

That's all for now.
Donald
Victoria, Australia
Joined: November 03, 2008
KitMaker: 294 posts
Armorama: 291 posts
Posted: Friday, December 23, 2016 - 03:29 AM UTC
Washington, United States
Joined: March 11, 2016
KitMaker: 1,792 posts
Armorama: 1,186 posts
Posted: Friday, December 23, 2016 - 01:20 PM UTC
Scalehobbyist.com has them for $263. Thinking about getting one.
United States
Joined: October 14, 2012
KitMaker: 2,663 posts
Armorama: 2,649 posts
Posted: Sunday, December 25, 2016 - 11:32 AM UTC
Now back to the build.
I temporarily taped the side panels to the hull to aid in placing the bottom braces.
I then flexed the braces to get them to fit.


I used the inner long braces to get everything to line up.

then glued down the cross braces.

United States
Joined: October 14, 2012
KitMaker: 2,663 posts
Armorama: 2,649 posts
Posted: Sunday, December 25, 2016 - 11:40 AM UTC
cross braces #H15 & H16 will need the tabs trimmed off.


Next I fitted them, but before the long braces can be installed the tabs on their bottom edge will need to be trimmed slightly.

Here the long braces are installed, I glued them all down to the bottom. DON"T glue them to the side pannels.

United States
Joined: October 14, 2012
KitMaker: 2,663 posts
Armorama: 2,649 posts
Posted: Sunday, December 25, 2016 - 11:48 AM UTC
No gaps here.

Here I removed the side panels , this will make painting and detailing easier.

Now to paint it.
That's all for now.
Donald
Victoria, Australia
Joined: November 03, 2008
KitMaker: 294 posts
Armorama: 291 posts
Posted: Sunday, December 25, 2016 - 12:58 PM UTC
Nice work so far.
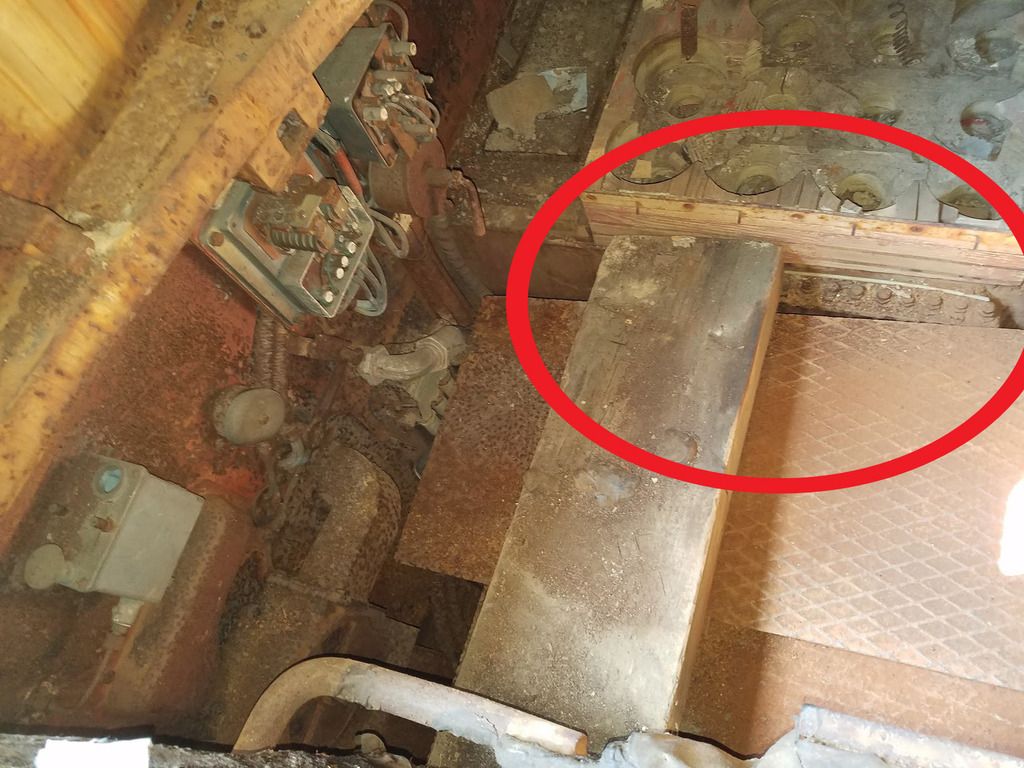
You will need to remove the rear grease nipple stations on the long rails. On the jagdtiger, these were moved outward against the inner hull sides. See the circled area below. Also, you will need to glue the hull sides to the hull, as theres a nasty gap left on the sponsons if you don't.
Hope this helps
United States
Joined: October 14, 2012
KitMaker: 2,663 posts
Armorama: 2,649 posts
Posted: Tuesday, December 27, 2016 - 01:40 AM UTC
I have some painting done.


(CORRECTION)
DO NOT install the covers # C5 & C6 until the Side panels and front panel # F14 are installed in the lower hull they may be broken off when installing part F14
The backside of the swing arms and idlers need a little filling due to some light sink marks.


United States
Joined: October 14, 2012
KitMaker: 2,663 posts
Armorama: 2,649 posts
Posted: Tuesday, December 27, 2016 - 01:46 AM UTC


I'm still working on the interior.
That's all for today.
Donald
Baleares, Spain / España
Joined: July 27, 2009
KitMaker: 59 posts
Armorama: 58 posts
Posted: Tuesday, December 27, 2016 - 03:09 AM UTC
Hi Donald.
I'm following your build so keep posting please.
I've done it with your previous builds and find them very instructive.
Cheers
England - South West, United Kingdom
Joined: March 13, 2015
KitMaker: 418 posts
Armorama: 235 posts
Posted: Wednesday, December 28, 2016 - 01:03 AM UTC
Very impressive build Donald, this build is just amazing. i'm gonna follow this topic.
United States
Joined: October 14, 2012
KitMaker: 2,663 posts
Armorama: 2,649 posts
Posted: Wednesday, December 28, 2016 - 07:28 PM UTC
I'm glad that you like it and hope that you find it useful .
Now back to the build,
I had a major screw up, The instructions have you install the brake covers C5 & C6 to the side walls before installing the side walls to the hull. (DON'T) when you slide Part F14 the front panel in it will break off C5 and maby C6.

Make sure you have the small parts F4 F7 & JD2 along with the linkage shown installed before installing the front two torsion bars.

I screwed up there and had a hard time removing the torsion bars to install the parts.
United States
Joined: October 14, 2012
KitMaker: 2,663 posts
Armorama: 2,649 posts
Posted: Wednesday, December 28, 2016 - 07:37 PM UTC
I know that some may say that i'm using the wrong colors for the parts, i think it helps to make them stand out a little more. Heck most of it will not be seen anyway.

The Torsion Bars with their exterior arms are installed.

That's all for now.
Donald
United States
Joined: October 14, 2012
KitMaker: 2,663 posts
Armorama: 2,649 posts
Posted: Thursday, December 29, 2016 - 01:42 AM UTC
When installing the large Fuel Tanks you have to bend the Grease mounts out of the way and slip them in behind.

These pics. came out a little darker than I wanted.

Installed the other Grease mounts and small boxes / tanks ?

United States
Joined: October 14, 2012
KitMaker: 2,663 posts
Armorama: 2,649 posts
Posted: Thursday, December 29, 2016 - 01:56 AM UTC
The Firewall needs some trimming as shown.

There is a small tank with a gage on the inside of the firewall, does anyone know what it is and what color it should be ?

Maby an engine Fire extinguisher ?

There are two Wingnuts Parts # J 24 that aren't mentioned on the Instruction Sheet.

That's all for today.
Donald
Telemark, Norway
Joined: March 24, 2015
KitMaker: 69 posts
Armorama: 69 posts
Posted: Thursday, December 29, 2016 - 02:34 AM UTC
You're making good progress here, not bothering with correcting everything Trumpeter has wrong, like the 1:35 scale gas pedal or the mounting bolts for the periscope glass holders going through the actual glass... Looks like they haven't bothered correcting anything they did wrong with the Tiger II kit. The lower hull warping bring back memories...
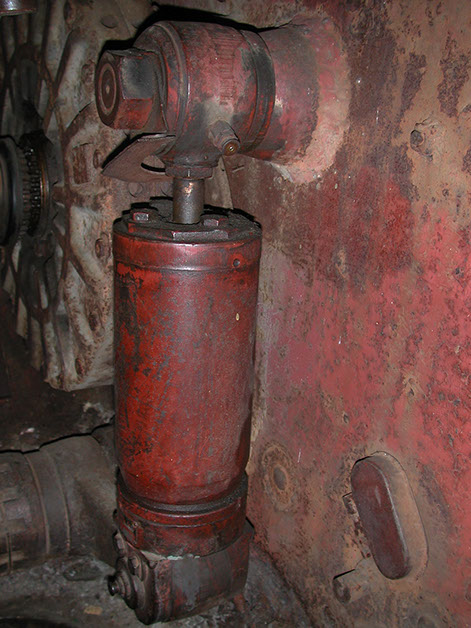
The tank on the firewall you ask about, is indeed a fire extinguisher, and it should be painted red.
Curious about the shiny part of the shock absorbers. It should be all primer red.
This is one as seen in the Tiger II they're currently restoring in Thun, Switzerland:
Good luck on the rest of your build!
Arild

Victoria, Australia
Joined: November 03, 2008
KitMaker: 294 posts
Armorama: 291 posts
Posted: Thursday, December 29, 2016 - 04:00 PM UTC
Don't bother pointing out any errors in the kit or with this build Arild, the OP isn't fussed with accuracy, looks to be building the kit out of box, and using fantasy for the interior colours.
United States
Joined: October 14, 2012
KitMaker: 2,663 posts
Armorama: 2,649 posts
Posted: Friday, December 30, 2016 - 02:01 AM UTC
England - South East, United Kingdom
Joined: January 11, 2003
KitMaker: 4,307 posts
Armorama: 2,130 posts
Posted: Friday, December 30, 2016 - 02:45 AM UTC
Donald, your work is far better than mine so I'm not commenting on that (especially as I have been known to use whatever colours I have in the box).
It may not be common knowledge on that side of the pond but in English (as spoken in Australia etc) there IS a U in colour. Same as there are two I's in Aluminium, not one as in Aluminum.
Bulldog#3
Grumpy Old Modeller No1
Growing old disgracefully!
New Zealand
Joined: June 19, 2013
KitMaker: 1,217 posts
Armorama: 1,092 posts
Posted: Friday, December 30, 2016 - 03:16 AM UTC
And, Australia is a penal colony after all. Just sayin'.
Love the work, Donald; keep it up
Kylie
A little antipodian rivalry
Telemark, Norway
Joined: March 24, 2015
KitMaker: 69 posts
Armorama: 69 posts
Posted: Friday, December 30, 2016 - 02:31 PM UTC
Donald, I don't get this. You ask about the colour of a specific part, but really don't want input on accuracy? Now, I'm not an expert (I prefer to stick to English when I'm writing, rather than a corrupted German), but I do have the Tiger II kit in progress, and I totally get why you won't bother with correcting everything. Because apparently, just about everything needs correcting. But guess what, I'm not correcting it all myself either.
I know from previous builds that you do more or less strictly OOB, but I took the liberty of pointing out the shock absorber as the painting suggested it works differently than the real thing, and it is an easy fix. Assuming you have an interest in how the real thing works, that is.
But, as you will surely point out, it is your build, and you do with whatever you please. I really could not care less.
Enjoy the big cat!
Arild