

..."cant help you about why were busier post-Retirement but it might be the reason men tend not to live as long as women. . . "
Maybe it's because it's the only way to get away from them.
Dioramas
Do you love dioramas & vignettes? We sure do.
Do you love dioramas & vignettes? We sure do.
Hosted by Darren Baker, Mario Matijasic
Building a Huge 200mm diorama, "Easy Pickins"

Armorsmith

Joined: April 09, 2015
KitMaker: 1,063 posts
Armorama: 1,000 posts
Posted: Tuesday, August 11, 2020 - 02:14 AM UTC
PolishBrigade12
Joined: January 31, 2009
KitMaker: 380 posts
Armorama: 366 posts

Posted: Tuesday, August 11, 2020 - 03:36 AM UTC
Guys, I think it's because we're just so anal retentive we just can't stop working, lol.
I recon I'm lucky Bros, my Lil woman is a keeper! I'll get this rolling within the week.
Cheers, Ski.
I recon I'm lucky Bros, my Lil woman is a keeper! I'll get this rolling within the week.
Cheers, Ski.

cheyenne
Joined: January 05, 2005
KitMaker: 2,185 posts
Armorama: 1,813 posts
Posted: Tuesday, August 11, 2020 - 03:41 AM UTC
Nice work Ski , looks great !!
Colors are cool also .
Colors are cool also .

jrutman
Joined: April 10, 2011
KitMaker: 7,941 posts
Armorama: 7,934 posts
Posted: Tuesday, August 11, 2020 - 04:18 AM UTC
Wow! Nice flathead. Gonna be epic,
J
J
Golikell

Joined: October 25, 2002
KitMaker: 1,757 posts
Armorama: 914 posts

Posted: Tuesday, August 11, 2020 - 10:21 PM UTC
I've been missing the first rounds of this thread. I'm happy to see you got back in action, as it would be a waste to leave it all lying around... (says he, who had a lapse of about 8 years  ).
).
Regarding the wall, it looks as if there are 2 white hearts in the plaster at the outside???
The figs are stunning!
).Regarding the wall, it looks as if there are 2 white hearts in the plaster at the outside???
The figs are stunning!

PolishBrigade12
Joined: January 31, 2009
KitMaker: 380 posts
Armorama: 366 posts
Posted: Thursday, August 13, 2020 - 02:18 PM UTC
Tanks Ma Brotha Cheyenne!
Jerry, I'll try to keep up with it, shouldn't be hard once the snow flies!
Erwin, Thanks, I appreciate your comments. I hate leaving anything undone. I've been known to be anal retentive, HA! A quick speedy update will bring yall up to speed, then let's get this "aged" old pig done. Sound good?, sounds good to me too!
Like Cheyennne, I've got a few ideas up my sleeve. I'll never attempt to catch up, that would be kinda like bein a groupy, but he's got me goin on his imagination spree, incredible!!!
Cheers Gents, updates within the week. Ski.
PolishBrigade12
Joined: January 31, 2009
KitMaker: 380 posts
Armorama: 366 posts
Posted: Friday, August 14, 2020 - 08:28 PM UTC
Ok, I finally found a sliver of time to get this bike SBS' rolling while my resin counter top is curing. I can't even get to the table saw right now! Oh well, maybe in a few days.......
Catching Up
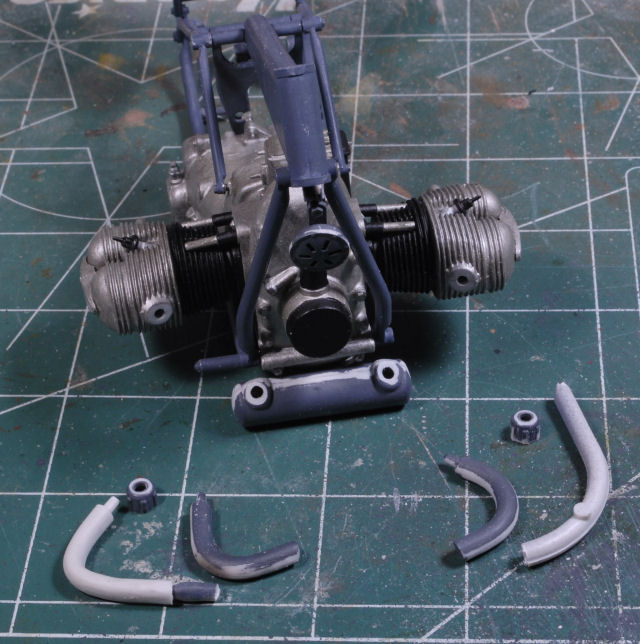
Many of the original pics were not found for this portion of the build, so here's what I've got to start off with. The engine is already installed and now the exhaust pipes are prep'd and installed.
Air Box, more wiring
I find using copper sheet works as well as brass, but easier to work with and the scale is still acceptable, even 1/9th.
This gig I made for the Harley looks rather crude, but it works well, especially after I get the tires on. Keeps my hands free to work.
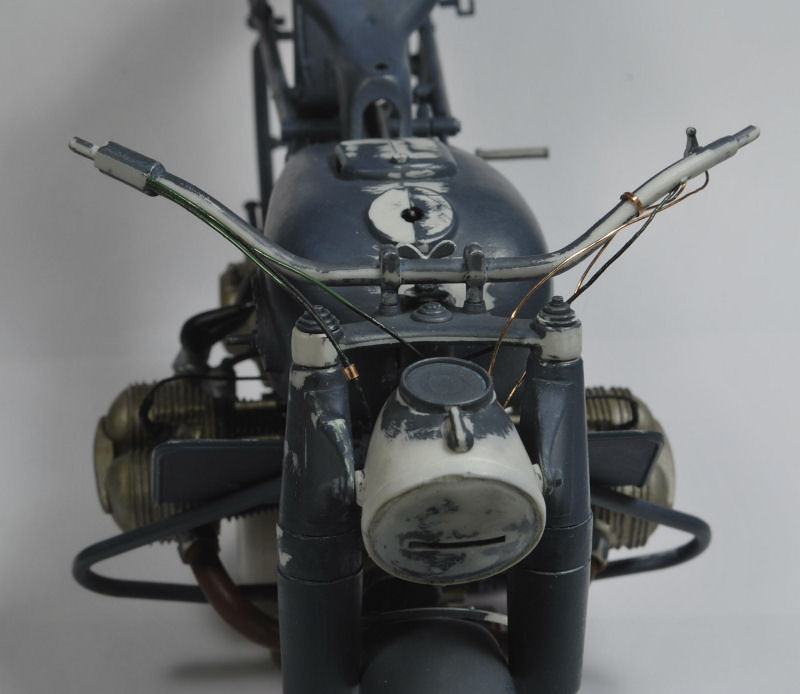
A closer look at the wiring and where the air box will go. The instructions for this come way too late in the game to install in the end. Trying to get it into this tight spot after the throttle cable and wiring is installed would be a major mistake and result in broke parts and the temptation to launch this sucker into the abyss, lol.
The right side view, which is often omitted from the instructions only to say, do the same on the right. The instructions are rather vague, so I'm taking my time.
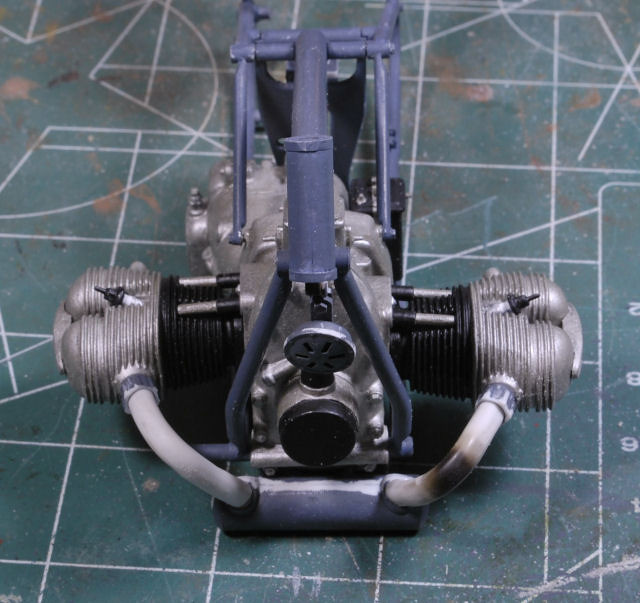
Ok, been working the wiring and had to remove the fuel tank to get to some of the tight spots. Another example of going backward to go forward.
The rear fender and wiring with clamps. I'm using phone line wire and shoving copper wire into the ends where needed to show the splits.
A closer look with a few of the copper clamps.
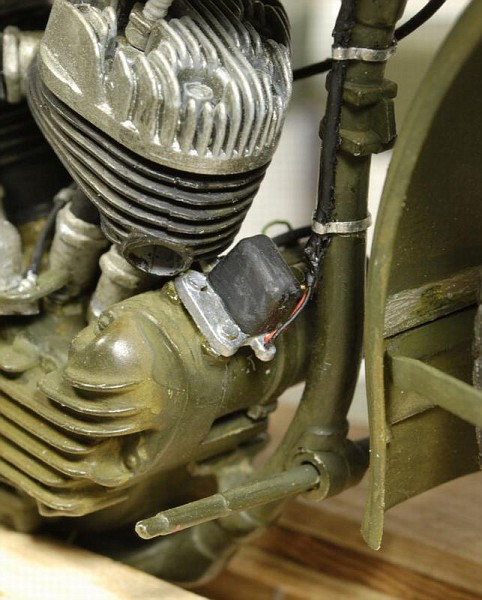
And there's that wonderful fuse box that eluded me for so long, right in the middle of the pic, kinda the brains of the system from the battery on.
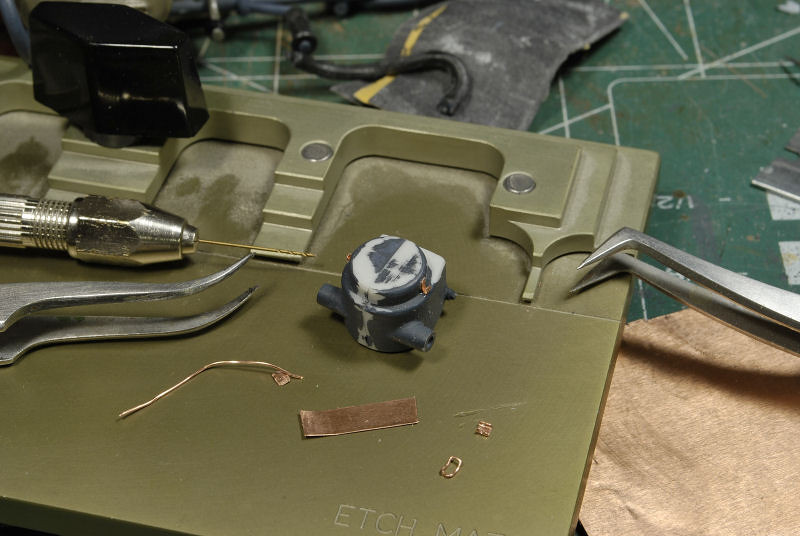
Battery and fuse wiring
I wired and installed the battery, fuse box, and air box.
The clutch cable and new plug wires are visible. Also, the horn wires and the rest of the rear cables ready for the front fork installation.
The intake air tubes with clamps and fuel lines installed.
Right side view of the fuel and air intake lines with clamps. I also closed off the knee pad locations on both sides of the fuel tank. I used green floral wire for all the cables and wires as well as some copper wire. Thin strips of sheet copper were used to fashion the line clamps. The battery terminal hook ups were fashioned out of scrap sprue and drilled to replicate actual connections.
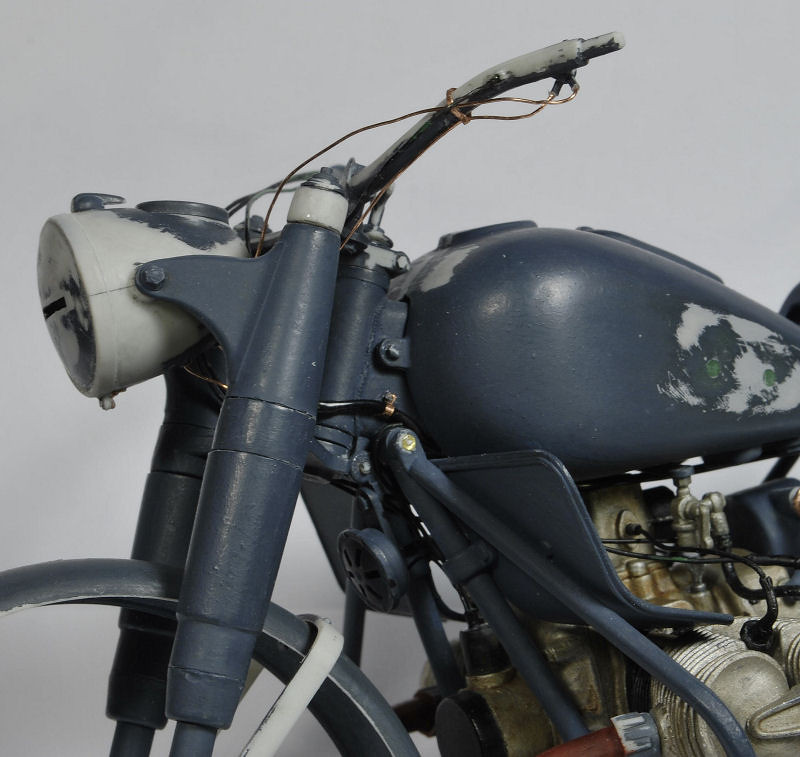
Forks and Fender work
Continuing on with the fork and fenders to the wiring of the head lamp and prep'd the wheels for installation. I also coated the seats to give a rougher look, but did not tear them or cut into the covering. I still need to add the rivet heads in the rear of each seat as well. The wiring was a challenge given that my sausage fingers get in the way and the carpet Monster consumes so much of my work, lol. At any rate I'm trying to keep the momentum going.
Most of the parts that will be installed.
That head lamps has been modified further, not just reconfiguring the clamp, but also the cover has been recessed to its correct dimension.

These wires were a pain to install and I'm not quite sure I have them right still. Oh well, I'll get that straightened out soon. Copper strips are used to clamp the throttle cables together.
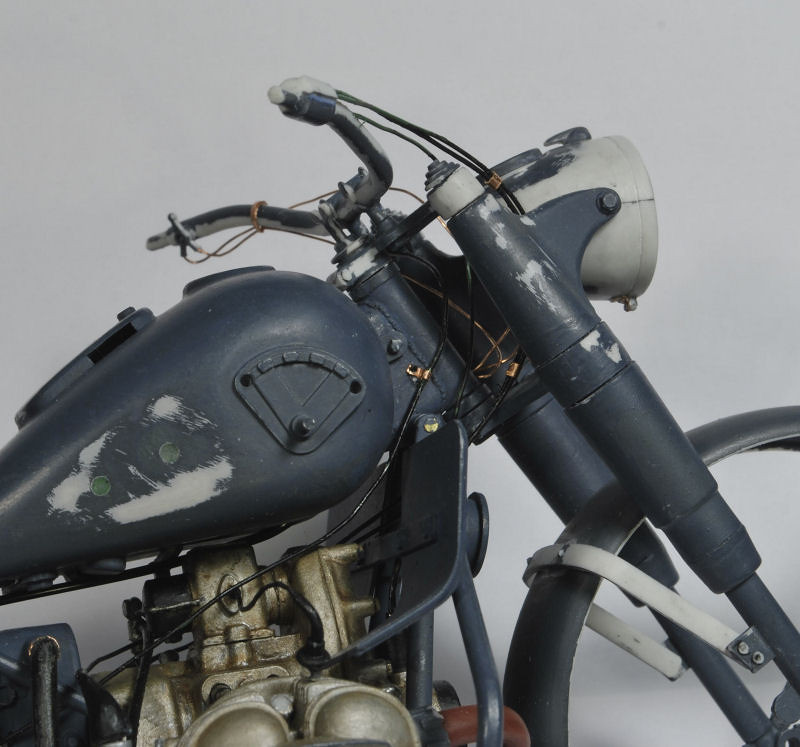
Small copper clamps were added against the frame and drilled, then a piece of stretched sprue was added and touched with a hot Xacto knife, filed and smoothed to simulate the screw heads. I still need to visit a train supply store to acquire supper small micro screws and nuts.
Left side view of the wiring, etc coming along the fork frame.
The drive shaft supplied is by no means accurate and requires some retooling, so the sprue is ready for working. That shaft has a tapered portion on each end with keyways which are not done with any accuracy. So, I'll break out the file and fabricate the correct configuration.
Not clearly visible is the wheel well contact points which required extensive filing to bring it into a more workable and accurate configuration. There's still lots to do before the final wheel installation.
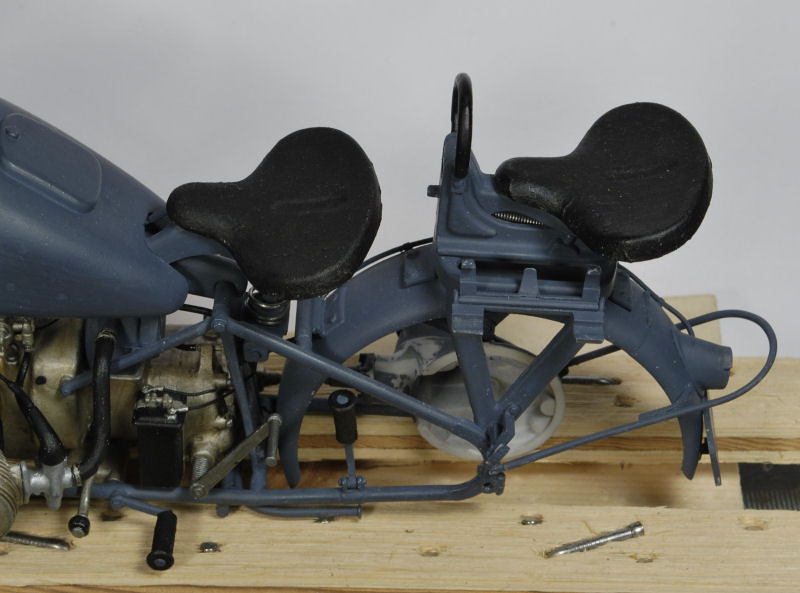
The driver and passenger seats have been modified with a layer of tissue paper for visible texture and temporarily installed.

Major leap forward
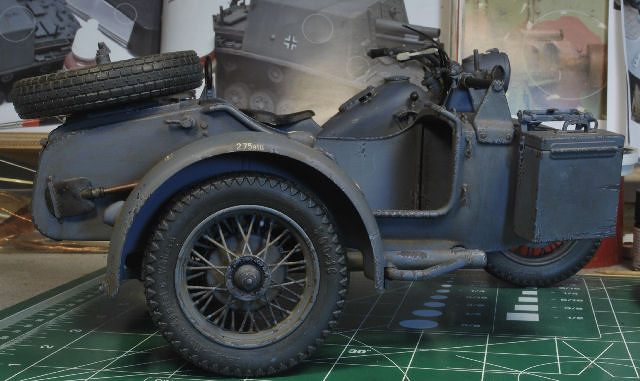
The wheels have been installed, not fun, and the bike is ready for pre-weathering.
I started working the exhaust weathering to avoid tight spots later. I used some decanted Hair Spray and brushed it on the pipes. Then after a quick blast from the hair dryer I brushed on some Tamiya XF-1 Flat Black. This of course goes against the grain as to how to utilize the Hair Spray method, but I'm experimenting right now. I know it doesn't look like much just yet, but we are far from done.
Also visible are the front disc brake and speedo cables.
I just added the last bit of detail until I weather the rigs for the base. I left off the side storage box for now and the speedo glass, etc. You may be able to tell the pigments used on the pipes. All that pretty detail went away when I blasted it with Dull Coat, but it will come to life again in the final process.
I think it may be time to put this Beemer aside and get started on the side car
Driver seat, passenger seat and muffler cover installed.
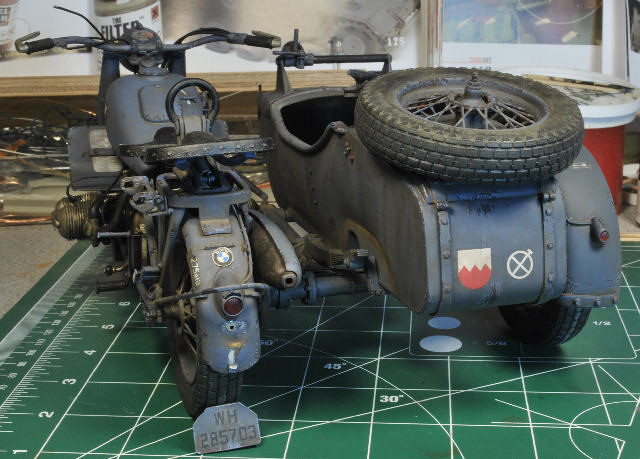
Time for a Side Car
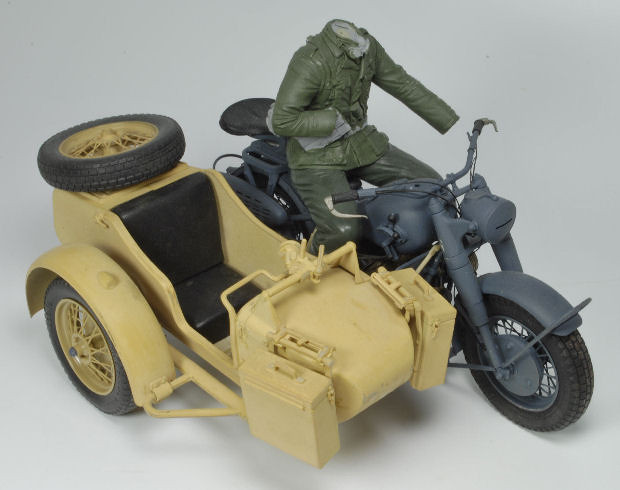
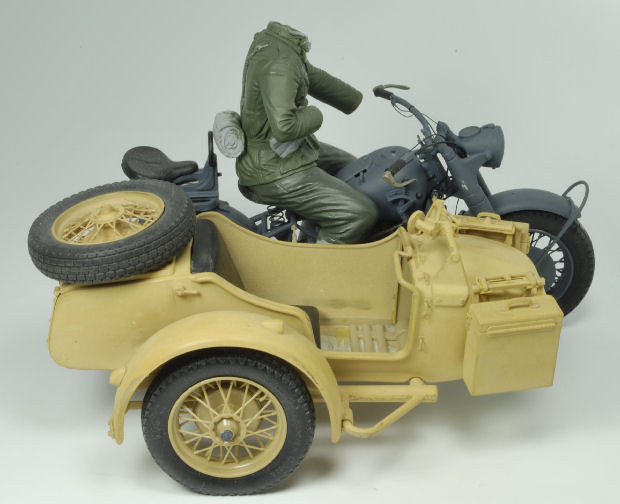
This side car was actually sent to me from ReeDee's Miniatures already asembled. Steve had one sitting on the shelf unused and sent it along with the driver figure, how cool is that? there really wasn't much to do to it except modify the gun mount a bit, but other than that it was a straight install, yehaaaa!
The driver figure initially had short pants, so some putty work has been done, plus other mods that will be covered in the figure portion of this build.
That was a lot covered in a short span. The initial weathering will be next.
Thanks for watchin, Ski.
Catching Up
Many of the original pics were not found for this portion of the build, so here's what I've got to start off with. The engine is already installed and now the exhaust pipes are prep'd and installed.
Air Box, more wiring
I find using copper sheet works as well as brass, but easier to work with and the scale is still acceptable, even 1/9th.
This gig I made for the Harley looks rather crude, but it works well, especially after I get the tires on. Keeps my hands free to work.
A closer look at the wiring and where the air box will go. The instructions for this come way too late in the game to install in the end. Trying to get it into this tight spot after the throttle cable and wiring is installed would be a major mistake and result in broke parts and the temptation to launch this sucker into the abyss, lol.
The right side view, which is often omitted from the instructions only to say, do the same on the right. The instructions are rather vague, so I'm taking my time.
Ok, been working the wiring and had to remove the fuel tank to get to some of the tight spots. Another example of going backward to go forward.
The rear fender and wiring with clamps. I'm using phone line wire and shoving copper wire into the ends where needed to show the splits.
A closer look with a few of the copper clamps.
And there's that wonderful fuse box that eluded me for so long, right in the middle of the pic, kinda the brains of the system from the battery on.
Battery and fuse wiring
I wired and installed the battery, fuse box, and air box.
The clutch cable and new plug wires are visible. Also, the horn wires and the rest of the rear cables ready for the front fork installation.
The intake air tubes with clamps and fuel lines installed.
Right side view of the fuel and air intake lines with clamps. I also closed off the knee pad locations on both sides of the fuel tank. I used green floral wire for all the cables and wires as well as some copper wire. Thin strips of sheet copper were used to fashion the line clamps. The battery terminal hook ups were fashioned out of scrap sprue and drilled to replicate actual connections.
Forks and Fender work
Continuing on with the fork and fenders to the wiring of the head lamp and prep'd the wheels for installation. I also coated the seats to give a rougher look, but did not tear them or cut into the covering. I still need to add the rivet heads in the rear of each seat as well. The wiring was a challenge given that my sausage fingers get in the way and the carpet Monster consumes so much of my work, lol. At any rate I'm trying to keep the momentum going.
Most of the parts that will be installed.
That head lamps has been modified further, not just reconfiguring the clamp, but also the cover has been recessed to its correct dimension.
These wires were a pain to install and I'm not quite sure I have them right still. Oh well, I'll get that straightened out soon. Copper strips are used to clamp the throttle cables together.
Small copper clamps were added against the frame and drilled, then a piece of stretched sprue was added and touched with a hot Xacto knife, filed and smoothed to simulate the screw heads. I still need to visit a train supply store to acquire supper small micro screws and nuts.
Left side view of the wiring, etc coming along the fork frame.
The drive shaft supplied is by no means accurate and requires some retooling, so the sprue is ready for working. That shaft has a tapered portion on each end with keyways which are not done with any accuracy. So, I'll break out the file and fabricate the correct configuration.
Not clearly visible is the wheel well contact points which required extensive filing to bring it into a more workable and accurate configuration. There's still lots to do before the final wheel installation.
The driver and passenger seats have been modified with a layer of tissue paper for visible texture and temporarily installed.
Major leap forward
The wheels have been installed, not fun, and the bike is ready for pre-weathering.
I started working the exhaust weathering to avoid tight spots later. I used some decanted Hair Spray and brushed it on the pipes. Then after a quick blast from the hair dryer I brushed on some Tamiya XF-1 Flat Black. This of course goes against the grain as to how to utilize the Hair Spray method, but I'm experimenting right now. I know it doesn't look like much just yet, but we are far from done.
Also visible are the front disc brake and speedo cables.
I just added the last bit of detail until I weather the rigs for the base. I left off the side storage box for now and the speedo glass, etc. You may be able to tell the pigments used on the pipes. All that pretty detail went away when I blasted it with Dull Coat, but it will come to life again in the final process.
I think it may be time to put this Beemer aside and get started on the side car
Driver seat, passenger seat and muffler cover installed.
Time for a Side Car
This side car was actually sent to me from ReeDee's Miniatures already asembled. Steve had one sitting on the shelf unused and sent it along with the driver figure, how cool is that? there really wasn't much to do to it except modify the gun mount a bit, but other than that it was a straight install, yehaaaa!
The driver figure initially had short pants, so some putty work has been done, plus other mods that will be covered in the figure portion of this build.
That was a lot covered in a short span. The initial weathering will be next.
Thanks for watchin, Ski.

Dioramartin

Joined: May 04, 2016
KitMaker: 1,476 posts
Armorama: 1,463 posts
Posted: Friday, August 14, 2020 - 10:53 PM UTC
Wow Ski Id almost forgotten why Glenn & I pestered you about this build, NOW I remember 
PolishBrigade12
Joined: January 31, 2009
KitMaker: 380 posts
Armorama: 366 posts
Posted: Saturday, August 15, 2020 - 06:40 AM UTC
Quoted Text
Wow Ski Id almost forgotten why Glenn & I pestered you about this build, NOW I remember
Ya killin me man, ya killin me...

Feels good to get started again, leme tell yuz!
cheyenne
Joined: January 05, 2005
KitMaker: 2,185 posts
Armorama: 1,813 posts
Posted: Monday, August 17, 2020 - 09:21 PM UTC
Beautiful work Ski !!
I like the hammered down finishing nails lol .
I like the hammered down finishing nails lol .
PolishBrigade12
Joined: January 31, 2009
KitMaker: 380 posts
Armorama: 366 posts
Posted: Monday, August 17, 2020 - 10:56 PM UTC
Quoted Text
Beautiful work Ski !!
I like the hammered down finishing nails lol .
You know how it is Brother, what ever works, HA!
PolishBrigade12
Joined: January 31, 2009
KitMaker: 380 posts
Armorama: 366 posts
Posted: Monday, August 17, 2020 - 10:57 PM UTC
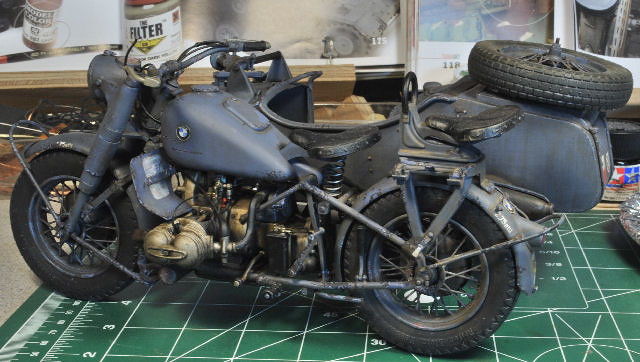
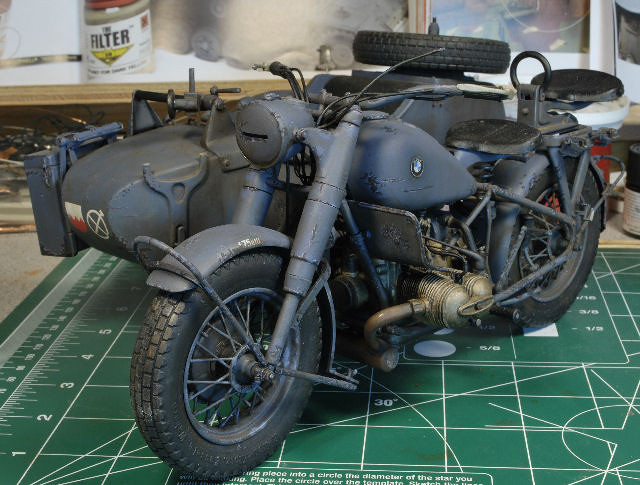
Painting and Initial Scratch and Weathering
All the weathering colors in the line-up and ready for action. I did an initial Burnt Umber oil wash and then added the rust base to most of the scratch areas. There's a lot of surfaces to tend to, so I had to take my time and make sure every visible location was addressed. The wheels/spokes were a real hoot, btw.
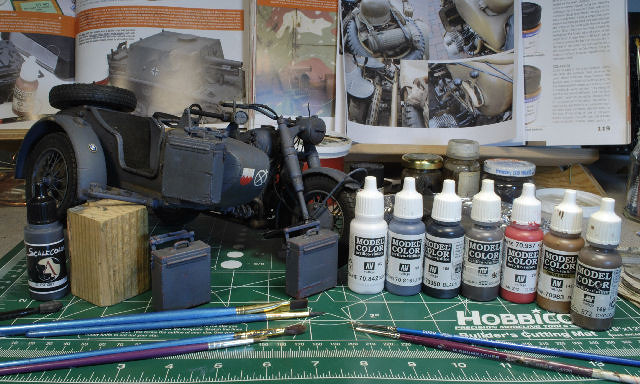
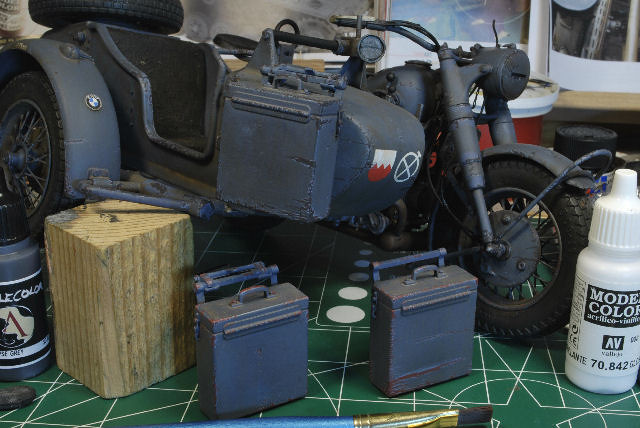
It's easy to get carried away with the scratching and initial weathering, so I had to walk away several times then come back and reassess the results. After the initial was complete it was time to put this puppy up for safe storage. The final weathering will be done just before securing to the base.
Ok, it's time for the Hog. The Harley is up next.
Cheers, Ski.
P.S. My Buddy Steve from ReeDee's Miniatures sent me a stowage kit for the pax, so I may incorporate that in here too. I do have another one of these R75s', so I may do a desert scenario and use them there.
https://sites.google.com/site/reedeesminiatures/products/1-9-200mm
All the weathering colors in the line-up and ready for action. I did an initial Burnt Umber oil wash and then added the rust base to most of the scratch areas. There's a lot of surfaces to tend to, so I had to take my time and make sure every visible location was addressed. The wheels/spokes were a real hoot, btw.
It's easy to get carried away with the scratching and initial weathering, so I had to walk away several times then come back and reassess the results. After the initial was complete it was time to put this puppy up for safe storage. The final weathering will be done just before securing to the base.
Ok, it's time for the Hog. The Harley is up next.
Cheers, Ski.
P.S. My Buddy Steve from ReeDee's Miniatures sent me a stowage kit for the pax, so I may incorporate that in here too. I do have another one of these R75s', so I may do a desert scenario and use them there.
https://sites.google.com/site/reedeesminiatures/products/1-9-200mm
Golikell
Joined: October 25, 2002
KitMaker: 1,757 posts
Armorama: 914 posts
Posted: Monday, August 17, 2020 - 11:25 PM UTC
Your bike turns out to be fantastico... I realy love the amount of details you manage to add. Ofcourse the scale permits this much more than a 1:35 bike would.
PolishBrigade12
Joined: January 31, 2009
KitMaker: 380 posts
Armorama: 366 posts
Posted: Wednesday, August 19, 2020 - 03:21 AM UTC
You are so right Erwin. I fear going back to 1/35th, they are super tiny, HA! It will certainly take some adjusting to.
Cheers, Ski.
Cheers, Ski.
PolishBrigade12
Joined: January 31, 2009
KitMaker: 380 posts
Armorama: 366 posts
Posted: Saturday, August 22, 2020 - 06:55 AM UTC
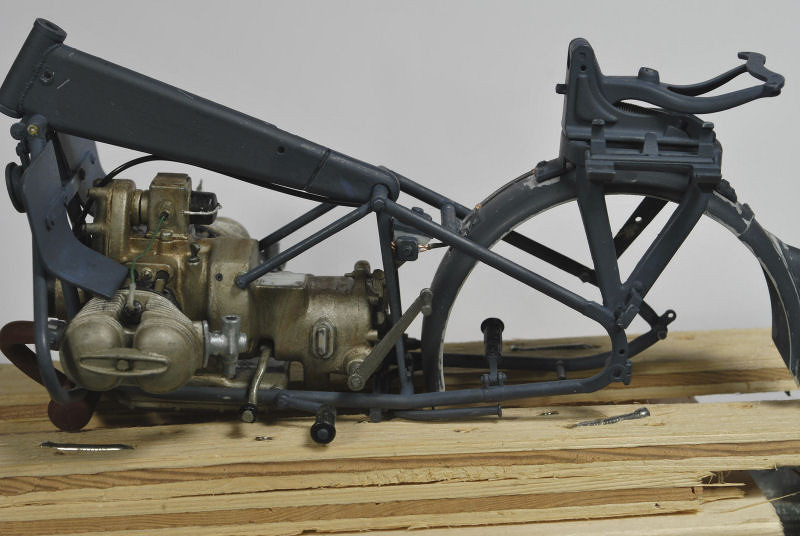
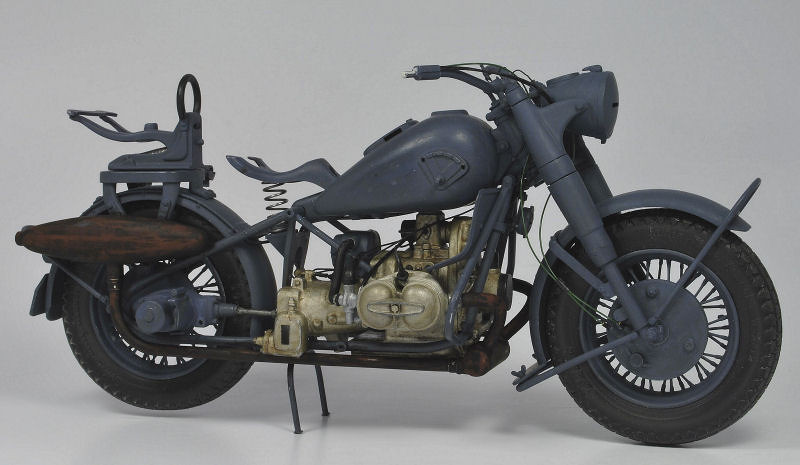
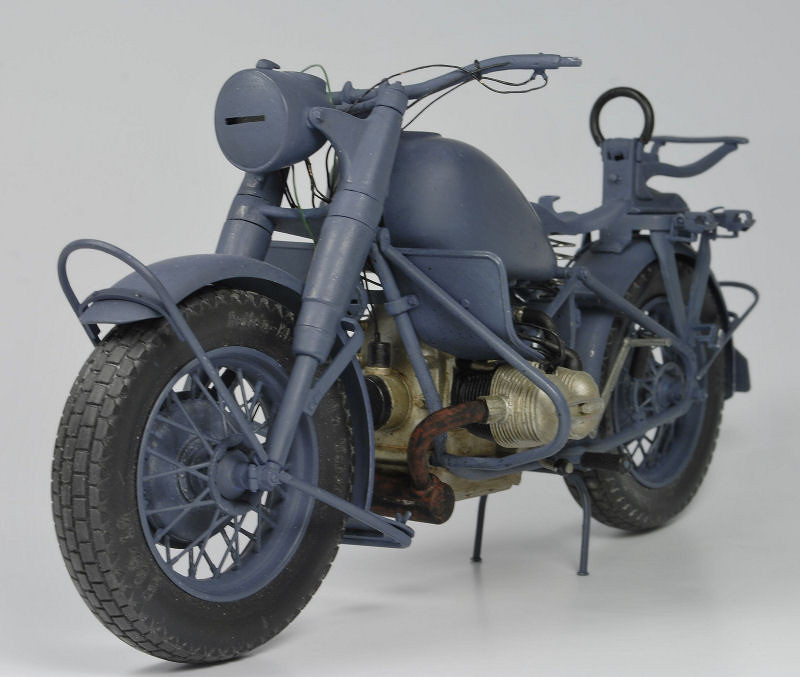
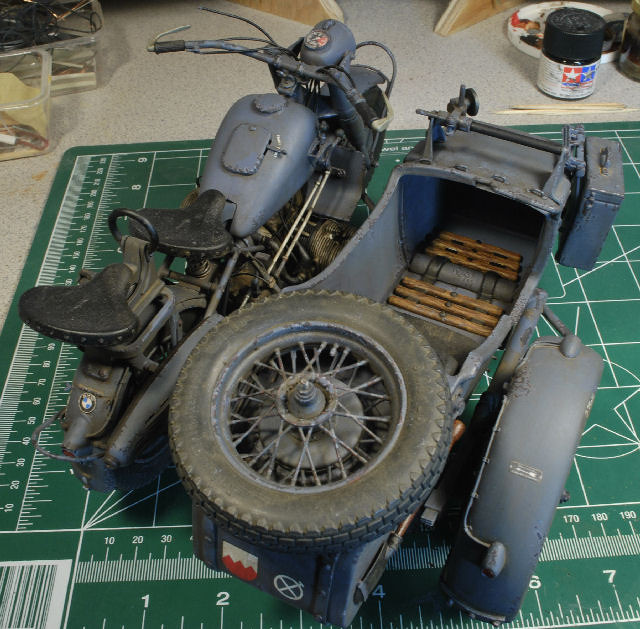
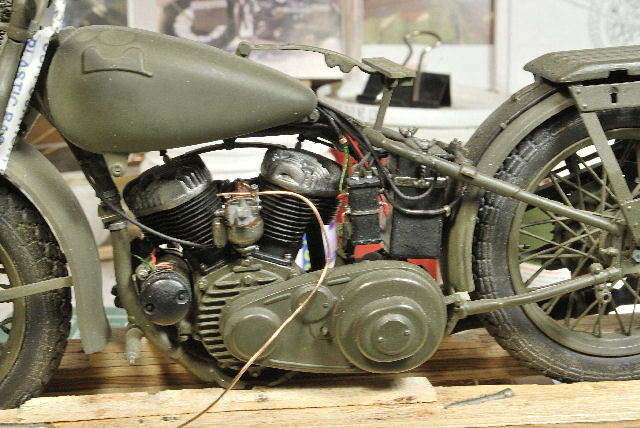
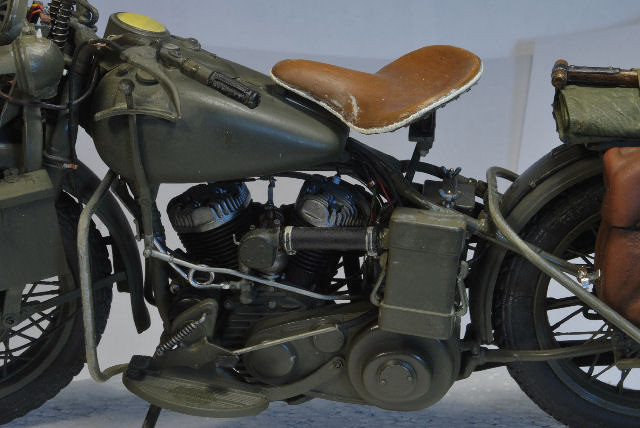
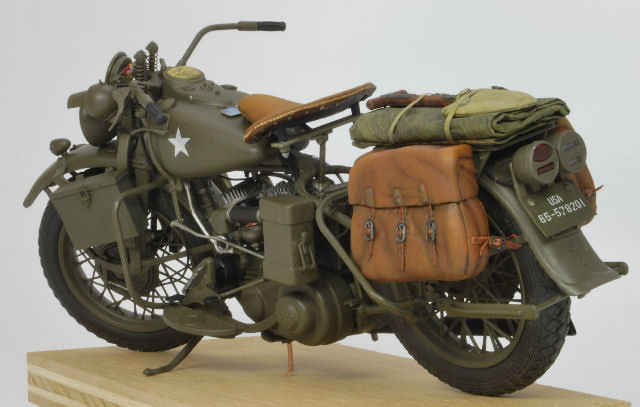
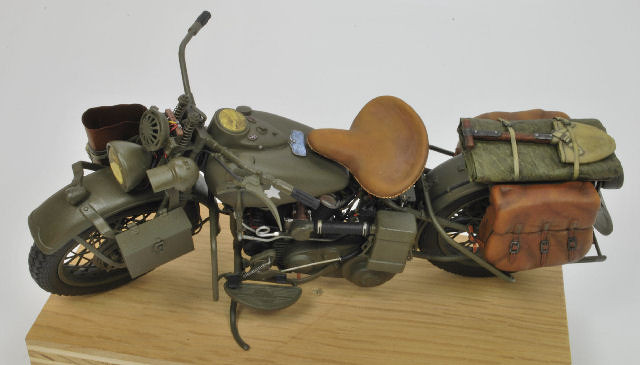
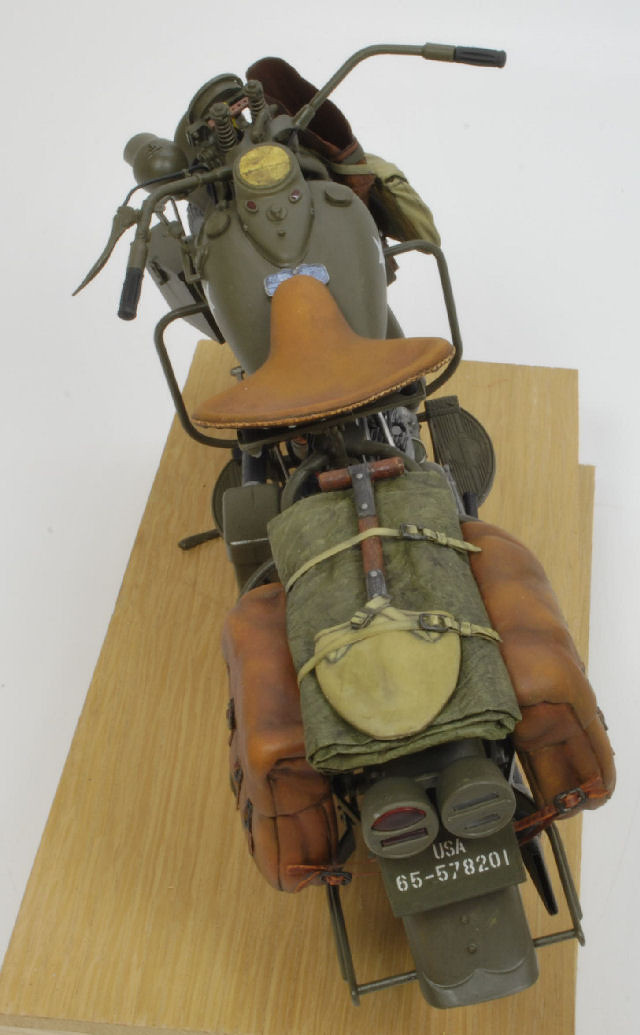
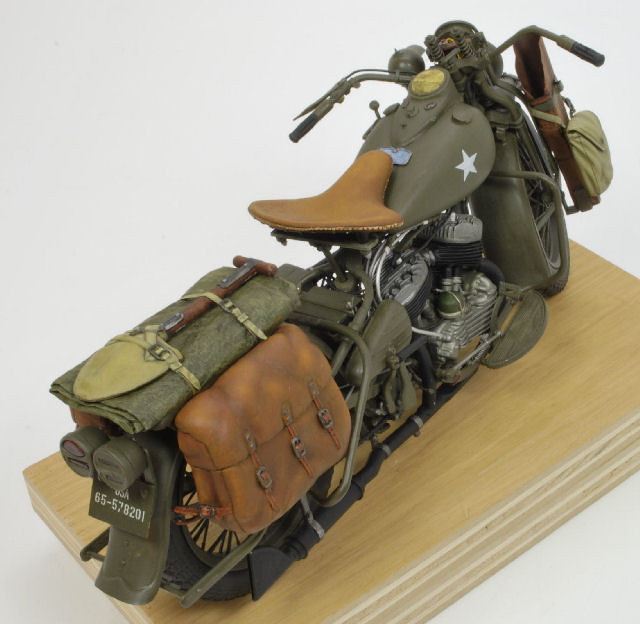
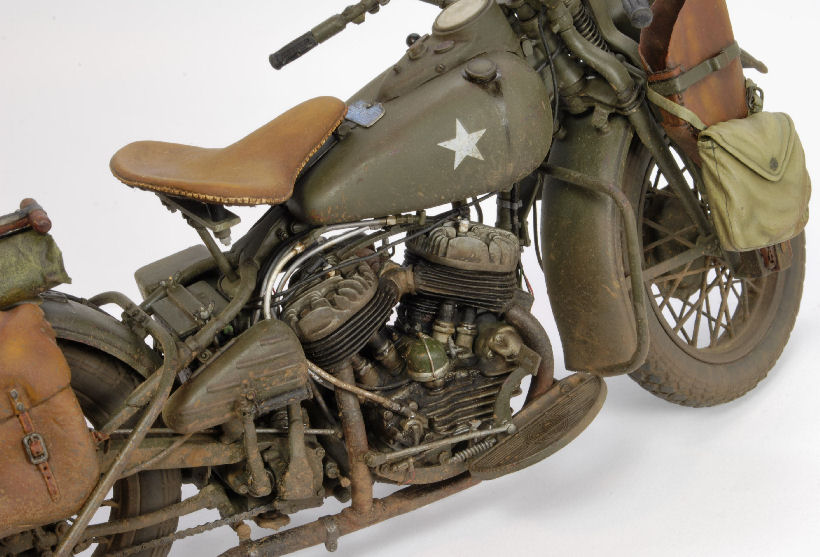
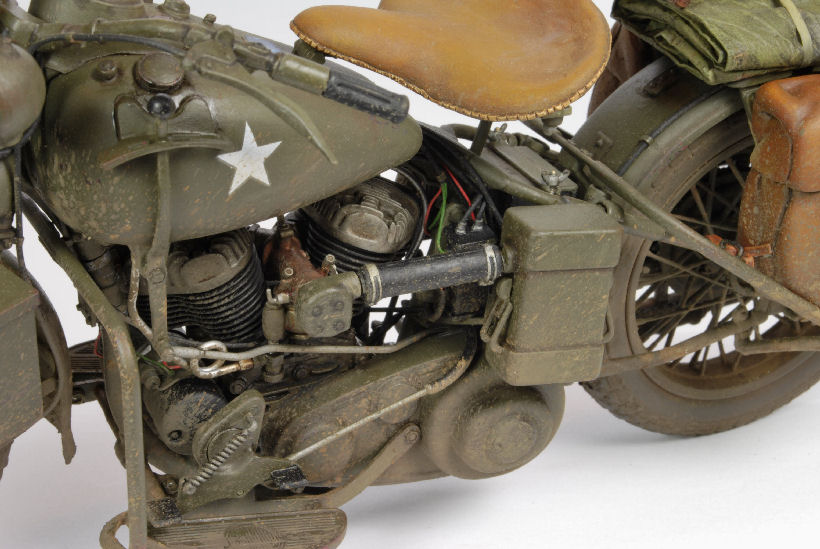
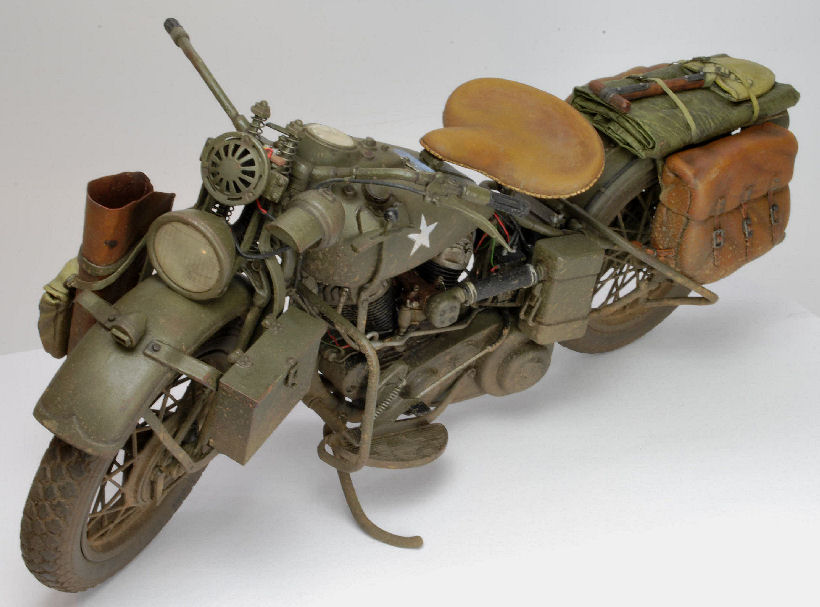
The Harley (Hog) Build
Italeri's 1/9th Scale Harley Davidson WLA 750 WWII Military Motorcycle
Please note, this is the second Harley I've built for this dio. The original took a deep six dive into the abyss and made it into the scrap heap. Yes, it was completed, but given the fact that this kit is so fragile it doesn't take much effort to break a part here, a part there, and before you know it, it looks like an abomination of it's former self. No worries, I pulled my second kit from the shelf and got to work. This gave me time to get the missing items corrected, so now I'm proficient at building Harleys.
Also, I could not find my scratch notes for this build, so I will give a short description as best I can remember and move on. For this build I was able to find technical manuals for the Harley online, they were very helpful. So, the plumbing and wiring are an exact duplication of those manuals and should be pretty accurate. I also used countless photo references to portray the correct location of the guts of this beast. So I'm satisfied with the results.
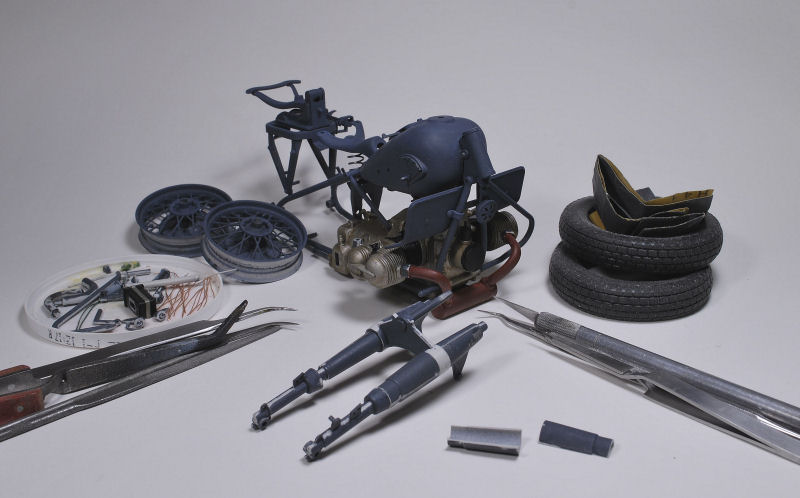
The main frame and suspension, forks and seat base have been assembled. This jig came in handy when dealing with this delicate kit. I used scrap wood from the shop and made a slot just wide enough to hold the kit in place while I used my "three" hands to put it together, lol.
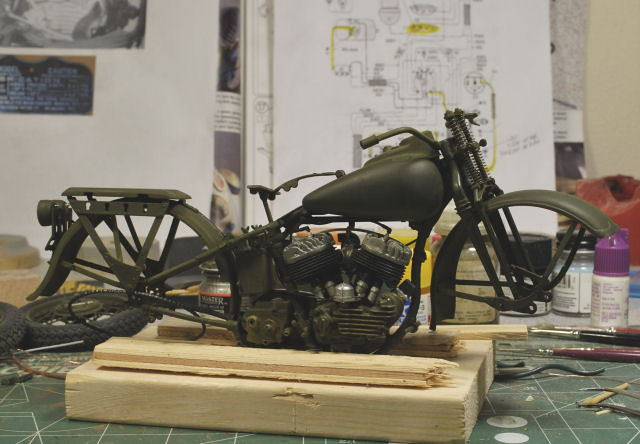
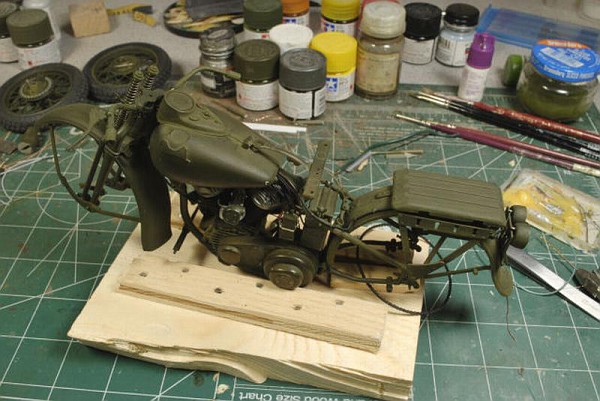
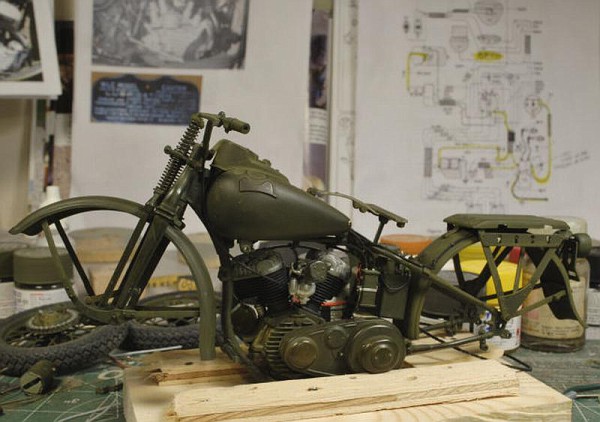
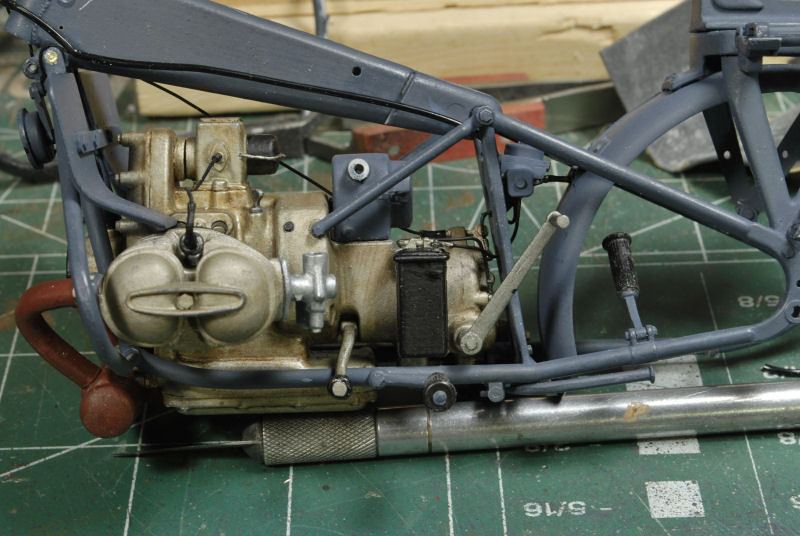
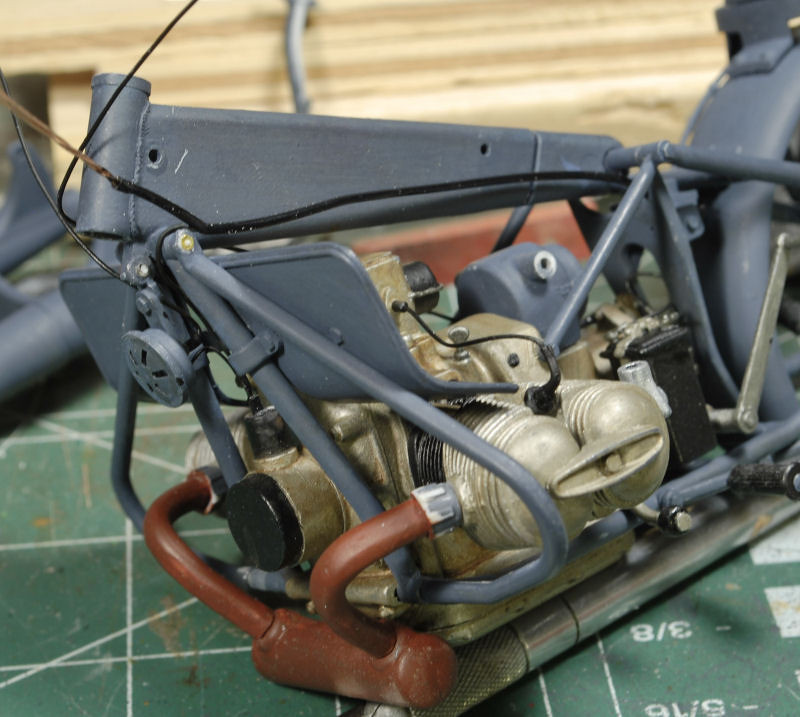
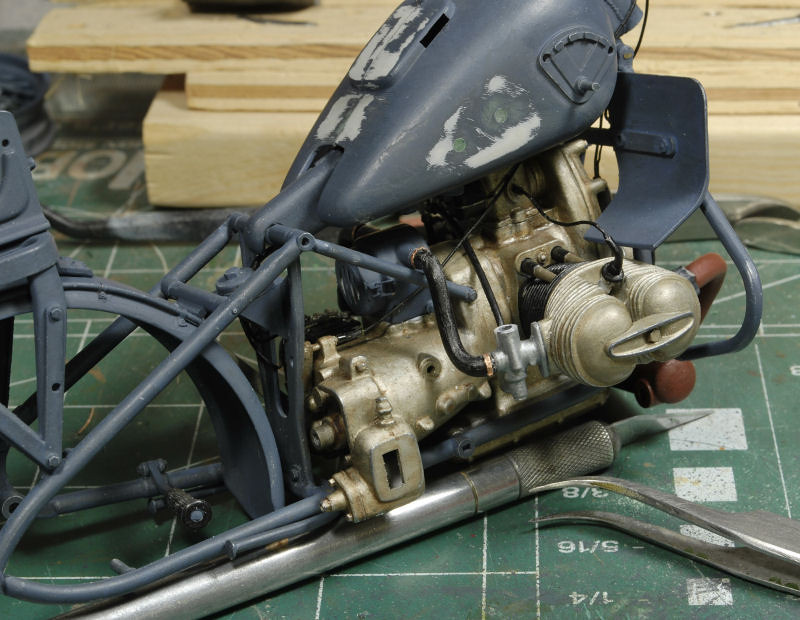
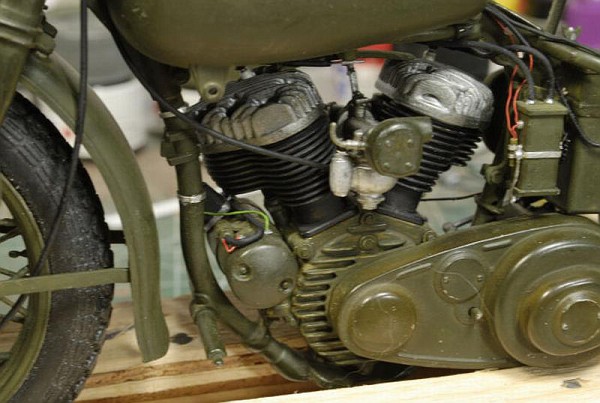
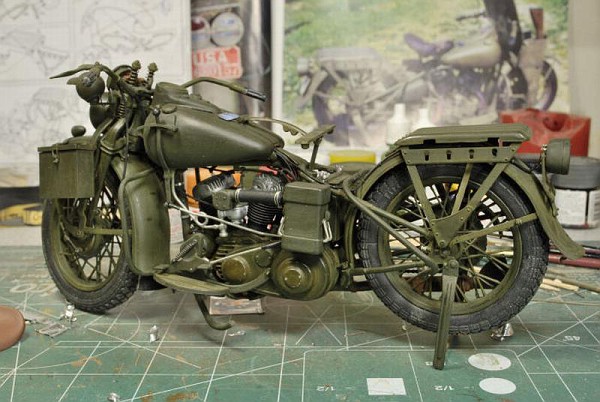
The engine, battery, and tail light wiring are visible in these pics. I decided to use colored wiring in some places to add visual interest. Routing some of these lines proved challenging at times.
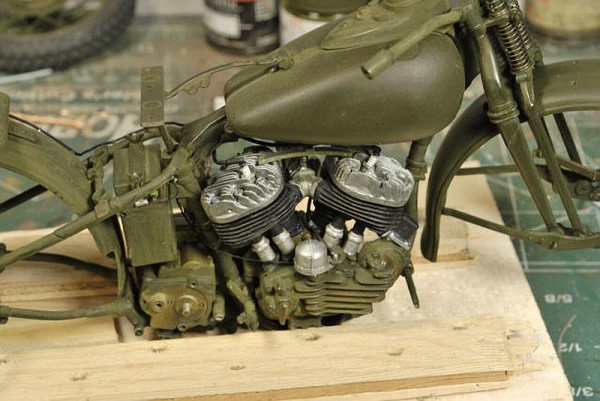

The tires were installed right after the main wiring job was finished. Some of the wiring had to be routed under the fuel tank as seen in reference pics, so I had to remove one tank half and run those lines. Here's a pic for scale reference, 1/35th vs 1/9th. What a difference, eh?
Some of the hydraulic/oil and fuel lines had to be remade, the kit lines were very weak and broke quite easily. I bent some cooper wire to match the kit lines and kept the end caps for each line, then I bored out the middle and slipped in the copper. Tada! It worked just fine.
Starter Solenoid and More Wiring
Here's a close-up pic of the brake linkage and scratch built locking wing nut. That break signal relay was a real hoot to get done correctly, especially adding the wiring to it. Looking at these pics now I remember how misaligned the valve tubes were and how some of the engine parts needed a bit more attention to be accurate. All the wire clamps were made from strips of pewter or copper sheeting.
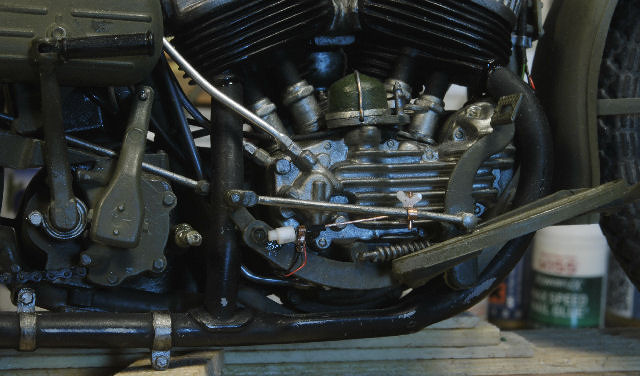

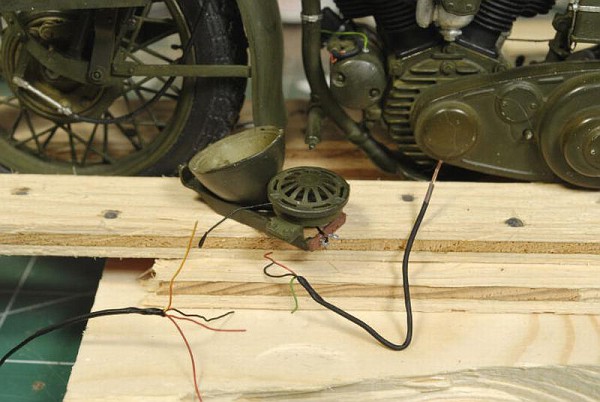
The horn and headlight wiring wasn't too bad until I had to install them, then the wrestling match began. I remember spending quite a bit of time getting these two units installed in the correct location and still look acceptable. I used a small piece of sprue for the wire junction above the horn. It has all the wires connecting to it before it goes back to the battery and fuse box. Even on a 1/9th scale kit this was proving frustrating, it's pretty small and in a lousy location to work on.
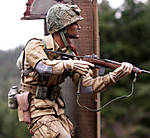
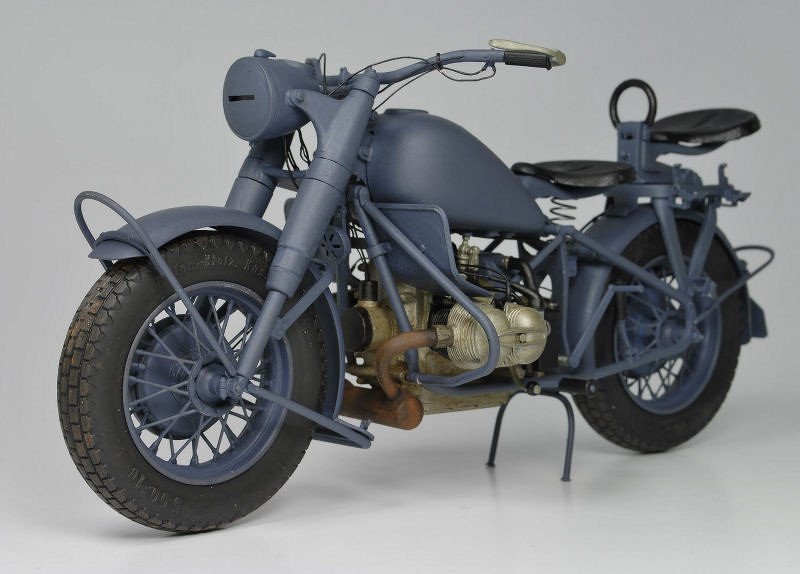
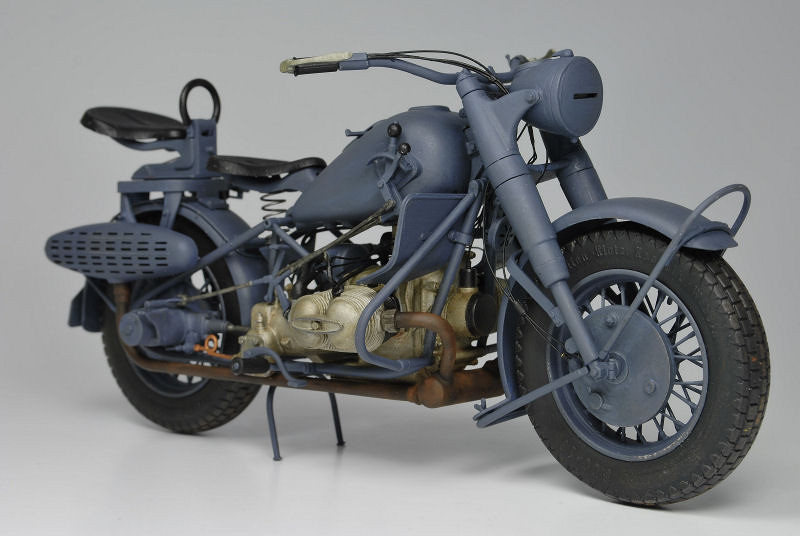
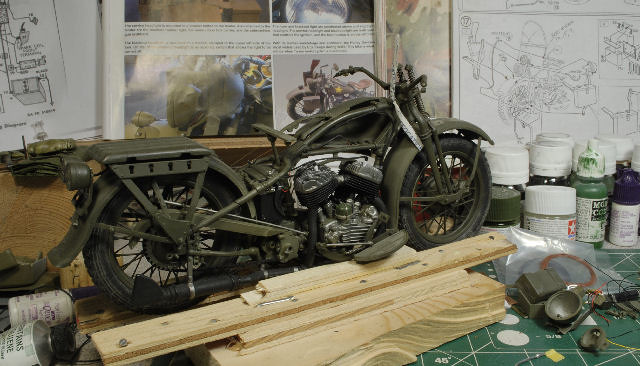
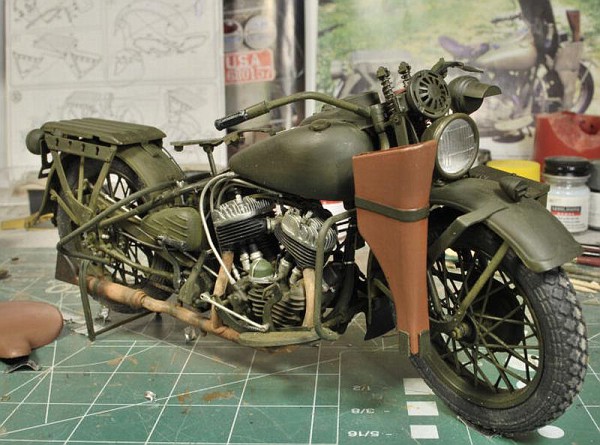
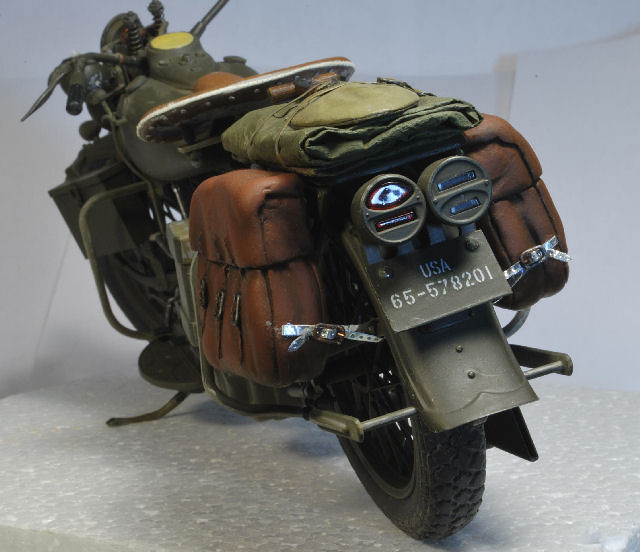
Ok, wiring done, tool box and minor items installed and now it's time to work the seat, rifle scabbard, and saddle bags.


Saddle Bag and Seat Mods
The saddle bags that came with this kit are atrocious, to say the least. I considered several different ideas of how to make them look realistic and decided on using Tamiya White putty. The samples are seen below. The seat needed some work too, so the stitched seam was added using putty and a folded tarp or wool blanket with straps and a shovel were also added to the rear stowage rack, and a sachet was strapped onto the scabbard.

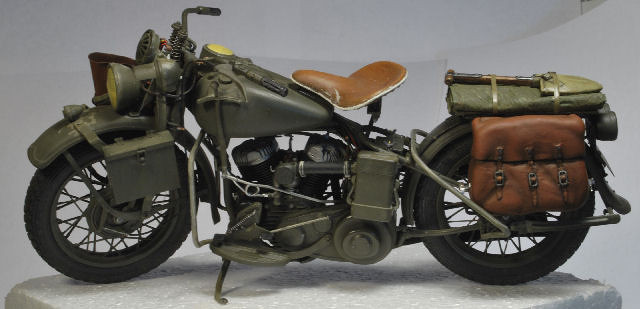
The saddle bags were given a good primer coat, then I used oils to get the worn leather effect.
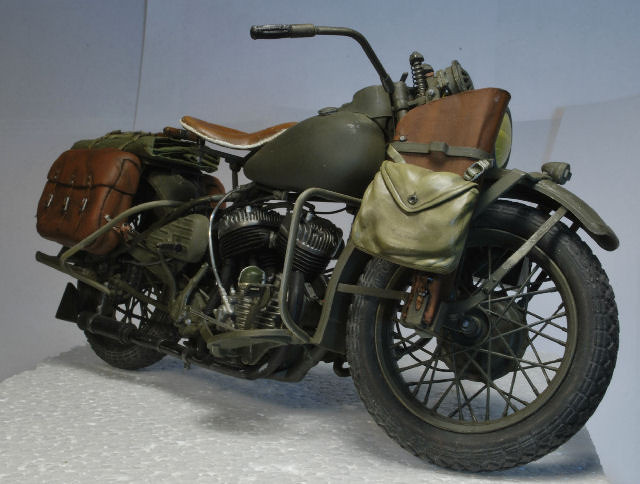
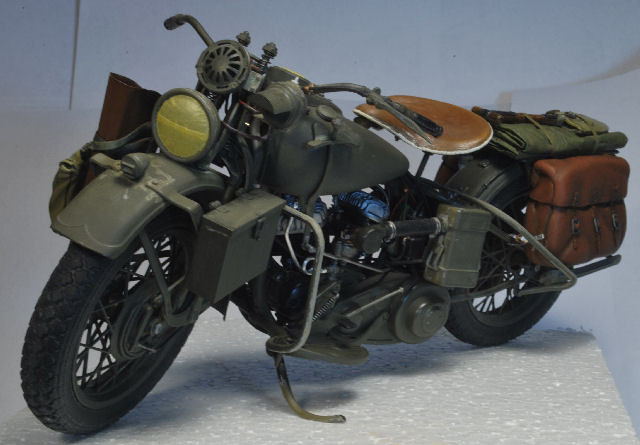
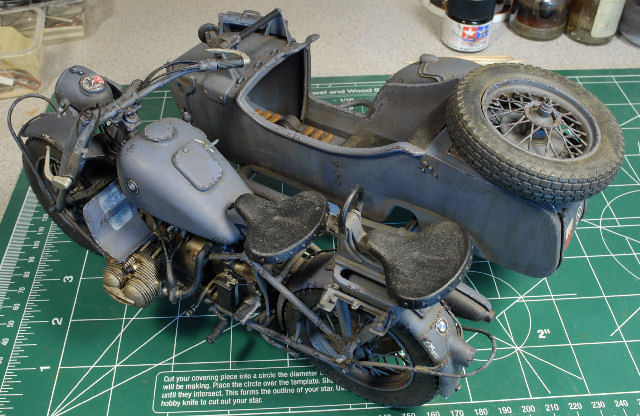
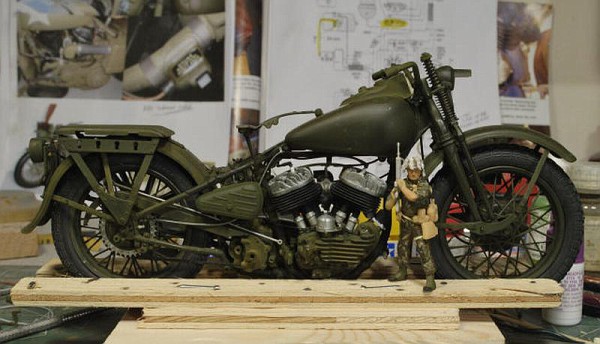
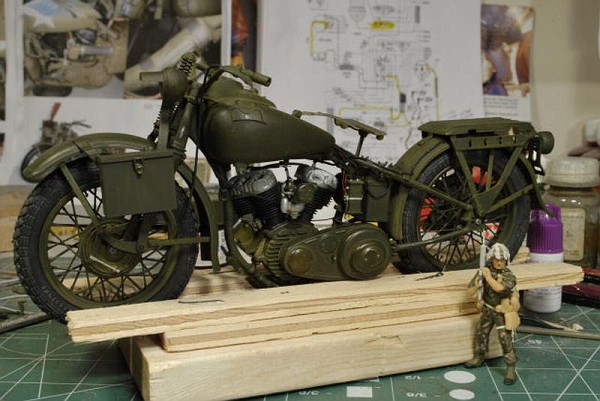
Before and After Preliminary Weathering of the Hog
Before,.....................................
After, ...........................................
Before I did any of the dirt/mud splatter I used Mig's Engine oils spill on the engine in the appropriate locations. Then all the standard techniques for splattered mud were used to get Mig's Euro dirt in the most likely spots, from tooth brush flicking to airbrush blasting a wet brush, and a fair amount of dry pigments as well.


Close ups of the engine grease and grime. The muffler had several pigments added as well.
I will not be redoing the figure logs, there's just way too much involved and sorting though the pics vs the write-up would become a job, very time consuming. This is a hobby, not a job, right? Hope this brings everyone up to speed and from here on out I'll redo the cemetery wall write-up, or take off from where I left off. I don't think that portion of the dio build was effected by the Ph Bkt debacle.
Thanks for watchin Gents, more to follow soon. Cheers, Ski.
Italeri's 1/9th Scale Harley Davidson WLA 750 WWII Military Motorcycle
Please note, this is the second Harley I've built for this dio. The original took a deep six dive into the abyss and made it into the scrap heap. Yes, it was completed, but given the fact that this kit is so fragile it doesn't take much effort to break a part here, a part there, and before you know it, it looks like an abomination of it's former self. No worries, I pulled my second kit from the shelf and got to work. This gave me time to get the missing items corrected, so now I'm proficient at building Harleys.
Also, I could not find my scratch notes for this build, so I will give a short description as best I can remember and move on. For this build I was able to find technical manuals for the Harley online, they were very helpful. So, the plumbing and wiring are an exact duplication of those manuals and should be pretty accurate. I also used countless photo references to portray the correct location of the guts of this beast. So I'm satisfied with the results.
The main frame and suspension, forks and seat base have been assembled. This jig came in handy when dealing with this delicate kit. I used scrap wood from the shop and made a slot just wide enough to hold the kit in place while I used my "three" hands to put it together, lol.
The engine, battery, and tail light wiring are visible in these pics. I decided to use colored wiring in some places to add visual interest. Routing some of these lines proved challenging at times.
The tires were installed right after the main wiring job was finished. Some of the wiring had to be routed under the fuel tank as seen in reference pics, so I had to remove one tank half and run those lines. Here's a pic for scale reference, 1/35th vs 1/9th. What a difference, eh?
Some of the hydraulic/oil and fuel lines had to be remade, the kit lines were very weak and broke quite easily. I bent some cooper wire to match the kit lines and kept the end caps for each line, then I bored out the middle and slipped in the copper. Tada! It worked just fine.
Starter Solenoid and More Wiring
Here's a close-up pic of the brake linkage and scratch built locking wing nut. That break signal relay was a real hoot to get done correctly, especially adding the wiring to it. Looking at these pics now I remember how misaligned the valve tubes were and how some of the engine parts needed a bit more attention to be accurate. All the wire clamps were made from strips of pewter or copper sheeting.
The horn and headlight wiring wasn't too bad until I had to install them, then the wrestling match began. I remember spending quite a bit of time getting these two units installed in the correct location and still look acceptable. I used a small piece of sprue for the wire junction above the horn. It has all the wires connecting to it before it goes back to the battery and fuse box. Even on a 1/9th scale kit this was proving frustrating, it's pretty small and in a lousy location to work on.
Ok, wiring done, tool box and minor items installed and now it's time to work the seat, rifle scabbard, and saddle bags.
Saddle Bag and Seat Mods
The saddle bags that came with this kit are atrocious, to say the least. I considered several different ideas of how to make them look realistic and decided on using Tamiya White putty. The samples are seen below. The seat needed some work too, so the stitched seam was added using putty and a folded tarp or wool blanket with straps and a shovel were also added to the rear stowage rack, and a sachet was strapped onto the scabbard.
The saddle bags were given a good primer coat, then I used oils to get the worn leather effect.
Before and After Preliminary Weathering of the Hog
Before,.....................................
After, ...........................................
Before I did any of the dirt/mud splatter I used Mig's Engine oils spill on the engine in the appropriate locations. Then all the standard techniques for splattered mud were used to get Mig's Euro dirt in the most likely spots, from tooth brush flicking to airbrush blasting a wet brush, and a fair amount of dry pigments as well.
Close ups of the engine grease and grime. The muffler had several pigments added as well.
I will not be redoing the figure logs, there's just way too much involved and sorting though the pics vs the write-up would become a job, very time consuming. This is a hobby, not a job, right? Hope this brings everyone up to speed and from here on out I'll redo the cemetery wall write-up, or take off from where I left off. I don't think that portion of the dio build was effected by the Ph Bkt debacle.
Thanks for watchin Gents, more to follow soon. Cheers, Ski.
jrutman
Joined: April 10, 2011
KitMaker: 7,941 posts
Armorama: 7,934 posts
Posted: Saturday, August 22, 2020 - 07:06 AM UTC
That is one magnificent beast right there! Congrats!
J
J
PolishBrigade12
Joined: January 31, 2009
KitMaker: 380 posts
Armorama: 366 posts
Posted: Saturday, August 22, 2020 - 07:13 AM UTC
Man you are quick Jerry! I barely finished my edit and you posted, lol. Thanks Bro!
cheyenne
Joined: January 05, 2005
KitMaker: 2,185 posts
Armorama: 1,813 posts
Posted: Saturday, August 22, 2020 - 08:30 PM UTC
Unbelievably cool Broski , real deal lookin fer sure !!
I really don't have enough words so I'll just let my facial expression convey my thoughts on this build ........
I really don't have enough words so I'll just let my facial expression convey my thoughts on this build ........
PolishBrigade12
Joined: January 31, 2009
KitMaker: 380 posts
Armorama: 366 posts
Posted: Saturday, August 22, 2020 - 10:11 PM UTC
Oh boy, what a pic Bro, lollllllllllllllllllllllll!
Tanks Ma Brotha!
Tanks Ma Brotha!
Dioramartin
Joined: May 04, 2016
KitMaker: 1,476 posts
Armorama: 1,463 posts
Posted: Friday, August 28, 2020 - 01:37 AM UTC
Aha! OK I see where you switched your model for the real thing, it was when you said After
PolishBrigade12
Joined: January 31, 2009
KitMaker: 380 posts
Armorama: 366 posts
Posted: Sunday, August 30, 2020 - 01:39 PM UTC
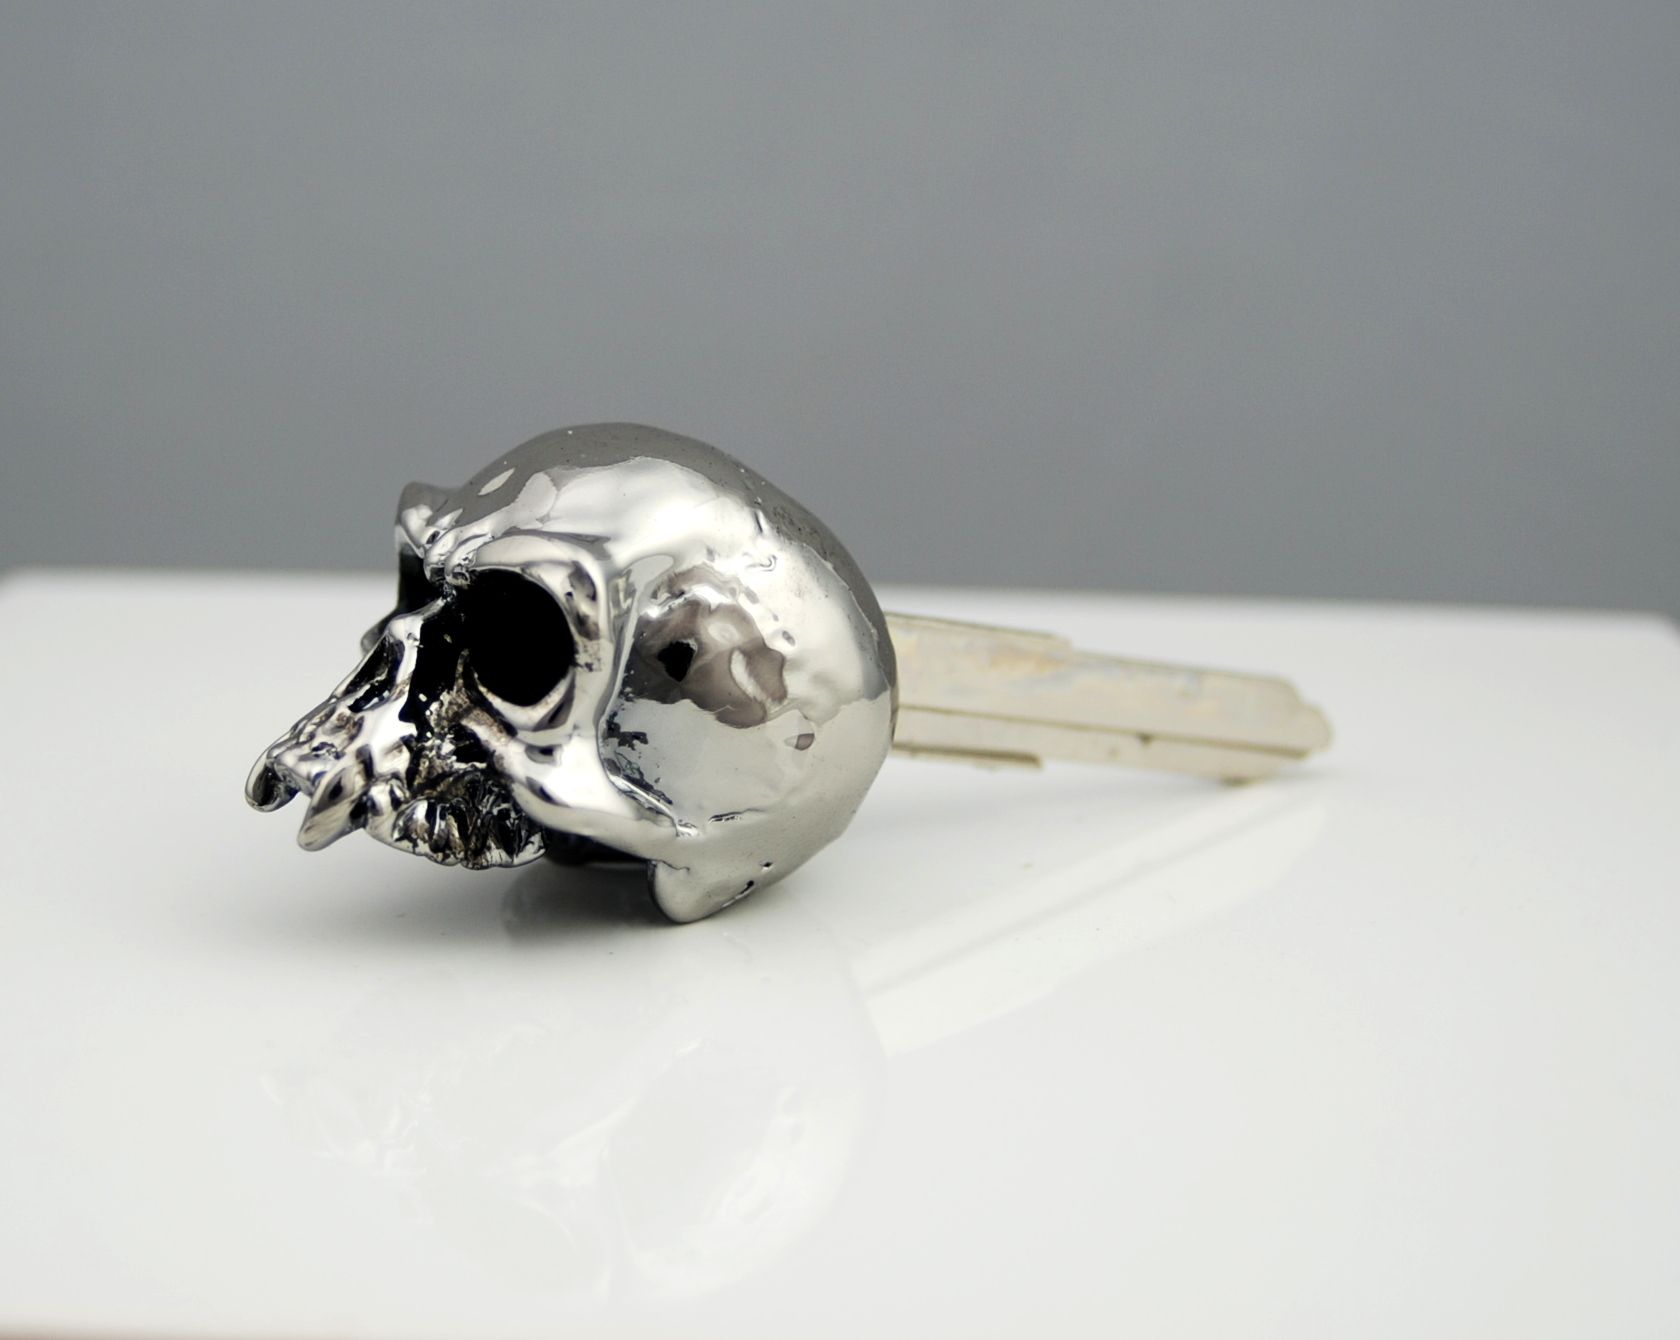
No,........that was before,..... but now it's after,............if that makes any sense, HA! No worries, I'll figure this out sooner than later.
Either way Bro, if you can pry the keys from Cheyenne, take er for a spin!
Cheers, Ma Brotha, Ski.
Either way Bro, if you can pry the keys from Cheyenne, take er for a spin!
Cheers, Ma Brotha, Ski.
cheyenne
Joined: January 05, 2005
KitMaker: 2,185 posts
Armorama: 1,813 posts
Posted: Sunday, August 30, 2020 - 10:52 PM UTC
Good luck gettin that key back , ...... you'll never make it past the trip wires .......
PolishBrigade12
Joined: January 31, 2009
KitMaker: 380 posts
Armorama: 366 posts
Posted: Tuesday, September 01, 2020 - 07:38 AM UTC
Lol, I don't remember that key. You must have made a set for yourself.
I'll get the cemetery wall posted soon, still working the bay window cabinet, almost done...................
I'll get the cemetery wall posted soon, still working the bay window cabinet, almost done...................
PolishBrigade12
Joined: January 31, 2009
KitMaker: 380 posts
Armorama: 366 posts
Posted: Wednesday, September 23, 2020 - 05:00 AM UTC
Ok, just finished my 1:1 re-mod in the kitchen, and my daughter's wedding. So, after the firewood is split and stacked I expect the snow fly,..........and bunker time! I will post the cemetery gate work and get after the veggies and get this beast done. But before I carry on, here's a few pics of the re-mod completed. It was a long 8 months, but it's done.
Himaleyan Granite, special order, not cheap. No,......actually it's poured resin, Stonecoatcountertops.com
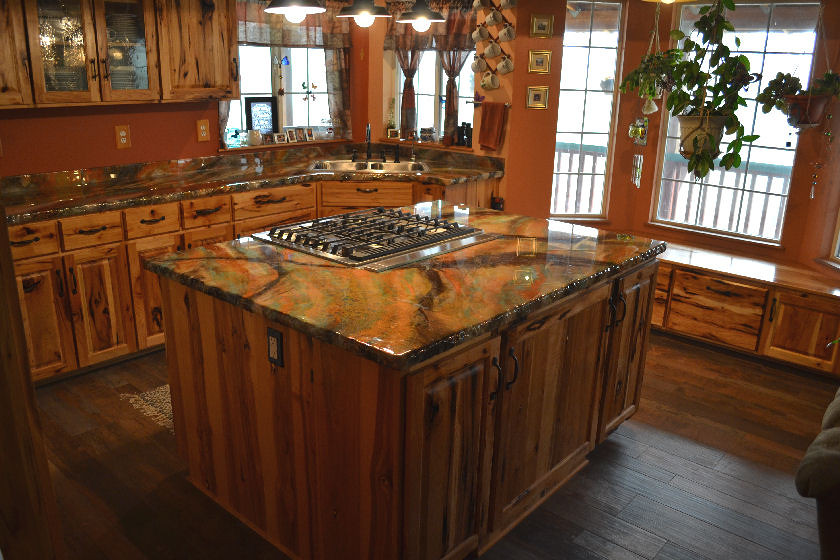
Rustic Hickory cabinets. The Mrs. loved the holes in the wood. Very difficult to work with at times, but after the learning curve it was a breeze. I always use to say "It's cheaper to learn with someone else's material." That is so true!
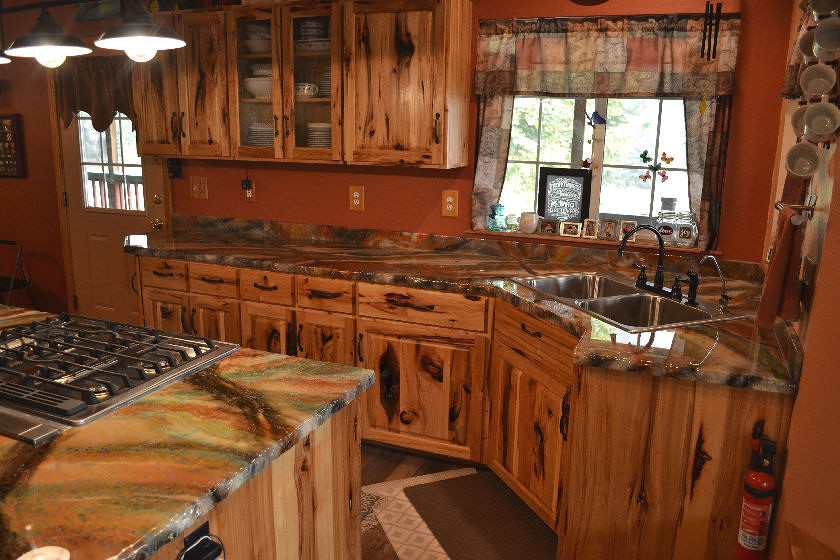
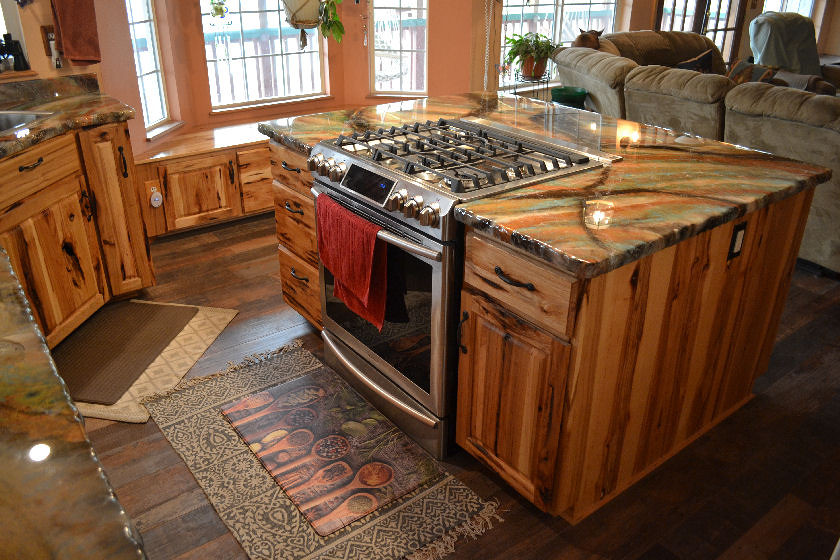
New lighting throughout, vinyl laminate flooring, re-mode newel post, railing, and steps.
Himaleyan Granite, special order, not cheap. No,......actually it's poured resin, Stonecoatcountertops.com
Rustic Hickory cabinets. The Mrs. loved the holes in the wood. Very difficult to work with at times, but after the learning curve it was a breeze. I always use to say "It's cheaper to learn with someone else's material." That is so true!
New lighting throughout, vinyl laminate flooring, re-mode newel post, railing, and steps.
jrutman
Joined: April 10, 2011
KitMaker: 7,941 posts
Armorama: 7,934 posts
Posted: Wednesday, September 23, 2020 - 10:54 AM UTC
Man o man, those wood tones coupled with the striations in the stone is really striking! I love it!
J
J
 |

WEB HOSTING BY


Copyright ©2021 Armorama and Kitmaker Network, a subsidiary of Silver Star Enterprises
All Rights Reserved. Please read our Conditions of Use and Privacy Policy.
All Rights Reserved. Please read our Conditions of Use and Privacy Policy.